Lemon Poppy Seed Loaf Fresh and Flavorful Delight

Are you ready to bake a Lemon Poppy Seed Loaf that bursts with flavor? This delightful treat combines the zesty tang of fresh lemons with the crunch of poppy seeds. In this article, I’ll guide you through each step, from selecting the right ingredients to baking tips that ensure perfect results. Whether you’re a baking novice or a seasoned pro, this lemon loaf is a must-try. Let’s dive in and make something delicious together!
Why I Love This Recipe
- Bright and Fresh Flavor: This loaf is bursting with the zesty taste of lemon, making it a perfect treat for any occasion.
- Easy to Make: With simple ingredients and straightforward instructions, this recipe is great for bakers of all skill levels.
- Perfectly Moist Texture: The addition of yogurt ensures that every slice is moist and tender, making it irresistible.
- Versatile Serving Options: This lemon poppy seed loaf can be enjoyed on its own, or dressed up with a dusting of powdered sugar and fresh garnishes.
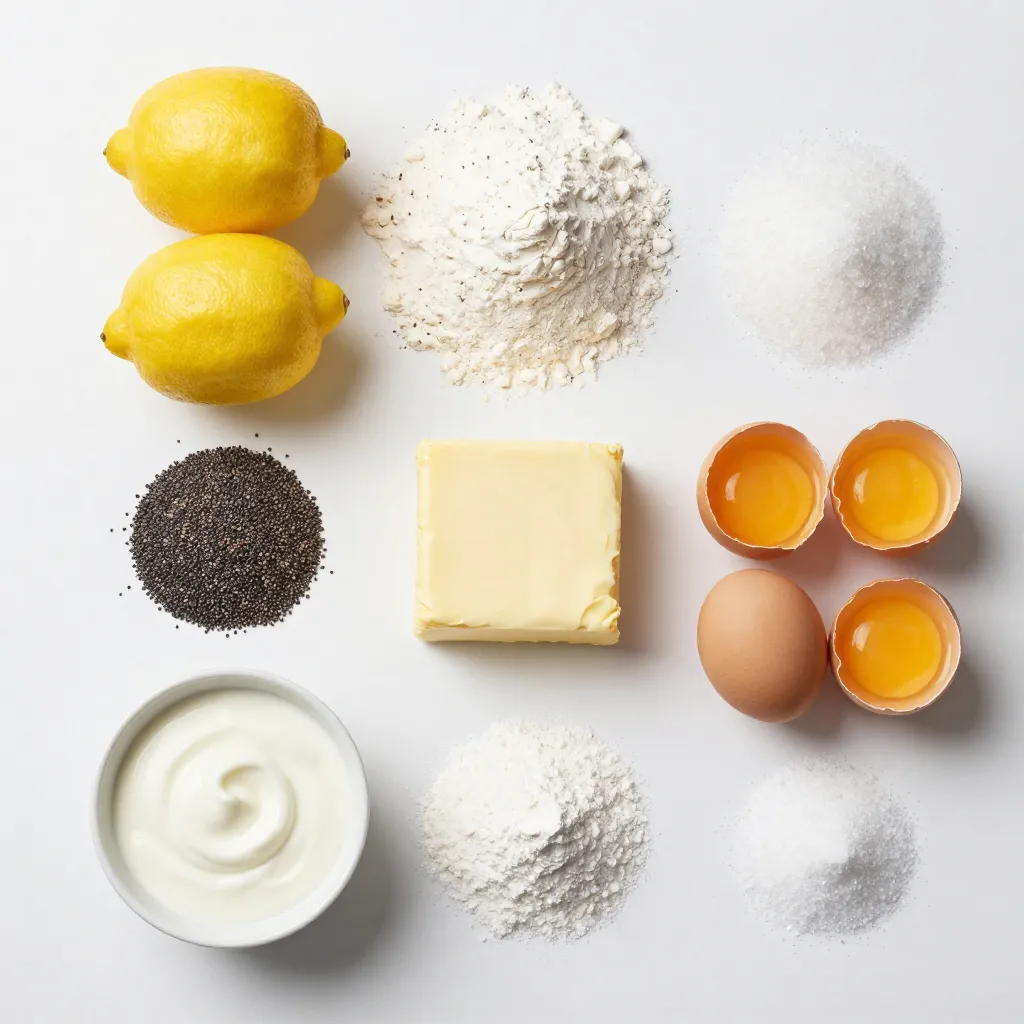
Ingredients
Main Ingredients for Lemon Poppy Seed Loaf
- 1 ½ cups all-purpose flour
- ½ cup unsalted butter, softened
- 1 cup granulated sugar
The main ingredients form the base of this loaf. All-purpose flour gives it structure. Unsalted butter adds richness and moisture. Granulated sugar brings sweetness and helps the loaf rise.
Flavor Enhancers
- 1 tablespoon lemon zest
- ¼ cup fresh lemon juice
- ½ teaspoon vanilla extract
These flavor enhancers brighten the loaf. Lemon zest adds a punchy citrus note. Fresh lemon juice gives it a tangy flavor. Vanilla extract rounds out the taste, making each bite delightful.
Optional Additions
- ½ cup plain yogurt or sour cream
- 2 tablespoons poppy seeds
Optional additions can enhance your loaf. Yogurt or sour cream keeps it moist and tender. Poppy seeds add crunch and a unique visual appeal. You can add more or less, depending on your taste.


Step-by-Step Instructions
Preparation Steps
- First, preheat your oven to 350°F (175°C).
- Grease a 9×5-inch loaf pan and line it with parchment paper for easy removal.
- In a bowl, whisk together 1 ½ cups of all-purpose flour, 1 teaspoon of baking powder, ½ teaspoon of baking soda, and ¼ teaspoon of salt. Set this dry mixture aside.
Making the Batter
- In a large mixing bowl, cream together ½ cup of softened unsalted butter and 1 cup of granulated sugar. Mix until light and fluffy, which takes about 3-4 minutes with an electric mixer.
- Beat in 2 large eggs, one at a time. Make sure each egg is fully mixed in before adding the next.
- Add 1 tablespoon of lemon zest, ¼ cup of fresh lemon juice, and ½ teaspoon of vanilla extract to the mixture. Mix well to combine all flavors.
Baking the Loaf
- Gradually add the dry mixture to the wet ingredients. Alternate this with ½ cup of plain yogurt, starting and ending with the flour mixture. Mix until just combined to avoid overmixing.
- Gently fold in 2 tablespoons of poppy seeds with a spatula until they are evenly spread throughout the batter.
- Pour the batter into your prepared loaf pan and smooth the top.
- Bake in your preheated oven for 50-60 minutes. Check if it’s done by inserting a toothpick into the center. It should come out clean.
- Once baked, remove the loaf from the oven and let it cool in the pan for about 10 minutes. Then transfer it to a wire rack to cool completely.
Tips & Tricks
Baking Tips
- Ensuring accurate measurements: Use a kitchen scale for precise flour and sugar amounts. This step helps you avoid a dry loaf. If you use cups, spoon flour into the cup and level it off with a knife.
- Avoiding overmixing: Mix just until combined. Overmixing can lead to a dense loaf. When you fold in the poppy seeds, do it gently.
After-Baking Tips
- Best ways to cool the loaf: After baking, let the loaf cool in the pan for 10 minutes. This prevents it from breaking apart. Then, move it to a wire rack to cool completely. This helps keep the texture light and fluffy.
- Perfecting the loaf texture: If the loaf feels too moist, it may need more time in the oven. Check with a toothpick; it should come out clean.
Presentation Tips
- Serving suggestions: Slice the loaf and arrange it on a nice platter. It looks great for brunch or tea time.
- Garnishing ideas: Dust the top with powdered sugar for sweetness. Add thin lemon slices or fresh mint leaves for color and freshness. These touches make your loaf stand out!
Pro Tips
- Fresh Ingredients: Always use fresh lemons for both zest and juice to enhance the flavor of your loaf.
- Yogurt Substitute: If you don’t have yogurt, sour cream can be used as an excellent substitute for moisture and tanginess.
- Check for Doneness: Use a toothpick to test the center of the loaf; it should come out clean or with a few crumbs attached, not wet batter.
- Cooling Tip: Allow the loaf to cool completely on a wire rack to prevent it from becoming soggy on the bottom.
Variations
Flavor Variations
You can make your lemon poppy seed loaf even more exciting! Try adding different citrus fruits like orange or lime. This creates a fresh twist. You can also use lemon extract instead of vanilla. It enhances the lemon flavor and makes it more intense.
Ingredient Swaps
If you need gluten-free options, use almond or coconut flour. These swaps work well in this recipe. For a vegan version, replace eggs with flaxseed meal or applesauce. Use coconut yogurt instead of plain yogurt to keep it dairy-free.
Serving Variants
Instead of a loaf, make lemon poppy seed muffins. They are perfect for brunch or snacks. You can also bake mini loaves for gifts. They look cute and are easy to share!
Storage Info
Short-term Storage
To keep your lemon poppy seed loaf fresh at room temperature, wrap it well. You can use plastic wrap or place it in an airtight container. This helps to keep moisture in and avoids drying out. Store it in a cool, dry place away from sunlight. Your loaf will stay tasty for about 2-3 days this way.
Long-term Storage
If you want to enjoy this loaf later, freezing is a great option. First, let the loaf cool completely. Then, wrap it tightly in plastic wrap. After that, place it in a freezer-safe bag or container. This method keeps it fresh for up to three months. When you’re ready to eat it, just remove it from the freezer. Thaw it overnight in the fridge or on the counter for a few hours.
Best Practices
To maintain freshness, always store your loaf in a cool area. Avoid cutting into it until you’re ready to serve. This keeps the inside moist. Check for signs of spoilage, like a dry texture or off smell. If you see mold or it feels very hard, it’s best to toss it. By following these tips, you can enjoy your lemon poppy seed loaf at its best!
FAQs
Common Recipe Questions
Can I use a different flour?
Yes, you can use whole wheat flour for a healthier option. It may change the texture a bit, making it denser. Almond flour is another choice. It adds a nice nutty flavor but may need adjustments in liquid.
How do I know when the loaf is done?
Check the loaf with a toothpick. Insert it into the center. If it comes out clean, the loaf is done. You can also look for a golden brown top and a firm texture.
Flavor and Storage Queries
Why is my loaf dense?
A dense loaf can happen for a few reasons. Overmixing the batter can lead to too much gluten, making it heavy. Using too much flour can also cause density. Make sure you measure carefully and mix just until combined.
How long does lemon poppy seed loaf last?
The loaf stays fresh for about three days at room temperature. Store it in an airtight container. If you want it to last longer, refrigerate it for up to a week.
Substitution Inquiries
Can I replace eggs in this recipe?
Yes, you can use flax eggs or applesauce. For each egg, use one tablespoon of ground flaxseed mixed with two and a half tablespoons of water. Let it sit for a few minutes to thicken.
What can I use instead of yogurt?
Sour cream works well as a substitute. You can also use buttermilk or a plant-based yogurt for a dairy-free option. Adjust the moisture based on what you choose.
You learned about the key ingredients and steps to make lemon poppy seed loaf. Proper preparation, accurate measuring, and mindful mixing are essential for success. Explore variations like different fruits or gluten-free options for a new twist. With the right storage methods, your loaf will stay fresh longer. Remember to ask questions if you face challenges. Enjoy the baking journey and share your delicious creation with other

Lemon Poppy Seed Delight
Ingredients
- 1.5 cups all-purpose flour
- 1 teaspoon baking powder
- 0.5 teaspoon baking soda
- 0.25 teaspoon salt
- 0.5 cup unsalted butter, softened
- 1 cup granulated sugar
- 2 large eggs
- 1 tablespoon lemon zest (from about 1 large lemon)
- 0.25 cup fresh lemon juice (about 1 large lemon)
- 0.5 teaspoon vanilla extract
- 2 tablespoons poppy seeds
- 0.5 cup plain yogurt (can substitute with sour cream)
Instructions
- Preheat your oven to 350°F (175°C). Grease a 9×5-inch loaf pan and line it with parchment paper for easy removal.
- In a bowl, whisk together the flour, baking powder, baking soda, and salt. Set this dry mixture aside.
- In a large mixing bowl, cream the softened butter and sugar together until light and fluffy, about 3-4 minutes using an electric mixer.
- Beat in the eggs one at a time, ensuring each is fully incorporated before adding the next.
- Add the lemon zest, lemon juice, and vanilla extract to the mixture and mix well.
- Gradually add the dry ingredients to the wet mixture, alternating with the yogurt, beginning and ending with the flour mixture. Mix until just combined to avoid overmixing.
- Fold in the poppy seeds gently with a spatula until evenly distributed throughout the batter.
- Pour the batter into your prepared loaf pan and smooth the top with a spatula.
- Bake in the preheated oven for 50-60 minutes, or until a toothpick inserted into the center of the loaf comes out clean.
- Once baked, remove from the oven and allow to cool in the pan for about 10 minutes, then transfer the loaf to a wire rack to cool completely.
Notes

Lemon Poppy Seed Delight
Ingredients
- 1 cup all-purpose flour
- 1 cup granulated sugar
- 1 cup buttermilk
- 1 cup vegetable oil
- 3 large eggs
- 2 tablespoons poppy seeds
- 2 tablespoons lemon zest
- 1 tablespoon lemon juice
- 1 teaspoon baking powder
- 1 teaspoon baking soda
- 1 teaspoon salt
Instructions
- Preheat the oven to 350°F (175°C) and grease a baking dish.
- In a large bowl, whisk together the flour, sugar, baking powder, baking soda, and salt.
- In another bowl, mix the buttermilk, oil, eggs, lemon zest, and lemon juice.
- Combine the wet and dry ingredients, then fold in the poppy seeds.
- Pour the batter into the prepared baking dish and smooth the top.
- Bake for 30 minutes or until a toothpick inserted in the center comes out clean.
- Allow to cool before serving.


![- 2 cups heavy whipping cream - 1 cup powdered sugar - 1 teaspoon vanilla extract - 1 cup strong brewed coffee, cooled - 1 tablespoon cocoa powder - 1 package (14.3 oz) Oreo cookies - 1/2 cup crushed espresso beans (optional, for garnish) - Shaved chocolate or chocolate curls (for garnish) Choosing the right coffee Select a coffee you enjoy drinking. A bold, rich coffee enhances the flavor of the cake. I recommend a dark roast for a deep, satisfying taste. Alternative sweeteners or creams You can use coconut cream or almond milk for a lighter version. If you want less sugar, consider using honey or maple syrup. Adjust the amount based on your taste. Substitutions for Oreo cookies If you can’t find Oreos, use chocolate wafer cookies. They provide a similar texture and flavor. You can also try gluten-free cookies if needed. For the full recipe, see the details above. First, gather your ingredients. You will need heavy cream, powdered sugar, and Oreo cookies. Brew strong coffee and let it cool. These steps set the stage for a great icebox cake. The chilling time is key. It helps the flavors blend and firm up the cake. I recommend letting it chill for at least four hours. Overnight is even better! Now, let’s layer the cake. Start by dipping each Oreo in the coffee mixture. Don’t soak them too long. You want them soft but not soggy. Place a layer of dipped Oreos in your baking dish. Next, spread a layer of whipped cream over the cookies. Make sure to smooth it out evenly. Repeat this process. Alternate between Oreos and whipped cream until you finish with cream on top. Once you complete layering, it’s time for the final touches. I love to sprinkle crushed espresso beans and chocolate curls on top for a fancy look. For serving, slice the cake into squares. Chilled plates add a nice touch. You can also add a dollop of whipped cream on the side. A sprinkle of cocoa powder gives an extra flair. Enjoy your Mocha Oreo Icebox Cake! For the full recipe, check out the details above. - Over-whipping cream: When you whip the cream, stop as soon as stiff peaks form. Over-whipping can turn your cream into butter. - Dipping Oreos too long: Dip each Oreo quickly. If you soak them too long, they will fall apart and get mushy. - How long to chill: Chill the cake for at least four hours. Overnight is best for rich flavors. - Timing for flavor melding: Allow the cake to sit in the fridge. This helps the coffee and cream flavors blend perfectly. - Best mixing tools: Use an electric mixer to whip the cream. It makes the process quick and easy. - Recommended baking dish: A 9x13 inch baking dish works great. It holds all the layers and fits in most fridges. For a detailed look at the ingredients and steps, check out the Full Recipe. {{image_2}} You can change the coffee type to fit your taste. Try espresso for a strong kick. Or, use flavored coffee like hazelnut or vanilla to add a unique twist. You can also mix in spices like cinnamon or a splash of coffee liqueur for more depth. Adding flavors to whipped cream can enhance the cake even more. Mix in a touch of almond extract or a bit of melted chocolate. You could also fold in some cocoa powder for a richer taste. Each flavor adds its own charm to this treat. For a gluten-free version, swap out regular Oreos for gluten-free cookies. Many brands offer delicious options that taste just as good. You can also use gluten-free chocolate wafers as an alternative. If you want a lower-calorie cake, use reduced-fat cream or a sugar substitute. Greek yogurt can also replace some of the cream for a lighter feel. Adjust the sweetness to your liking while keeping the taste intact. You can make holiday-themed twists by adding peppermint extract in December. Top the cake with crushed candy canes for a festive look. In the summer, use fresh fruits like strawberries or raspberries. Layer them between the Oreos for a bright, fruity taste. Each season brings a new chance to play with flavors. For the [Full Recipe], check out the detailed instructions and ingredients. To keep your Mocha Oreo Icebox Cake fresh, cover it tightly. Use plastic wrap or aluminum foil. This prevents air from getting in and keeps the flavors intact. I recommend a glass or plastic container with a lid. This way, it stays safe and tastes great. Yes, you can freeze the cake! This is a great option if you want to save some for later. Wrap the cake tightly in plastic wrap and then in foil. This helps prevent freezer burn. To defrost, move the cake to the fridge. Let it sit overnight. This keeps it moist and tasty. Your icebox cake will last about 3 to 5 days in the fridge. Look for signs of spoilage, like off smells or mold. If the cake looks dry or the cookies are too soft, it’s time to toss it. Enjoy your delicious treat while it’s fresh! For the [Full Recipe](#), check back to make this amazing dessert! An icebox cake is a no-bake dessert that layers cookies and whipped cream. It is simple to make and perfect for warm days. The history of icebox cakes dates back to the 1920s. People used iceboxes to chill desserts before modern fridges were common. This cake allows flavors to meld as it chills, creating a rich taste. Yes, you can use other cookies! Try chocolate chip cookies for a twist. Graham crackers also work well and give a nice crunch. Vanilla wafers add a sweet touch too. Feel free to experiment with different flavors and textures to find your favorite. You will know the cake is ready when the whipped cream is set and holds its shape. It should feel firm to the touch. After chilling for at least four hours, the cookies will soften, but they should not fall apart. The layers should look smooth and cohesive. Absolutely! This cake is perfect for making in advance. You can prepare it a day before you plan to serve. Just cover it well with plastic wrap before chilling. This way, the flavors deepen and the cake tastes even better. In this blog post, we explored the key ingredients for a delicious icebox cake. We covered tips on choosing the right coffee and alternatives for Oreos. You learned step-by-step instructions for preparation, layering, and adding final touches. We also shared common mistakes and timing for best results. Now, with these details in mind, you can create your own perfect icebox cake. Don't be afraid to experiment with flavors and variations. Enjoy the process and delight in sharing your creation!](https://dailydishlab.com/wp-content/uploads/2025/07/0dda9964-7972-494e-946c-2eb6009d36dd-768x768.webp)


