
Are you craving a refreshing treat that’s both simple and delicious? Look no further! In this guide, I’ll show you how to make Mango Coconut Chia Pudding, an easy no-cook delight that requires only a few wholesome ingredients. Perfect for breakfast, snacks, or dessert, this treat is packed with flavor and nutrition. Let’s dive in and whip up this tropical goodness that will brighten your day!
Why I Love This Recipe
- Delicious Flavor Combination: The tropical sweetness of mango combined with creamy coconut creates a delightful taste that transports you to a sunny beach.
- Health Benefits: Chia seeds are packed with nutrients, including omega-3 fatty acids, fiber, and protein, making this pudding a nutritious choice.
- Easy Preparation: This recipe requires no cooking, and with just a few simple steps, you can have a delicious treat ready to enjoy.
- Customizable: You can easily adjust the sweetness or add different toppings to suit your taste preferences, making it a versatile dessert.
Ingredients
Main Ingredients
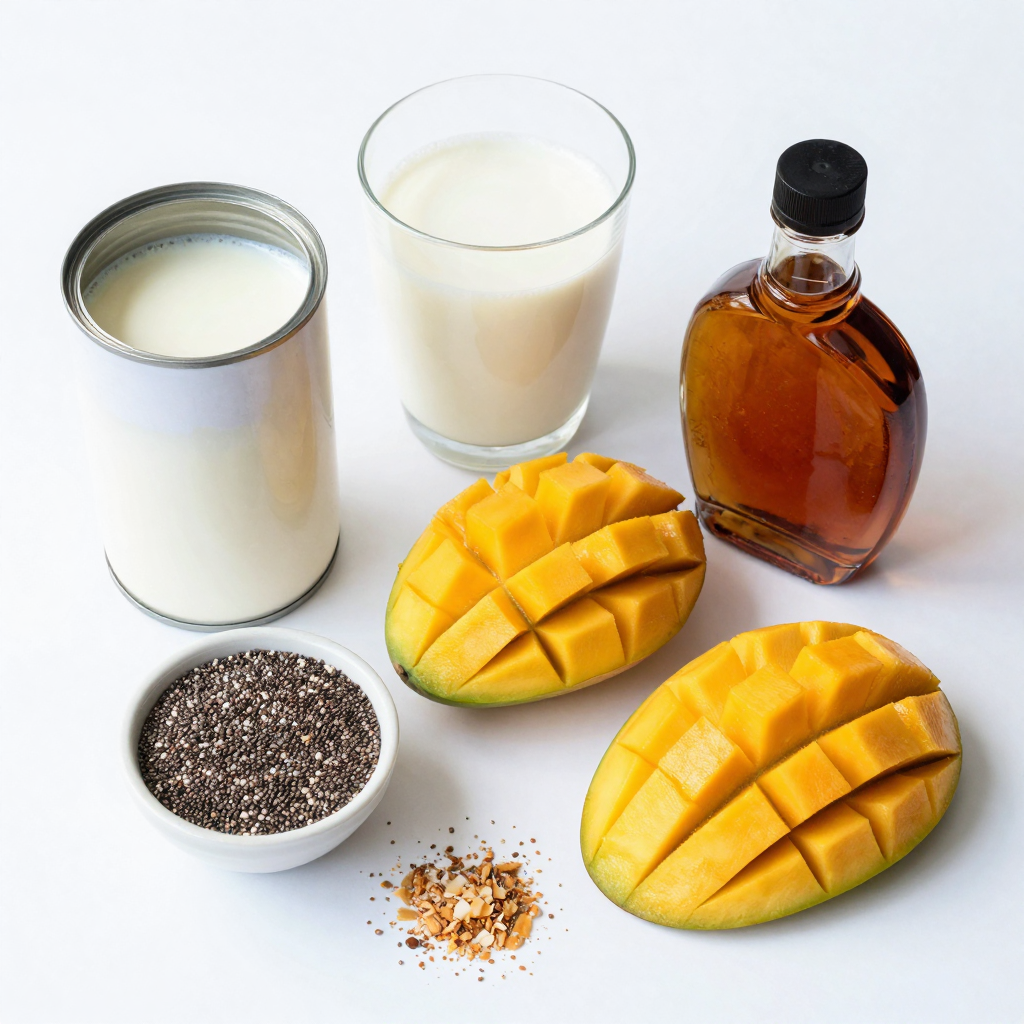
– 1 cup coconut milk (canned or carton)
– 1/2 cup almond milk (or any plant-based milk)
– 1/4 cup chia seeds
– 2 tablespoons maple syrup (or honey)
– 1 ripe mango, pureed
– 1/2 teaspoon vanilla extract
When making mango coconut chia pudding, I focus on fresh and simple ingredients. Coconut milk adds a creamy texture and rich flavor. I often use canned coconut milk for a thicker pudding, but you can use carton milk too.
Almond milk or any plant-based milk gives a lighter feel. I choose almond milk for its nutty taste, but you can pick your favorite.
Chia seeds are the star. They swell up and create a pudding-like texture. I use a quarter cup for the right thickness.
For sweetness, I use maple syrup or honey. Two tablespoons is the perfect amount, but adjust it to your taste.
A ripe mango is key for a fruity flavor. I blend it into a puree and use it for layering. A hint of vanilla extract rounds out the taste.
Optional Toppings
– Fresh mango chunks
– Toasted coconut flakes
– Mint leaves for presentation
Toppings make this pudding even better. Fresh mango chunks add more sweetness and color. Toasted coconut flakes give a nice crunch. I love to add mint leaves for a fresh look. They also add a lovely aroma.
These ingredients come together for a tasty treat you can enjoy anytime!
Step-by-Step Instructions
Preparation Process
First, you need to combine the coconut milk and almond milk. Take a medium mixing bowl and pour in 1 cup of coconut milk and 1/2 cup of almond milk. Use a whisk to mix them until they blend well. Next, add 1/4 cup of chia seeds to this mixture. Chia seeds will help thicken the pudding. Then, mix in 2 tablespoons of maple syrup and 1/2 teaspoon of vanilla extract. Stir everything well so the chia seeds spread evenly.
Chilling and Setting
Once mixed, cover the bowl with plastic wrap. If you prefer, you can divide the mixture into jars with lids. Place your bowl or jars in the refrigerator. Let them chill for at least 4 hours or overnight. This time helps the chia seeds absorb the liquid and thicken the pudding nicely.
Serving Suggestions
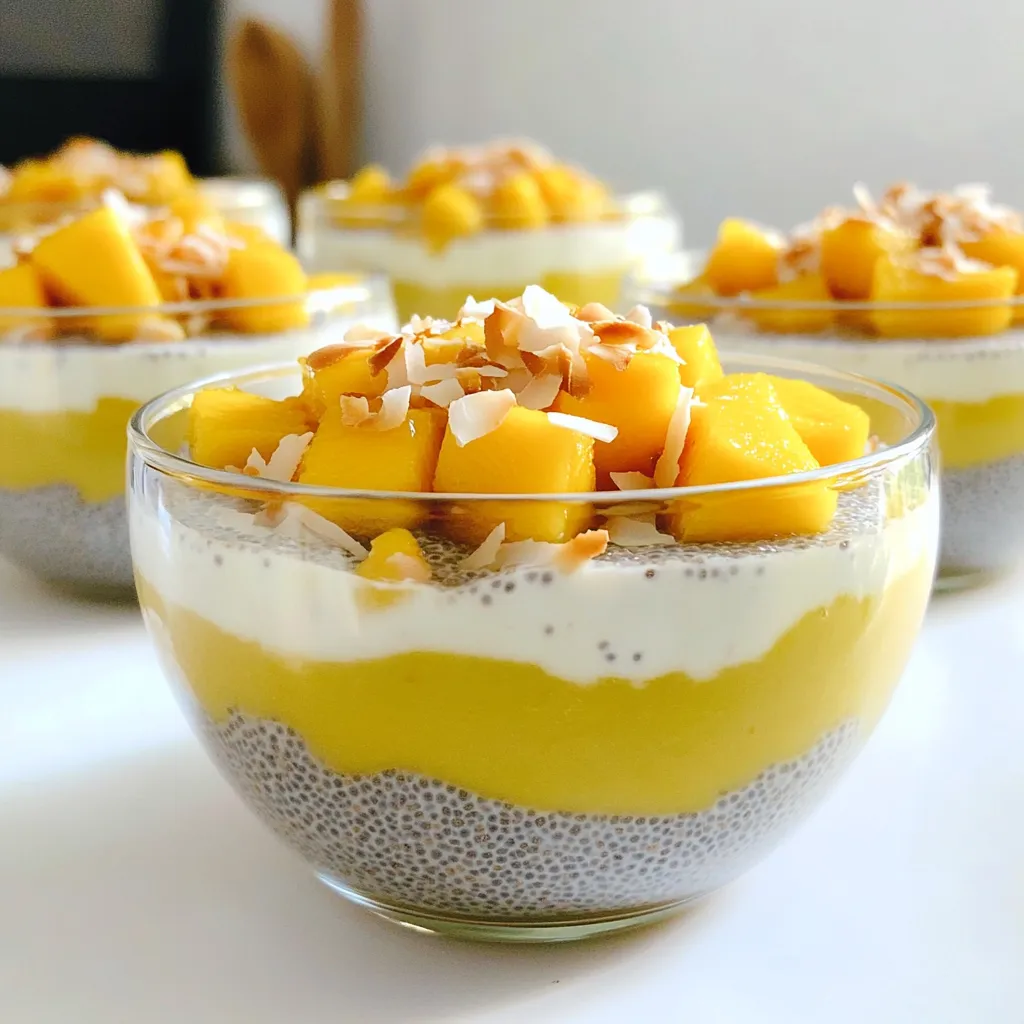
When the pudding is set, grab your serving bowls or glasses. Spoon half of the chia pudding into each bowl. Then, add a layer of pureed mango on top. Use the remaining chia pudding to cover the mango layer. For the final touch, top each serving with fresh mango chunks. Sprinkle toasted coconut flakes on top for extra crunch and flavor. This will make your pudding look and taste amazing!
Pro Tips
- Chia Seed Soaking Time: Allow the chia seeds to soak for at least 4 hours or overnight to achieve a creamy and thick consistency.
- Mango Ripeness: Use a ripe mango for the best flavor; it should feel slightly soft to the touch and emit a sweet aroma.
- Layering Technique: For a visually appealing presentation, layer the pudding and mango puree carefully in clear glasses.
- Flavor Variations: Experiment with different plant-based milks or sweeteners to customize the taste to your liking.
Tips & Tricks
Achieving the Perfect Texture
To get the right texture in your pudding, soaking chia seeds is key. Chia seeds need time to absorb liquid. I suggest soaking them for at least four hours or overnight. This helps them swell and create that creamy feel. If you want a thicker pudding, use less liquid. For a thinner pudding, add more milk to your mix.
Flavor Enhancements
You can make your pudding even tastier by adding spices or extra sweetness. A pinch of cinnamon or nutmeg can add warmth. You can also try adding a splash of almond extract for a new twist. If you like it sweeter, adjust your maple syrup. Honey is a great alternative too.
Presentation Tips
How you serve your pudding can make a big difference. Use clear glasses to show off those beautiful layers. Add fresh mango chunks and sprinkle toasted coconut flakes on top. A mint leaf is a nice touch for color and freshness. This makes your dish look fancy and fun!
Variations
Alternative Milk Options
You can switch up the milk in this recipe. Try oat milk or soy milk instead. These options still keep it creamy. If you want a nut-free choice, use rice milk or hemp milk. Both give a nice flavor without nuts.
Sweeteners and Flavors
Maple syrup adds a lovely sweetness. If you prefer, use honey instead. It gives a different taste but is just as good. You can also spice things up! Add a dash of cinnamon or nutmeg for extra warmth. These spices pair well with mango and coconut.
Fruit Variations
While mango is great, you can also use other fruit purees. Try making a berry layer with blueberries or strawberries. Seasonal fruits work well, too. Peaches or ripe bananas can create fun new flavors. Mix and match to find your favorite combo!
Storage Info
Refrigeration Guidelines
Mango coconut chia pudding lasts up to five days in the fridge. Store it in airtight containers to keep it fresh. Make sure to cover it well so it does not absorb any smells from the fridge. If you notice any extra liquid, just stir it before serving. This pudding gets better as it sits, so don’t hesitate to make it in advance.
Freezing Instructions
Yes, you can freeze chia pudding! It freezes well for up to two months. To freeze, place the pudding in freezer-safe containers. Leave some space at the top, as the pudding expands when frozen. When you’re ready to enjoy it, take it out and thaw it in the fridge overnight. You can serve it cold or let it sit at room temperature for a bit. Adding fresh mango and toasted coconut after thawing gives it a nice finish.
FAQs
Can I make this mango coconut chia pudding ahead of time?
Yes, you can make this pudding ahead of time. In fact, it tastes better after sitting. Store it in the fridge for up to five days. Just cover it well to keep it fresh. You can prepare the layers in jars for easy serving too.
Are chia seeds healthy?
Chia seeds are very healthy. They are rich in omega-3 fatty acids, fiber, and protein. These tiny seeds help you feel full and can aid digestion. They also have antioxidants which protect your body. Adding chia seeds to your diet boosts your nutrition easily.
Can I use frozen mango?
Yes, frozen mango works well in this recipe. It blends smoothly and adds a nice flavor. Just let it thaw slightly before pureeing. Fresh mango gives a bright flavor, but frozen is a great time-saver. Both options make the pudding tasty.
What can I substitute for maple syrup?
You can use honey or agave nectar instead of maple syrup. Both sweeteners add a nice taste. Honey is sweeter, so you may need less. Agave nectar has a mild flavor, making it a good choice too. Feel free to experiment with your favorite sweetener!
This post shared key steps to make mango coconut chia pudding. We explored main ingredients like coconut milk, chia seeds, and ripe mango. You learned how to prepare, chill, and serve the pudding, plus tips for perfect texture and flavor. Variations give you room to experiment with milks and fruits. Remember to store wisely and enjoy fresh or frozen. Chia seeds bring nutrition, making this treat both tasty and healthy. Embrace creativity and enjoy this delicious dessert!


