Maple Glazed Salmon Tasty and Easy Recipe Guide

Looking for a dish that impresses while being easy to make? Maple glazed salmon fits the bill! In this guide, I’ll walk you through simple steps to create a flavorful meal everyone will love. From fresh ingredients to cooking tips and variation ideas, I’ve got you covered. Join me to discover how to blend the sweet taste of maple with tender salmon for a dish that shines at any table!
Why I Love This Recipe
- Deliciously Sweet and Savory: The combination of maple syrup and soy sauce creates a perfect balance of flavors that enhances the natural taste of the salmon.
- Quick and Easy: This recipe comes together in just 25 minutes, making it a great choice for weeknight dinners or last-minute entertaining.
- Healthy and Nutritious: Salmon is packed with omega-3 fatty acids, making this dish not only tasty but also good for your heart and overall health.
- Beautiful Presentation: The vibrant colors of the glazed salmon and fresh green onions make this dish visually appealing, perfect for impressing guests.
Ingredients
List of Ingredients
To make maple glazed salmon, gather these simple ingredients:
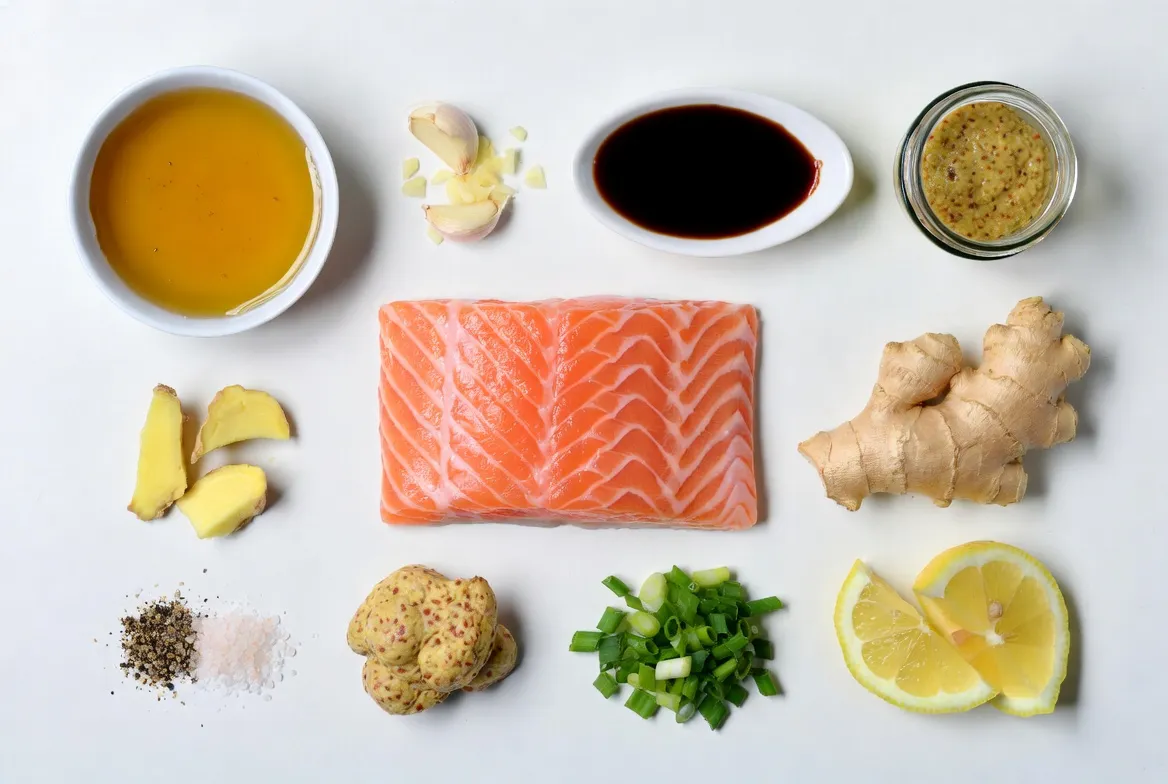
- 4 salmon fillets (6 oz each)
- 1/4 cup pure maple syrup
- 2 tablespoons soy sauce (or tamari for gluten-free)
- 1 tablespoon Dijon mustard
- 2 cloves garlic, minced
- 1 teaspoon fresh ginger, grated
- Salt and pepper to taste
- Chopped green onions for garnish
- Lemon wedges for serving
Notes on Ingredient Quality
Choosing the right ingredients makes a big difference. For the salmon, fresh fillets work best. Look for bright, shiny skin and a mild scent. Use pure maple syrup, not pancake syrup. The real deal tastes better and is healthier. Fresh garlic and ginger add great flavor. If you can, use organic soy sauce or tamari. This choice enhances the taste and is a better option for your health.
Substitutions for Key Ingredients
If you cannot find an ingredient, don’t worry! Here are some easy swaps:
- Salmon: You can use trout or another firm fish.
- Soy Sauce: If you need it gluten-free, use tamari or coconut aminos.
- Dijon Mustard: Yellow mustard or honey mustard can work, but the taste will change.
- Fresh Ginger: Ground ginger can substitute, but use less since it is stronger.
- Green Onions: Chives or parsley can add color and flavor as a garnish.
These substitutions help you make a delicious dish, no matter what you have on hand!

Step-by-Step Instructions
Preparation of the Maple Glaze
To make the maple glaze, start by gathering your ingredients. You need pure maple syrup, soy sauce, Dijon mustard, garlic, and ginger. In a small bowl, mix:
- 1/4 cup pure maple syrup
- 2 tablespoons soy sauce (or tamari)
- 1 tablespoon Dijon mustard
- 2 cloves garlic, minced
- 1 teaspoon fresh ginger, grated
Whisk these together until smooth. The glaze should smell sweet and savory. Set it aside for later.
Cooking Process: Baking the Salmon
Now, it’s time to bake the salmon. First, preheat your oven to 400°F (200°C). While the oven heats, line a baking sheet with parchment paper. This helps with cleanup.
Next, take your salmon fillets, about 6 oz each, and place them on the sheet, skin-side down. Lightly sprinkle salt and pepper on top.
Using a brush, coat each fillet with the maple glaze. Make sure the salmon is well-covered, but save some glaze for later.
Bake the salmon for 12-15 minutes. Check it at 12 minutes. The salmon should flake easily with a fork when it’s done.
Finishing Touches and Serving Suggestions
When the salmon is done, take it out of the oven. Brush the reserved glaze on top for extra flavor.
Let it rest for a couple of minutes. This allows the juices to settle.
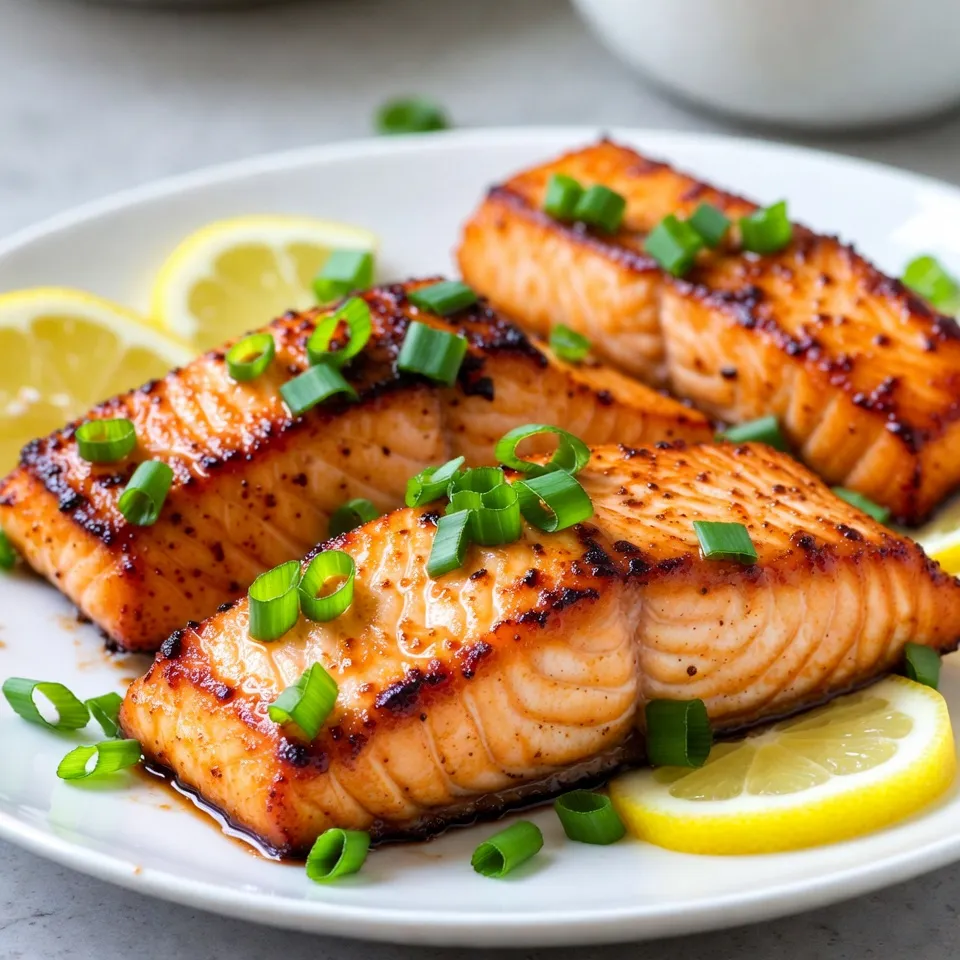
To serve, plate the salmon on a large white dish for contrast.
Garnish with chopped green onions and add lemon wedges on the side. For a complete meal, consider pairing it with steamed asparagus or quinoa. Enjoy your delicious maple glazed salmon!
Tips & Tricks
Cooking Time and Temperature Guidelines
To cook the salmon perfectly, I preheat my oven to 400°F (200°C). This heat ensures the fish cooks evenly. Bake the salmon for 12-15 minutes. Check if it flakes easily with a fork. This means it’s done. If you prefer it more cooked, add a few more minutes.
How to Achieve the Perfect Glaze
For the perfect glaze, I mix pure maple syrup, soy sauce, Dijon mustard, minced garlic, and grated ginger. Whisk them together until smooth. Brush the glaze on the salmon before baking. Save some glaze for later. After baking, brush it on again for extra flavor and shine. This step makes the salmon look and taste great.
Recommendations for Serving and Pairing
I love serving maple glazed salmon on a large white plate. The white background makes the colors pop. I top the salmon with chopped green onions for freshness. Add lemon wedges on the side for brightness. Pair this dish with steamed asparagus or quinoa. These sides complement the sweet and savory flavors well.
Pro Tips
- Use Fresh Ingredients: Always opt for fresh salmon and high-quality maple syrup for the best flavor.
- Don’t Overcook: Keep an eye on the salmon while baking to prevent it from drying out; it should flake easily when done.
- Experiment with Flavors: Feel free to add a splash of orange juice or a pinch of cayenne pepper to the glaze for a unique twist.
- Rest Before Serving: Allow the salmon to rest for a few minutes after baking; this helps the juices redistribute for a moist fillet.

Variations
Alternative Flavors and Add-Ins
You can switch up the glaze for fun. Try adding orange juice or zest for a citrus twist. A touch of sriracha adds heat if you like spice. For a smoky flavor, mix in some smoked paprika. You can also use honey instead of maple syrup for a different sweet note. Fresh herbs like thyme or rosemary can add a nice touch, too.
Different Cooking Methods (Grilling, Pan-Seared)
Grilling gives salmon a nice char and smoky flavor. For grilling, preheat your grill to medium heat. Cook the salmon skin-side down for about 6-8 minutes. Brush on the glaze during the last few minutes.
Pan-searing is quick and easy. Heat oil in a skillet over medium-high heat. Cook the salmon for about 4-5 minutes on each side. Brush with glaze just before it’s done. This method gives you a crispy outside and tender inside.
Side Dish Suggestions for a Complete Meal
Serve your maple glazed salmon with sides that balance the dish. Steamed asparagus or green beans pair well and add color. Quinoa or rice can soak up the glaze nicely. A fresh salad with mixed greens and a light vinaigrette adds crunch. Don’t forget some lemon wedges to brighten the flavors!
Storage Info
Proper Storage Techniques
To keep your maple glazed salmon fresh, store it in a tight container. Place it in the fridge right after it cools down. This way, it stays safe and tasty. Use it within three days for the best flavor. If you have some glaze leftover, store it in a separate container.
Reheating Instructions
When you want to enjoy your leftovers, reheat them gently. A microwave works, but I prefer an oven for even warmth. Preheat the oven to 350°F (175°C). Cover the salmon with foil to keep it moist. Heat it for about 10 minutes or until it feels warm. If using a microwave, heat in short bursts to avoid drying it out.
Freezing Guidelines and Tips
You can freeze maple glazed salmon if you need to save it for later. Wrap the salmon tightly in plastic wrap. Then, place it in a freezer bag. Make sure to remove as much air as possible. It can stay in the freezer for about three months. To eat, thaw it in the fridge overnight before reheating. This keeps the flavor and texture nice.
FAQs
Common Questions About Maple Glazed Salmon
What is maple glazed salmon?
Maple glazed salmon is a dish where salmon fillets are brushed with a sweet and tangy glaze made from pure maple syrup, soy sauce, Dijon mustard, garlic, and ginger. The glaze gives the salmon a rich flavor and shiny finish.
How long does it take to cook maple glazed salmon?
It takes about 12 to 15 minutes to bake the salmon at 400°F (200°C). The salmon is ready when it flakes easily with a fork.
Can I use frozen salmon for this recipe?
Yes, you can use frozen salmon. Just be sure to fully thaw it before cooking. This helps it cook evenly.
Nutritional Information and Dietary Considerations
How many calories are in maple glazed salmon?
Each 6 oz salmon fillet has about 350 calories. This can vary based on the specific ingredients you use, like the type of soy sauce.
Is maple glazed salmon healthy?
Yes, salmon is rich in omega-3 fatty acids, which are good for your heart. The glaze is sweet but can be adjusted to fit your taste.
Are there gluten-free options?
Yes, use tamari instead of regular soy sauce. Tamari is gluten-free and works well in this recipe.
Tips for Cooking Salmon Perfectly Every Time
How do I know when salmon is done?
Salmon is done when it flakes easily with a fork. You can also check the color; it should be opaque and light pink.
What if I overcook the salmon?
If you overcook it, the salmon may be dry. To avoid this, watch the time closely and check it a few minutes before the end.
Should I use skin-on or skinless salmon?
Both work well, but skin-on salmon tends to stay moist. If you prefer skinless, just be gentle when flipping it.
This blog post explored the essentials of making a delicious maple glazed salmon. We covered key ingredients, cooking steps, and tips to perfect your dish. Remember to choose quality ingredients and consider substitutes if needed. Using the right cooking time and temperature will ensure great results. Experiment with flavors and cooking methods for variety. Proper storage and reheating can extend your meal’s life. Follow these steps, and enjoy a tasty dish that impresse

Maple Glazed Salmon
Ingredients
- 4 fillets salmon (6 oz each)
- 0.25 cup pure maple syrup
- 2 tablespoons soy sauce (or tamari for gluten-free)
- 1 tablespoon Dijon mustard
- 2 cloves garlic, minced
- 1 teaspoon fresh ginger, grated
- to taste salt and pepper
- for garnish chopped green onions
- for serving lemon wedges
Instructions
- In a small bowl, whisk together the maple syrup, soy sauce, Dijon mustard, minced garlic, and grated ginger until well combined. This will be your glaze.
- Preheat your oven to 400°F (200°C) and line a baking sheet with parchment paper for easy cleanup.
- Place the salmon fillets on the prepared baking sheet, skin-side down. Season them lightly with salt and pepper.
- Brush the maple glaze generously over each salmon fillet, reserving some glaze for a final brush later.
- Bake the salmon in the preheated oven for 12-15 minutes, or until the salmon flakes easily with a fork and is cooked to your desired level of doneness.
- Once done, remove the salmon from the oven and brush with the reserved glaze for added flavor.
- Let the salmon rest for a couple of minutes before serving. Garnish with chopped green onions and serve with lemon wedges on the side.


![Loaded Baked Potato Soup is all about comfort and flavor. To make this hearty dish, you will need the following ingredients: - 4 large russet potatoes, peeled and diced - 1 cup sharp cheddar cheese, shredded - 1 cup sour cream - 4 cups chicken or vegetable broth - 1/2 cup green onions, sliced (plus extra for garnish) - 1/2 cup cooked bacon bits (or vegetarian bacon for a meat-free option) - 1/4 cup unsalted butter - 1/4 cup all-purpose flour - 1 teaspoon garlic powder - 1 teaspoon onion powder - Salt and pepper to taste These ingredients come together to create a creamy and rich soup that warms the soul. The russet potatoes provide a great base, while the cheddar cheese and sour cream add the perfect tang. You can easily switch out the bacon for a vegetarian option if you prefer. Each bite is full of flavor, making this soup a true delight. For the full recipe, check out the details above. Start by melting the butter in a large pot over medium heat. Once the butter is melted, add the flour to create a roux. Stir it constantly for about two minutes. This step helps to thicken your soup later. Gradually whisk in the chicken or vegetable broth. Keep whisking until the mixture is smooth and thickened. Cook this for another five minutes. This base gives your soup a rich flavor. Now, it’s time to add the star of the show: the potatoes! Add the diced potatoes along with garlic powder, onion powder, salt, and pepper to the pot. Stir everything well. Bring the mixture to a boil, then reduce the heat to low. Cover the pot and let it simmer for 15 to 20 minutes, or until the potatoes are soft. This step allows the flavors to blend nicely. Once the potatoes are tender, grab an immersion blender. Blend the soup to your desired consistency. You can make it completely smooth or leave some chunks for texture. After blending, stir in the sour cream and half of the cheddar cheese. Mix until everything is well combined and heated through. Taste your soup, and adjust the seasoning if needed. For the final touch, serve your soup hot. Top it with the remaining cheese, crispy bacon bits, and sliced green onions. This adds flavor and a nice crunch. For the full recipe, be sure to check the detailed instructions above. - Cut your potatoes into even pieces. This helps them cook at the same time. - Use an immersion blender for easy blending. It makes the soup smooth and creamy. - Serve your soup in rustic bread bowls. This adds a cozy touch. - Top your soup with extra cheese, crispy bacon, and sliced green onions. These toppings add flavor and fun. - If your soup is too thin, thicken it with more flour. Just a little will do. - If your soup is too thick, add more broth. This will help reach your perfect texture. For the full recipe, check the details above! {{image_2}} To make a vegetarian version of loaded baked potato soup, swap out the bacon for sautéed mushrooms. Mushrooms add a rich, umami flavor that enhances the soup. You can use any kind of mushrooms you like, such as cremini or shiitake. Next, instead of chicken broth, use vegetable broth. This keeps the soup hearty while ensuring it’s meat-free. With these changes, you keep the soup delicious and satisfying. If you want to kick up the flavor, add some spices. Smoked paprika gives a nice depth, while chili powder adds warmth. Both spices can transform the soup into something special. For those who like heat, a splash of hot sauce can work wonders. Just a few drops can make your taste buds dance! For a richer, creamier soup, use heavy cream instead of sour cream. This will give the soup a velvety texture. If you prefer a tangy taste, swap sour cream with Greek yogurt. This option still keeps the soup creamy but adds a nice zing. Each choice leads to a different experience in every bowl. For the complete recipe, check out the [Full Recipe]. Store your Loaded Baked Potato Soup in an airtight container. It stays fresh for up to 4 days. I find it best to let it cool first before sealing. This helps keep the flavors intact. If you plan to enjoy it later, proper storage is key. This soup freezes well for up to 3 months. When you freeze it, use a freezer-safe container. Make sure to leave some space at the top for expansion. When you want to eat it, just reheat gently. This keeps the creamy texture smooth and inviting. To reheat, warm it on the stove over low heat. Stir often to avoid sticking. If the soup seems thick, add a splash of broth. This brings back its creamy goodness. I recommend avoiding the microwave if you want to keep it creamy. The stovetop method is much better for flavor. Yes, prepare the soup and store in the fridge overnight. This makes meal prep easy. When you’re ready, just reheat it for a warm, tasty meal. Add more flour or use a cornstarch slurry for thickening. Start with a little and stir well. Keep adding until you reach your desired thickness. Pair with crusty bread, salad, or a sandwich for a complete meal. These sides add balance and texture to your soup experience. Gently reheat on the stovetop, adding broth if necessary to maintain consistency. Stir often to avoid hot spots and ensure even heating. Use gluten-free flour for a gluten-free option (check all other ingredients). This way, everyone can enjoy this delicious soup without worry. This blog post covered how to make delicious Loaded Baked Potato Soup. We discussed the key ingredients, step-by-step instructions, and useful tips. You can choose variations to suit your taste. Storage tips ensure your soup stays fresh, whether in the fridge or freezer. Now, you can enjoy this classic dish at home. With simple ingredients and easy steps, it’s a fun recipe to try. Make it your own by adjusting flavors and toppings. Enjoy your cooking and the great taste of this soup!](https://dailydishlab.com/wp-content/uploads/2025/06/6da01e17-9fa2-4ad9-9d4f-ab98b2553b0b-768x768.webp)

![To make this dish, you need simple and fresh ingredients. Here’s what you'll need: - 1 whole chicken (about 4-5 lbs) - 2 lemons (one for juicing, one for slicing) - 4 tablespoons olive oil - 4 cloves garlic, minced - 1 tablespoon fresh rosemary, chopped - 1 tablespoon fresh thyme, chopped - 1 tablespoon fresh parsley, chopped - Salt and pepper, to taste - 1 large onion, quartered - 1 cup chicken broth This mix brings out bright flavors and makes the chicken delicious. The lemon juice adds zing, while the herbs give it depth. You can boost the taste with a few extra ingredients. Try adding: - 1 teaspoon paprika for a smoky touch - 1 tablespoon Dijon mustard for a hint of tang - A pinch of chili flakes for some heat These additions can personalize your dish and make it even more exciting. Pair your chicken with sides that complement its flavors. Here are some great options: - Roasted vegetables like carrots and potatoes - A green salad with a light vinaigrette - Garlic bread to soak up the tasty juices These sides create a balanced meal and make dinner feel special. For the full recipe, check out the details above. First, gather your ingredients. You need a whole chicken, lemons, olive oil, garlic, and herbs. I love using fresh rosemary, thyme, and parsley. These add great flavor. Start by preheating your oven to 425°F (220°C). Next, pat the chicken dry with paper towels. This helps the skin crisp up while roasting. Place the chicken in a roasting pan. In a bowl, mix olive oil, juice from one lemon, minced garlic, and the chopped herbs. Add salt and pepper to taste. This mix is packed with flavor! Now, rub this mixture all over the chicken. Make sure to get it under the skin. This step is key for juicy meat. Stuff the chicken's cavity with the quartered onion and sliced lemon. This adds moisture and aroma while cooking. Pour chicken broth into the roasting pan. This keeps the chicken moist. Next, tie the chicken legs together with kitchen twine. Tuck the wing tips under the bird. This helps the chicken cook evenly. Roast the chicken in your preheated oven. It should take about 1 hour and 15 minutes. Use a meat thermometer to check that it hits 165°F (74°C). Halfway through, baste the chicken with pan juices. This adds extra flavor and moisture. Once done, take the chicken out of the oven. Let it rest for 10-15 minutes before carving. This helps the juices settle. For carving, use a sharp knife. Start with the legs, then move to the breast. For a lovely presentation, place the carved chicken on a large platter. Add fresh lemon slices and sprinkle more herbs on top. Serve with sides like roasted vegetables or a green salad for a complete meal. For the full recipe, check the details above. To make your Lemon Herb Roasted Chicken burst with flavor, start with fresh herbs. Fresh rosemary, thyme, and parsley work best. They add a bright taste that dried herbs can’t match. Always rub the herb mix under the chicken skin. This step seals in the flavors. Squeeze the juice of one lemon over the chicken too. The lemon gives a nice tang and helps balance the richness of the meat. Juiciness is key to a great roasted chicken. First, make sure to pat the chicken dry. This helps the skin crisp up. Pour chicken broth into the pan before roasting. This broth creates steam, keeping the meat moist. Basting the chicken with its pan juices halfway through cooking adds flavor and moisture. Finally, let the chicken rest after roasting. This step helps the juices settle for a tender bite. One common mistake is not preheating the oven. Always preheat to 425°F (220°C) to ensure even cooking. Don’t skip the kitchen twine either. Tying the legs helps the chicken cook evenly. Avoid opening the oven too often, as this lets heat escape. Lastly, don’t rush the resting time after cooking. This time allows for a juicier chicken. For a complete guide, check out the Full Recipe. {{image_2}} You can mix up your herbs for new tastes. Instead of rosemary, try sage or dill. These herbs give a different feel to the chicken. You can also use dried herbs. They work well if you do not have fresh ones. Just use one-third of the amount. This change keeps the dish fresh and fun. You can roast this chicken in many ways. An air fryer cooks it quick and gives a nice crisp skin. Cook at 375°F for about 50 minutes. A slow cooker is another option. Cook on low for 6 to 8 hours. This method keeps the chicken super juicy and tender. Each method has its charm, making dinner easy and tasty. This lemon herb roasted chicken is already gluten-free. You can enjoy it safe without worry. For a keto diet, skip any starchy sides. Instead, serve it with a salad or steamed veggies. This keeps your meal low in carbs but high in flavor. You can enjoy a delicious meal that fits your needs! For the full recipe, check out [Full Recipe]. After enjoying your lemon herb roasted chicken, store the leftovers. Let the chicken cool first. Place it in an airtight container. Keep it in the fridge. Use the leftovers within three to four days. You can shred the meat for salads or sandwiches. This way, you avoid waste and enjoy tasty meals. If you want to save your chicken longer, freezing is a great option. Cut the chicken into portions. Wrap each piece tightly in plastic wrap. Then, place the wrapped chicken in a freezer bag. Remove as much air as possible. Label the bag with the date. When you're ready to eat, thaw it overnight in the fridge. Reheat the chicken in the oven at 350°F (175°C) until warm. This will keep it juicy and delicious. Lemon herb roasted chicken lasts in the fridge for three to four days. If frozen, it stays good for about four months. After that, the quality may drop. Always check for any off smells or changes in texture before eating. Keeping track of how long it’s been stored helps ensure your meals stay safe and tasty. You can tell when the chicken is done by checking its temperature. Use a meat thermometer to check the thickest part of the thigh. The safe internal temperature is 165°F (74°C). If the juices run clear, it is also a good sign. Always let the chicken rest after cooking. This allows the juices to spread and keeps the meat moist. Yes, you can use chicken parts. Thighs, breasts, or drumsticks work well. Just adjust the cooking time. Smaller pieces will cook faster, so keep an eye on them. They may take about 30 to 45 minutes to cook through. Ensure each piece reaches 165°F (74°C) for safety. If you don’t have fresh herbs, you can use dried ones. Use about one-third of the amount of dried herbs compared to fresh. For example, if the recipe calls for one tablespoon of fresh rosemary, use one teaspoon of dried rosemary. Dried herbs can still add great flavor. Experiment with different ones to find your favorite mix. For the complete cooking process, check out the Full Recipe. Lemon herb roasted chicken is a delightful dish you can easily make at home. We covered the key ingredients and how to prepare and roast your chicken for the best taste. I shared tips for keeping the chicken juicy and avoiding common mistakes. I also highlighted variations for unique flavors and dietary needs and provided storage information for leftovers. Remember, cooking is about enjoyment. Experiment and have fun with this recipe to make it your own. Enjoy your delicious meal!](https://dailydishlab.com/wp-content/uploads/2025/06/834e469e-ee3b-4758-a8f8-2aa538b40a90-768x768.webp)


