
Are you ready to treat yourself to something decadent yet easy to make? These Matcha Cheesecake Bars combine the rich creaminess of cheesecake with the earthy flavor of matcha. In just a few simple steps, you’ll create a dessert that’s perfect for any occasion. Whether you’re a matcha lover or new to this delightful green powder, these bars will impress everyone. Let’s dive into the ingredients and get started!
Why I Love This Recipe
- Unique Flavor Combination: The earthy matcha paired with creamy cheesecake creates a delightful balance that is both refreshing and indulgent.
- Beautiful Presentation: The vibrant green color of matcha makes these bars visually stunning, perfect for impressing guests at any gathering.
- Easy to Make: With simple ingredients and straightforward steps, anyone can whip up these delicious bars without any fuss.
- Perfect for Any Occasion: Whether it’s a casual get-together or a special celebration, these matcha cheesecake bars are always a hit!
Ingredients
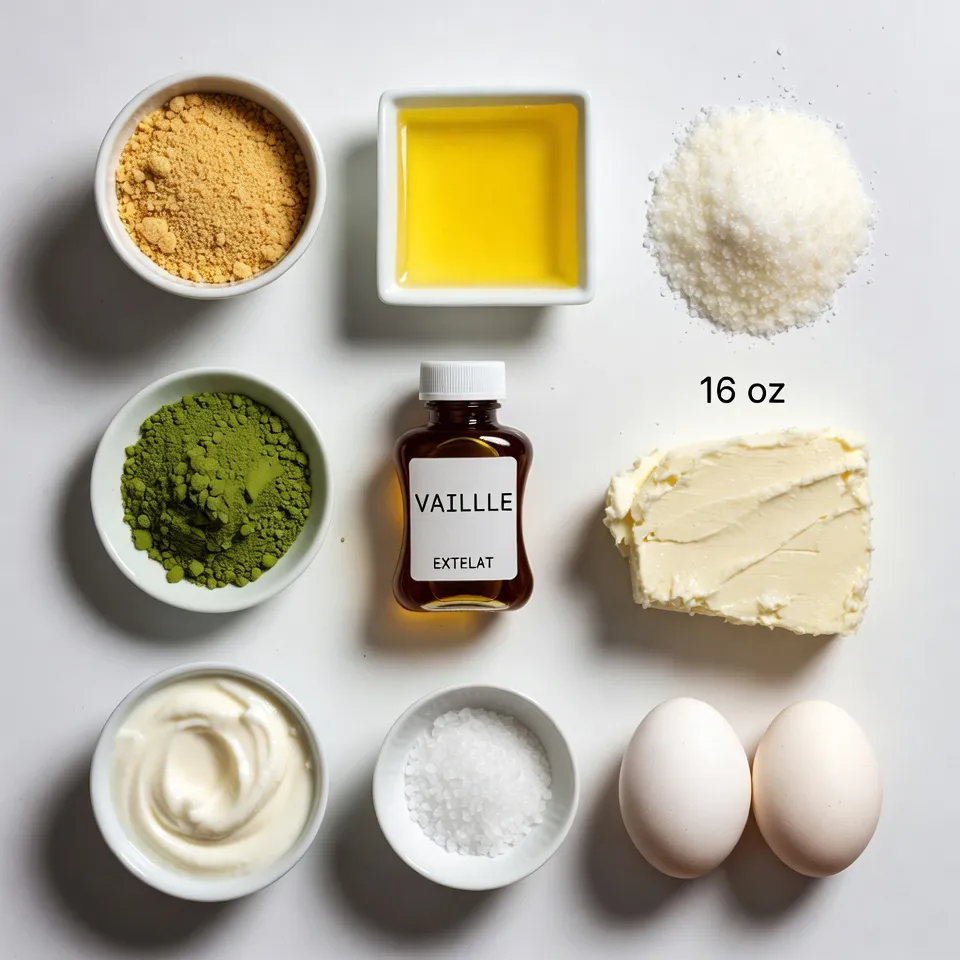
List of Ingredients
– 1 cup graham cracker crumbs
– 1/4 cup unsalted butter, melted
– 2 tablespoons sugar
– 16 oz cream cheese, softened
– 3/4 cup sugar (for filling)
– 2 large eggs
– 1/4 cup sour cream
– 2 teaspoons matcha powder (plus extra for dusting)
– 1 teaspoon vanilla extract
– Pinch of salt
Ingredient Substitutes
You can change up some ingredients for your Matcha Cheesecake Bars. Here are some ideas:
– Alternative crust options: Instead of graham crackers, try crushed cookies like Oreos or shortbread. They give a unique taste and texture.
– Dairy-free substitutions: Use coconut cream for cream cheese to keep it dairy-free. Swap sour cream with coconut yogurt for a creamy feel.
– Variations with different flavors: Add chocolate chips or citrus zest like lemon or orange. This can give a fun twist to the matcha flavor.
Step-by-Step Instructions
Preparation Steps
1. First, preheat your oven to 325°F (160°C). This gets the oven ready for baking.
2. Line an 8×8 inch baking pan with parchment paper. Make sure to leave some paper hanging over the edges. This helps you lift the bars later.
3. In a medium bowl, mix the graham cracker crumbs, melted butter, and 2 tablespoons of sugar. Stir until the crumbs are well coated.
4. Press this mixture firmly into the bottom of the prepared pan. This creates a nice, even crust. Bake for 10 minutes. After baking, let the crust cool slightly.
Cheesecake Filling Steps
1. In a large mixing bowl, beat the softened cream cheese and 3/4 cup of sugar. Mix until it’s smooth and creamy.
2. Add the eggs one at a time. Mix well after each egg. Scrape down the sides of the bowl to make sure it blends evenly.
3. Next, mix in the sour cream, 2 teaspoons of matcha powder, vanilla extract, and a pinch of salt. Beat until everything is smooth and well combined.
4. Pour the cheesecake filling over the cooled crust. Spread it out evenly. Gently tap the pan on the counter to remove air bubbles.
5. Bake in the preheated oven for 25 to 30 minutes. The edges should be set, but the center may still jiggle a bit.
Cooling and Serving
1. When the bars are done, take them out of the oven. Let them cool at room temperature for about an hour.
2. After that, refrigerate them for at least 4 hours. Overnight is best to let the flavors meld.
3. Once chilled, lift the cheesecake out of the pan using the parchment paper. Cut into squares or rectangles.
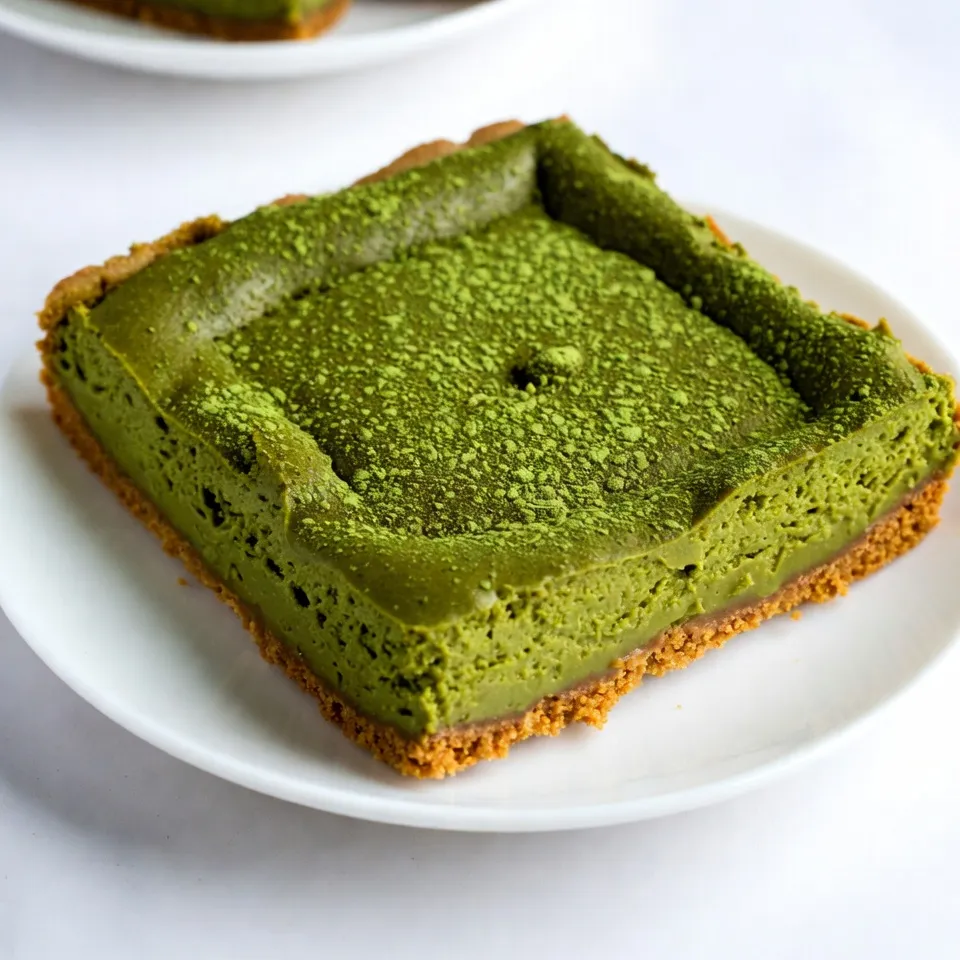
4. Dust with extra matcha powder before serving for a nice touch. Enjoy!
Tips & Tricks
Achieving the Perfect Texture
To get the best texture, bake these bars at 325°F (160°C). This low temperature helps the filling cook evenly without burning. Bake for about 25-30 minutes. The edges will set, but the center should still jiggle slightly. This means it’s perfect!
To check if your bars are done, look for the edges. They should be firm, while the middle remains soft. If you see cracks, they may have baked too long. Always trust your eyes!
Presentation Tips
To make these bars look fancy, dust them with extra matcha powder right before serving. This adds a pop of color and a hint of flavor.
You can pair them with fresh fruit, like strawberries or blueberries. A dollop of whipped cream also makes a great addition. These small touches make your dessert stand out!
Common Mistakes to Avoid
One common mistake is overmixing the filling. Mix just until smooth. If you mix too much, you can add too much air. This can cause cracks while baking.
Another mistake is not cooling the bars properly. After baking, let them cool at room temperature. Then, refrigerate for at least 4 hours. This helps the flavors blend and the bars set nicely. Don’t rush this step!
Pro Tips
- Use Room Temperature Ingredients: Make sure your cream cheese and eggs are at room temperature to ensure a smooth and creamy filling without lumps.
- Don’t Overbake: Keep an eye on the baking time; the cheesecake should have a slight jiggle in the center when you take it out. It will firm up as it cools.
- Chill Overnight: For the best flavor, let your cheesecake bars chill in the refrigerator overnight. This will help the flavors to meld beautifully.
- Dust with Matcha Before Serving: A light dusting of matcha on top before serving not only enhances the visual appeal but also adds a fresh burst of flavor.
Variations
Flavor Additions
You can change the flavor of your matcha cheesecake bars to keep things fun. One great option is chocolate matcha cheesecake bars. Just add some melted dark chocolate to the filling. This will give a deep, rich flavor that pairs well with matcha.
Another fun twist is to add citrus flavors. You can mix in lemon or orange zest. This brightens the taste and adds a fresh note to your dessert. Citrus-infused matcha brings a zesty kick that dances on your palate.
Alternative Presentation
If you want to serve matcha cheesecake in a new way, try making matcha cheesecake cups. Use small cups or jars for individual servings. Layer the crust and filling, and top with whipped cream. This makes for a cute and easy dessert.
You can also create a matcha cheesecake layer cake. Bake the filling in larger pans and stack the layers. Frost with whipped cream or a cream cheese frosting. This presentation is perfect for parties and special events.
Dietary Modifications
For those with dietary needs, you can make gluten-free options. Use gluten-free graham crackers for the crust. This way, everyone can enjoy the treat without worry.
If you want a vegan version, swap out the cream cheese and eggs. Use cashew cream or silken tofu for the filling. Adjust the ingredients to match the recipe, and you’ll have delicious vegan matcha cheesecake bars. Everyone will love these options!
Storage Info
Refrigeration Guidelines
To store leftover matcha cheesecake bars, place them in an airtight container. Make sure to separate layers with parchment paper. This prevents sticking and keeps them fresh. The expected shelf life in the fridge is about 5 to 7 days. After this time, they may lose taste and texture.
Freezing Instructions
You can freeze these bars to enjoy later. Start by cutting them into squares. Wrap each square in plastic wrap, then place them in a freezer bag. This keeps them fresh for up to 3 months. When you want to eat them, take them out and thaw in the fridge overnight. Avoid thawing at room temperature to keep the texture smooth.
Serving After Storage
To refresh the flavors after refrigeration or freezing, dust the bars with extra matcha powder. This adds a fresh touch and enhances the taste. If they seem dry, serve with a dollop of whipped cream or a drizzle of chocolate sauce. This brings back that creamy cheesecake feel.
FAQs
Can I use different types of tea powder?
Yes, you can use other tea powders. Green tea is a great choice. You might try flavored teas, too. Matcha gives a rich taste, but other teas can work well. Look for a fine powder to keep the texture smooth. Some popular options include:
– Jasmine green tea
– Earl Grey tea
– Hibiscus powder
These teas add unique flavors and colors to your cheesecake bars.
Is there a way to make this recipe sugar-free?
Absolutely! You can replace sugar with sugar alternatives. Here are a few options:
– Stevia
– Erythritol
– Monk fruit sweetener
These substitutes can help you cut sugar without losing taste. Just use them in equal amounts or follow the package’s guidelines.
What should I do if the bars crack?
Cracks can happen sometimes, but you can prevent them. Here are some tips to keep your bars smooth:
– Bake at a lower temperature to cook evenly.
– Avoid overmixing the filling; this adds air and causes cracks.
– Let the bars cool slowly in the oven with the door slightly open.
These steps can help you achieve a perfect finish on your matcha cheesecake bars.
This blog post covers a simple matcha cheesecake bar recipe that’s both tasty and fun. You learned about the ingredients needed, step-by-step instructions, and helpful tips to avoid mistakes. We also explored variations and storage methods.
Try making these bars your own with flavors and toppings. Enjoying a delicious treat can be easy. I hope you feel inspired to bake and shar


