
Are you ready to make a dessert that’s a crowd-pleaser? My Mint Chocolate Chip Cheesecake is rich, creamy, and packed with flavor. With a crunchy chocolate crust and a filling that melts in your mouth, this cheesecake is a perfect treat for any occasion. Join me as we dive into the ingredients, tips, and easy steps to create this delightful dessert that will leave everyone asking for seconds!
Why I Love This Recipe
- Decadent Flavor: The combination of creamy cheesecake with refreshing mint and rich chocolate creates a delightful dessert that satisfies every craving.
- Easy to Make: This recipe is straightforward, making it perfect for both novice and experienced bakers. Just follow the steps, and you’ll have a stunning cheesecake.
- Perfect for Occasions: Whether it’s a birthday, holiday, or just a sweet treat for yourself, this cheesecake is sure to impress family and friends.
- Customizable: You can easily adjust the flavors or toppings to match your preferences, making it a versatile dessert for any palate.
Ingredients
Primary Ingredients
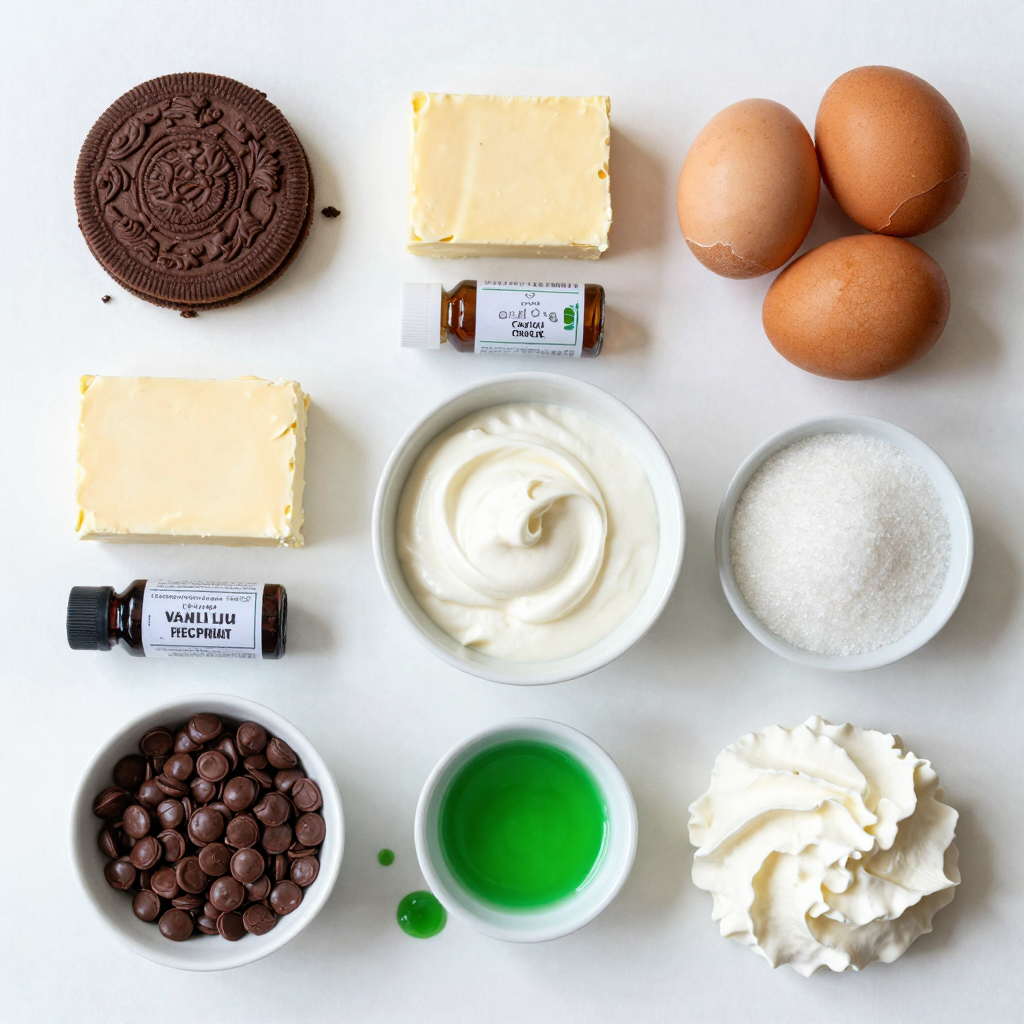
To make a tasty Mint Chocolate Chip Cheesecake, you need these main items:
– 16 oz cream cheese, softened
– 1 cup granulated sugar
– 2 large eggs
– 1 teaspoon peppermint extract
These ingredients create a rich and creamy filling. The cream cheese gives the cheesecake its smooth texture. Sugar adds sweetness, while eggs help it set. Peppermint extract brings that fresh mint taste.
Crust Ingredients
The crust is simple and delicious. For it, gather:
– 1 ½ cups chocolate sandwich cookie crumbs
– ½ cup unsalted butter, melted
Combining these makes a crunchy base. The chocolate crumbs add flavor, and the melted butter helps bind them together.
Optional Items
You can add a few fun touches if you want:
– Green food coloring (optional, for a minty hue)
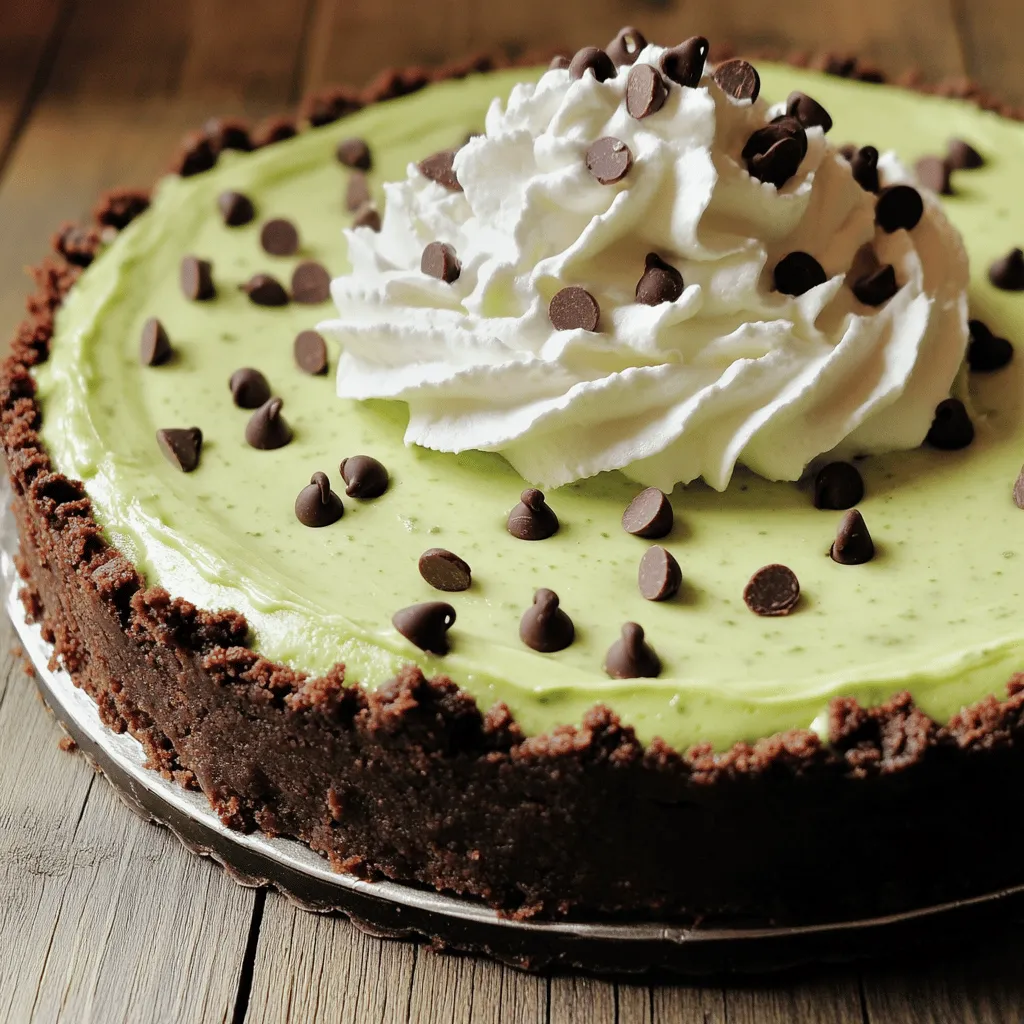
– Whipped cream (for topping)
The green food coloring makes your cheesecake look extra festive. Whipped cream adds a nice finish on top, making it even more appealing.
Step-by-Step Instructions
Prepping the Crust
Start by preheating your oven to 325°F (160°C). In a medium bowl, combine 1 ½ cups of chocolate sandwich cookie crumbs with ½ cup of melted unsalted butter. Mix until the crumbs are coated well. Press this mixture evenly into the bottom of a 9-inch springform pan. Bake the crust for 10 minutes. Once done, take it out and let it cool.
Making the Cheesecake Filling
In a large mixing bowl, beat 16 ounces of softened cream cheese with a hand mixer until smooth. Gradually add 1 cup of granulated sugar, mixing until combined. Next, add 1 teaspoon of vanilla extract and 1 teaspoon of peppermint extract. If you want a fun minty color, add a few drops of green food coloring. Mix for another minute. Now, add 2 large eggs one at a time. Mix just until combined after each egg. Be careful not to overmix. Then, add 1 cup of sour cream and mix until smooth. Gently fold in 1 cup of mini chocolate chips.
Baking and Cooling the Cheesecake
Pour the cheesecake mixture over the cool crust. Smooth the top with a spatula. Bake it in your preheated oven for 45-50 minutes. Look for the edges to be set, while the center has a slight jiggle. After baking, turn off the oven and crack the door. Let the cheesecake cool gradually for about an hour. Once it cools, cover it with plastic wrap. Refrigerate for at least 4 hours, or overnight for the best flavor and texture. Before serving, top with whipped cream and sprinkle more mini chocolate chips on top. Enjoy your Mint Chocolate Chip Cheesecake!
Pro Tips
- Use Room Temperature Ingredients: Ensure your cream cheese and eggs are at room temperature for a smoother batter, which helps prevent lumps.
- Prevent Cracking: To minimize cracks on the surface, bake the cheesecake in a water bath. Wrap the springform pan in foil to avoid leaks.
- Chill Overnight: For the best flavor and texture, allow the cheesecake to chill overnight before serving. This helps the flavors meld beautifully.
- Garnish Creatively: Experiment with different toppings like crushed mint candies or chocolate shavings for a more visually appealing presentation.
Tips & Tricks
Ensuring a Smooth Texture
To get a smooth texture, start with room temperature ingredients. Cold cream cheese can clump up. Mix the cream cheese slowly. Avoid overmixing. If you mix too fast, air bubbles can form. Those bubbles can crack your cheesecake.
Achieving the Perfect Bake
When baking, look for a slight jiggle in the center. This means it’s not overcooked. Use an oven thermometer to check the heat. Ovens can be off by a few degrees. If you bake at the wrong temp, your cheesecake may not set right.
Serving Suggestions
Serve your cheesecake with a swirl of whipped cream. Sprinkle extra mini chocolate chips on top. This makes your cake look fancy and delicious. You can also add fresh mint leaves for a pop of color. Enjoy every creamy bite!
Variations
Flavor Enhancements
You can make your mint chocolate chip cheesecake even better by adding extra flavors. A drop of vanilla or almond extract can change the taste. Vanilla adds warmth and depth, while almond gives a nice nutty touch. Use about half a teaspoon to start. Taste as you go to find your perfect mix.
Crust Alternatives
If you want a different crust, try using graham cracker crumbs instead of chocolate cookies. This gives a nice contrast to the minty filling. For gluten-free options, use gluten-free cookie crumbs. Just make sure the crumbs are finely crushed, so they hold together well. You can even use nuts for a crunchy and fun twist.
Presentation Ideas
Serving your cheesecake can be as fun as making it! Instead of cutting it into slices, try serving it in individual cups. This makes for a cute and easy dessert for parties. You can also use decorative plates. Add a sprig of mint or a drizzle of chocolate sauce on top for a fancy touch. These small details can impress your guests and make your dessert stand out.
Storage Info
Refrigeration
To keep your Mint Chocolate Chip Cheesecake fresh, cover it tightly. Use plastic wrap or foil. This keeps moisture in and prevents odors from other foods. Store it in the fridge for up to five days. The cheesecake tastes best after it chills overnight. This time lets the flavors blend well.
Freezing Tips
You can freeze slices of cheesecake for later. Wrap each slice in plastic wrap. Then, place the wrapped slices in a freezer bag. Press out as much air as you can. This helps avoid freezer burn. To enjoy, thaw the slices in the fridge overnight. This keeps the texture smooth and creamy.
Shelf Life
In the fridge, your cheesecake lasts about five days. In the freezer, it can last up to three months. After this time, the taste and texture may change. Enjoy your Mint Chocolate Chip Cheesecake while it’s fresh for the best flavor.
FAQs
How long does it take to make Mint Chocolate Chip Cheesecake?
Making Mint Chocolate Chip Cheesecake takes about 5 hours in total. This includes:
– Prep time: 30 minutes to gather and mix ingredients.
– Bake time: 45-50 minutes in the oven.
– Cooling time: 1 hour in the oven after baking.
– Chilling time: At least 4 hours in the fridge for the best flavor.
This breakdown helps you plan your day for this creamy delight.
Can I make this cheesecake in advance?
Yes, you can make this cheesecake in advance! In fact, it tastes better after chilling overnight. Here are some benefits of making it ahead:
– Flavor develops: Chilling allows the mint and chocolate flavors to blend.
– Convenience: You can serve it fresh without last-minute stress.
– Storage: Wrap it well in plastic wrap to keep it fresh in the fridge.
You can make this cheesecake up to 2 days ahead of when you plan to serve it.
What can I substitute for cream cheese?
If you need a cream cheese substitute, you have options! Here are some alternatives:
– Greek yogurt: Use plain Greek yogurt for a tangy flavor and creamy texture.
– Ricotta cheese: This gives a lighter texture but still creamy.
– Tofu: Silken tofu can work for a dairy-free option. Blend until smooth.
Each option changes the taste a bit, but they all work in this recipe.
This blog post covered how to make a delicious Mint Chocolate Chip Cheesecake. We explored the ingredients needed, including cream cheese and chocolate cookies. You learned the step-by-step method, from prepping the crust to baking and cooling. We shared tips for a smooth texture and perfect bake. Consider trying different flavors or crusts for variety. Lastly, we discussed how to store your cheesecake for freshness. Enjoy your homemade treat, and impress friends with your baking skills!


