Mouthwatering Mushroom Spinach Stuffed Chicken Delight

Are you ready to impress at dinner time? My Mushroom Spinach Stuffed Chicken Delight is an easy, tasty dish that will wow your family and friends. This recipe combines tender chicken with a rich, creamy filling of spinach and mushrooms. It’s a crowd-pleaser that looks fancy but is simple to make. Let’s dive into this mouthwatering adventure and bring a burst of flavor to your table!
Why I Love This Recipe
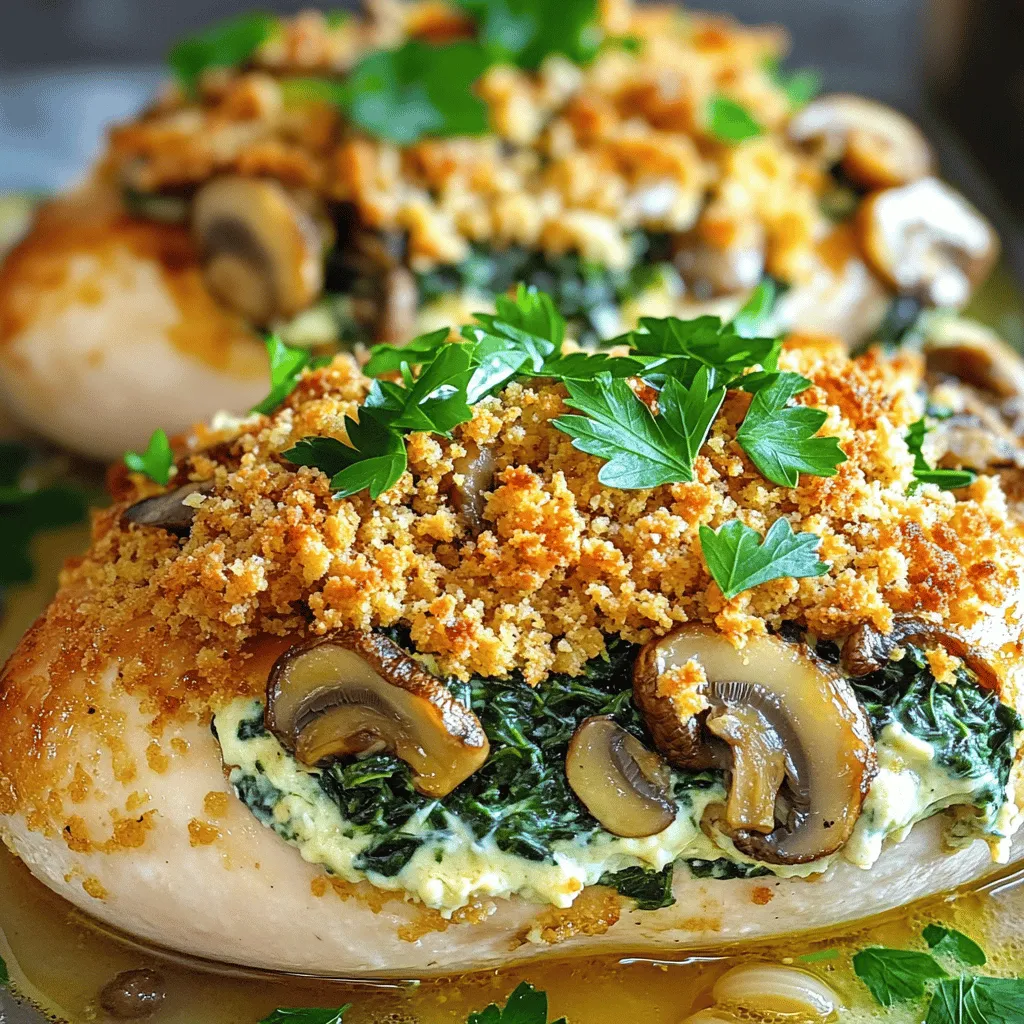
- Delicious Flavor Combination: The blend of mushrooms, spinach, and creamy cheese creates a rich and savory filling that elevates the chicken to new heights.
- Healthy and Nutritious: With fresh spinach and mushrooms, this dish is packed with vitamins and minerals, making it a wholesome dinner option.
- Easy to Prepare: Despite looking impressive, this recipe is straightforward and can be made in under an hour, perfect for busy weeknights.
- Versatile Dish: This stuffed chicken can be paired with various sides, such as rice or salad, allowing for endless variations and creativity.
Ingredients
When making Mushroom Spinach Stuffed Chicken, you need a few key ingredients. Each plays a part in making this dish tasty and satisfying.
- Chicken Preparation: Use 4 boneless, skinless chicken breasts. They are easy to stuff and cook evenly.
- Stuffing Components: Gather 1 cup of fresh spinach and 1 cup of finely chopped mushrooms. These give flavor and nutrition. You will also need ½ cup of softened cream cheese and ¼ cup of grated Parmesan cheese. These cheeses make the filling creamy and rich.
- Flavor Enhancers: For taste, add 2 cloves of minced garlic and 1 teaspoon of dried thyme. Use 1 teaspoon of olive oil to cook the filling. Don’t forget salt and pepper to season the mixture.
- Optional Toppings: If you like a crunchy topping, add ½ cup of breadcrumbs. Fresh parsley makes a great garnish for a pop of color.

Step-by-Step Instructions
Preparation
First, preheat your oven to 375°F (190°C). This step is key for even cooking. Next, grab a baking dish and lightly grease it to prevent sticking. Now, heat a skillet over medium heat. Add 1 teaspoon of olive oil. When the oil is warm, add 2 cloves of minced garlic. Sauté the garlic for about 1 minute until it smells great. Then, add 1 cup of finely chopped mushrooms. Cook these for 5 to 7 minutes until they become soft and golden.
Mixing the Filling
Now it’s time to add color and flavor. Toss in 1 cup of chopped fresh spinach. Cook until it wilts, which takes about 2 minutes. Once wilted, remove the skillet from heat and let it cool slightly. In a bowl, mix the spinach and mushroom blend with ½ cup of softened cream cheese and ¼ cup of grated Parmesan cheese. Sprinkle in 1 teaspoon of dried thyme, and season with salt and pepper to taste. Stir until everything is well combined.
Stuffing the Chicken
Next, let’s prepare the chicken. Take 4 boneless, skinless chicken breasts and create pockets in each one. Be careful not to cut all the way through. Stuff each chicken breast with your mushroom and spinach mixture. If needed, use toothpicks to secure the openings. This helps keep the filling inside while cooking.
Baking
Place the stuffed chicken breasts in your greased baking dish. If you like a crunchy topping, sprinkle ½ cup of breadcrumbs over them. Now, it’s time to bake. Put the dish in the preheated oven and cook for 25 to 30 minutes. Use a meat thermometer to check that the chicken reaches an internal temperature of 165°F (75°C). Once cooked, remove from the oven and let it rest for about 5 minutes before serving. This helps keep the juices in and makes for a juicy dish. Enjoy your delicious Mushroom Spinach Stuffed Chicken!
Pro Tips
- Use Fresh Ingredients: For the best flavor, always opt for fresh spinach and mushrooms. They will enhance the overall taste of the dish.
- Don’t Overstuff: Be cautious not to overfill the chicken breasts. This can cause the filling to spill out during cooking.
- Check for Doneness: Use a meat thermometer to ensure chicken reaches an internal temperature of 165°F (75°C) for safe eating.
- Let It Rest: Allow the chicken to rest for a few minutes after baking. This helps the juices redistribute, keeping the meat moist.
Tips & Tricks
Perfecting the Stuffing
To make a great stuffing, focus on texture. You want it creamy but not too wet. Start by sautéing the mushrooms and garlic in olive oil. This adds flavor and helps remove excess moisture. Once cooked, add the spinach. It wilts quickly and blends well with the mushrooms. Then, mix in cream cheese and Parmesan. This combination gives you a rich, creamy filling. Adjust salt and pepper to taste for extra flavor.
To keep the chicken juicy, do not overcook it. Use a meat thermometer to check the internal temperature. The chicken should reach 165°F (75°C). Remember to let it rest after baking. This allows the juices to redistribute, ensuring each bite is tender.
Serving Suggestions
For side dishes, consider fresh salads or roasted vegetables. A simple green salad complements the rich stuffing well. You could also serve it with garlic mashed potatoes for a hearty meal.
For plating, try stacking the stuffed chicken on a bed of sautéed greens. Drizzle a bit of balsamic glaze on the plate for a pop of color. Garnish with fresh parsley for a vibrant touch. This makes your dish look as good as it tastes!

Variations
Ingredient Swaps
You can switch up the cheese in this dish. Try mozzarella for a gooey texture. Feta adds a tangy kick. Goat cheese brings a creamy richness. Each choice changes the flavor.
Adding nuts like walnuts or pine nuts gives a nice crunch. Fresh herbs like basil or oregano can boost the taste. These swaps make your dish unique.
Dietary Adjustments
If you’re gluten-free, use crushed rice crackers instead of breadcrumbs. They work well and add a nice texture.
For a dairy-free option, try using cashew cream instead of cream cheese. Nutritional yeast can replace Parmesan for a cheesy flavor without dairy. These adjustments keep the dish tasty for everyone.
Storage Info
Refrigeration
Store any leftovers in an airtight container. This keeps the chicken fresh. It’s best to let the chicken cool first. Once cooled, place it in the fridge. Stuffed chicken can last up to three days in the fridge. After that, the taste and texture may change. Always check for any strange smells before eating.
Freezing
To freeze the stuffed chicken, wrap each piece tightly in plastic wrap. This helps prevent freezer burn. Place the wrapped chicken in a zip-top freezer bag. Label the bag with the date. You can freeze the chicken for up to three months. When you’re ready to eat, take it out of the freezer. Thaw it overnight in the fridge for best results.
To reheat, preheat your oven to 375°F (190°C). Place the chicken in a baking dish. Cover it with foil to keep it moist. Bake for about 20-25 minutes or until heated through. Enjoy your Mushroom Spinach Stuffed Chicken again with full flavor!
FAQs
How do I know when the chicken is fully cooked?
To check if your chicken is fully cooked, use a meat thermometer. Insert it into the thickest part of the chicken. The internal temperature should reach 165°F (75°C). If you don’t have a thermometer, cut into the chicken. The juices should run clear, not pink. Always ensure the chicken is firm to the touch.
Can I make this recipe ahead of time?
Yes, you can prepare this dish ahead of time. Stuff the chicken breasts and store them in the fridge for up to 24 hours. This makes dinner easy on busy nights. Just bake them when you’re ready. You can also freeze them for later. Wrap the stuffed chicken tightly in plastic wrap.
What sides go best with Mushroom Spinach Stuffed Chicken?
This dish pairs well with simple sides. Choose steamed vegetables like broccoli or green beans. A light salad with vinaigrette complements the flavors nicely. You can also serve it with mashed potatoes or rice. These sides balance the richness of the chicken.
Can I make this dish with other proteins?
Absolutely! You can use turkey breasts or pork chops for stuffing. Both work well with the mushroom and spinach mix. For a vegetarian option, try using large portobello mushrooms instead of meat. Each protein offers a new taste to enjoy.
In this blog post, we explored the tasty recipe for Mushroom Spinach Stuffed Chicken. We covered key ingredients like chicken, spinach, and cream cheese. You learned step-by-step instructions from preparation to baking. I also provided tips for perfect stuffing and serving ideas.
This dish is easy to make and great for any meal. Enjoy your kitchen time and impress your family with this delicious recipe!

Mushroom Spinach Stuffed Chicken
Ingredients
4 boneless, skinless chicken breasts
1 cup fresh spinach, chopped
1 cup mushrooms, finely chopped
½ cup cream cheese, softened
¼ cup grated Parmesan cheese
2 cloves garlic, minced
1 teaspoon dried thyme
1 teaspoon olive oil
Salt and pepper to taste
½ cup breadcrumbs (optional, for topping)
Fresh parsley, for garnish
Instructions
Preheat the oven to 375°F (190°C).
In a skillet over medium heat, add olive oil and sauté garlic for 1 minute until fragrant.
Add chopped mushrooms to the skillet and cook for 5-7 minutes until softened.
Stir in the chopped spinach and cook until wilted, about 2 minutes.
Remove from heat and let cool slightly. Then, mix in cream cheese, Parmesan cheese, thyme, and season with salt and pepper.
Prepare the chicken breasts by slicing a pocket into the side of each breast, being careful not to cut all the way through.
Stuff each chicken breast with the mushroom and spinach mixture, securing the opening with toothpicks if needed.
Place the stuffed chicken breasts on a greased baking dish. If using breadcrumbs, sprinkle them on top for added crunch.
Bake in the preheated oven for 25-30 minutes, or until the chicken is cooked through and reaches an internal temperature of 165°F (75°C).
Remove from the oven and let rest for 5 minutes before serving. Garnish with fresh parsley.
Prep Time: 15 min | Total Time: 45 min | Servings: 4

Mushroom Spinach Stuffed Chicken
Ingredients
- 4 pieces boneless, skinless chicken breasts
- 1 cup fresh spinach, chopped
- 1 cup mushrooms, finely chopped
- 0.5 cup cream cheese, softened
- 0.25 cup grated Parmesan cheese
- 2 cloves garlic, minced
- 1 teaspoon dried thyme
- 1 teaspoon olive oil
- to taste Salt and pepper
- 0.5 cup breadcrumbs (optional, for topping)
- to taste Fresh parsley, for garnish
Instructions
- Preheat the oven to 375°F (190°C).
- In a skillet over medium heat, add olive oil and sauté garlic for 1 minute until fragrant.
- Add chopped mushrooms to the skillet and cook for 5-7 minutes until softened.
- Stir in the chopped spinach and cook until wilted, about 2 minutes.
- Remove from heat and let cool slightly. Then, mix in cream cheese, Parmesan cheese, thyme, and season with salt and pepper.
- Prepare the chicken breasts by slicing a pocket into the side of each breast, being careful not to cut all the way through.
- Stuff each chicken breast with the mushroom and spinach mixture, securing the opening with toothpicks if needed.
- Place the stuffed chicken breasts on a greased baking dish. If using breadcrumbs, sprinkle them on top for added crunch.
- Bake in the preheated oven for 25-30 minutes, or until the chicken is cooked through and reaches an internal temperature of 165°F (75°C).
- Remove from the oven and let rest for 5 minutes before serving. Garnish with fresh parsley.


![To make this dish, you need fresh seafood and pasta. Here are the main ingredients: - 8 oz (225g) linguine or spaghetti - 1 lb (450g) shrimp, peeled and deveined - 1 lb (450g) scallops, patted dry These ingredients give you the perfect base for a seafood pasta that tastes like a dream. Seasoning can make or break your dish. Here are the key seasonings and additions: - 3 tablespoons olive oil, divided - 3 cloves garlic, minced - 1 cup cherry tomatoes, halved - 1 teaspoon red pepper flakes (adjust to taste) - 1 lemon, zested and juiced - 1 cup fresh spinach, roughly chopped - Salt and pepper to taste - Fresh parsley, chopped, for garnish These flavors blend beautifully, making your pasta lively and bright. You can use different types of pasta for this dish. I recommend: - Linguine - Spaghetti Both options work well. They hold the sauce nicely and pair well with the seafood. For a twist, try fettuccine or penne. Each adds its own charm to the dish. For the complete recipe, check out the [Full Recipe]. Start by filling a large pot with water. Add a pinch of salt to the water. Bring the water to a rolling boil. Once boiling, add 8 ounces of linguine or spaghetti. Cook it according to the package instructions until it's al dente. Before you drain it, save 1 cup of the pasta water. Drain the pasta and set it aside, keeping it warm. Grab a large skillet and place it over medium heat. Pour in 2 tablespoons of olive oil. Wait until the oil shimmers, then add 1 pound of shrimp, peeled and deveined. Cook the shrimp for about 2-3 minutes on each side. They should turn pink and opaque. Once done, use a slotted spoon to transfer the shrimp to a plate and set them aside. In the same skillet, add 1 tablespoon of olive oil. Gently place 1 pound of dry scallops in a single layer. Avoid crowding the pan. Sear the scallops for about 2-3 minutes without moving them. This helps form a golden crust. Flip the scallops over and sear the other side for another 2 minutes. Once cooked, remove them from the skillet and set them aside with the shrimp. Now it’s time to make the sauce. In the leftover oil, add 3 cloves of minced garlic and 1 teaspoon of red pepper flakes. Sauté for about 30 seconds until you smell the garlic. Be careful not to burn it! Then, add 1 cup of halved cherry tomatoes. Cook for 3-4 minutes until they soften and release their juices. Turn down the heat and stir in the juice and zest from 1 lemon. Add the cooked pasta directly to the skillet. Toss everything gently to combine. Use the reserved pasta water a little at a time. This creates a light, silky sauce. Toss in 1 cup of roughly chopped fresh spinach. Cook for 1 more minute until the spinach wilts. Carefully fold in the sautéed shrimp and scallops. Make sure they are evenly mixed throughout the pasta. Season with salt and pepper to taste. If you want more heat, add extra red pepper flakes. Now, plate the pasta in shallow bowls. Make sure each bowl has equal portions of seafood. Garnish with freshly chopped parsley for a colorful finish. Cooking shrimp and scallops just right is key. Shrimp cooks fast. It takes about 2-3 minutes per side. When they turn pink, they are done. Scallops need a little more time. Sear them for about 2-3 minutes on each side. They should have a nice golden crust. Keep an eye on them. Overcooked seafood can become tough. To boost the taste, try adding lemon zest and juice. This gives a fresh flavor. You can also toss in some fresh herbs like basil or dill. A pinch of red pepper flakes adds a nice kick. If you love cheese, sprinkle some grated Parmesan on top before serving. It melts beautifully over the warm pasta. Make your dish look as good as it tastes. Serve the pasta in shallow bowls. This allows the seafood to shine. Top with fresh parsley for a pop of color. You can also add a lemon wedge on the side for a bright touch. A drizzle of olive oil right before serving makes it look fancy. With these tips, your shrimp and scallop pasta will impress everyone at the table. For the full recipe, check above. {{image_4}} You can boost the nutrition of your shrimp and scallop pasta by adding vegetables. Fresh vegetables add color and flavor. Try these options: - Zucchini: Cut it into thin ribbons or small cubes. Sauté it for a few minutes until tender. - Bell Peppers: Slice them into strips and add them with the garlic for a sweet crunch. - Asparagus: Chop into pieces and add it in the last few minutes of cooking. - Broccoli: Steam it briefly before tossing it into the pasta for a healthy addition. Adding vegetables not only makes your meal more balanced, but it also adds great texture and flavor! While shrimp and scallops are delicious, you can mix up the proteins in this dish. Here are some tasty alternatives: - Chicken: Use bite-sized pieces of cooked chicken for a heartier meal. - Mussels: Add these tasty shellfish for a unique twist and a rich flavor. - Crab: Lump crab meat offers a sweet taste that pairs well with the pasta. Feel free to experiment with different proteins. Each option brings its own flavor and charm to the dish. Changing the sauce can completely alter the dish. Here are some sauce ideas to consider: - Creamy Alfredo: Replace the olive oil with heavy cream for a rich, creamy texture. - Pesto: Toss in fresh basil pesto before serving for a vibrant and herby flavor. - Tomato Sauce: Use a light marinara sauce for a classic Italian touch. Each sauce option adds a new layer of taste to your pasta. Explore these variations to find your favorite! For the complete recipe, check out the Full Recipe. To keep your shrimp and scallop pasta fresh, first let it cool. Place the pasta in an airtight container. Make sure to separate the seafood if possible. It helps keep everything fresh. Store it in the fridge for up to three days. This way, you can enjoy it later without losing flavor. When you are ready to eat, reheat the pasta gently. Use a skillet over low heat. Add a splash of water or olive oil to keep it moist. Stir frequently to heat evenly. This method helps keep the shrimp and scallops tender. Avoid using a microwave, as it can make them rubbery. You can freeze shrimp and scallop pasta if you want to save it longer. Use a freezer-safe container or bag. Make sure to remove as much air as possible. It will keep for up to two months. When you are ready to eat, thaw it in the fridge overnight. Reheat it slowly to keep the flavors and textures intact. For the full recipe, check the details above. I recommend using linguine or spaghetti for this dish. Both types hold the sauce well. Their long strands capture all the flavors from the shrimp and scallops. You want a pasta that balances with the seafood. Yes, frozen shrimp and scallops work great here. Just thaw them beforehand. This makes sure they cook evenly. The flavor stays fresh and delicious, even with frozen seafood. To make the dish less spicy, reduce or skip the red pepper flakes. You could also add a bit more lemon juice for a fresh taste. This will balance the flavor without adding heat. I suggest a light salad or garlic bread. A fresh green salad adds a nice crunch. Garlic bread complements the dish and soaks up the sauce well. Both options enhance your dining experience without overpowering it. You can find the full recipe for Seaside Delight Shrimp and Scallop Pasta in the earlier sections of this article. It provides all the details you need to create this tasty meal. In this blog post, we explored how to make delicious shrimp and scallop pasta. We reviewed main ingredients, seasonings, and pasta types. I shared step-by-step instructions, cooking times, and tips for flavor and presentation. We also discussed variations like adding vegetables and different sauces. Lastly, I provided storage methods and answered common FAQs. Cooking this dish can be easy and fun. You can impress your family and friends with your new skills. Enjoy creating and tasting your pasta dish!](https://dailydishlab.com/wp-content/uploads/2025/06/c6436c47-e976-4ac6-abd7-ac1aef5e871c-768x768.webp)
![To make Lemon Dill Grilled Salmon, you need a few simple yet fresh ingredients. Here’s the list: - Fresh Salmon Fillets - Fresh Dill - Lemon - Garlic - Olive Oil - Honey - Seasoning: Salt and Pepper - Lemon Slices for Garnish Each ingredient plays a key role in creating the bright and delicious taste of this dish. Fresh salmon fillets give you a rich flavor and perfect texture. The fresh dill adds a fragrant herb note that pairs well with the fish. Lemon provides the zesty brightness that cuts through the richness of the salmon. Garlic gives depth, while olive oil adds a smooth finish. Honey balances the flavors with just a hint of sweetness. Finally, salt and pepper enhance everything, and lemon slices make for a lovely garnish. You can find the full recipe with detailed steps to prepare this dish easily. Enjoy the process of cooking and savor the delightful taste! - In a mixing bowl, combine the chopped dill, lemon zest, lemon juice, minced garlic, olive oil, honey, salt, and pepper. - Whisk the ingredients together until well blended to create a marinade. This step is key. The mix of flavors will soak into the salmon. - Place the salmon fillets in a resealable plastic bag or shallow dish. Pour the marinade over the top. - Seal the bag or cover the dish. This ensures the salmon gets coated well. Marinate in the refrigerator for 30 minutes to 1 hour for maximum flavor. The longer you marinate, the more taste you get. - Preheat your grill to medium-high heat. This helps cook the salmon evenly. - Remove the salmon from the marinade and let any excess drip off. Discard the marinade for safety. - Grease the grill grates with a little olive oil. This helps prevent sticking. - Place the salmon fillets skin-side down on the grill. Grill for 4-6 minutes without moving them. This allows the skin to become crispy. - Carefully flip the salmon fillets using a wide spatula. Grill for an additional 4-6 minutes. The fish should be opaque and flake easily with a fork. Adjust the time based on the thickness of your fillets. - Remove the salmon from the grill and let it rest for a couple of minutes. Resting helps keep it juicy. - Serve the grilled salmon garnished with fresh lemon slices and a sprinkle of additional dill if desired. Enjoy the fresh taste! For the complete recipe, check out the Full Recipe link. To enhance flavor with the marinade, use fresh ingredients. Fresh dill, garlic, and lemon add zest to the salmon. Combine these ingredients in a bowl and whisk until well mixed. This step makes every bite burst with flavor. Marinating is key, too. Let the salmon sit in the marinade for at least 30 minutes. This time allows the flavors to soak in deeply. For best results, aim for one hour. To prevent sticking on the grill, grease the grates with olive oil. This simple tip helps the salmon slide off easily. Place the salmon skin-side down on the grill first. Grill for 4-6 minutes without moving it. This helps the skin get crispy. To check for doneness, look for opaque flesh that flakes easily. If your salmon is thick, it may need a bit more time. Always use a wide spatula when flipping. This supports the fillet and keeps it intact. For a complete meal, pair your salmon with fresh vegetables or a light salad. Steamed asparagus or roasted broccoli complement the dish well. You can also serve it with rice or quinoa for a filling side. Don’t forget to garnish with lemon slices. They add a bright touch and extra flavor. Enjoy your delicious meal! For the full recipe, check out the detailed steps above. {{image_2}} Alternative Herbs and Spices You can switch up the herbs in this dish. Try fresh parsley or basil instead of dill. These herbs add unique tastes and aromas. Adding a pinch of red pepper flakes gives a bit of heat. This twist can make your salmon extra special. Different Citrus Options Lemon is great, but don’t stop there. Use lime or orange juice for a different kick. Each citrus option brings its own flavor. You can mix citrus juices for a fun blend. This variation makes the dish exciting and fresh. Oven-Baked Lemon Dill Salmon Baking salmon is simple and tasty. Preheat your oven to 375°F. Place the marinated salmon on a baking sheet. Bake for 15 to 20 minutes. Check for flakiness to know when it's done. This method keeps the salmon moist and flavorful. Pan-Seared Lemon Dill Salmon Pan-searing gives a crispy outer layer. Heat oil in a pan over medium heat. Add the salmon skin-side down and cook for 4-5 minutes. Flip and cook for another 4-5 minutes. This method enhances the flavor and adds a nice texture. Low-Carb and Keto Options This recipe is already low in carbs. You can keep it keto-friendly by using healthy fats. Olive oil works great here. You can also serve it with low-carb veggies like zucchini or asparagus. Gluten-Free Modifications This dish is naturally gluten-free. Just make sure all your ingredients are gluten-free. Check the labels on the olive oil and honey. This way, you can enjoy this dish without any worries. For the full recipe, check the earlier section and get started on this delicious meal! After grilling your lemon dill salmon, you may have some leftovers. To keep your salmon fresh, follow these best practices for refrigeration: - Cool it down first. Let the salmon reach room temperature before storing. - Use an airtight container. This helps prevent odors and keeps the salmon moist. - Refrigerate within two hours. This keeps bacteria from growing. If you want to enjoy your salmon later, freezing is a great option. Here's how to freeze salmon safely: - Wrap each fillet tightly. Use plastic wrap or aluminum foil to prevent freezer burn. - Place in a freezer bag. Squeeze out as much air as possible before sealing. - Label and date it. This helps you keep track of how long it’s been in the freezer. When it's time to enjoy your leftover salmon, reheating correctly is key to keeping the flavor and texture. Here are some recommended methods: - Oven method: Preheat your oven to 275°F (135°C). Place the salmon on a baking sheet and cover it with foil. Heat for about 15 minutes. - Stovetop method: Heat a non-stick skillet over medium-low heat. Add a splash of water or broth. Place the salmon in the skillet, cover, and heat for 5-7 minutes. To maintain the flavor and texture, avoid using a microwave. Microwaving can dry out the salmon and make it tough. Enjoy your delicious lemon dill grilled salmon again with these easy tips. And don't forget to check out the Full Recipe for more details! Marinating salmon for 30 minutes to 1 hour works best. This time allows the flavors to soak in without overpowering the fish. If you marinate for too long, the texture may change. Always keep it in the fridge while marinating to keep it fresh. Yes, you can use dried dill instead of fresh. Use about one-third of the amount since dried herbs are stronger. Fresh dill gives a brighter flavor, but dried dill still works well in a pinch. Grill your salmon at medium-high heat, around 375°F to 400°F. This heat helps create a nice sear while keeping the inside tender. If your grill runs hotter, reduce the heat slightly. - What if my salmon fillets are thick or thin? For thick fillets, increase the grilling time by a few minutes. For thin fillets, decrease the time. Always check for doneness by seeing if the fish flakes easily with a fork. Salmon is rich in omega-3 fatty acids, which are good for your heart. It also has high-quality protein that helps build muscle. Salmon is packed with vitamins like B12, D, and selenium. Eating salmon can boost brain health and improve mood. For the full recipe, please refer to [Full Recipe]. This blog post gives you the keys to grill perfect salmon. We covered essential ingredients, marinating tips, and grilling techniques. With the right marinade and careful cooking, you'll impress at every meal. Plus, explore tasty variations to keep it fresh and exciting. Store leftovers smartly and reheat without losing flavor. By following these steps, you can enjoy delicious salmon that is healthy and easy to make. Embrace these tips to make every salmon dish a hit!](https://dailydishlab.com/wp-content/uploads/2025/06/c925202d-eb72-4cda-aa67-938206b6f665-768x768.webp)
