No-Bake Chocolate Mint Oreo Bars Easy Dessert Recipe

Get ready to treat your taste buds with the easiest no-bake dessert! In this article, I’ll show you how to whip up No-Bake Chocolate Mint Oreo Bars that are rich, creamy, and oh-so-delicious. Perfect for any occasion, this recipe requires no baking and uses simple ingredients. Join me as we dive into the step-by-step process, tips, and even some fun variations to make these bars your own. You won’t want to miss this!
Why I Love This Recipe
- Decadent Flavor: The combination of chocolate and mint creates a rich and refreshing taste that is simply irresistible.
- No-Bake Convenience: This recipe requires no baking, making it perfect for warm days or when you’re short on time.
- Easy to Make: With just a few simple steps and ingredients, anyone can whip up these delicious bars.
- Customizable: Add your favorite toppings or adjust the mint flavor to suit your taste preferences.
Ingredients
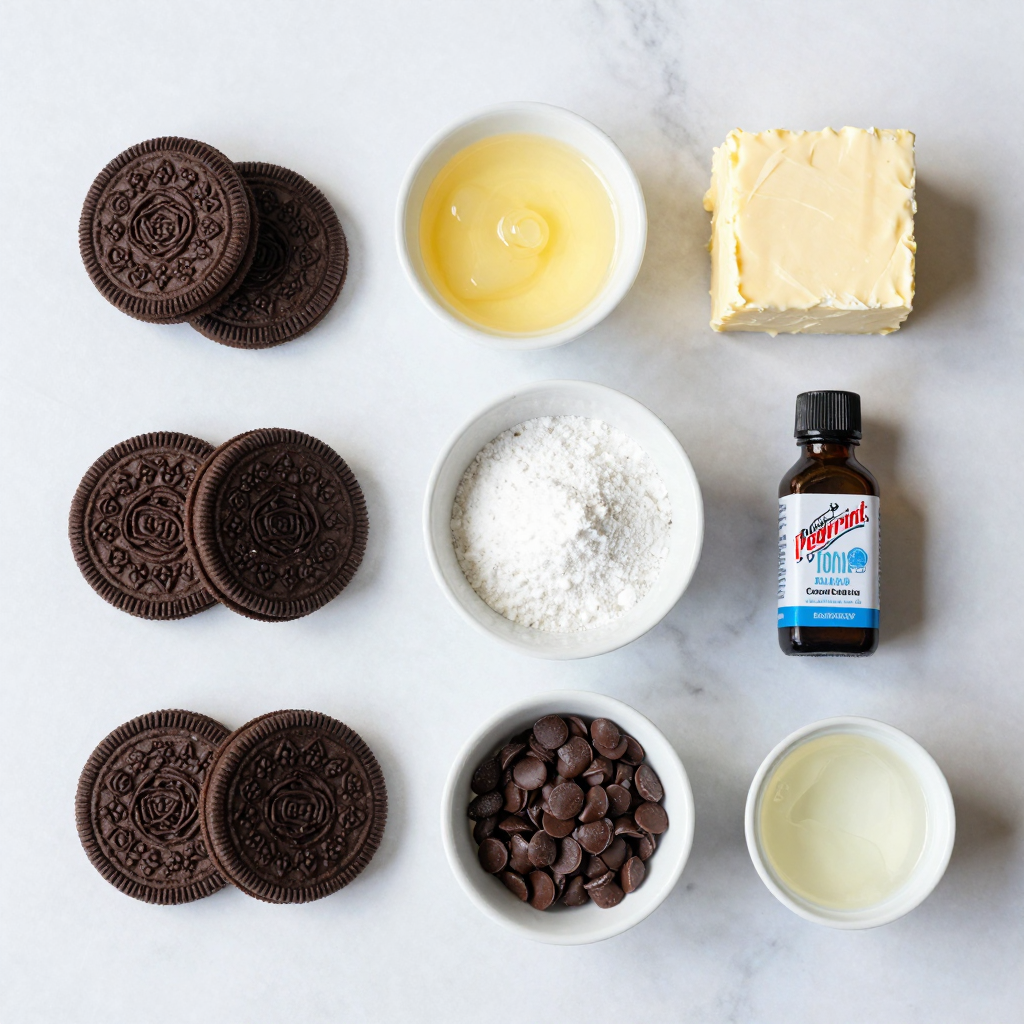
List of Ingredients for No-Bake Chocolate Mint Oreo Bars
To make these tasty bars, you need:
- 24 Oreo cookies (plus extra for topping)
- 1/2 cup unsalted butter, melted
- 1/2 cup cream cheese, softened
- 1 cup powdered sugar
- 1/2 teaspoon peppermint extract
- 1 cup semi-sweet chocolate chips
- 2 tablespoons coconut oil
Optional Toppings
You can add some fun toppings to enhance your bars. Try these:
- Crushed Oreos for texture
- Mint leaves for a fresh touch
- Drizzled chocolate for extra richness
Ingredient Substitutions
If you don’t have some ingredients, don’t worry! Here are a few swaps:
- Use gluten-free cookies if needed.
- Swap cream cheese with Greek yogurt for a lighter option.
- Use dark chocolate chips for a richer flavor.
- Replace coconut oil with any neutral oil, like vegetable oil.
These simple swaps keep your dessert delicious and fun!

Step-by-Step Instructions
How to Prepare the Oreo Base
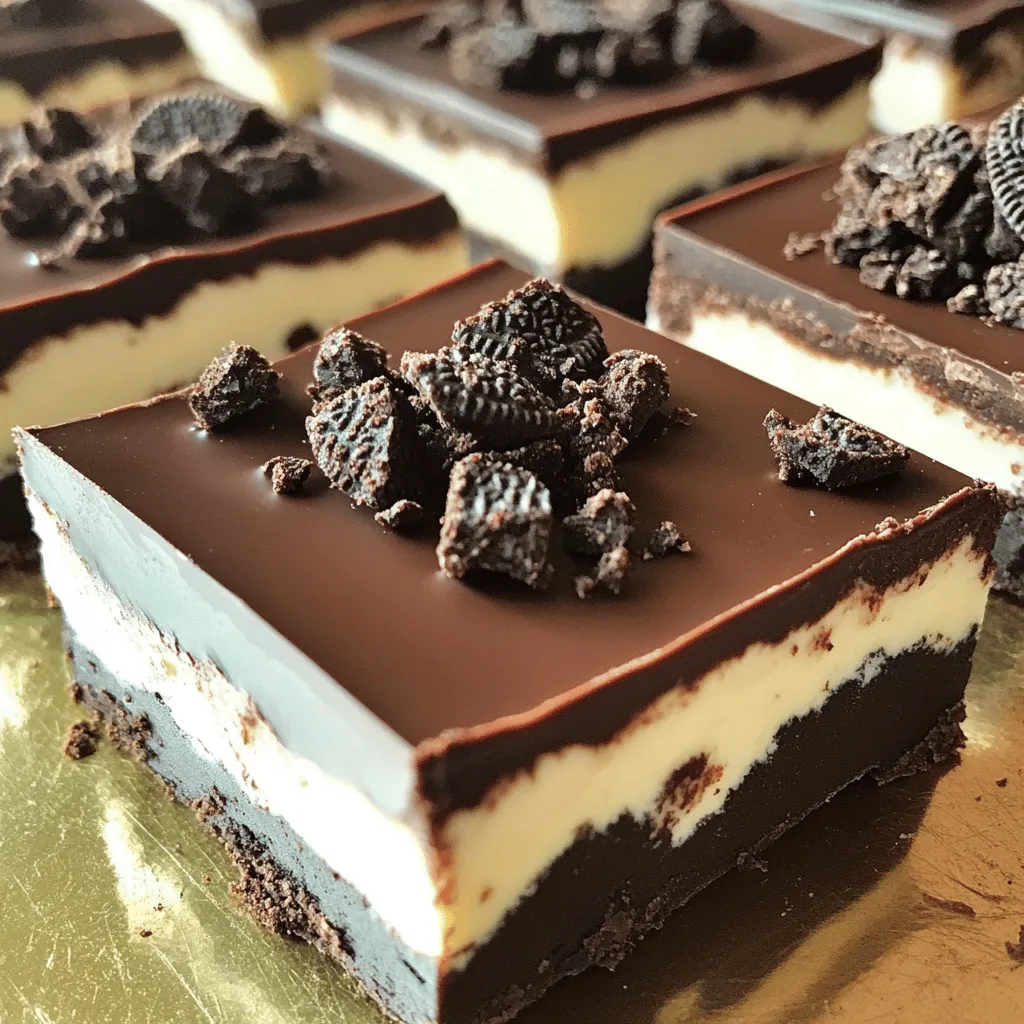
Start by crushing 24 Oreo cookies in a food processor. You want fine crumbs. If you don’t have a food processor, place them in a zip-top bag and crush them with a rolling pin. Next, in a large bowl, mix the crushed cookies with 1/2 cup of melted unsalted butter. Stir until the mixture looks like wet sand. This will be your base. Press this mixture firmly into the bottom of a 9×9 inch baking pan. Make sure it’s even and compact. After that, place the pan in the fridge to chill while you prepare the filling.
Instructions for the Cream Cheese Filling
In a medium bowl, beat 1/2 cup of softened cream cheese until it’s smooth. Gradually add in 1 cup of powdered sugar and 1/2 teaspoon of peppermint extract. Mix well until fully combined. This filling should be creamy and light. Once your Oreo base is ready from the fridge, spread this cream cheese mixture over it. Use a spatula to get an even layer. This creamy layer adds a nice minty flavor that pairs perfectly with the Oreo base.
Melting and Adding the Chocolate Topping
Now, it’s time to melt the chocolate. In a microwave-safe bowl, combine 1 cup of semi-sweet chocolate chips and 2 tablespoons of coconut oil. Microwave this mixture in 30-second intervals. Stir after each interval until it’s smooth and fully melted. Once melted, pour the chocolate evenly over the cream cheese layer. Use a spatula to spread it out smoothly. For a fun touch, crumble some extra Oreo cookies on top of the melted chocolate. This adds texture and looks great! After you finish this step, cover the pan with plastic wrap. Chill in the fridge for at least 2 hours, or until firm.
Pro Tips
- Use Room Temperature Cream Cheese: Make sure your cream cheese is at room temperature for a smoother filling. This ensures it blends seamlessly with the powdered sugar and peppermint extract.
- Chill Your Bars Properly: Allow the bars to chill for the full 2 hours or until firm. This helps them set properly and makes cutting into squares much easier.
- Experiment with Extracts: While peppermint is classic, try using almond or vanilla extract for a different flavor profile in the cream cheese layer.
- Microwave in Intervals: When melting chocolate, microwave in 30-second intervals and stir frequently to prevent burning. This helps achieve a smooth consistency.
Tips & Tricks
How to Achieve the Best Texture
To get the best texture for your No-Bake Chocolate Mint Oreo Bars, follow these tips:
- Crush the Oreo cookies finely. This makes a smooth base.
- Mix the melted butter well with the crumbs. It should feel like wet sand.
- Press the crust firmly into the pan. A compact base holds the bars together.
- Let the bars chill longer if they feel too soft. The filling needs time to set well.
Common Mistakes to Avoid
Here are common mistakes to watch out for:
- Not crushing the Oreos enough. Large chunks can make the crust crumbly.
- Forgetting to soften the cream cheese. Cold cream cheese won’t mix well.
- Overheating the chocolate. Melt it slowly to keep it smooth and shiny.
- Skipping the chilling time. These bars taste best when fully set.
Recommended Tools for Preparation
Using the right tools makes this recipe easier:
- A food processor is great for crushing Oreos quickly.
- A large mixing bowl helps combine the filling ingredients well.
- A 9×9 inch baking pan works perfectly for this recipe.
- A spatula helps spread the chocolate evenly over the bars.
- Plastic wrap is handy for covering the pan while chilling.

Variations
Alternative Flavor Combinations
You can change the flavor of these bars easily. Instead of mint, try using orange extract. This gives a fresh, citrus twist. You can also use almond extract for a nutty flavor. If you want a fruity touch, consider adding raspberry or strawberry puree to the cream cheese layer. Each of these flavors brings a new taste to the dessert. Experimenting with flavors keeps your dessert fun and exciting.
Gluten-Free Version
To make gluten-free Oreo bars, use gluten-free cookies. Many brands offer gluten-free Oreo-style cookies. The rest of the recipe stays the same. Just remember to check all other ingredients for gluten. This way, you can enjoy the dessert without worry. You still get the same rich taste and creamy texture. Everyone will love them, even if they need to avoid gluten.
Vegan Adaptation
You can also make these bars vegan! Use vegan cream cheese instead of regular cream cheese. Substitute coconut oil for the butter. Make sure to choose vegan chocolate chips. This way, you keep the rich flavors while making it plant-based. Your friends who follow a vegan diet will enjoy these bars too. They are a great treat for everyone, regardless of dietary needs.
Storage Info
How to Store No-Bake Bars
Store your No-Bake Chocolate Mint Oreo Bars in an airtight container. This keeps them fresh and tasty. Make sure to place parchment paper between layers. This prevents sticking. You can keep them in the fridge for best results.
Freezing Instructions
You can freeze these bars for later. Cut them into squares before freezing. Wrap each square in plastic wrap. Then, place them in a freezer-safe bag. They will stay good for up to three months. To eat, just thaw in the fridge overnight.
Shelf Life and Best Practices
These bars can last in the fridge for about five days. Make sure to check for any signs of spoilage. If you notice any changes in smell or texture, it’s best to throw them away. Always use clean utensils when serving to keep them fresh longer. Enjoy them chilled for the best taste!
FAQs
Can I use different cookies for the base?
Yes, you can use different cookies. Try chocolate wafers or graham crackers. Each option gives a unique taste. Just crush them well, like you do with Oreos.
How long do these bars last in the refrigerator?
These bars can last up to one week in the fridge. Just make sure to cover them. They taste great even after a few days!
Can I make this recipe in advance?
Absolutely! You can make these bars a day or two ahead of time. This gives the flavors time to blend. Just store them in the fridge until you’re ready to serve.
What can I replace the cream cheese with?
You can use Greek yogurt or a non-dairy cream cheese. Both options work well. They keep the bars creamy without changing the flavor too much.
How to serve No-Bake Chocolate Mint Oreo Bars?
Cut the bars into squares and serve chilled. You can add whipped cream or extra cookie crumbs on top. This makes them look fancy and more fun to eat!
To make No-Bake Chocolate Mint Oreo Bars, you need simple ingredients and clear steps. I shared easy recipes and tips for the best texture. You can even explore fun variations like gluten-free or vegan options.
In closing, whether you are new to baking or an expert, this dessert is easy and delicious. You can store these bars for later or share them with friends. Enjoy the process and have fun making these tasty treats!

No-Bake Chocolate Mint Oreo Bars
Ingredients
24 Oreo cookies (plus extra for topping)
1/2 cup unsalted butter, melted
1/2 cup cream cheese, softened
1 cup powdered sugar
1/2 teaspoon peppermint extract
1 cup semi-sweet chocolate chips
2 tablespoons coconut oil
Instructions
Prepare the Base: Crush 24 Oreo cookies in a food processor until fine crumbs form.
Mix the Crust: In a large bowl, combine the crushed Oreo cookies with melted unsalted butter. Stir until the mixture resembles wet sand.
Set the Base: Press the Oreo mixture evenly into the bottom of a 9×9 inch baking pan. Make sure it is compact. Place in the fridge to set while preparing the filling.
Make the Filling: In a medium bowl, beat the softened cream cheese until smooth. Gradually add in powdered sugar and peppermint extract, mixing until well combined.
Spread the Filling: Remove the base from the refrigerator and spread the cream cheese mixture evenly over the Oreo crust.
Melt the Chocolate: In a microwave-safe bowl, combine semi-sweet chocolate chips and coconut oil. Microwave in 30-second intervals, stirring after each, until melted and smooth.
Top the Bars: Pour the melted chocolate evenly over the cream cheese layer. Gently spread it with a spatula to ensure full coverage.
Add Toppings: Crumble extra Oreo cookies on top of the melted chocolate for added texture and decoration.
Chill: Cover the baking pan with plastic wrap and refrigerate for at least 2 hours or until firm.
Serve: Once set, cut into squares and serve chilled.
Prep Time: 20 minutes | Total Time: 2 hours 20 minutes (includes chilling) | Servings: 16 squares

No-Bake Chocolate Mint Oreo Bars
Ingredients
- 24 cookies Oreo cookies (plus extra for topping)
- 0.5 cup unsalted butter, melted
- 0.5 cup cream cheese, softened
- 1 cup powdered sugar
- 0.5 teaspoon peppermint extract
- 1 cup semi-sweet chocolate chips
- 2 tablespoons coconut oil
Instructions
- Prepare the Base: Crush 24 Oreo cookies in a food processor until fine crumbs form.
- Mix the Crust: In a large bowl, combine the crushed Oreo cookies with melted unsalted butter. Stir until the mixture resembles wet sand.
- Set the Base: Press the Oreo mixture evenly into the bottom of a 9x9 inch baking pan. Make sure it is compact. Place in the fridge to set while preparing the filling.
- Make the Filling: In a medium bowl, beat the softened cream cheese until smooth. Gradually add in powdered sugar and peppermint extract, mixing until well combined.
- Spread the Filling: Remove the base from the refrigerator and spread the cream cheese mixture evenly over the Oreo crust.
- Melt the Chocolate: In a microwave-safe bowl, combine semi-sweet chocolate chips and coconut oil. Microwave in 30-second intervals, stirring after each, until melted and smooth.
- Top the Bars: Pour the melted chocolate evenly over the cream cheese layer. Gently spread it with a spatula to ensure full coverage.
- Add Toppings: Crumble extra Oreo cookies on top of the melted chocolate for added texture and decoration.
- Chill: Cover the baking pan with plastic wrap and refrigerate for at least 2 hours or until firm.
- Serve: Once set, cut into squares and serve chilled.

![To make these delicious scones, gather the following ingredients: - 2 cups all-purpose flour - 1/3 cup granulated sugar - 1 tablespoon baking powder - 1/4 teaspoon salt - 1/2 cup unsalted butter, chilled and cubed - 1/2 cup heavy cream - 1 large egg - 1 teaspoon vanilla extract - 1 cup fresh raspberries - 1/2 cup white chocolate chips You can customize your scones with some fun add-ins. Here are a few ideas: - 1/2 cup chopped nuts, like pecans or walnuts - 1/2 teaspoon cinnamon for a warm spice note - Zest from 1 lemon or orange for a citrus twist - A handful of dark chocolate chips for a richer flavor Using fresh, high-quality ingredients makes a big difference. For the best results, choose: - Flour: Go for a good brand of all-purpose flour. This helps with texture. - Butter: Use unsalted butter. It gives you control over the salt in your recipe. - Raspberries: Fresh raspberries are key. Look for plump, firm berries. - Chocolate: Choose high-quality white chocolate chips. They melt well and taste great. These choices enhance the flavor and texture of your scones. For an easy guide, check out the Full Recipe for more details. 1. Preheat your oven to 400°F (200°C). Line a baking sheet with parchment paper. 2. In a large bowl, whisk together the flour, sugar, baking powder, and salt. 3. Add the chilled butter to the dry mix. Use your fingers or a pastry cutter to blend until the mix looks like coarse crumbs. 4. In another bowl, whisk the cream, egg, and vanilla together. 5. Pour the cream mix into the flour mix. Stir gently until just combined. Do not overmix! 6. Fold in the fresh raspberries and white chocolate chips. Make sure they are evenly spread. 7. Turn the dough onto a floured surface. Knead gently a few times until it comes together. 8. Pat the dough into a circle about 1 inch thick. Cut it into 8 wedges with a sharp knife or pizza cutter. 9. Place the wedges on the baking sheet, leaving space between each. 10. Bake for 15-20 minutes until golden brown on top. 11. Remove from the oven. Let them cool slightly on a wire rack before serving. - Step 1: Make sure your oven is fully preheated. This helps the scones rise well. - Step 3: Keep the butter cold. This gives the scones a nice flaky texture. - Step 5: Mixing too much makes the scones tough. Mix until you see no dry flour. - Step 6: Gently fold, so you keep the raspberries whole. This adds a juicy burst of flavor. - Overmixing the dough: This results in tough scones. Mix just until combined. - Skipping the chilling: Cold ingredients help create a better texture. Don’t skip the cold butter! - Not measuring ingredients: Use exact measurements for the best results. Baking is a science. - Ignoring baking time: Check your scones at 15 minutes. They should be golden, not burnt. For the complete recipe, check out the Full Recipe section above. To make the best raspberry white chocolate scones, follow a few simple steps. First, keep your butter very cold. This helps create a fluffy texture. I suggest cubing the butter and chilling it before use. Second, mix the dry and wet ingredients gently. Overmixing makes scones tough, and we want them light and airy. Lastly, shape your dough carefully. Pat it down without pressing too hard to keep air pockets inside. Serve these scones warm for the best taste. You can dust them with powdered sugar for a sweet touch. Pair them with clotted cream for richness. If you like, add fresh raspberries on the side for extra flavor. These scones also shine at brunch or tea time, making them perfect for any gathering. Raspberry white chocolate scones go well with many drinks. A nice cup of Earl Grey tea complements their sweetness. You can also enjoy them with a light lemonade or even coffee. For spreads, try a tart raspberry jam to balance the sweetness. Each pairing enhances the flavors of the scones, making each bite delightful. For the full recipe, visit the [Full Recipe]. {{image_2}} You can play with the flavors of your scones. Instead of raspberries, try blueberries or strawberries for a fresh twist. You may also swap white chocolate for dark chocolate or milk chocolate. Each option gives a new taste. If you like nuts, add chopped almonds or pecans to the mix. These small changes can make a big difference. If you need gluten-free scones, use a gluten-free flour blend. Many blends work well in baking. Look for one that has xanthan gum. This will help the scones hold their shape. You can also use almond flour or coconut flour, but adjust the liquid in the recipe. These flours add a different flavor and texture. You can change the flavors with the seasons. In fall, add chopped apples and cinnamon for a warm taste. Winter calls for cranberry and orange zest. In spring, use lemon zest and poppy seeds for a bright, fresh flavor. Summer is perfect for peaches or cherries. Each season brings new fruits to enjoy in your scones. For the complete recipe, check the Full Recipe section. To keep your Raspberry White Chocolate Scones fresh, store them in an airtight container. This helps maintain their soft texture and delightful flavor. Place a piece of parchment paper between layers to prevent sticking. You can keep them at room temperature for up to two days. If you want to store them longer, the fridge is a good option, but it may dry them out a bit. When you're ready to enjoy your scones again, reheating is easy. Preheat your oven to 350°F (175°C). Place the scones on a baking sheet. Warm them for about 5-7 minutes. This will bring back their fresh-baked taste. You can also microwave them for about 10-15 seconds, but this might make them a bit soft. Freezing is a great way to save scones for later. Allow the scones to cool completely. Then, wrap each scone in plastic wrap. Place them in a freezer bag or container. They will stay fresh for up to three months. When you want to eat them, thaw overnight in the fridge. Then, reheat as mentioned above. This way, you can enjoy these tasty treats anytime! For the complete recipe, check out the Full Recipe. You can tell scones are done when they turn golden brown. The tops should feel firm to the touch. A toothpick inserted into the center should come out clean. If it has dough on it, bake them a bit longer. These signs help ensure your Raspberry White Chocolate Scones are baked just right! Yes, you can make the dough ahead of time! Chill the dough for up to 24 hours in the fridge. Wrap it tightly in plastic wrap. When you’re ready to bake, simply cut the dough into wedges and bake as directed. This saves time and lets you enjoy fresh scones at your convenience. If you need a substitute for white chocolate, try using dark chocolate chips or milk chocolate chips. You can also use dried fruit like cherries or apricots for a different flavor. Each option adds a unique twist to the scone. Experiment and find what you like best! For the complete recipe and specific steps, check the Full Recipe. We explored how to make perfect scones from scratch. We covered key ingredients, detailed instructions, and helpful tips. I shared common mistakes to avoid and fun variations to try. Storing and reheating tips ensure you enjoy fresh scones longer. Baking scones is easy and rewarding. With practice, your scones will impress everyone. Get creative and enjoy this tasty treat!](https://dailydishlab.com/wp-content/uploads/2025/07/7e56670c-1729-4c97-bf35-067a569313c1-768x768.webp)


