No-Bake Chocolate Peanut Butter Krispie Cups Delight

- 1 cup creamy peanut butter - 1/2 cup honey or maple syrup - 3 cups crispy rice cereal - 1 cup dark chocolate chips - 1/4 cup coconut oil - 1/4 teaspoon sea salt - Optional toppings: crushed peanuts, sea salt flakes, or mini chocolate chips To create these No-Bake Chocolate Peanut Butter Krispie Cups, you need simple ingredients. Start with creamy peanut butter. It gives a rich taste and smooth texture. Honey or maple syrup adds sweetness. Choose what you like best. The crispy rice cereal gives a nice crunch. Using dark chocolate chips adds a deep flavor. Coconut oil helps melt the chocolate smoothly. The sea salt helps balance the sweetness. You can also add toppings for extra fun. Crushed peanuts, sea salt flakes, or mini chocolate chips work great. Gather these ingredients before you start. It makes the cooking process much easier. You can find most of these items at your local store. Now, you are ready to make a tasty treat! First, take a medium saucepan. Place it on low heat. Add 1 cup of creamy peanut butter and 1/2 cup of honey or maple syrup. Stir continuously until it melts. This should take just a few minutes. Remove the saucepan from the heat when it is smooth and well mixed. Next, grab a large mixing bowl. Pour in 3 cups of crispy rice cereal. Take the melted peanut butter mixture and pour it over the cereal. Sprinkle in 1/4 teaspoon of sea salt. Mix it all together until each piece of cereal gets coated. This step is key for flavor. Now, return to the same saucepan. Add 1 cup of dark chocolate chips and 1/4 cup of coconut oil. Heat this on low while stirring. You want it to melt completely and become creamy. Once smooth, it’s ready to use. Line a muffin tin with paper liners. Spoon the peanut butter cereal mix into each liner. Press down to make a strong base, filling each liner halfway. Now, spoon the melted chocolate over the cereal layer in each cup. Make sure to cover it completely. You can add optional toppings like crushed peanuts or sea salt flakes on top for extra crunch. Finally, put the muffin tin in the fridge for at least 30 minutes. This helps the cups set. Once firm, gently remove them from the liners and enjoy! To make great layers in your cups, start with the peanut butter mix. Make sure you press it down well in each muffin liner. A tight base holds everything together. Next, pour the melted chocolate on top. Be sure to cover the peanut butter mix fully. This keeps the layers clean and tasty. You can sprinkle some crushed peanuts or sea salt on top, too. These add crunch and flavor. If you need to swap ingredients, there are great options. Use almond butter or sunflower seed butter instead of peanut butter. For sweeteners, maple syrup works well if you want a different taste. You can also use light corn syrup if you prefer. For the cereal, you can choose puffed rice or even granola. Just keep the same amount, so it stays crunchy. Melting chocolate can be tricky, but here are some tips. Always use low heat to avoid burning. Stir the chocolate chips often as they melt. You can add a bit of coconut oil to make it smooth. If the chocolate hardens too fast, just warm it again gently. Using a double boiler works well, too. This method helps control the heat and makes melting easier. {{image_2}} You can easily make these cups nut-free. Simply swap the peanut butter for sun butter or soy nut butter. Both options give you similar creaminess without any nuts. This way, everyone can enjoy the treat, even those with nut allergies. For a vegan version, use maple syrup instead of honey. Also, choose dairy-free chocolate chips. Combine these swaps for a tasty, plant-based delight. You won't lose any of the yummy flavor. Want to spice things up? Try adding extras like mini marshmallows or shredded coconut. You can also mix in some crispy cereal bits for a fun crunch. Another great idea is to add a dash of cinnamon or a splash of vanilla extract. These small changes make your cups unique and exciting. You can store your No-Bake Chocolate Peanut Butter Krispie Cups in an airtight container. Keep them in the fridge for the best taste and texture. This helps them stay fresh and firm. The cool air keeps the chocolate from melting and the cups from losing shape. If you want to keep them longer, freezing is a great option. Place each cup in a single layer in a freezer-safe container. You can also wrap them in plastic wrap first. When you want to eat them, let them thaw in the fridge for a few hours. This keeps their flavor rich and delicious. These tasty cups last about a week in the fridge. For frozen cups, they can stay good for up to three months. However, I recommend enjoying them within a month for the best taste. After that, the texture may change and not be as pleasant. Enjoy your treats while they are still fresh! Yes, you can use other nut butters. Almond butter and cashew butter work well. You can also try sunflower seed butter for a nut-free option. Each nut butter will change the taste a bit. Choose one you enjoy. To make these cups gluten-free, use gluten-free crispy rice cereal. Always check the label. Most brands offer gluten-free options. This small change keeps your dessert safe for all. If your chocolate hardens too fast, try melting it over low heat. You can also add a bit more coconut oil. This will help keep it smooth and creamy. Stir it well to mix. Yes, you can make these cups ahead of time. They store well in the fridge for up to a week. You can also freeze them for longer storage. Just let them thaw before serving. You learned how to craft no-bake chocolate peanut butter cups. We covered all the ingredients needed and gave clear step-by-step instructions. I shared tips to help you make the best cups and offered some creative variations to try. Store your treats well, and enjoy the options for flavors. These cups are easy, fun, and perfect for sharing. Now, get started and treat yourself!

WANT TO SAVE THIS RECIPE?

Get ready for a treat that’s both easy and delicious! My No-Bake Chocolate Peanut Butter Krispie Cups are a perfect sweet snack. With creamy peanut butter, crispy rice cereal, and rich dark chocolate, these cups will please your taste buds. Plus, they come together in no time. Let’s dive into the simple steps and enjoy a delightful dessert that you and your family will love!

Ingredients

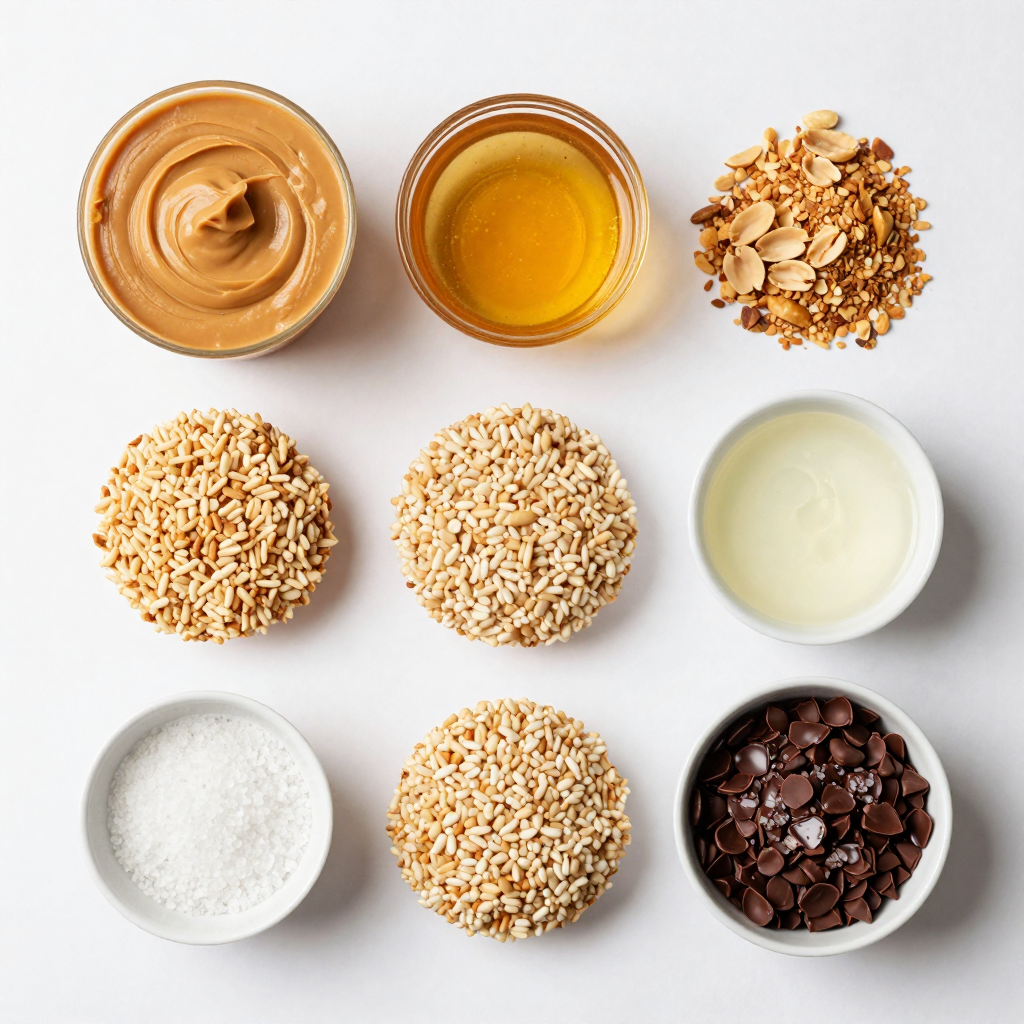
List of Required Ingredients

  • 1 cup creamy peanut butter
  • 1/2 cup honey or maple syrup
  • 3 cups crispy rice cereal
  • 1 cup dark chocolate chips
  • 1/4 cup coconut oil
  • 1/4 teaspoon sea salt
  • Optional toppings: crushed peanuts, sea salt flakes, or mini chocolate chips

To create these No-Bake Chocolate Peanut Butter Krispie Cups, you need simple ingredients. Start with creamy peanut butter. It gives a rich taste and smooth texture. Honey or maple syrup adds sweetness. Choose what you like best.

The crispy rice cereal gives a nice crunch. Using dark chocolate chips adds a deep flavor. Coconut oil helps melt the chocolate smoothly. The sea salt helps balance the sweetness. You can also add toppings for extra fun. Crushed peanuts, sea salt flakes, or mini chocolate chips work great.

Gather these ingredients before you start. It makes the cooking process much easier. You can find most of these items at your local store. Now, you are ready to make a tasty treat!
Step-by-Step Instructions

Preparing the Peanut Butter Mixture

First, take a medium saucepan. Place it on low heat. Add 1 cup of creamy peanut butter and 1/2 cup of honey or maple syrup. Stir continuously until it melts. This should take just a few minutes. Remove the saucepan from the heat when it is smooth and well mixed.

Combining the Cereal

Next, grab a large mixing bowl. Pour in 3 cups of crispy rice cereal. Take the melted peanut butter mixture and pour it over the cereal. Sprinkle in 1/4 teaspoon of sea salt. Mix it all together until each piece of cereal gets coated. This step is key for flavor.

Creating the Chocolate Layer

Now, return to the same saucepan. Add 1 cup of dark chocolate chips and 1/4 cup of coconut oil. Heat this on low while stirring. You want it to melt completely and become creamy. Once smooth, it’s ready to use.

Setting the Cups in the Refrigerator

Line a muffin tin with paper liners. Spoon the peanut butter cereal mix into each liner. Press down to make a strong base, filling each liner halfway. Now, spoon the melted chocolate over the cereal layer in each cup. Make sure to cover it completely. You can add optional toppings like crushed peanuts or sea salt flakes on top for extra crunch. Finally, put the muffin tin in the fridge for at least 30 minutes. This helps the cups set. Once firm, gently remove them from the liners and enjoy!

Tips & Tricks

How to Make Perfectly Layered Cups

To make great layers in your cups, start with the peanut butter mix. Make sure you press it down well in each muffin liner. A tight base holds everything together. Next, pour the melted chocolate on top. Be sure to cover the peanut butter mix fully. This keeps the layers clean and tasty. You can sprinkle some crushed peanuts or sea salt on top, too. These add crunch and flavor.

Substitutions for Ingredients

If you need to swap ingredients, there are great options. Use almond butter or sunflower seed butter instead of peanut butter. For sweeteners, maple syrup works well if you want a different taste. You can also use light corn syrup if you prefer. For the cereal, you can choose puffed rice or even granola. Just keep the same amount, so it stays crunchy.

Best Practices for Melting Chocolate

Melting chocolate can be tricky, but here are some tips. Always use low heat to avoid burning. Stir the chocolate chips often as they melt. You can add a bit of coconut oil to make it smooth. If the chocolate hardens too fast, just warm it again gently. Using a double boiler works well, too. This method helps control the heat and makes melting easier.

Variations

Nut-Free Option

You can easily make these cups nut-free. Simply swap the peanut butter for sun butter or soy nut butter. Both options give you similar creaminess without any nuts. This way, everyone can enjoy the treat, even those with nut allergies.

Vegan Version

For a vegan version, use maple syrup instead of honey. Also, choose dairy-free chocolate chips. Combine these swaps for a tasty, plant-based delight. You won’t lose any of the yummy flavor.

Flavor Add-Ins: Suggestions

Want to spice things up? Try adding extras like mini marshmallows or shredded coconut. You can also mix in some crispy cereal bits for a fun crunch. Another great idea is to add a dash of cinnamon or a splash of vanilla extract. These small changes make your cups unique and exciting.

Storage Info

How to Store No-Bake Chocolate Peanut Butter Krispie Cups

You can store your No-Bake Chocolate Peanut Butter Krispie Cups in an airtight container. Keep them in the fridge for the best taste and texture. This helps them stay fresh and firm. The cool air keeps the chocolate from melting and the cups from losing shape.

Freezing Instructions

If you want to keep them longer, freezing is a great option. Place each cup in a single layer in a freezer-safe container. You can also wrap them in plastic wrap first. When you want to eat them, let them thaw in the fridge for a few hours. This keeps their flavor rich and delicious.

Shelf Life and Best Use Timeline

These tasty cups last about a week in the fridge. For frozen cups, they can stay good for up to three months. However, I recommend enjoying them within a month for the best taste. After that, the texture may change and not be as pleasant. Enjoy your treats while they are still fresh!

FAQs

Can I use other types of nut butter?

Yes, you can use other nut butters. Almond butter and cashew butter work well. You can also try sunflower seed butter for a nut-free option. Each nut butter will change the taste a bit. Choose one you enjoy.

How can I make these gluten-free?

To make these cups gluten-free, use gluten-free crispy rice cereal. Always check the label. Most brands offer gluten-free options. This small change keeps your dessert safe for all.

What can I do if the chocolate hardens too quickly?

If your chocolate hardens too fast, try melting it over low heat. You can also add a bit more coconut oil. This will help keep it smooth and creamy. Stir it well to mix.

Can I make these ahead of time for parties?

Yes, you can make these cups ahead of time. They store well in the fridge for up to a week. You can also freeze them for longer storage. Just let them thaw before serving.

You learned how to craft no-bake chocolate peanut butter cups. We covered all the ingredients needed and gave clear step-by-step instructions. I shared tips to help you make the best cups and offered some creative variations to try.

Store your treats well, and enjoy the options for flavors. These cups are easy, fun, and perfect for sharing. Now, get started and treat yourself!

- 1 cup creamy peanut butter - 1/2 cup honey or maple syrup - 3 cups crispy rice cereal - 1 cup dark chocolate chips - 1/4 cup coconut oil - 1/4 teaspoon sea salt - Optional toppings: crushed peanuts, sea salt flakes, or mini chocolate chips To create these No-Bake Chocolate Peanut Butter Krispie Cups, you need simple ingredients. Start with creamy peanut butter. It gives a rich taste and smooth texture. Honey or maple syrup adds sweetness. Choose what you like best. The crispy rice cereal gives a nice crunch. Using dark chocolate chips adds a deep flavor. Coconut oil helps melt the chocolate smoothly. The sea salt helps balance the sweetness. You can also add toppings for extra fun. Crushed peanuts, sea salt flakes, or mini chocolate chips work great. Gather these ingredients before you start. It makes the cooking process much easier. You can find most of these items at your local store. Now, you are ready to make a tasty treat! First, take a medium saucepan. Place it on low heat. Add 1 cup of creamy peanut butter and 1/2 cup of honey or maple syrup. Stir continuously until it melts. This should take just a few minutes. Remove the saucepan from the heat when it is smooth and well mixed. Next, grab a large mixing bowl. Pour in 3 cups of crispy rice cereal. Take the melted peanut butter mixture and pour it over the cereal. Sprinkle in 1/4 teaspoon of sea salt. Mix it all together until each piece of cereal gets coated. This step is key for flavor. Now, return to the same saucepan. Add 1 cup of dark chocolate chips and 1/4 cup of coconut oil. Heat this on low while stirring. You want it to melt completely and become creamy. Once smooth, it’s ready to use. Line a muffin tin with paper liners. Spoon the peanut butter cereal mix into each liner. Press down to make a strong base, filling each liner halfway. Now, spoon the melted chocolate over the cereal layer in each cup. Make sure to cover it completely. You can add optional toppings like crushed peanuts or sea salt flakes on top for extra crunch. Finally, put the muffin tin in the fridge for at least 30 minutes. This helps the cups set. Once firm, gently remove them from the liners and enjoy! To make great layers in your cups, start with the peanut butter mix. Make sure you press it down well in each muffin liner. A tight base holds everything together. Next, pour the melted chocolate on top. Be sure to cover the peanut butter mix fully. This keeps the layers clean and tasty. You can sprinkle some crushed peanuts or sea salt on top, too. These add crunch and flavor. If you need to swap ingredients, there are great options. Use almond butter or sunflower seed butter instead of peanut butter. For sweeteners, maple syrup works well if you want a different taste. You can also use light corn syrup if you prefer. For the cereal, you can choose puffed rice or even granola. Just keep the same amount, so it stays crunchy. Melting chocolate can be tricky, but here are some tips. Always use low heat to avoid burning. Stir the chocolate chips often as they melt. You can add a bit of coconut oil to make it smooth. If the chocolate hardens too fast, just warm it again gently. Using a double boiler works well, too. This method helps control the heat and makes melting easier. {{image_2}} You can easily make these cups nut-free. Simply swap the peanut butter for sun butter or soy nut butter. Both options give you similar creaminess without any nuts. This way, everyone can enjoy the treat, even those with nut allergies. For a vegan version, use maple syrup instead of honey. Also, choose dairy-free chocolate chips. Combine these swaps for a tasty, plant-based delight. You won't lose any of the yummy flavor. Want to spice things up? Try adding extras like mini marshmallows or shredded coconut. You can also mix in some crispy cereal bits for a fun crunch. Another great idea is to add a dash of cinnamon or a splash of vanilla extract. These small changes make your cups unique and exciting. You can store your No-Bake Chocolate Peanut Butter Krispie Cups in an airtight container. Keep them in the fridge for the best taste and texture. This helps them stay fresh and firm. The cool air keeps the chocolate from melting and the cups from losing shape. If you want to keep them longer, freezing is a great option. Place each cup in a single layer in a freezer-safe container. You can also wrap them in plastic wrap first. When you want to eat them, let them thaw in the fridge for a few hours. This keeps their flavor rich and delicious. These tasty cups last about a week in the fridge. For frozen cups, they can stay good for up to three months. However, I recommend enjoying them within a month for the best taste. After that, the texture may change and not be as pleasant. Enjoy your treats while they are still fresh! Yes, you can use other nut butters. Almond butter and cashew butter work well. You can also try sunflower seed butter for a nut-free option. Each nut butter will change the taste a bit. Choose one you enjoy. To make these cups gluten-free, use gluten-free crispy rice cereal. Always check the label. Most brands offer gluten-free options. This small change keeps your dessert safe for all. If your chocolate hardens too fast, try melting it over low heat. You can also add a bit more coconut oil. This will help keep it smooth and creamy. Stir it well to mix. Yes, you can make these cups ahead of time. They store well in the fridge for up to a week. You can also freeze them for longer storage. Just let them thaw before serving. You learned how to craft no-bake chocolate peanut butter cups. We covered all the ingredients needed and gave clear step-by-step instructions. I shared tips to help you make the best cups and offered some creative variations to try. Store your treats well, and enjoy the options for flavors. These cups are easy, fun, and perfect for sharing. Now, get started and treat yourself!
No-Bake Chocolate Peanut Butter Krispie Cups

Indulge in the delightful combination of chocolate and peanut butter with these No-Bake Chocolate Peanut Butter Krispie Cups! This easy recipe requires just a few simple ingredients and is perfect for satisfying your sweet tooth. In only 45 minutes, you can whip up a batch of these delicious treats that everyone will love. Click through to discover the full recipe and enjoy a bite-sized treat that’s both fun and flavorful!

Ingredients
  

1 cup creamy peanut butter

1/2 cup honey or maple syrup

3 cups crispy rice cereal

1 cup dark chocolate chips

1/4 cup coconut oil

1/4 teaspoon sea salt

Optional toppings: crushed peanuts, sea salt flakes, or mini chocolate chips

Instructions
 

In a medium saucepan over low heat, combine the peanut butter and honey (or maple syrup). Stir continuously until melted and well combined. Remove from heat.

    In a large mixing bowl, add the crispy rice cereal and pour the melted peanut butter mixture over it. Add the sea salt and mix until the cereal is evenly coated.

      Line a muffin tin with paper liners. Spoon the peanut butter cereal mixture into each liner, pressing down to form a compact layer at the bottom. Fill each liner to about halfway.

        In the same saucepan, melt the dark chocolate chips and coconut oil over low heat, stirring until smooth and creamy.

          Spoon the melted chocolate over the peanut butter cereal layer in each muffin liner, covering it completely.

            Sprinkle optional toppings such as crushed peanuts or sea salt flakes on top of the chocolate layer for extra flavor and crunch.

              Place the muffin tin in the refrigerator for at least 30 minutes to allow the cups to set completely. Once firm, remove from the liners and serve.

                Prep Time: 15 minutes | Total Time: 45 minutes | Servings: 12 cups

                  WANT TO SAVE THIS RECIPE?

                  Related Posts