
Looking for a refreshing dessert that requires no baking? You’ve come to the right place! My No-Bake Key Lime Pie Bars are easy to whip up and perfect for any occasion. With zesty lime flavor and a crunchy crust, these bars will impress your friends and family. In this guide, I’ll show you all the ingredients, steps, and tips to make this delicious treat. Get ready to enjoy a slice of sunshine!
Why I Love This Recipe
- Refreshing Flavor: The bright, tangy taste of key lime juice makes these bars a perfect treat for warm days.
- No-Bake Convenience: With no baking required, these bars are quick and easy to prepare, saving time in the kitchen.
- Creamy Texture: The fluffy whipped cream mixed into the filling creates a luscious, smooth texture that melts in your mouth.
- Perfect for Sharing: These bars cut easily into squares, making them a delightful dessert to share at gatherings and parties.
Ingredients
Essential Ingredients for No-Bake Key Lime Pie Bars
To make these delicious bars, you need some key ingredients. Here’s a simple list:
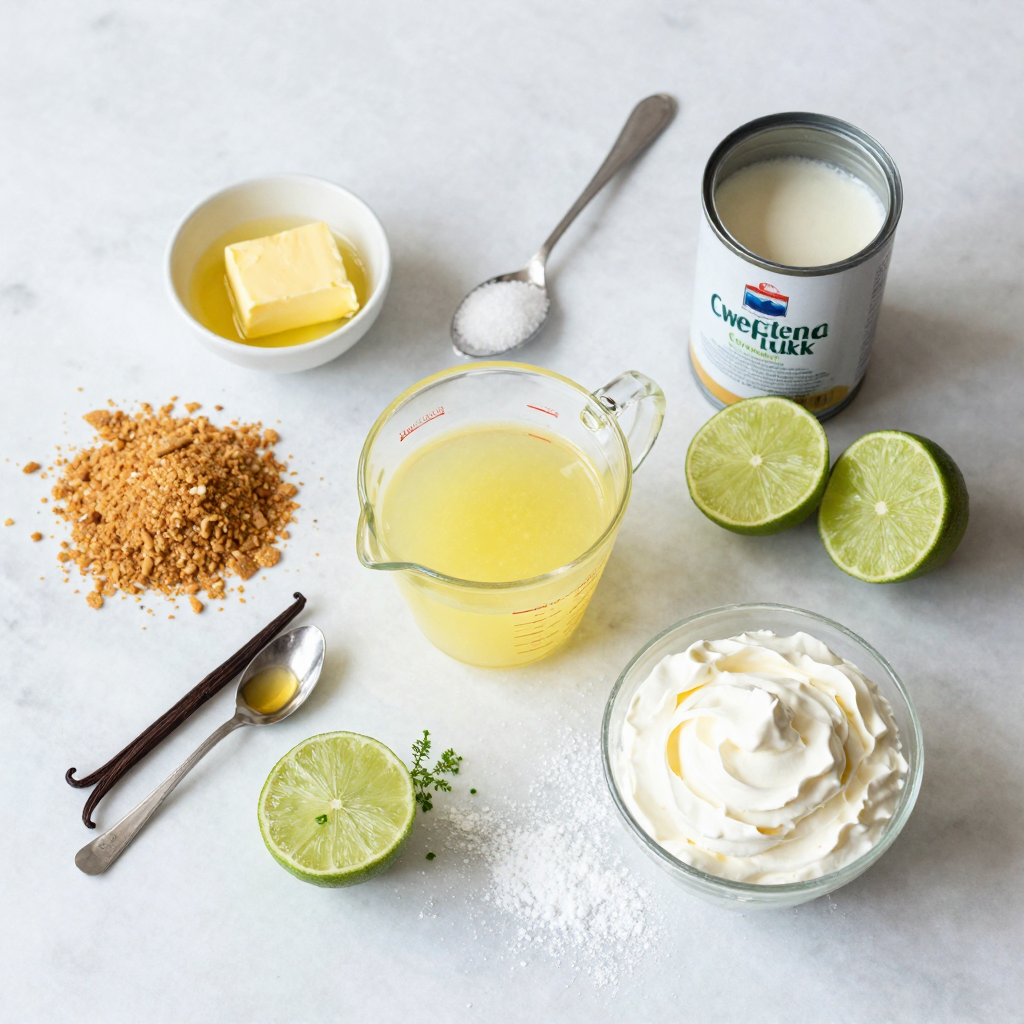
– 1 ½ cups graham cracker crumbs
– ½ cup unsalted butter, melted
– 1 tablespoon sugar
– 1 can (14 oz) sweetened condensed milk
– ½ cup fresh key lime juice (about 5-6 limes)
– Zest of 2 key limes
– 1 teaspoon vanilla extract
– 1 cup heavy whipping cream
– 2 tablespoons powdered sugar
These ingredients create a smooth and creamy filling with a crunchy crust. The fresh key lime juice gives it that bright, zesty flavor we all love.
Optional Garnishes and Toppings
While the bars taste amazing on their own, you can make them even better with a few garnishes. Here are some fun options:
– Key lime slices
– Whipped cream
These toppings add a nice touch and make your dessert look pretty. Plus, they enhance the tart flavor.
Ingredient Substitutions
If you don’t have all the ingredients, don’t worry! Here are a few swaps you can try:
– Use regular lime juice if you can’t find key limes.
– Swap melted butter with coconut oil for a different flavor.
– Substitute heavy cream with coconut cream for a dairy-free option.
These substitutions can still keep the taste close to the original while giving you a chance to try something new. Cooking is all about creativity!
Step-by-Step Instructions
Preparing the Graham Cracker Crust
To start, gather your ingredients. You need graham cracker crumbs, melted butter, and sugar. In a medium bowl, mix the crumbs, butter, and sugar. Keep mixing until it looks like wet sand. This is your crust. Next, take a 9×9-inch baking dish. Pour the crust mix into it. Press it down firmly. Use the back of a measuring cup for a smooth layer.
Making the Key Lime Filling
Now, let’s make the filling. Take a large bowl and add sweetened condensed milk. Squeeze in fresh key lime juice. You need about 5-6 limes for half a cup. Add the zest of 2 limes and vanilla extract. Whisk this mix until it’s smooth and creamy. In another bowl, whip the heavy cream with a mixer. Beat it until soft peaks form. Gradually add powdered sugar and keep whipping until the peaks are stiff.
Assembling and Chilling the Bars
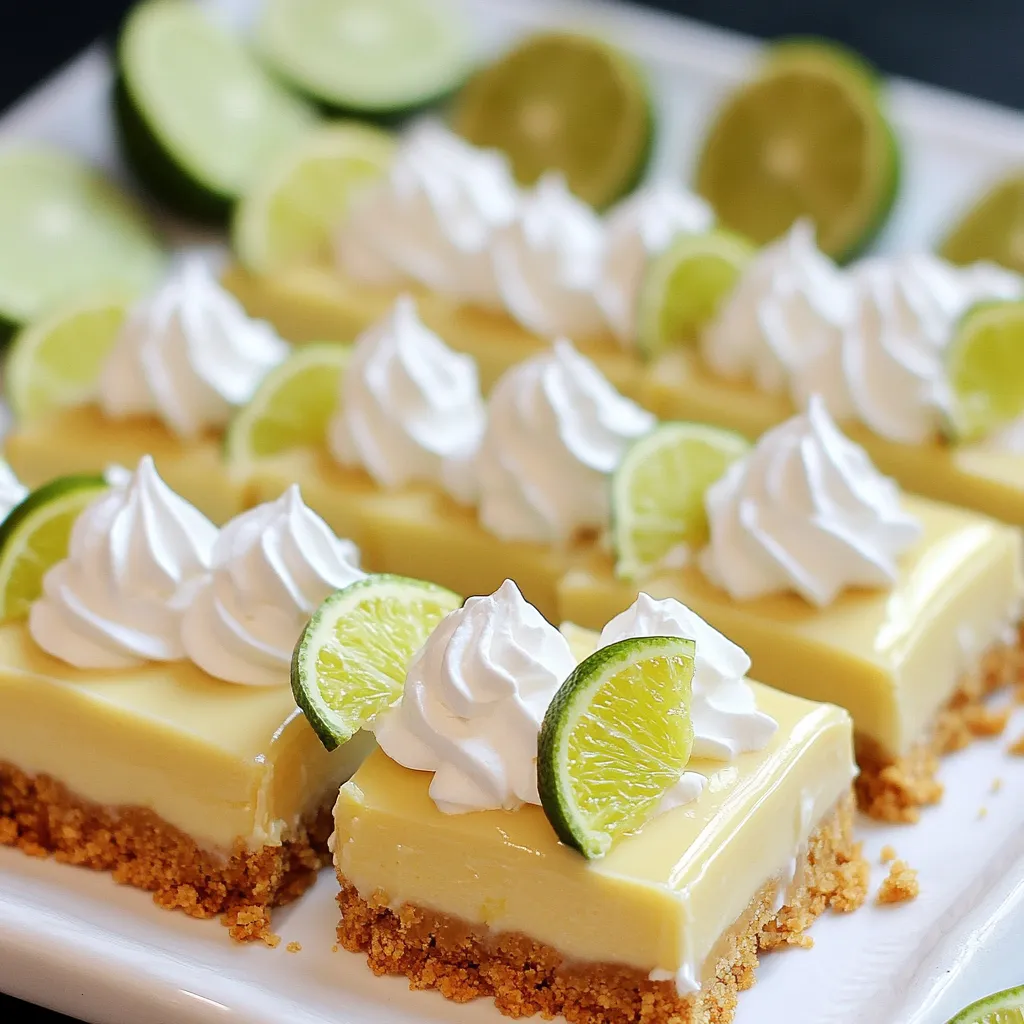
Gently fold the whipped cream into the key lime mixture. Make sure there are no streaks left. Now, pour this filling over the crust. Spread it evenly. Cover the dish with plastic wrap. Place it in the fridge for at least 4 hours. This helps the bars set. Once they are firm, slice them into squares. If you like, top each square with key lime slices and a dollop of whipped cream. Enjoy your refreshing dessert!
Pro Tips
- Use Fresh Limes: Always opt for fresh key limes instead of bottled juice for the best flavor.
- Chill Thoroughly: Ensure the pie bars are completely chilled and set before slicing for clean edges.
- Whip Cream to Stiff Peaks: Whipping the cream to stiff peaks provides a light and airy texture to the filling.
- Presentation Matters: Garnish with lime slices and whipped cream for an appealing presentation that enhances enjoyment.
Tips & Tricks
Perfecting the Graham Cracker Crust
To create a great graham cracker crust, you need the right texture. Start with 1 ½ cups of graham cracker crumbs. Mix this with ½ cup of melted unsalted butter and 1 tablespoon of sugar. The mix should feel like wet sand. Press it firmly into a 9×9-inch baking dish. Using the back of a measuring cup helps make it smooth. You want a crust that holds up well. Allow it to chill while you prepare the filling.
Achieving the Best Filling Texture
For the best filling, use a large mixing bowl. Combine one 14 oz can of sweetened condensed milk with ½ cup of fresh key lime juice. Add the zest of 2 key limes and 1 teaspoon of vanilla extract. Whisk these ingredients until smooth. The key is to blend well but not overmix. In another bowl, whip 1 cup of heavy cream until soft peaks form. Gradually add 2 tablespoons of powdered sugar. Then, whip until stiff peaks form. Gently fold the whipped cream into the key lime mixture. This will create a light and airy filling.
Serving Suggestions for Key Lime Bars
When ready to serve, slice the chilled bars into squares. For a fun touch, garnish with key lime slices and a dollop of whipped cream. Arrange the bars on a platter, with lime slices around the edges. This adds color and makes it look inviting. These bars are perfect for summer gatherings or any celebration. Enjoy the refreshing taste and share with friends!
Variations
Different Citrus Options
You can switch up the flavor by using other citrus fruits. Try lemon or orange juice for a different taste. Each option brings its own unique twist. Lemon gives a bright zing, while orange adds a sweet note. Feel free to mix and match to find your favorite.
Dairy-Free Alternatives
If you want a dairy-free version, there are great options. Use coconut cream instead of heavy cream for a rich texture. Substitute sweetened condensed milk with coconut condensed milk. This keeps the bars creamy and adds a hint of coconut flavor.
Other Add-Ins or Flavor Enhancements
Get creative with add-ins and enhance the flavor! You can mix in some shredded coconut for texture. Add a handful of crushed mint leaves for a fresh twist. Another great idea is to fold in some crushed berries for a fruity surprise. These tweaks make the bars even more fun and tasty!
Storage Info
Best Ways to Store No-Bake Key Lime Pie Bars
To keep your No-Bake Key Lime Pie Bars fresh, store them in the fridge. Place them in an airtight container. This helps to prevent them from absorbing any odors from the fridge. If you make a large batch, slice the bars before storing. This way, it’s easy to grab a piece when you want one.
How Long Can You Keep Them?
You can keep these bars in the fridge for up to five days. Make sure to check for any signs of spoilage. If you notice any changes, it’s best to toss them out. If you want to store them longer, freezing is a great option.
Tips for Freezing and Thawing
To freeze your No-Bake Key Lime Pie Bars, follow these steps:
– Wrap each slice: Use plastic wrap to cover each bar tightly.
– Place in a container: Put the wrapped bars in a freezer-safe container.
– Label and date: Write the date on the container so you know when you froze them.
You can freeze the bars for up to two months. When you are ready to eat them, take them out of the freezer. Let them thaw in the fridge for a few hours. This keeps them nice and creamy. Enjoy your delicious treat whenever you like!
FAQs
Can I use bottled key lime juice instead of fresh?
Yes, you can use bottled key lime juice. It saves time and adds flavor. However, fresh juice gives the best taste. Fresh key lime juice is more vibrant and tart. If you want pure flavor, go for fresh limes.
How do I know when the bars are set?
You can tell the bars are set when they are firm to the touch. After chilling for at least four hours, check the edges. If they feel solid, the bars are ready. You can also insert a knife; it should come out clean.
Can I make these bars ahead of time?
Absolutely! These bars are great for making in advance. You can prepare them up to two days ahead. Just store them in the fridge until you are ready to serve. This makes them perfect for parties or gatherings.
No-bake key lime pie bars are simple and delicious. We discussed essential ingredients, tips for the perfect crust, and how to make a creamy filling. You can switch up the flavors or add cool toppings to fit your taste. Proper storage keeps these treats fresh longer. Remember, using fresh key lime juice makes a big difference. Enjoy making these easy bars, and share them with friends for smiles all around!


