
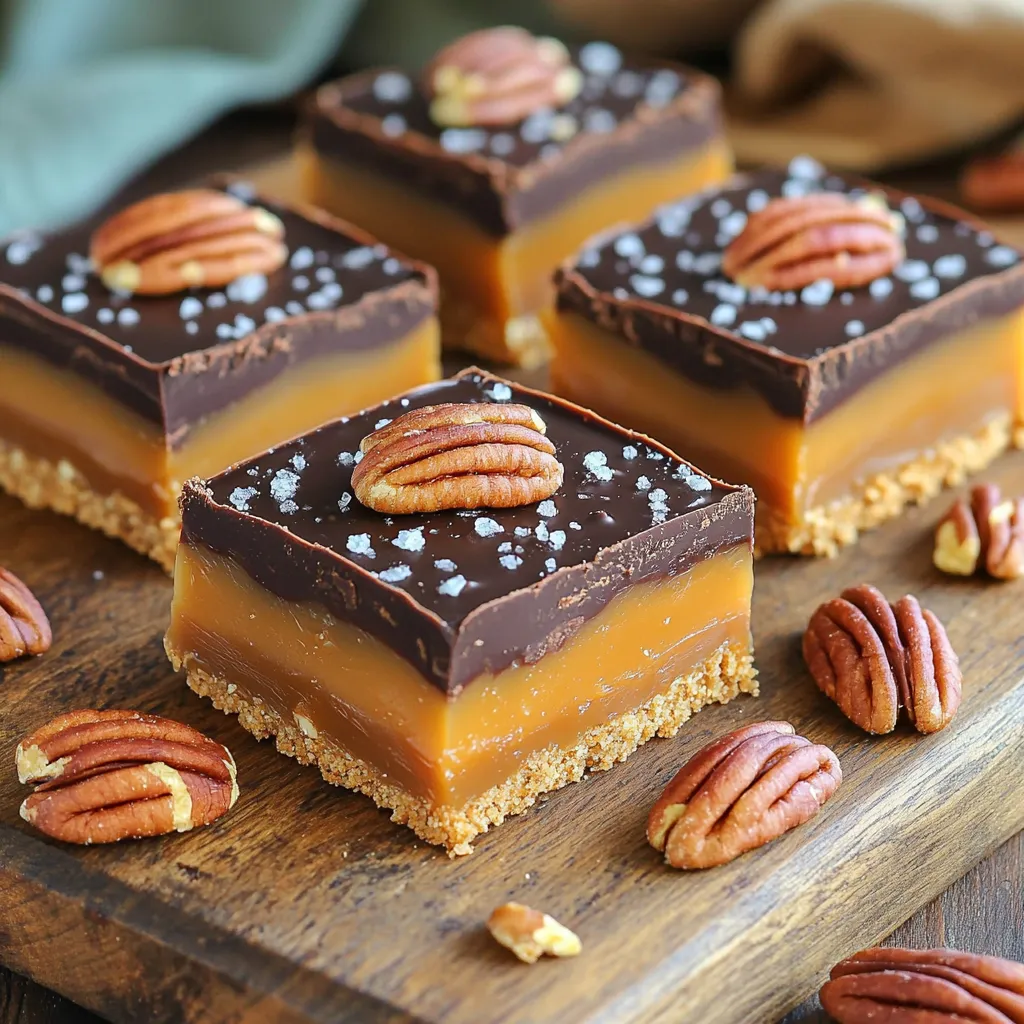
Want to indulge in a rich, sweet treat without turning on the oven? Discover my No-Bake Salted Caramel Turtle Bars, a perfect dessert delight! These simple bars blend graham cracker crust, creamy caramel, and smooth chocolate for a heavenly flavor combo. Plus, they come together in just a few easy steps. Ready to impress your friends and family with this delicious no-bake dessert? Let’s dive in!
Why I Love This Recipe
- Decadent Layers: These bars combine a crunchy graham cracker base, gooey caramel filling, and rich chocolate, creating a delightful texture and flavor experience.
- No-Bake Convenience: This recipe doesn’t require any baking, making it perfect for warm days or when you’re short on time.
- Customizable Nuts: You can easily swap pecans for walnuts or other nuts, allowing you to tailor the recipe to your taste preferences.
- Impressive Presentation: These bars are not only delicious but also visually stunning, making them a great choice for entertaining or special occasions.
Ingredients
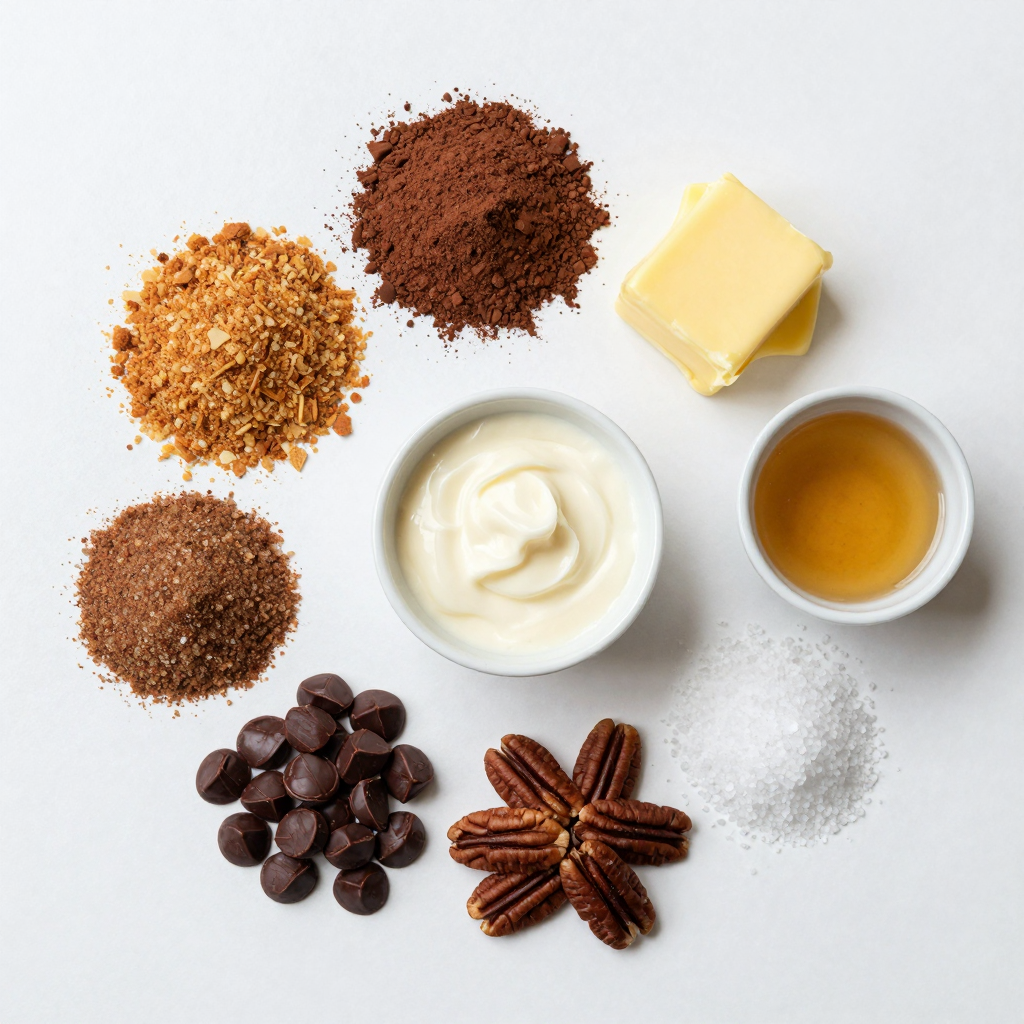
List of Ingredients
– 1 ½ cups graham cracker crumbs
– ½ cup unsweetened cocoa powder
– 1 cup unsalted butter, melted
– 1 cup brown sugar, packed
– 1 cup sweetened condensed milk
– 1 cup semi-sweet chocolate chips
– 1 cup pecans, chopped (or walnuts)
– 1 teaspoon vanilla extract
– ½ teaspoon sea salt
– Additional sea salt for topping
For these no-bake salted caramel turtle bars, you need a mix of sweet and salty flavors. The graham cracker crumbs and cocoa powder create a tasty base. You will also need melted butter, which helps bind everything together. Brown sugar adds sweetness, while sweetened condensed milk brings richness and creaminess.
The chocolate chips will top the bars, giving a smooth finish. Chopped pecans or walnuts add a nice crunch and flavor. Don’t forget the vanilla extract and sea salt, as they enhance the taste. Use extra sea salt for the top to balance the sweetness.
These simple ingredients make a delicious treat that everyone will love.
Step-by-Step Instructions
Preparing the Base
To start, grab a mixing bowl. Combine 1 ½ cups of graham cracker crumbs and ½ cup of unsweetened cocoa powder. This mix gives the bars a rich flavor. Next, stir in 1 cup of melted butter and 1 cup of packed brown sugar. Mix until it looks like wet sand. This will be your base layer, so make sure it’s well combined.
Pressing the Base
Now, take an 8×8 inch square pan and line it with parchment paper. Leave some paper hanging over the edges for easy lifting later. Firmly press the graham cracker mixture into the bottom of the pan. You want it even and compact. After pressing, pop it in the fridge. Let it firm up while you make the filling.
Making the Caramel Filling
For the caramel filling, use a medium saucepan. Heat 1 cup of sweetened condensed milk, 1 cup of unsalted butter, and 1 teaspoon of vanilla extract over medium heat. Stir the mixture continuously. You want it to bubble and thicken, which takes about 5-7 minutes. This step is key for a creamy filling.
Assembling the Bars
Once the caramel thickens, remove it from heat. Fold in 1 cup of chopped pecans or walnuts. Pour this delicious caramel mixture over your graham cracker base. Spread it evenly with a spatula. Don’t forget to sprinkle ½ teaspoon of sea salt on top for that perfect sweet and salty combo.
Melting the Chocolate Topping
Next, melt 1 cup of semi-sweet chocolate chips. Use a microwave-safe bowl and heat in 30-second bursts. Stir in between each session until smooth. Once melted, pour the chocolate over the caramel layer. Spread it out evenly to cover everything.
Final Steps
Now, return the pan to the fridge. Chill for at least 2 hours, or until set. After chilling, lift the bars out of the pan using the parchment paper. Cut them into squares and sprinkle some extra sea salt on top. These bars are sure to impress!
Pro Tips
- Chill Your Bars: Allow the bars to chill for the full 2 hours for a firmer texture and easier slicing.
- Use Quality Chocolate: Opt for high-quality semi-sweet chocolate chips for a richer chocolate flavor.
- Customize Your Nuts: Feel free to substitute walnuts or even skip the nuts for a nut-free version of these bars.
- Presentation Matters: For an elegant touch, drizzle some melted chocolate over the top before serving.
Tips & Tricks
Achieving the Perfect Texture
– Press the graham cracker mixture well into the pan. This makes a strong base.
– Cook the caramel filling until it thickens. This gives a nice texture to the bars.
Presentation Tips
– Serve the bars on a rustic wooden board or a white platter. This looks great.
– Add whole pecans on top and sprinkle sea salt for a pretty finish.
Common Mistakes to Avoid
– Do not overheat the chocolate or caramel. This can ruin their smoothness.
– Do not skip chilling time for the bars. It helps them set properly for slicing.
Variations
Alternative Nut Options
You can switch pecans for walnuts in this recipe. Walnuts give a nice crunch and a slightly different taste. If you or someone you know has nut allergies, don’t worry! You can make these bars nut-free. Just skip the nuts altogether, or use seeds like sunflower or pumpkin seeds for a similar texture.
Flavor Modifications
Want to change up the flavor? You can add almond or butterscotch extract to the caramel filling. These flavors mix well with the chocolate and make your bars unique. You can also try using dark or milk chocolate chips instead of semi-sweet. Each type of chocolate gives a different taste that might surprise you!
Healthier Substitutions
If you want a healthier option, consider using honey or maple syrup instead of brown sugar. These natural sweeteners add a nice flavor while cutting down on processed sugars. You can also use low-fat graham crackers. They help make your dessert a bit lighter while keeping that great taste. Enjoy experimenting with these tasty swaps!
Storage Info
How to Store
To keep your no-bake salted caramel turtle bars fresh, store them in an airtight container. This helps maintain their texture and flavor. Use a glass or plastic container with a tight lid. If you stack the bars, place parchment paper between layers to avoid sticking.
Freezing Instructions
If you want to save some for later, you can freeze the bars. Wrap each bar in plastic wrap or foil. Then, place them in a freezer-safe bag or container. This will help keep them safe in the freezer for up to three months. When you’re ready to enjoy, take out the bars and let them thaw in the fridge for a few hours.
Shelf Life
These bars stay fresh for about one week in the fridge. Look for signs of spoilage like a change in smell or texture. If they become hard or dry, it’s best to toss them. Proper storage helps keep them tasty for a long time.
FAQs
Can I make the caramel filling on the stovetop?
Yes, you can make the caramel filling on the stovetop. Use a medium saucepan over medium heat. Combine sweetened condensed milk, butter, and vanilla extract. Stir often to avoid burning. When it bubbles, let it cook for 5 to 7 minutes. This helps it thicken nicely. Make sure to watch it carefully while it cooks.
How long do these no-bake bars take to set?
These no-bake bars need at least 2 hours in the fridge to set. This time helps the layers firm up. If you want them extra firm, leave them in longer. A good chill makes cutting easier and keeps the bars together.
Can I substitute the sweetened condensed milk?
Yes, you can substitute sweetened condensed milk. Use coconut milk mixed with sugar. You can also blend regular milk with sugar and heat it until thick. This will give you a similar texture, but the flavor might change a bit.
What can I use instead of graham cracker crumbs?
If you don’t have graham cracker crumbs, try using crushed cookies. Vanilla wafers or digestive biscuits work well too. You can even use oats for a healthier option. Just blend them until fine. This will give you a nice base for the bars.
You now have a complete guide to making delicious no-bake bars. We covered the key ingredients and step-by-step instructions to ensure your success. Remember to take care with each layer, from the graham cracker base to the melted chocolate topping. Use the tips provided to avoid common mistakes and explore fun variations to suit your taste. Store your bars properly to keep them fresh and ready to enjoy. Experiment and enjoy every bite of your homemade treat!


