One Pot Spaghetti Quick and Easy Dinner Delight

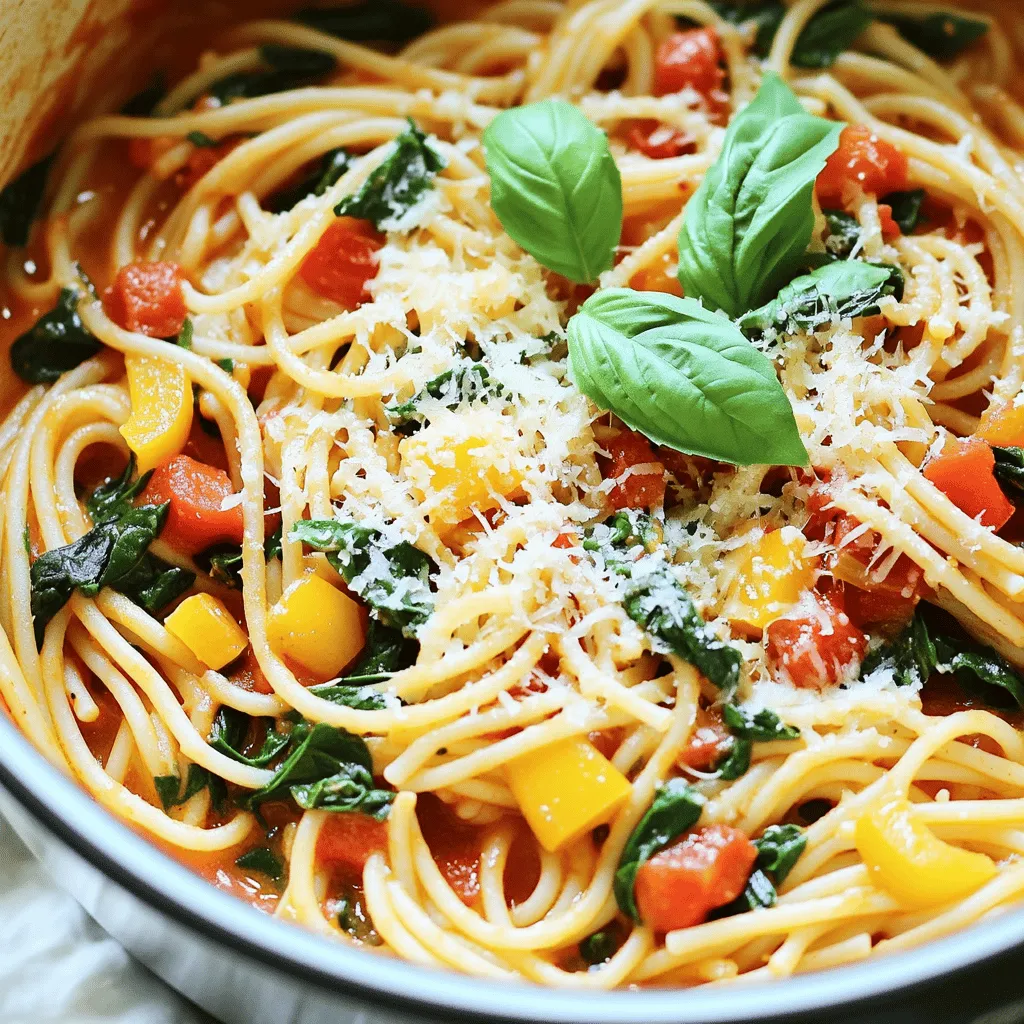
Are you tired of long dinner prep? I hear you. One Pot Spaghetti is the answer! It’s quick, easy, and full of flavor. In just a few steps, you can whip up a satisfying meal that everyone will love. From simple ingredients to smart tips, I’ve got you covered. Let’s dive into this delicious journey and make your next dinner a breeze!
Why I Love This Recipe
- Quick and Easy: This recipe is perfect for busy weeknights, taking just 25 minutes from start to finish.
- One Pot Wonder: Cooking everything in one pot means less cleanup and more time to enjoy your meal.
- Flavorful and Healthy: Packed with vegetables and fresh spinach, this spaghetti dish is as nutritious as it is delicious.
- Customizable: You can easily add your favorite proteins or vegetables to make this dish your own!
Ingredients
Complete List of Ingredients
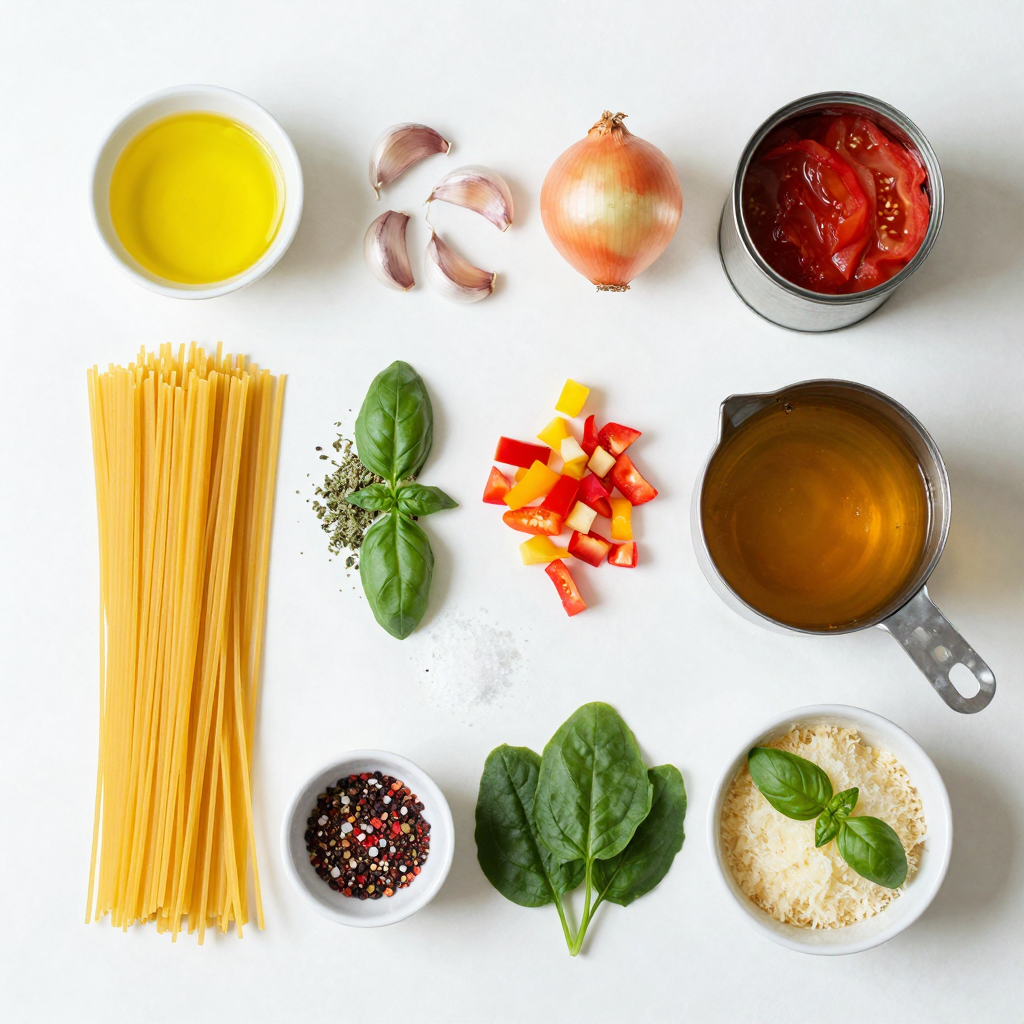
For this easy One Pot Spaghetti, you need:
- 8 oz spaghetti
- 1 tablespoon olive oil
- 3 cloves garlic, minced
- 1 small onion, finely chopped
- 1 bell pepper, diced (any color)
- 1 can (14 oz) diced tomatoes, with juices
- 2 cups vegetable broth
- 1 teaspoon dried oregano
- 1 teaspoon dried basil
- 1/2 teaspoon red pepper flakes (optional)
- Salt and pepper to taste
- 1 cup fresh spinach
- Grated Parmesan cheese for serving (optional)
- Fresh basil leaves for garnish
Substitutions for Specific Ingredients
You can swap ingredients to fit your taste or needs. Use whole wheat spaghetti for a healthier option. If you lack olive oil, try avocado oil or butter instead. For garlic, garlic powder works in a pinch. Instead of bell pepper, you can use zucchini or mushrooms. Canned tomatoes can be replaced with fresh tomatoes or tomato sauce. If you want a richer flavor, use chicken broth instead of vegetable broth.
Dietary Considerations
This recipe can easily fit many diets. To make it vegan, skip the Parmesan cheese. For gluten-free options, use gluten-free spaghetti. This dish is packed with veggies, making it great for a balanced meal. It also offers a good source of fiber from the spinach and whole grains if using whole wheat spaghetti. Enjoy making this healthy dish that everyone will love!

Step-by-Step Instructions
Detailed Cooking Instructions
1. Start by heating the olive oil in a large pot over medium heat.
2. Add minced garlic and chopped onion. Sauté them for 2 to 3 minutes. The onion should be soft and clear.
3. Next, toss in the diced bell pepper. Cook for another 2 to 3 minutes, stirring often.
4. Pour in the can of diced tomatoes with juice. Add the vegetable broth, oregano, basil, and red pepper flakes if you like heat. Season with salt and pepper. Stir everything well.
5. Bring the mix to a boil. Now, add the spaghetti. Make sure it is fully covered by the liquid.
6. Lower the heat, cover the pot, and let it simmer for 10 to 12 minutes. Stir occasionally to keep it from sticking.
7. After the spaghetti is just right, mix in the fresh spinach. Cook for 2 more minutes until the spinach wilts.
8. Take the pot off the heat and let it sit for a few minutes. This makes it thicker and tastier.
9. Serve warm. Top it with grated Parmesan cheese and fresh basil leaves.
Tips for Ensuring Perfect Texture
- Use the right amount of liquid. Too little can lead to dry pasta.
- Stir the spaghetti often while cooking. This helps it cook evenly.
- Check the spaghetti a minute or two before the time is up. It should be firm but not hard.
- Let it sit after cooking. This helps the sauce soak into the pasta.
How to Avoid Common Mistakes
- Do not skip the sautéing step. It builds rich flavors.
- Avoid cooking at too high a heat. This may burn the pasta.
- Don’t forget to stir frequently. This keeps the spaghetti from clumping.
- Measure your ingredients. Too much or too little can change the taste and texture.
Pro Tips
- Use Whole Wheat Spaghetti: For a healthier option, substitute regular spaghetti with whole wheat spaghetti to increase fiber content.
- Add More Vegetables: Feel free to toss in additional vegetables like zucchini, mushrooms, or carrots to enhance the flavor and nutrition.
- Customize Your Spices: Adjust the amount of red pepper flakes based on your spice preference; you can also experiment with other herbs like thyme or parsley.
- Let It Rest: Allowing the dish to sit for a few minutes after cooking helps it thicken and intensifies the flavors.
Tips & Tricks
Time-Saving Tips for Quick Prep
To save time, gather all your ingredients first. This makes cooking smooth and easy. Use pre-chopped veggies if you can. You can also use a garlic press for quick peeling. A good tip is to boil water while you chop. This cuts down on prep time.
Cooking Techniques for Enhanced Flavor
Start by sautéing garlic and onion in olive oil. This brings out their rich flavors. Add your spices early to let them bloom. When you add the tomatoes and broth, stir well. This mixes the flavors. Remember to taste as you go. Adjust salt and pepper for the best taste.
Best Utensils and Tools to Use
A large pot is key for this dish. Use a wooden spoon to stir. This prevents scratching the pot. A sharp knife helps with chopping. A cutting board keeps your area tidy. Lastly, have measuring cups handy for precise amounts.

Variations
How to Personalize Your One Pot Spaghetti
You can easily make One Pot Spaghetti your own. Just change a few ingredients. For example, swap the bell pepper with zucchini or mushrooms. You can also use different cheese. Try feta or mozzarella for a new flavor. If you want more protein, add cooked chicken, shrimp, or beans. This dish is flexible and fun!
Ingredients for Different Flavor Profiles
To change the taste, think about herbs and spices. You can add fresh herbs like parsley or thyme. If you like heat, toss in more red pepper flakes. Want a smoky flavor? Add some smoked paprika. For a hint of sweetness, include a splash of balsamic vinegar. Each choice brings a new twist to this dish.
Quick Variations for Dietary Needs
If you need a low-carb option, use spiralized zucchini instead of pasta. This keeps the meal light and fresh. For a vegan version, skip the cheese and use vegetable broth. You can also add chickpeas for protein. These quick swaps let everyone enjoy this dish, no matter their diet.
Storage Info
How to Store Leftover One Pot Spaghetti
Storing leftover One Pot Spaghetti is simple. First, let it cool down. Then, place it in an airtight container. Make sure to cover it well to keep it fresh. Store it in the fridge for up to 3 days. If you want to keep it longer, freezing is a good option.
Reheating Instructions for Best Results
To reheat your spaghetti, use a saucepan or a microwave. If using a saucepan, add a splash of water or broth. Heat it over low heat, stirring occasionally. This helps it warm evenly and prevents sticking. If using a microwave, cover the bowl with a microwave-safe lid. Heat in short bursts, stirring in between, until it’s hot throughout.
Freezing Options and Tips
Freezing One Pot Spaghetti is a great way to save meals. Use a freezer-safe container or heavy-duty freezer bag. Make sure to leave some space for expansion. Label the container with the date to keep track. It can last up to 2 months in the freezer. When ready to eat, let it thaw in the fridge overnight. Reheat it as mentioned above for the best taste.
FAQs
What is the best way to cook spaghetti in one pot?
The best way to cook spaghetti in one pot is to keep it simple. Start by heating olive oil in a large pot. Add garlic and onion, then sauté until soft. Next, add your bell pepper and cook for a few minutes. Pour in diced tomatoes and vegetable broth. Season with oregano, basil, and red pepper flakes. Then, bring it all to a boil. Once boiling, add the spaghetti. Ensure the pasta is fully submerged in the liquid. Simmer until the spaghetti is al dente. This method keeps flavors rich and saves time on cleanup.
Can I make One Pot Spaghetti ahead of time?
Yes, you can make One Pot Spaghetti ahead of time. Cook it as per the recipe and let it cool. Once cool, store it in an airtight container in the fridge. It can last for up to three days. When you are ready to eat, simply reheat it on the stove or in the microwave. Add a splash of broth to keep it moist. This makes it a great option for meal prep or quick dinners on busy nights.
How do I make my One Pot Spaghetti creamier?
To make your One Pot Spaghetti creamier, you can add a few simple ingredients. Try adding a splash of heavy cream or a dollop of cream cheese. Stir these in just before serving. Another option is to mix in some shredded cheese, like mozzarella or Parmesan. This will create a rich, creamy texture. You can also try using a starchy pasta cooking water which helps to thicken the sauce. Each of these methods adds a delightful creaminess to your dish!
This article covered how to make simple, tasty one-pot spaghetti. We discussed key ingredients, including substitutions for diets like vegan and gluten-free. I shared detailed cooking steps and tips to get great texture. You learned common pitfalls and how to avoid them.
Always feel free to make your dish unique with different flavors. Don’t forget to consider storage options for leftovers.
Mastering one-pot spaghetti means enjoying a fast, delicious meal. You have the skills to impress everyone.

One Pot Spaghetti
Ingredients
8 oz spaghetti
1 tablespoon olive oil
3 cloves garlic, minced
1 small onion, finely chopped
1 bell pepper, diced (any color)
1 can (14 oz) diced tomatoes, with juices
2 cups vegetable broth
1 teaspoon dried oregano
1 teaspoon dried basil
1/2 teaspoon red pepper flakes (optional)
Salt and pepper to taste
1 cup fresh spinach
Grated Parmesan cheese for serving (optional)
Fresh basil leaves for garnish
Instructions
In a large pot, heat the olive oil over medium heat. Add the minced garlic and chopped onion, sautéing for about 2-3 minutes until the onion becomes translucent.
Add the diced bell pepper to the pot and cook for an additional 2-3 minutes, stirring occasionally.
Pour in the can of diced tomatoes (with juices), vegetable broth, oregano, basil, red pepper flakes (if using), and season with salt and pepper. Stir well to combine.
Bring the mixture to a boil, then add the spaghetti to the pot. Ensure the spaghetti is submerged in the liquid.
Reduce the heat, cover, and simmer for about 10-12 minutes, or until the spaghetti is al dente and most of the liquid is absorbed, stirring occasionally to prevent sticking.
Once the spaghetti is cooked, fold in the fresh spinach and cook for an additional 2 minutes until the spinach wilts.
Remove the pot from heat and let it sit for a couple of minutes to thicken.
Serve warm, topped with grated Parmesan cheese and fresh basil leaves for garnish.
Prep Time: 10 minutes | Total Time: 25 minutes | Servings: 4

One Pot Spaghetti
Ingredients
- 8 oz spaghetti
- 1 tablespoon olive oil
- 3 cloves garlic, minced
- 1 small onion, finely chopped
- 1 bell pepper diced (any color)
- 14 oz can diced tomatoes, with juices
- 2 cups vegetable broth
- 1 teaspoon dried oregano
- 1 teaspoon dried basil
- 0.5 teaspoon red pepper flakes (optional)
- to taste salt and pepper
- 1 cup fresh spinach
- for serving grated Parmesan cheese (optional)
- for garnish fresh basil leaves
Instructions
- In a large pot, heat the olive oil over medium heat. Add the minced garlic and chopped onion, sautéing for about 2-3 minutes until the onion becomes translucent.
- Add the diced bell pepper to the pot and cook for an additional 2-3 minutes, stirring occasionally.
- Pour in the can of diced tomatoes (with juices), vegetable broth, oregano, basil, red pepper flakes (if using), and season with salt and pepper. Stir well to combine.
- Bring the mixture to a boil, then add the spaghetti to the pot. Ensure the spaghetti is submerged in the liquid.
- Reduce the heat, cover, and simmer for about 10-12 minutes, or until the spaghetti is al dente and most of the liquid is absorbed, stirring occasionally to prevent sticking.
- Once the spaghetti is cooked, fold in the fresh spinach and cook for an additional 2 minutes until the spinach wilts.
- Remove the pot from heat and let it sit for a couple of minutes to thicken.
- Serve warm, topped with grated Parmesan cheese and fresh basil leaves for garnish.


![- 2 cups cooked shredded chicken - 1 can (15 oz) black beans, drained and rinsed - 1 can (15 oz) corn, drained - 1 packet taco seasoning - 1 cup salsa The main ingredients create the base of your casserole. The chicken offers protein and flavor. Black beans add fiber and a nice texture. Corn brings a touch of sweetness. Taco seasoning gives it that classic taco flavor. Salsa adds moisture and a pop of zest. - 1 cup sour cream - 2 cups shredded cheddar cheese (divided) The creamy layer makes this dish rich and smooth. Sour cream balances the spices with its coolness. The cheddar cheese melts beautifully, adding a great taste. Using two cups lets you have some on top for that golden finish. - 8 small corn tortillas, cut into quarters - 1 jalapeño, diced (optional) - Fresh cilantro, sliced avocado, and lime wedges for serving Corn tortillas are the backbone of this casserole. They soak up flavors and keep the layers together. You can add jalapeños for a spicy kick. Fresh cilantro, avocado, and lime make great garnishes. They brighten the dish and add freshness. For the full recipe, check out the details provided earlier. - Preheat oven to 350°F (175°C). - In a large mixing bowl, combine cooked chicken, black beans, corn, taco seasoning, and salsa. Mix well until combined. This step is key. It brings all the flavors together. The chicken adds protein, while beans and corn give texture. Taco seasoning provides that classic flavor we all love. Salsa adds moisture and zest. - In another bowl, mix sour cream with 1 cup of cheddar cheese. This makes a creamy layer. - In a 9x13 inch baking dish, spread half of the tortilla quarters. - Layer half of the chicken mixture over the tortillas. - Spread half of the sour cream and cheese mixture on top. You want to build layers for great taste. The tortillas give a base. The chicken mixture adds heartiness, and the creamy layer keeps it rich. - Repeat these layers using the remaining tortillas, chicken mixture, and creamy layer. - Top with the last cup of cheddar cheese. If using jalapeños, add them now. This final layer of cheese melts beautifully. It forms a golden crust that is hard to resist. - Cover the dish with foil. Bake for 30 minutes. - After 30 minutes, remove the foil. Bake for another 10-15 minutes until bubbly and golden. Baking warms everything through. The covered dish helps steam the casserole. Once uncovered, the cheese gets that nice golden color. For the full recipe, refer to the earlier section. Enjoy the process! To make your chicken taco casserole truly shine, use homemade or high-quality taco seasoning. The right seasoning packs a punch and enhances the flavor of your dish. Also, let the casserole cool slightly before serving. This small step brings out the flavors even more, making every bite enjoyable. Serve your casserole hot, and don’t skip the garnishes! Fresh cilantro and avocado add a burst of flavor. You can also pair it with a side salad or rice. These sides make for a complete meal that everyone will love. To make this dish, you will need a few simple tools: - Large mixing bowl - 9x13 inch baking dish - Aluminum foil These tools help ensure your casserole cooks evenly and looks great on your table. Don't forget to check the full recipe for detailed steps! {{image_2}} You can easily mix things up in your chicken taco casserole. If you want a different flavor, swap the chicken for ground turkey or beef. Both meats add a unique taste and texture. You can also use black-eyed peas or pinto beans instead of black beans. This change keeps the dish hearty and adds extra protein. Do you like heat? Add more jalapeños for a spicy kick. You can also include diced green chiles for extra flavor. These spicy ingredients boost the taste and make your casserole really pop. Adjust the amount based on your spice preference. If you're looking for a meatless meal, try a vegetarian version. You can substitute the chicken with a mix of extra vegetables like bell peppers, zucchini, or mushrooms. You can also use plant-based proteins like lentils or tofu. This way, you can enjoy a tasty and filling casserole without any meat. For the full recipe, check out the [Full Recipe]. After you enjoy your chicken taco casserole, store leftovers in an airtight container. This keeps the flavors fresh. You can refrigerate it for up to 3-4 days. Just make sure to let it cool before sealing. If you want to keep it longer, freezing works well. You can freeze the casserole in individual portions or freeze the whole dish. It stays good for up to 3 months. When you're ready to eat, just thaw it in the fridge overnight. To reheat, you have two options. You can heat it in the oven at 350°F until it is warmed through. If you're in a hurry, use the microwave. Just make sure it heats evenly so every bite is nice and hot. Enjoy your meal! Yes, leftover rotisserie chicken works great for this recipe. It saves time and adds flavor. Just shred or chop the chicken before mixing it in. This method makes the dish even easier. You'll love how the chicken blends with the other ingredients. You can use flour tortillas as a substitute. They will work just as well. Cut them into quarters like corn tortillas. This small change won’t affect the taste much. You'll still enjoy the same delicious flavors in your casserole. Ensure to use gluten-free tortillas and check seasonings for gluten. Many brands offer gluten-free options. Look for taco seasoning that is labeled gluten-free. These small changes keep this dish safe for everyone. Enjoy your flavorful casserole without worry! This chicken taco casserole is a tasty and simple dish to make. We covered key ingredients like cooked chicken, black beans, and corn. The creamy layer with sour cream and cheddar adds flavor, while the tortillas bring it together. You can customize it with different meats or make it vegetarian. Store leftovers easily, or freeze them for later. Enjoy this dish hot with your favorite garnishes. I hope you find joy in making this recipe and sharing it with others.](https://dailydishlab.com/wp-content/uploads/2025/06/a9a43d40-fc95-41bf-8f1f-f0e9c5c83338-768x768.webp)
![For the base of this dish, you need: - 8 oz. rice noodles - 2 tablespoons vegetable oil - 1 tablespoon fresh ginger, minced - 4 cloves garlic, minced - 1 bell pepper, julienned (any color) - 1 cup broccoli florets - 1 cup snap peas - 2 green onions, chopped - 3 tablespoons soy sauce - 1 tablespoon sesame oil - 1 tablespoon honey (or maple syrup for a vegan option) - Sesame seeds for garnish - Fresh cilantro for garnish - Salt and pepper to taste These ingredients create a vibrant and tasty dish. The ginger and garlic add warmth and depth. The bright veggies make every bite a treat. To boost the flavor, consider adding: - Red pepper flakes for heat - Mushrooms for a savory touch - Carrots for added sweetness and color - Cashews for crunch and richness These options can enhance the dish and make it your own. You can swap ingredients based on your needs: - Use gluten-free noodles if you need a gluten-free option. - Replace soy sauce with tamari for a gluten-free sauce. - For a vegan dish, make sure to use maple syrup instead of honey. These swaps let everyone enjoy a delicious Ginger Garlic Noodle Stir Fry. Check out the Full Recipe for more details on how to put it all together! First, you need to make your rice noodles. Boil water in a pot. Add 8 oz. of rice noodles and cook them according to the package instructions. This usually takes about 5-7 minutes. Once they are soft, drain them in a colander. Rinse them with cold water to stop the cooking. Toss the noodles with a bit of oil. This will help keep them from sticking together. Now, let’s get cooking! Heat 2 tablespoons of vegetable oil in a skillet or wok over medium-high heat. Wait until the oil shimmers. Add 1 tablespoon of minced ginger and 4 cloves of minced garlic. Stir them quickly for about 30 seconds. You want them fragrant, not burnt. Next, toss in your julienned bell pepper. Stir-fry this for 2-3 minutes until it's slightly soft. Now, add 1 cup of broccoli florets and 1 cup of snap peas. Keep stirring for another 3-4 minutes. Your veggies should be bright and tender-crisp. If they look dull or mushy, you’ve cooked them too long! In a small bowl, mix together 3 tablespoons of soy sauce, 1 tablespoon of sesame oil, and 1 tablespoon of honey or maple syrup. Pour this sauce over the cooked veggies. Add your prepared rice noodles to the skillet. Toss everything together gently. Make sure the noodles and veggies are well combined and heated through. Finally, season your dish with salt and pepper to taste. Fold in 2 chopped green onions for a fresh touch. Serve your Ginger Garlic Noodle Stir Fry hot. Garnish with sesame seeds and fresh cilantro for that perfect finish. This dish is not only easy but also packed with flavor. Enjoy your meal! For the full recipe, check out the details above. To get the best texture, keep your heat high. Hot oil helps cook food fast. Cut your veggies thin for quick cooking. Stir them often to avoid burning. Don't crowd the pan; it can make your veggies soggy. Work in batches if needed. You want that crisp bite! Start with fresh ginger and garlic. They create a strong base for flavor. Sauté them quickly to release their oils. Use a mix of sauces for depth. Soy sauce adds saltiness, while sesame oil gives richness. Honey or maple syrup offers a sweet touch. Taste as you go to balance flavors. One big mistake is overcooking the veggies. They should stay bright and crunchy. Avoid using old oil; it can ruin the taste. Don't skip the seasoning; it elevates the dish. Lastly, remember to toss everything together well. This ensures each bite is packed with flavor. Make sure to check out the [Full Recipe] for all the steps! {{image_2}} You can easily make this dish vegetarian or vegan. Just skip the meat and use more veggies. Try adding mushrooms, zucchini, or carrots for extra taste. Use maple syrup instead of honey to keep it vegan. This keeps the dish sweet and delicious. Adding protein can make your meal heartier. Chicken works well and cooks quickly. Simply cut it into bite-sized pieces and stir-fry it before adding veggies. Tofu is another great choice. Use firm tofu and cube it. Fry until golden for a tasty crunch. Shrimp also adds flavor. Cook them until they turn pink, then mix them in. You can change the taste by swapping some ingredients. Instead of rice noodles, try whole wheat or soba noodles for a different texture. Use dark soy sauce for a richer flavor. Add chili flakes or sriracha if you like heat. You can also try different vegetables like bok choy or asparagus for variety. For the full recipe and more tips, check out the Full Recipe section! After you enjoy your Ginger Garlic Noodle Stir Fry, store any leftovers. Use an airtight container. This helps keep it fresh. Let the stir fry cool to room temperature first. Avoid putting hot food in the fridge. This can raise the temperature inside, which is not safe. Place the container in the fridge. It will last up to three days. When you’re ready to eat leftovers, reheat carefully. Use a skillet for best results. Heat it on medium heat. Add a splash of water or oil to keep it moist. Stir it gently until heated through. This keeps the noodles from getting too dry or sticky. You can also use the microwave. Just cover the bowl with a damp paper towel. Heat for one minute at a time, stirring in between. You can freeze Ginger Garlic Noodle Stir Fry for later. Use a freezer-safe container or bag. Make sure to remove as much air as possible. This helps prevent freezer burn. It will stay good for up to two months. When you’re ready to eat it, thaw it overnight in the fridge. Reheat it in a skillet for best taste and texture. You can follow the steps for reheating leftovers. Using this method keeps the flavors fresh. For the full recipe, check out the previous sections. Making Ginger Garlic Noodle Stir Fry takes about 20 minutes total. You need 10 minutes to prep and another 10 to cook. This quick time makes it perfect for busy days when you want a tasty meal fast. Yes, you can use different noodles for this recipe. Options like egg noodles or udon work well. You can also try whole wheat or gluten-free noodles if you prefer. Just remember to adjust the cooking time based on the noodles you choose. Ginger and garlic offer many health benefits. Ginger can help with digestion and reduce nausea. It also has anti-inflammatory properties. Garlic can boost your immune system. It may help lower blood pressure and improve heart health. Both add flavor and nutrition to your meals, making them great choices in cooking. You've learned to make a delicious Ginger Garlic Noodle Stir Fry. We covered key ingredients, techniques, and helpful tips to ensure your dish shines. Dietary variations allow everyone to enjoy this meal. Proper storage keeps leftovers fresh, while reheating maintains great flavor. Follow these steps and you'll impress at the dinner table. Remember, with practice, you'll master this stir fry and tweak it to fit your taste. Enjoy cooking and sharing this simple, tasty dish!](https://dailydishlab.com/wp-content/uploads/2025/07/2e7dc7f2-8fff-4ba0-8595-d5dc5059986b-768x768.webp)