

If you’re craving a fresh and tasty dish, look no further! My Peach Burrata Arugula Pizza brings delicious flavors in every bite. This easy recipe combines sweet peaches, creamy burrata, and peppery arugula to create a perfect harmony. You’ll love making this dish at home, impressing your friends or family with your skills. Let’s dive into the ingredients and get started on this delightful pizza journey!
Why I Love This Recipe
- Fresh and Fruity: This pizza combines the sweetness of ripe peaches with creamy burrata, creating a fresh and vibrant flavor profile.
- Easy to Make: Using pre-made dough makes this recipe quick and accessible for a weeknight dinner or a casual gathering.
- Beautiful Presentation: The colorful toppings make for a stunning presentation that is sure to impress your guests.
- Versatile Topping: The combination of arugula and balsamic glaze adds an elegant touch, making it perfect for any occasion.
Ingredients
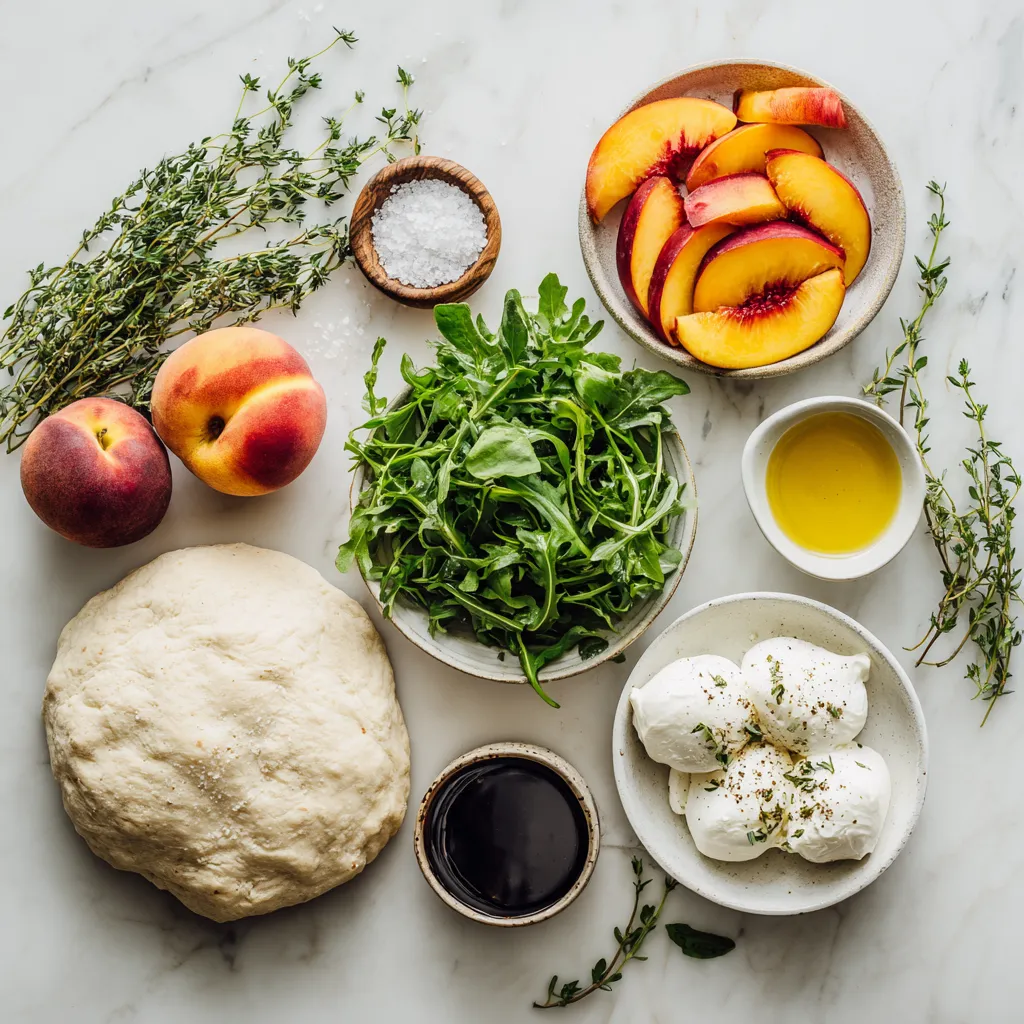
List of Ingredients
– 1 pre-made pizza dough (store-bought or homemade)
– 2 ripe peaches, thinly sliced
– 1 cup burrata cheese, torn into pieces
– 2 cups fresh arugula
– 1 tablespoon olive oil
– 1 tablespoon balsamic glaze
– Salt and freshly cracked black pepper to taste
– 1 teaspoon fresh thyme leaves (optional)
Optional Ingredients
– Fresh thyme leaves add a nice touch of flavor.
– You can also use fresh basil for a different taste.
Ingredient Substitutions
– If you can’t find burrata, use fresh mozzarella instead.
– For a gluten-free option, try a cauliflower pizza crust.
– If peaches are out of season, pears work well too.
– Use a flavored olive oil, like garlic or chili, for extra taste.
Step-by-Step Instructions
Preparing the Dough
First, preheat your oven to 475°F (245°C). If you have a pizza stone, place it in the oven now. Next, take your pre-made pizza dough. On a floured surface, roll or stretch it out. Aim for about 12 inches in diameter. Transfer the dough to a floured pizza peel or a baking sheet lined with parchment paper.
Brush a thin layer of olive oil over the dough. Make sure to coat the edges well. This adds flavor and helps with browning.
Assembling the Pizza
Now, it’s time to add the toppings! Start by laying out the sliced peaches evenly on the dough. Leave a small border around the edges. This space will form the crust.
Next, take your burrata cheese. Tear it into pieces and place it over the peaches. The cheese will melt slightly while baking, creating a creamy texture.
Sprinkle some salt and freshly cracked black pepper over the top. If you like, add fresh thyme leaves for a nice touch.
Baking Tips and Techniques
Carefully slide the pizza onto the preheated pizza stone. If you’re using a baking sheet, just place it in the oven. Bake the pizza for 10 to 12 minutes. You want the crust to look golden and crispy.
Once it’s done, take the pizza out and let it cool for a minute. Top it with fresh arugula and drizzle balsamic glaze over the warm pizza. Slice it up and enjoy the wonderful mix of flavors!
Tips & Tricks
How to Achieve the Crispiest Crust
To get a crispy crust, start with a hot oven. Preheat your oven to 475°F. If you have a pizza stone, place it inside to heat up. This stone helps cook the bottom well. Roll your dough thin, about 12 inches wide. Use a floured surface to stretch it. Brush the dough lightly with olive oil before adding toppings. This layer keeps moisture out and adds flavor. Bake for 10 to 12 minutes. Look for a golden-brown color to know it’s done.
Enhancing Flavor with Fresh Herbs
Fresh herbs can boost your pizza’s taste. I love using thyme. Add a teaspoon of fresh thyme leaves before baking. This herb pairs well with peaches and burrata. You can also try basil for a different flavor. Just sprinkle it on after baking for a fresh touch. Herbs elevate the dish and make it taste gourmet.
Serving Suggestions
Serve your pizza warm for the best taste. Top with fresh arugula right after baking. The peppery arugula adds a nice crunch. Drizzle balsamic glaze over the top for sweetness. You can also add a pinch of sea salt for a flavor pop. Cut the pizza into slices for easy sharing. This pizza is great for lunch or dinner. Enjoy it with friends or family!
Pro Tips
- Choose Ripe Peaches: Ensure your peaches are perfectly ripe for the best flavor. They should yield slightly to pressure and have a sweet aroma.
- Perfect Burrata Placement: Tear the burrata into larger pieces to create a creamy texture that melts beautifully during baking.
- Crust Crispiness: For an extra crispy crust, pre-bake the pizza dough for 3-4 minutes before adding toppings.
- Balsamic Glaze Timing: Drizzle the balsamic glaze right before serving to maintain its flavor and prevent it from becoming too runny.
Variations
Vegetarian Options
This pizza shines as a vegetarian dish. The sweet peaches and creamy burrata give it a rich taste. You can keep it simple or add more veggies. Try adding sliced tomatoes or bell peppers. These will bring more color and flavor. You can also add spinach for extra nutrients. Each veggie adds a new layer of taste.
Adding Proteins
If you want more protein, consider adding chicken or prosciutto. Grilled chicken adds a nice smoky flavor. Slice it thin and place it on top of the peaches. Prosciutto adds a salty kick that pairs well with the sweet peaches. You can also try adding cooked bacon or pepperoni. These options make the pizza heartier and more filling.
Different Cheese Choices
While burrata is creamy and delicious, you can try other cheeses. Fresh mozzarella is a great swap. It melts well and has a mild taste. Goat cheese is another option. It adds a tangy flavor that complements the peaches. Feta cheese gives a salty bite, balancing the sweetness. Feel free to mix and match these cheeses to find your favorite!
Storage Info
Storing Leftovers
You can store leftover pizza in the fridge for up to three days. Place slices in an airtight container. If you have a whole pizza left, wrap it tightly in plastic wrap. This helps keep it fresh and tasty. Make sure the pizza cools down before storing it.
Reheating Instructions
To reheat your pizza, use the oven for the best results. Preheat your oven to 375°F (190°C). Place the pizza on a baking sheet. Heat for about 10 minutes or until warm. This method keeps the crust crispy. You can also use a skillet. Heat the skillet over medium heat and add the pizza. Cover it with a lid and warm it for 5 to 7 minutes.
Freezing Options
You can freeze this pizza for later. Wrap each slice in plastic wrap and then in foil. This helps prevent freezer burn. You can freeze it for up to two months. To enjoy it later, thaw it in the fridge overnight. Reheat as mentioned above for the best taste.
FAQs
Can I use a different type of cheese?
Yes, you can use other cheeses. Try goat cheese or feta for a tangy taste. Both options add a nice flavor to the pizza. You can also use mozzarella if you prefer a milder cheese. Each cheese will change the pizza’s taste, so choose one you love.
How can I make this pizza gluten-free?
To make this pizza gluten-free, use gluten-free pizza dough. Many stores sell ready-made options. You can also make your own from gluten-free flour. Just follow the package instructions for best results. Ensure all your toppings, like the balsamic glaze, are gluten-free too.
What other toppings pair well with peach and burrata?
Peach and burrata mix well with many toppings. Add prosciutto for saltiness or arugula for a peppery bite. Nuts like walnuts or pecans add crunch. Fresh herbs like basil work great too. Feel free to get creative and mix flavors you enjoy!
This blog post outlined how to make a tasty pizza from scratch. You learned about key ingredients, step-by-step instructions, and tips for a great crust. We also explored delicious variations and storage tips. Remember, you can swap ingredients or add special toppings to fit your taste. Making pizza can be fun and easy. Enjoy trying out these ideas, and impress your friends and family with your skills. Happy cookin


