Craving a delicious and healthy dessert? Look no further! My Peanut Butter Banana Ice Cream is simple to make and oh-so-creamy. With just a few ingredients and easy steps, you can whip up this tasty treat in no time. Plus, it’s a great way to cool off on a hot day. Join me as we explore the ingredients, techniques, and fun variations to customize your ice cream experience!
Why I Love This Recipe
- Deliciously Creamy: This ice cream has a rich and creamy texture that mimics traditional ice cream, making it a perfect guilt-free treat.
- Simple Ingredients: Made with just a few wholesome ingredients, it’s easy to whip up without any fancy equipment or hard-to-find items.
- Healthier Alternative: This recipe is naturally sweetened with bananas and honey, providing a healthier alternative to store-bought ice creams loaded with sugar.
- Customizable: You can easily add your favorite mix-ins like chocolate chips or nuts, tailoring it to your personal taste preferences.
Ingredients
List of Ingredients
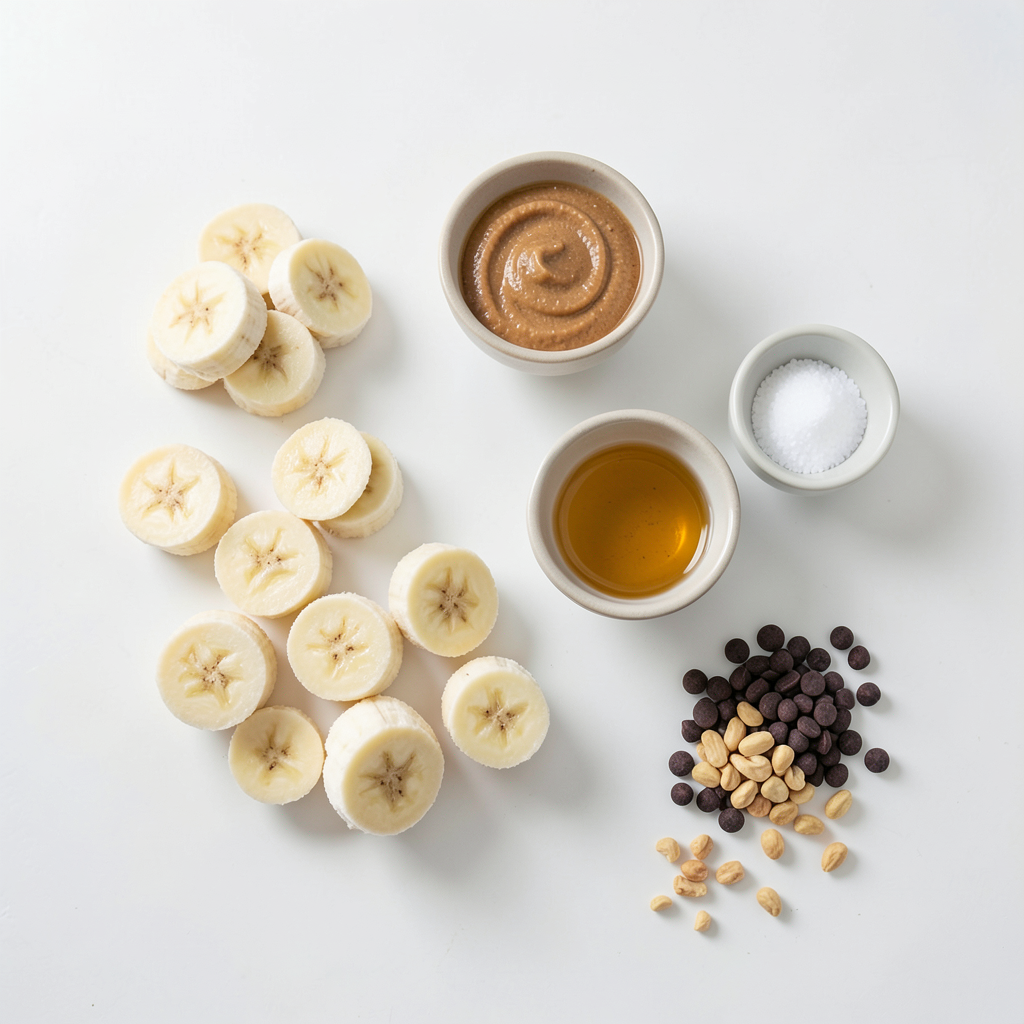
- 4 ripe bananas, sliced and frozen
- 1/2 cup natural peanut butter
- 1 tablespoon honey (or maple syrup for a vegan option)
- 1 teaspoon vanilla extract
- A pinch of sea salt
- Optional: 1/4 cup dark chocolate chips or chopped peanuts for mix-ins
Nutritional Information
This ice cream is not just tasty but also good for you! Each serving has:
- Calories: About 200
- Protein: 5 grams
- Fat: 10 grams
- Carbohydrates: 25 grams
- Fiber: 3 grams
- Sugar: 10 grams
These numbers can vary based on mix-ins and any changes you make.
Ingredient Substitutions
You can switch some ingredients if needed. Here are some ideas:
- Use almond butter or cashew butter instead of peanut butter for a nut-free option.
- Swap honey with maple syrup for a vegan treat.
- Use a few drops of almond extract if you want a different flavor.
- Replace dark chocolate chips with dried fruit for a fruity twist.
These swaps can help you enjoy this ice cream with what you have on hand!
Step-by-Step Instructions
Preparation and Freezing Bananas
Start with ripe bananas. Choose bananas that have brown spots; they taste sweeter. Slice the bananas into thin coins. This helps them freeze faster. Place the banana slices in a freezer-safe container. Freeze them for at least two hours. You want them completely solid. Frozen bananas make the ice cream creamy and smooth.
Blending the Ingredients
Once the bananas are frozen, grab a high-powered blender or food processor. Transfer the frozen banana slices into the blender. Add 1/2 cup of natural peanut butter. It gives the ice cream a rich, nutty flavor. Next, add 1 tablespoon of honey or maple syrup. This sweetens the mix. Then, pour in 1 teaspoon of vanilla extract for extra flavor. Don't forget a pinch of sea salt; it balances the sweetness. Blend on high speed until smooth. This may take a minute or two. Stop and scrape down the sides if needed. The mixture should be creamy with no lumps.
Final Touches and Serving Suggestions
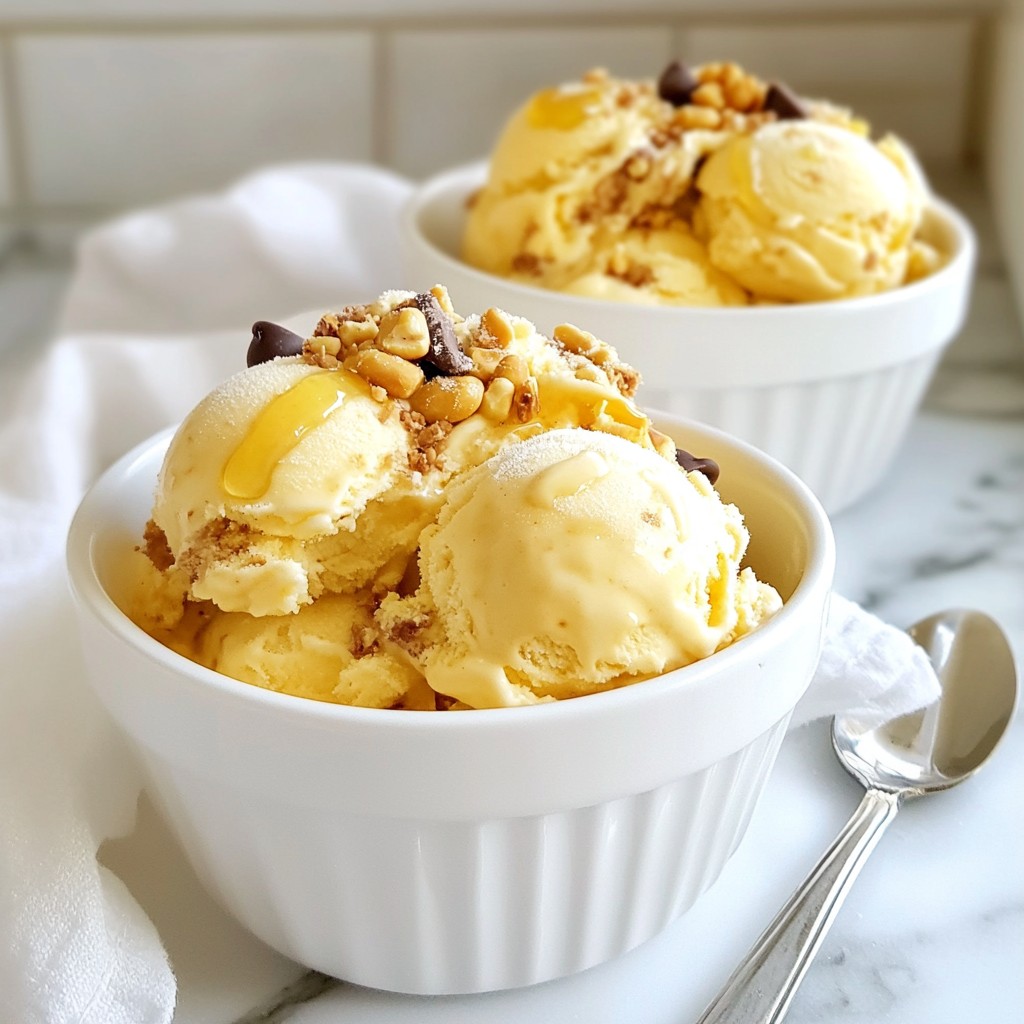
If you like, add 1/4 cup of dark chocolate chips or chopped peanuts. Pulse a few times to mix them in. Transfer the ice cream mixture to a container. Smooth the top. For a softer serve, enjoy it right away. If you prefer a firmer texture, place it in the freezer for 30 more minutes. Scoop the ice cream into bowls. You can add toppings like extra peanuts or chocolate chips if you want. Enjoy this simple and creamy treat!
Tips & Tricks
Achieving the Perfect Consistency
To get that smooth and creamy texture, use ripe bananas. The riper they are, the sweeter they taste. Freeze the banana slices for at least two hours. This ensures they blend well. When blending, stop to scrape the sides. This helps mix everything evenly. If it's too thick, add a splash of milk or water. Blend again until it's just right.
Flavor Enhancements
You can boost the flavor with a few simple tweaks. Try adding a teaspoon of cinnamon for warmth. If you love chocolate, dark cocoa powder works great too. For a nutty twist, add a bit of almond extract. Mix in dark chocolate chips or chopped peanuts for crunch. These add texture and taste.
Recommended Tools & Equipment
Using the right tools makes a big difference. A high-powered blender or food processor is key. These machines help create that smooth blend. A freezer-safe container is important for storing your ice cream. You might also want a spatula for scraping down the sides. Finally, an ice cream scoop makes serving easy and fun.
Pro Tips
- Choose the Right Bananas: Make sure your bananas are very ripe, as this will yield the sweetest flavor and the creamiest texture in your ice cream.
- Blend Thoroughly: Don’t rush the blending process. Blend until the mixture is completely smooth to ensure a creamy consistency without any chunks.
- Customize Your Mix-ins: Feel free to get creative with mix-ins! Try adding nuts, berries, or even a swirl of chocolate for added texture and flavor.
- Storage Tips: Store any leftover ice cream in an airtight container. To serve, let it sit at room temperature for a few minutes to soften before scooping.
Variations
Vegan Option with Maple Syrup
You can make this ice cream vegan by using maple syrup. Simply swap honey for maple syrup in the recipe. This change keeps the ice cream sweet and creamy without any animal products. Maple syrup adds a nice flavor too. It blends well with the peanut butter and banana.
Custom Mix-Ins (Chocolate, Nuts, etc.)
Get creative with mix-ins! You can add 1/4 cup of dark chocolate chips or chopped peanuts. Toss them in right before blending. This gives your ice cream extra texture and taste. You can also try other mix-ins. Think about adding dried fruit, coconut, or even crumbled cookies. The options are endless.
Serving Ideas (Toppings and Pairings)
When serving, think about fun toppings. A drizzle of chocolate sauce or a sprinkle of cinnamon can elevate your dish. You might enjoy serving it in a waffle cone for a fun twist. Pair it with fresh fruit like strawberries or raspberries for a fresh touch. You can also serve it with a dollop of whipped cream for extra indulgence.
Storage Info
Best Practices for Freezing
To keep your peanut butter banana ice cream fresh, freeze it right. After blending, place the ice cream in a container. Smooth the top to minimize air pockets. Cover the container tightly with a lid or plastic wrap. This helps prevent ice crystals from forming. Enjoy the best flavor by freezing it for about 30 minutes after blending.
Storage Containers Recommendations
Choose the right container for your ice cream. I recommend using a glass or plastic container with a tight seal. These containers keep the ice cream fresh. Avoid using metal containers, as they can cause freezer burn. If you have any, use a silicone ice cream mold for easy scooping later.
Shelf Life and Re-freezing Guidance
Your homemade ice cream can last for about one week in the freezer. After that, it may lose its creamy texture and flavor. If you re-freeze it, let it soften for a few minutes before serving. This makes scooping easier. Always check for ice crystals or off smells before eating. If you notice these signs, it’s best to toss it out.
FAQs
Can I make this ice cream without a blender?
You can try using a fork to mash the frozen bananas. It may take time, but it works. Mix in the peanut butter and other ingredients well. A blender or food processor makes it smoother and creamier, but your method is still valid.
How long does homemade peanut butter banana ice cream last?
This ice cream stays good for about a week in the freezer. Store it in an airtight container to keep it fresh. After a week, the ice cream may lose flavor or texture. Before serving, let it sit out a few minutes to soften.
What can I use as a substitute for peanut butter?
If you need a nut-free option, try sunflower seed butter or soy nut butter. These alternatives give a similar taste and texture. You could also use almond butter or cashew butter for a different flavor. Just ensure the substitute fits your dietary needs.
You learned how to make delicious peanut butter banana ice cream. We covered the key ingredients, helpful tips, and step-by-step instructions. You can customize it with mix-ins or vegan options too.
Remember to store it right for the best flavor. Making this treat is fun and easy. Now, it’s your turn to enjoy a creamy, homemade dessert. Dive in and share your creations!