Peanut Butter Banana Oatmeal Cookies Simple Delight

Looking for a sweet treat that’s easy to make and packed with flavor? You’re in the right place! In this blog post, I’ll guide you through making Peanut Butter Banana Oatmeal Cookies. These cookies are soft, chewy, and perfect for a snack or dessert. Plus, I’ll share tips, variations, and storage ideas to help you get the best results. Let’s whip up this simple delight together!
Why I Love This Recipe
- Easy to Make: This recipe requires minimal ingredients and simple steps, making it perfect for quick baking sessions.
- Healthy Ingredients: With ripe bananas and natural peanut butter, these cookies are a nutritious treat that satisfies your sweet tooth.
- Customizable: You can easily add your favorite mix-ins like chocolate chips or nuts, tailoring each batch to your taste.
- Great for Snacking: These cookies are not only delicious but also provide a healthy energy boost, making them ideal for on-the-go snacking.
Ingredients
List of Ingredients
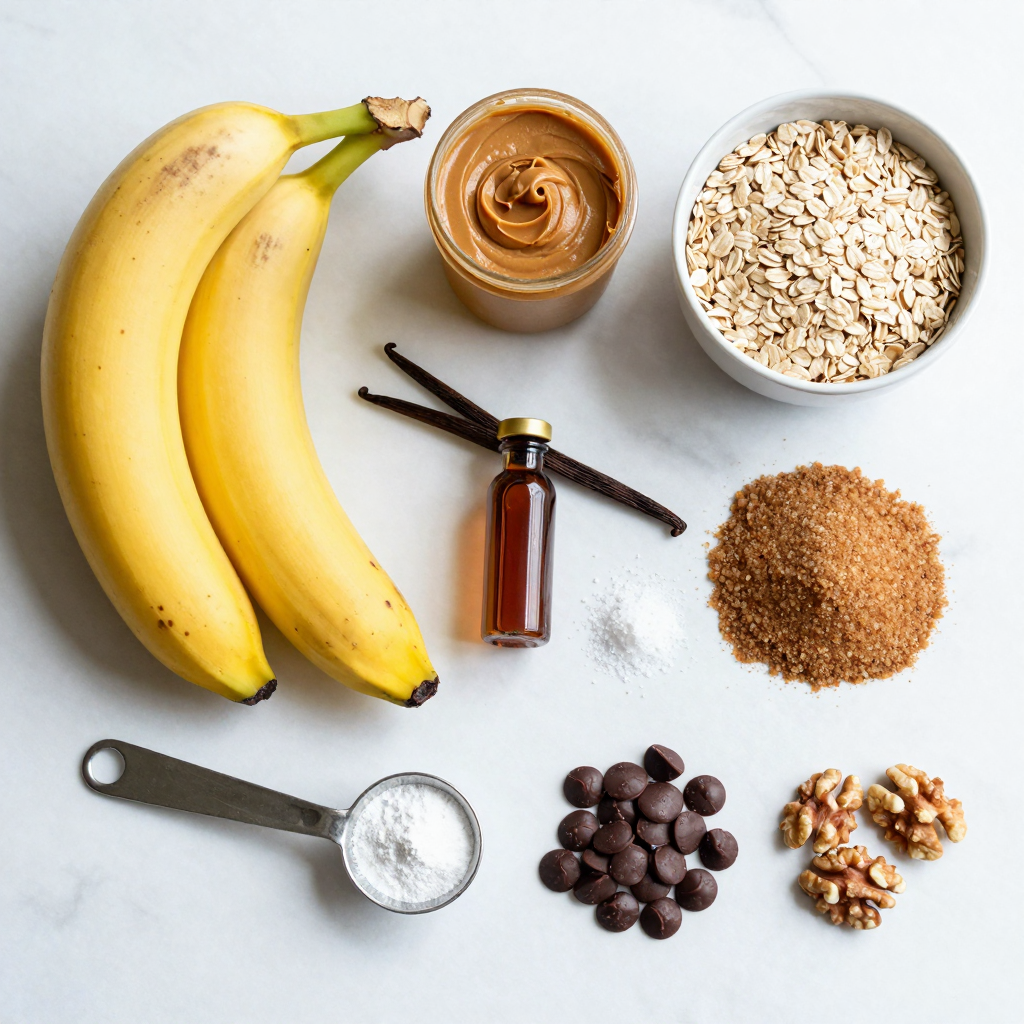
To make these tasty cookies, you will need:
- 2 ripe bananas, mashed
- 1 cup natural peanut butter (smooth or crunchy)
- 1 cup rolled oats
- 1/2 cup brown sugar (or coconut sugar for a healthier option)
- 1/2 teaspoon vanilla extract
- 1/4 teaspoon baking soda
- 1/4 teaspoon salt
- 1/2 cup dark chocolate chips (optional)
- 1/4 cup chopped nuts (such as walnuts or pecans, optional)
These simple ingredients work together to create a chewy and flavorful cookie. The ripe bananas add sweetness and moisture, while peanut butter provides a rich, nutty taste.
Optional Add-ins
You can personalize your cookies with some fun add-ins. Here are a few ideas:
- Dark chocolate chips for a sweet touch
- Chopped nuts like walnuts or pecans for crunch
- A sprinkle of cinnamon for warmth
- Dried fruits like raisins or cranberries for extra sweetness
These add-ins let you customize your cookies to your taste. Try different combinations to find your favorite mix!
Substitutions for Common Ingredients
If you don’t have certain items on hand, don’t worry! Here are some easy swaps:
- Use almond butter instead of peanut butter for a nut-free option.
- Replace brown sugar with honey or maple syrup for a natural sweetener.
- Use quick oats instead of rolled oats if that’s what you have.
These substitutions keep the recipe flexible, so you can still enjoy delicious cookies even if you’re missing an ingredient.

Step-by-Step Instructions
Preparation Steps
Start by preheating your oven to 350°F (175°C). This helps the cookies bake evenly. Line a baking sheet with parchment paper. This makes for easy cleanup later. In a large bowl, mash two ripe bananas. You want them smooth but not completely liquid. Then, add one cup of natural peanut butter to the bananas. Stir until the mixture is combined well. Next, mix in half a cup of brown sugar. You can use coconut sugar if you prefer a healthier choice. Add half a teaspoon of vanilla extract, a quarter teaspoon of baking soda, and a quarter teaspoon of salt. Stir the mixture again until it is smooth.
Now, it’s time to fold in one cup of rolled oats. Make sure the oats are evenly mixed in. If you like, add half a cup of dark chocolate chips and a quarter cup of chopped nuts. Gently mix these in. Take a tablespoon or cookie scoop and drop spoonfuls of dough onto the baking sheet. Leave some space between each one. They will spread a little while baking.
Baking Process
Place the baking sheet in the preheated oven. Bake the cookies for about 10 to 12 minutes. You want the edges to turn golden brown. The cookies should look set but not hard. When the time is up, take them out of the oven. Let them sit on the baking sheet for five minutes. This helps them firm up before you move them.
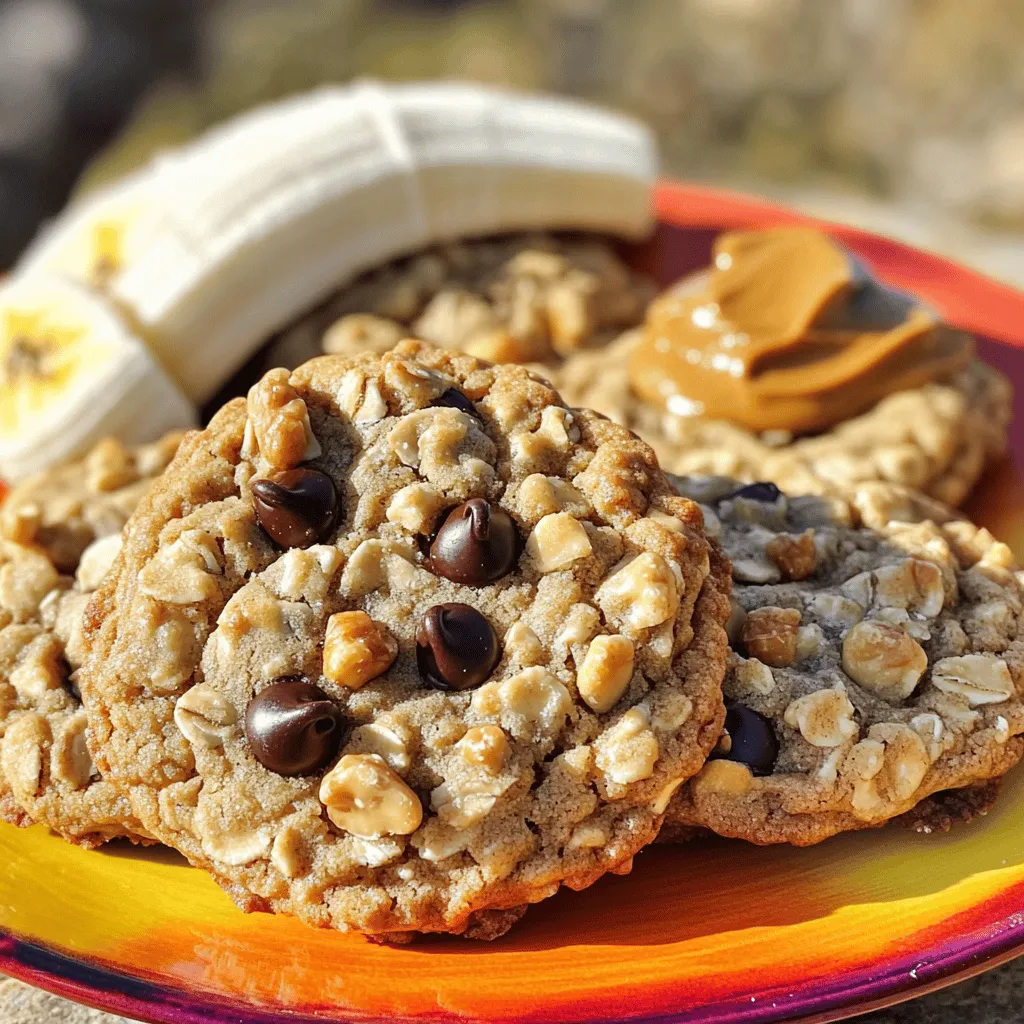
Cooling and Serving Suggestions
After five minutes, use a spatula to transfer the cookies to a wire rack. Let them cool completely. For a fun serving idea, arrange the cookies on a colorful plate. Serve them with fresh banana slices or a scoop of peanut butter for dipping. Enjoy your cookies with a tall glass of almond milk. These cookies are a simple delight, perfect for any time of day!
Pro Tips
- Use Overripe Bananas: The riper the bananas, the sweeter and more flavorful your cookies will be. Look for bananas with brown spots for the best taste.
- Experiment with Nut Butters: While peanut butter is delicious, try almond or cashew butter for a different flavor profile. Just ensure they are natural without added sugars.
- Customize Add-Ins: Feel free to add in dried fruits, seeds, or different types of nuts to make these cookies uniquely yours!
- Store Properly: Keep any leftover cookies in an airtight container at room temperature for up to a week, or freeze them for longer storage.
Tips & Tricks
How to Achieve the Best Texture
To get the best texture in your cookies, use ripe bananas. The riper they are, the sweeter and softer your cookies will be. Mix the bananas and peanut butter fully. This ensures a smooth blend. For chewy cookies, do not overbake. Bake just until the edges turn golden brown. Adding oats helps create a hearty texture. If you want a softer cookie, use less oats.
Common Mistakes to Avoid
One common mistake is using unripe bananas. They do not mash well and lack sweetness. Another issue is not measuring ingredients accurately. Too much peanut butter can make cookies oily. On the flip side, too little can make them dry. Avoid overcrowding the baking sheet. This can cause cookies to stick together. Lastly, don’t skip the cooling time. This helps cookies firm up and hold their shape.
Ideal Storage Tips
Store your cookies in an airtight container. This keeps them fresh for a longer time. If you want them to last, place parchment paper between layers. You can also freeze cookies for later. To freeze, place them in a zip-top bag. They will stay good for up to three months. When ready to eat, thaw them at room temperature. Enjoy your cookies fresh and delicious!

Variations
Gluten-Free Options
You can easily make these cookies gluten-free. Just use certified gluten-free oats. They work just as well as regular oats. This small change ensures everyone can enjoy these cookies without worry.
Vegan Alternatives
To make the cookies vegan, swap out the brown sugar for coconut sugar. This keeps the recipe plant-based. You can also skip the chocolate chips or use dairy-free chocolate. This way, everyone can enjoy a tasty treat!
Flavor Additions
Want to kick up the flavor? Try adding spices like cinnamon or nutmeg. A dash of these spices can make the cookies more exciting. You can also mix in different nut butters. Almond or cashew butter can add a unique twist. Just keep the same amount as peanut butter. These simple swaps keep your cookies fresh and fun!
Storage Information
How to Store Cookies
After you bake the cookies, let them cool completely. This step is key. Once cool, place them in an airtight container. Keep the container at room temperature. The cookies will stay soft and yummy for several days. If you want to keep them fresh longer, consider refrigerating the cookies. Just remember to let them sit out for a bit before eating. This way, they will taste better.
Freezing Instructions
If you want to save some cookies for later, freezing is a great option. To freeze, let the cookies cool completely first. Then, place them in a single layer on a baking sheet. Put the sheet in the freezer for about an hour. After that, you can transfer the cookies to a freezer-safe bag. Remove as much air as possible to prevent freezer burn. Cookies can stay frozen for up to three months. When you’re ready to eat, just thaw them at room temperature.
Shelf Life and Freshness Tips
These cookies are best when fresh, but they can last. If stored properly, they can stay good for up to one week at room temperature. To keep them fresh longer, use parchment paper between layers in the container. This helps to avoid sticking. Always check for any signs of spoilage. If the cookies smell off or look strange, it’s best to toss them. Enjoy them while they’re fresh for the best taste!
FAQs
Can I use other nut butters?
Yes, you can use other nut butters. Almond butter and cashew butter work well. These nut butters give a different taste but still keep it yummy. Just ensure the nut butter is natural. The texture might change a bit, but the cookies will still be great.
How do I know when the cookies are done?
You will know the cookies are done when the edges turn golden brown. The center should look set and not too soft. It helps to set a timer for 10-12 minutes. Once you take them out, let them cool for a few minutes. They will firm up as they cool.
Can I make this recipe ahead of time?
Yes, you can make this recipe ahead of time. You can mix the dough and keep it in the fridge for up to 24 hours. When ready, just scoop and bake. This is great for busy days or when you want fresh cookies!
This blog post covered all you need to know about making cookies. We explored key ingredients and offered smart substitutions. You learned step-by-step instructions for baking and cooling your cookies. I shared tips for the best texture and avoided common mistakes. We also discussed fun variations and how to store leftovers.
Now, with this knowledge, you can bake your perfect cookies anytime! Enjoy your baking journey!

Peanut Butter Banana Oatmeal Cookies
Ingredients
2 ripe bananas, mashed
1 cup natural peanut butter (smooth or crunchy)
1 cup rolled oats
1/2 cup brown sugar (or coconut sugar for a healthier option)
1/2 teaspoon vanilla extract
1/4 teaspoon baking soda
1/4 teaspoon salt
1/2 cup dark chocolate chips (optional)
1/4 cup chopped nuts (such as walnuts or pecans, optional)
Instructions
Preheat your oven to 350°F (175°C) and line a baking sheet with parchment paper.
In a large mixing bowl, combine the mashed bananas and peanut butter until fully integrated.
Add the brown sugar, vanilla extract, baking soda, and salt to the mixture. Stir well until combined.
Gradually fold in the rolled oats until they are evenly distributed in the mixture.
If desired, add in the dark chocolate chips and chopped nuts, gently mixing to incorporate.
Using a tablespoon or cookie scoop, drop spoonfuls of dough onto the prepared baking sheet, leaving space between each cookie as they will spread slightly.
Bake in the preheated oven for about 10-12 minutes, or until the edges are golden brown and the cookies appear set.
Remove from the oven and let the cookies cool on the baking sheet for 5 minutes before transferring them to a wire rack to cool completely.
Prep Time: 10 mins | Total Time: 22 mins | Servings: About 12 cookies
– Presentation Tips: Arrange the cookies on a colorful plate, and serve alongside fresh banana slices or a dollop of peanut butter for dipping. Enjoy with a tall glass of almond milk!

Peanut Butter Banana Oatmeal Cookies
Ingredients
- 2 pieces ripe bananas, mashed
- 1 cup natural peanut butter (smooth or crunchy)
- 1 cup rolled oats
- 1/2 cup brown sugar (or coconut sugar for a healthier option)
- 1/2 teaspoon vanilla extract
- 1/4 teaspoon baking soda
- 1/4 teaspoon salt
- 1/2 cup dark chocolate chips (optional)
- 1/4 cup chopped nuts (such as walnuts or pecans, optional)
Instructions
- Preheat your oven to 350°F (175°C) and line a baking sheet with parchment paper.
- In a large mixing bowl, combine the mashed bananas and peanut butter until fully integrated.
- Add the brown sugar, vanilla extract, baking soda, and salt to the mixture. Stir well until combined.
- Gradually fold in the rolled oats until they are evenly distributed in the mixture.
- If desired, add in the dark chocolate chips and chopped nuts, gently mixing to incorporate.
- Using a tablespoon or cookie scoop, drop spoonfuls of dough onto the prepared baking sheet, leaving space between each cookie as they will spread slightly.
- Bake in the preheated oven for about 10-12 minutes, or until the edges are golden brown and the cookies appear set.
- Remove from the oven and let the cookies cool on the baking sheet for 5 minutes before transferring them to a wire rack to cool completely.
- Arrange the cookies on a colorful plate, and serve alongside fresh banana slices or a dollop of peanut butter for dipping. Enjoy with a tall glass of almond milk!

![- 2 cups all-purpose flour - 1 teaspoon baking powder - 1 teaspoon baking soda - 1 teaspoon ground cinnamon - 1/2 teaspoon ground ginger - 1/2 teaspoon salt The dry ingredients are key to getting the right structure. The flour gives body, while the baking powder and baking soda help the whoopie pies rise. The spices add warmth and flavor, making the treats truly delicious. - 1 cup granulated sugar - 1 cup packed brown sugar - 1 cup vegetable oil - 4 large eggs These wet ingredients bring moisture and sweetness. The sugars create a rich taste, while the oil keeps the pies soft. Eggs bind everything together for the perfect texture. - 2 cups grated carrots (about 4 medium carrots) - 1/2 cup crushed pineapple, thoroughly drained - 1 teaspoon vanilla extract Grated carrots add natural sweetness and a lovely color. Pineapple gives a hint of tartness and keeps the cakes moist. Vanilla adds a warm, sweet note that enhances the flavor. - 8 oz cream cheese, softened at room temperature - 1/4 cup unsalted butter, softened at room temperature - 2 cups powdered sugar - 1 teaspoon vanilla extract - A pinch of salt The cream cheese filling is rich and tangy. It balances the sweetness of the whoopie pies. Mixing in butter and powdered sugar creates a smooth texture. A pinch of salt enhances the flavors, while vanilla rounds it out. For the complete recipe, check out the Full Recipe. - Preheat your oven to 350°F (175°C). - Line your baking sheets with parchment paper. This helps keep the whoopie pies from sticking. - In a medium bowl, whisk together the flour, baking powder, baking soda, ground cinnamon, ground ginger, and salt. - Make sure everything is well combined. This will give your cookies the right texture. - In a large bowl, mix the granulated sugar, brown sugar, and vegetable oil. Use an electric mixer to blend them until smooth. - Add the eggs one at a time, mixing well after each addition. This makes your batter light and fluffy. - Gradually add the dry mixture to the wet mixture. Mix on low speed until just combined; some lumps are okay. - Fold in the grated carrots and crushed pineapple. Add the vanilla extract for extra flavor. - Use a cookie scoop or tablespoon to drop rounded scoops of batter onto the prepared baking sheets. - Space them about 2 inches apart to allow for spreading during baking. - Bake for 12-15 minutes. The edges should be set, and the tops should spring back when touched. - While the cookies cool, prepare the filling. In a large bowl, beat the softened cream cheese and butter until creamy. - Gradually add the powdered sugar, mixing until the filling is smooth. Add the vanilla extract and a pinch of salt to enhance the flavor. - Once the cookies are fully cool, take one and spread a layer of cream cheese filling on the flat side. - Top it with another cookie, flat side down, to create a sandwich. - Repeat this with the remaining cookies until all the whoopie pies are assembled. For a special touch, dust them with powdered sugar. - For the full recipe, check out the detailed instructions. To make your whoopie pies soft, avoid overmixing the batter. Overmixing makes cookies tough. Mix just until the dry ingredients blend with the wet. A few lumps are fine. To know when cookies are done, look for set edges. Press the top gently. It should spring back. If it leaves a dent, bake a bit longer. For a pretty presentation, dust the whoopie pies with powdered sugar. You can also sprinkle chopped walnuts on top. This adds texture and looks great on a platter. Pair these sweet treats with milk or tea. A glass of cold milk balances the flavors. Tea adds warmth and comfort. You can add chopped nuts or raisins to the batter. This gives extra crunch and flavor. Try walnuts or pecans for a nutty touch. Using different spices can elevate your whoopie pies. Add nutmeg or allspice for a warm twist. A pinch of cloves can also deepen the flavor. For the full recipe, check out the Carrot Cake Whoopie Pies section above. {{image_4}} You can change the cream cheese filling to suit your taste. Try different flavors like lemon or orange. They add a zesty twist to your whoopie pies. If you want something lighter, use whipped cream instead. Whipped cream gives a fluffy texture that pairs well with the carrot cake base. For gluten-free options, use a gluten-free flour blend. This keeps the whoopie pies soft and tasty. If you need a vegan version, swap eggs with applesauce. Use a plant-based cream cheese for the filling. These adjustments make the treats enjoyable for everyone. Adding coconut brings a tropical vibe to your whoopie pies. Shredded coconut adds texture and sweetness. For chocolate lovers, consider adding cocoa powder to the batter. You can also use chocolate chips for extra richness. These combinations make each bite exciting and delicious. For the complete recipe, check out the [Full Recipe]. You can store carrot cake whoopie pies at room temperature. Place them in an airtight container. This keeps them soft and fresh. They stay good for about three days. If you want them to last longer, keep them in the fridge. To freeze whoopie pies, wrap each pie in plastic wrap. Then place them in a freezer bag. This extra layer keeps them fresh for up to three months. Label the bag with the date. When you're ready to eat them, just pull them out and let them thaw at room temperature. Enjoy whoopie pies at room temperature for the best taste. If you like them warm, heat them in the microwave for 10-15 seconds. This makes the cream cheese filling soft and yummy. You can serve them as is or dust with powdered sugar for a fun touch. For a little crunch, add chopped nuts on top! Check the Full Recipe for more fun ideas. To make carrot cake whoopie pies, start by mixing flour, baking powder, and spices. In another bowl, blend sugars, oil, and eggs. Combine both mixtures and fold in grated carrots and pineapple. Drop spoonfuls onto baking sheets and bake until set. While they cool, whip up a cream cheese filling. Assemble by spreading filling between two cookies. Yes, you can prepare the batter in advance. Just cover it and store it in the fridge for up to 24 hours. When ready to bake, let the batter sit at room temperature for a bit. Then, scoop and bake as usual. Whoopie pies last about 3 to 4 days at room temperature. Keep them in an airtight container to stay soft and fresh. You can also refrigerate them to extend their life by a few more days. You can find carrot cake whoopie pies at local bakeries and specialty shops. Some grocery stores may also carry them in their bakery section. If you prefer homemade, follow the full recipe to make your own! To freeze whoopie pies, wrap each one in plastic wrap. Then, place them in a freezer bag or container. They can last up to 3 months in the freezer. To enjoy, let them thaw in the fridge or at room temperature. Absolutely! You can use different fillings like chocolate ganache, vanilla buttercream, or whipped cream. Get creative with flavors to suit your taste. Just ensure the filling complements the carrot cake flavor for the best results. You learned how to make delicious carrot cake whoopie pies. We covered the ingredients, mixing, baking, and assembling steps. Tips and tricks helped you perfect the texture and enhance flavors. You explored variations for fillings and dietary needs. Finally, I provided storage info for your treats. These whoopie pies will impress family or friends. Enjoy baking and sharing these treats!](https://dailydishlab.com/wp-content/uploads/2025/06/fbfd3e26-f016-49e5-9504-61425c24e368-768x768.webp)


![- 1 ½ cups all-purpose flour - 1 teaspoon baking powder - ½ teaspoon baking soda - ½ teaspoon salt - 1 cup unsalted butter, softened - 1 cup granulated sugar - 3 large eggs - 1 tablespoon lemon zest - 2 tablespoons lemon juice - 1 teaspoon vanilla extract - 1 cup fresh blueberries - Optional: 1 cup powdered sugar for glaze - Optional: 2 tablespoons lemon juice for glaze To create a Lemon Blueberry Pound Cake, you need some simple ingredients. The base combines flour, sugar, and butter for a rich texture. The eggs add moisture and help the cake rise. Lemon zest and juice give the cake its bright, fresh flavor. Fresh blueberries burst in your mouth with every bite. If you want to add a glaze, powdered sugar and more lemon juice make it shine. This cake is not just tasty; it looks great too! You can serve it on a nice plate with berries on top. - Calories per serving: Approximately 300 - Key nutrients: - Carbs: 40g - Fats: 15g - Proteins: 3g Knowing the nutritional facts helps you enjoy this treat wisely. Each slice has about 300 calories. It has a good mix of carbs for energy, some fats for flavor, and a bit of protein. This cake can fit well into a balanced diet. For the full recipe, check the [Full Recipe]. - Preheating the oven: Start by preheating your oven to 350°F (175°C). This helps the cake bake evenly. - Greasing the loaf pan: Next, grease and flour a 9x5-inch loaf pan. This step keeps the cake from sticking to the pan. - Creaming butter and sugar: In a large bowl, beat 1 cup of softened unsalted butter with 1 cup of granulated sugar. Use an electric mixer on medium speed for about 3-4 minutes. The mix should look light and fluffy. - Adding eggs and flavorings: Add 3 large eggs one at a time, mixing well after each. Then, stir in 1 tablespoon of lemon zest, 2 tablespoons of lemon juice, and 1 teaspoon of vanilla extract until combined. - Incorporating dry ingredients: In a separate bowl, whisk together 1 ½ cups of all-purpose flour, 1 teaspoon of baking powder, ½ teaspoon of baking soda, and ½ teaspoon of salt. Gradually add this mix to the wet ingredients. Mix until just combined to keep your cake light. - Folding in blueberries: Carefully fold in 1 cup of fresh blueberries with a rubber spatula. Make sure to spread them evenly throughout the batter. - Baking time and test for doneness: Pour the batter into your prepared loaf pan. Bake for 55-65 minutes. You will know it’s done when a toothpick inserted in the center comes out clean. For detailed instructions, check out the Full Recipe. - How to avoid overmixing: When you mix the batter, do it gently. After you add the dry ingredients, mix just until you see no more flour. Overmixing can make the cake tough. It’s okay if there are a few small lumps. - Ensuring even baking: Make sure your oven is at the right temperature. An oven thermometer can help with this. Place the cake in the center of the oven. This spot helps it bake evenly. Rotate the pan halfway through baking to avoid any hot spots. - Presentation ideas: The key to a great presentation is color. Serve the cake on a bright platter. Add fresh blueberries and mint leaves on top for a pop of color. You can also dust it with powdered sugar for a sweet touch. - Pairing with beverages: This lemon blueberry pound cake pairs well with tea or lemonade. The tartness of the lemon and sweetness of the blueberries complement these drinks perfectly. You can also serve it with a scoop of vanilla ice cream for an extra treat. - Dense cake: If your cake turns out dense, check your measurements. Too much butter or flour can cause this. Also, make sure you cream the butter and sugar well. This step adds air to the batter. - Sunken centers: A sunken center can happen if the oven is too hot. It can also happen if the batter is too heavy. To fix this, avoid adding too many blueberries. They make the batter heavy. Make sure to bake the cake long enough until a toothpick comes out clean. {{image_2}} You can make this lemon blueberry pound cake even more fun by adding other fruits. Raspberries and strawberries work great. They add a nice tartness that pairs well with lemon. You can also try different citrus zest. Lime or orange zest gives a fresh twist to the cake. Each fruit brings its own charm and flavor. If you need gluten-free options, use a 1-to-1 gluten-free flour blend. This swap will keep the cake tender and moist. For egg substitutions, consider using applesauce or flaxseed meal. One egg can be replaced with ¼ cup of applesauce or 1 tablespoon of flaxseed mixed with 2.5 tablespoons of water. These options work well in keeping the cake light and delicious. If you want to make mini loaves or muffins, adjust your baking time. Mini loaves take about 30-40 minutes, while muffins bake for 18-20 minutes. Check for doneness by inserting a toothpick in the center. This will help you get perfect little treats for any occasion. Enjoy the fun of sharing in smaller portions! You can store your lemon blueberry pound cake in two ways: at room temperature or in the fridge. If you keep it at room temperature, wrap it in plastic wrap. This keeps it moist and fresh. Make sure to place it in a cool, dry spot. Storing it this way works well for up to three days. If you want it to last longer, put it in the fridge. This will help it stay fresh for about a week. Just remember, cold air can dry out the cake. So, be sure to wrap it well. Freezing slices is a great option if you want to save some cake for later. First, let the cake cool completely. Then cut it into slices. Wrap each slice tightly in plastic wrap. After that, place the wrapped slices in a freezer bag. This way, they won’t stick together. You can freeze them for up to three months. When you want a slice, take it out and let it thaw. Simply leave it on the counter for a few hours or overnight in the fridge. Your lemon blueberry pound cake stays fresh for a while. If stored properly, it can last up to a week in the fridge. At room temperature, it stays good for about three days. Look for signs of spoilage. If the cake looks dry or has a strange smell, it’s best to throw it out. Also, any mold is a clear sign it’s time to say goodbye. Enjoy every bite while it’s fresh! To keep your pound cake moist, you can follow these tips: - Use fresh ingredients. - Measure flour correctly. Too much can dry the cake. - Avoid overbaking. Keep a close eye on baking time. - Wrap the cake in plastic wrap when cool. This helps lock in moisture. Yes, you can use frozen blueberries. They work well in this recipe. However, frozen blueberries may change the cake's texture. They can make the batter a little wetter. You might see some color bleed, turning the batter slightly blue. This won't affect the taste, and the cake will still be delicious! To check if your cake is done, insert a toothpick into the center. If it comes out clean or with just a few crumbs, the cake is ready. If it has wet batter on it, bake for a few more minutes. Be careful not to overbake, as this can dry out the cake. Yes, you can make this pound cake ahead of time. Bake it a day or two before serving. Just wrap it well to keep it fresh. You can serve it at room temperature. If you want, you can even freeze it for later. Just make sure to thaw it overnight in the fridge. Making a lemon glaze is simple. Here’s how: - Mix 1 cup of powdered sugar with 2 tablespoons of lemon juice. - Stir until smooth. - Drizzle it over the cooled pound cake for a sweet and tangy finish. This glaze adds a lovely shine and extra flavor. You now know how to make a delicious lemon blueberry pound cake. We covered key ingredients, step-by-step instructions, and helpful tips. Remember to avoid overmixing and adjust baking times for mini loaves. Consider flavor variations and storage advice for the best results. With these simple steps, you can bake an amazing treat that everyone will love. Enjoy the baking process and share your creation with others!](https://dailydishlab.com/wp-content/uploads/2025/07/b06ae976-d76d-41cd-a559-ecf5622799d5-768x768.webp)
