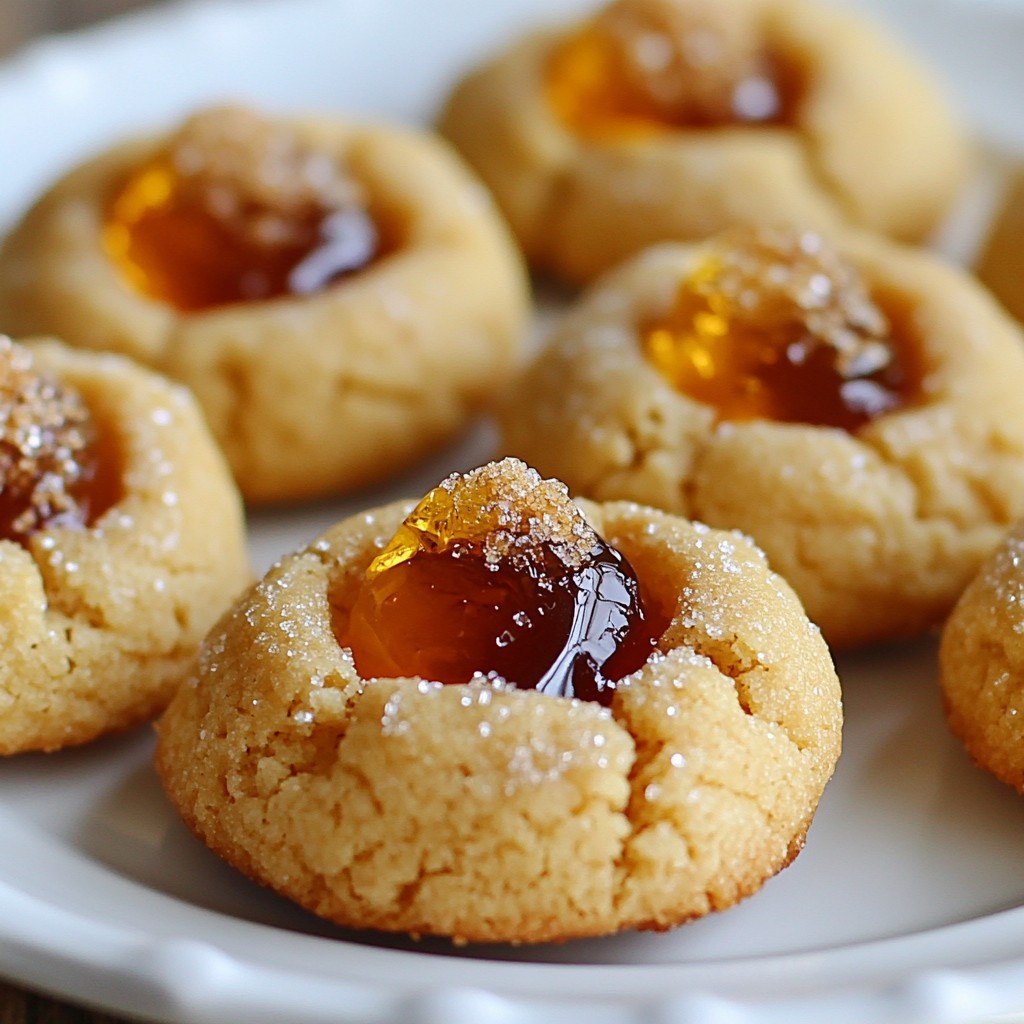
Looking for a sweet treat that's both fun and easy to make? Look no further than Peanut Butter Jelly Thumbprint Cookies! These cookies combine the rich flavor of peanut butter with your favorite jam for a delightful snack. In this guide, I’ll walk you through the simple steps to create these irresistible cookies, share tips for making them perfect, and explore delicious variations to surprise your taste buds. Let’s get baking!
Why I Love This Recipe
- Delicious Flavor Combination: The rich peanut butter pairs perfectly with the sweet and fruity jelly, creating a nostalgic taste that everyone loves.
- Easy to Make: This recipe comes together quickly and requires minimal ingredients, making it perfect for bakers of all skill levels.
- Great for Sharing: With 24 cookies in a batch, these thumbprint cookies are ideal for parties, gatherings, or simply sharing with friends and family.
- Customizable Options: Feel free to experiment with different flavors of jelly or even substitute nut butters for a unique twist!
Ingredients
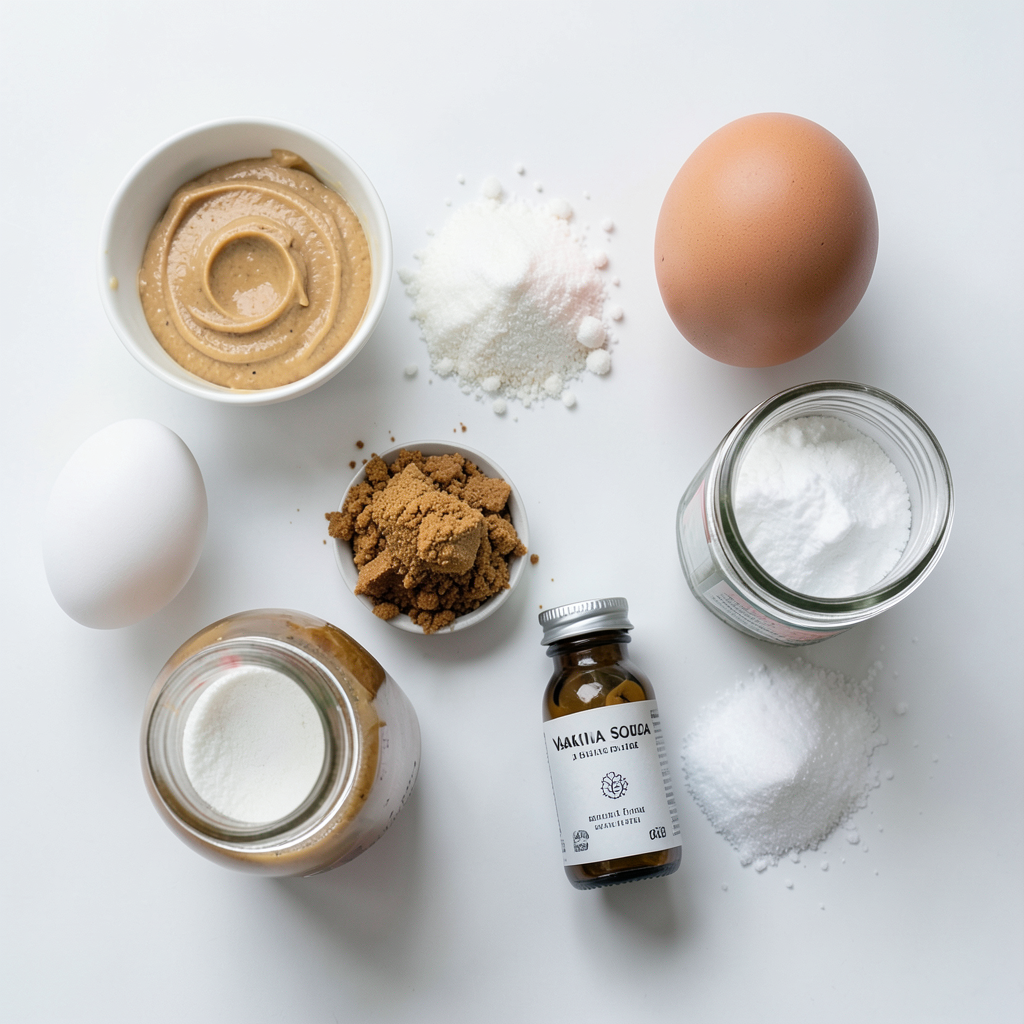
Required Ingredients
- 1 cup creamy peanut butter
- 1/2 cup granulated sugar
- 1/2 cup brown sugar, packed
- 1 large egg
- 1 teaspoon vanilla extract
- 1 teaspoon baking soda
- 1/4 teaspoon salt
- 1/2 cup jelly or jam (your choice: strawberry, raspberry, or grape)
- Extra sugar for rolling (optional)
Using creamy peanut butter gives the best texture. Choose a brand with no added sugar for more control over sweetness. Fresh eggs make the cookies light and fluffy.
Optional Ingredients
- You can add chocolate chips for a rich twist.
- Try almond or coconut extract for extra flavor.
- Experiment with different jelly or jam flavors like apricot or blackberry.
Different jams can change the cookie's taste. Strawberry offers sweetness, while raspberry gives a tart kick.
Step-by-Step Instructions
Preparation Steps
1. Preheat Your Oven: Start by preheating your oven to 350°F (175°C). This ensures your cookies bake evenly.
2. Prepare the Baking Sheet: Line a baking sheet with parchment paper. This helps prevent sticking and makes cleanup easy.
3. Mix the Dough Ingredients: In a large mixing bowl, combine 1 cup of creamy peanut butter, 1/2 cup of granulated sugar, and 1/2 cup of packed brown sugar. Mix until smooth and creamy.
4. Add Egg and Vanilla: Crack in 1 large egg and add 1 teaspoon of vanilla extract. Beat the mixture until everything blends well.
5. Add Dry Ingredients: Sprinkle in 1 teaspoon of baking soda and 1/4 teaspoon of salt. Mix thoroughly until all the ingredients come together.
Cookie Formation
1. Form Dough Balls: Take a tablespoon or a cookie scoop to portion out the dough. Roll each portion into a ball.
2. Optional Sugar Coating: If you want extra sweetness, roll each dough ball in sugar before placing them on the baking sheet.
3. Create Indentations: Place the dough balls on the lined baking sheet, spacing them about 2 inches apart. Use your thumb or a round measuring spoon to make a small indentation in the center of each cookie.
Baking Instructions
1. Bake the Cookies: Place the baking sheet in the preheated oven. Bake for 10-12 minutes, or until the edges turn lightly golden.
2. Cool the Cookies: Remove the cookies from the oven. Let them cool on the baking sheet for 5 minutes. After that, transfer the cookies to a wire rack to cool completely.
These steps guide you through making delicious Peanut Butter Jelly Thumbprint Cookies. Enjoy the process and the delightful treat!
Tips & Tricks
Baking Tips
To ensure your Peanut Butter Jelly Thumbprint Cookies have the right texture, follow these steps:
- Use room temperature ingredients: This helps the dough mix well. Cold eggs or peanut butter can lead to clumps.
- Don’t overmix: Mix until just combined. Overmixing can make cookies tough instead of soft.
- Chill the dough: If your dough feels too sticky, chill it for 30 minutes. This makes it easier to roll.
- Check your oven: Oven temperatures can vary. Use an oven thermometer to ensure accuracy for even baking.
For measuring ingredients accurately:
- Use dry measuring cups for solids: Scoop the ingredient and level it off with a knife.
- Use liquid measuring cups for liquids: Fill to the line for the exact amount.
- Weigh ingredients when possible: This gives the most precise measurement, especially for flour.
Flavors and Sweetness
When selecting jelly or jam, consider these tasty options:
- Strawberry: A classic choice that pairs well with peanut butter.
- Raspberry: Offers a nice tartness that balances the sweetness.
- Grape: Provides a nostalgic flavor that many love.
To adjust sweetness to your liking:
- Reduce sugar: If you prefer less sweet cookies, cut down the granulated or brown sugar by a few tablespoons.
- Use less jelly: Fill the thumbprint with less jelly for a more subtle flavor.
- Try sugar substitutes: Options like honey or maple syrup can work, but adjust the liquid in the dough.
Pro Tips
- Chill the Dough: For a firmer dough that’s easier to handle, chill the cookie dough in the refrigerator for 30 minutes before rolling into balls.
- Choose Quality Jelly: Use high-quality jelly or jam for the best flavor. Homemade options can add a personal touch!
- Don’t Overbake: Keep an eye on the cookies while baking; they should be lightly golden at the edges but still soft in the center.
- Storage Tips: Store cookies in an airtight container at room temperature for up to a week. You can also freeze them for longer storage.
Variations
Alternative Ingredients
If you need gluten-free options, use a gluten-free flour blend instead of regular flour. This change keeps the cookies soft and tasty. Check the label to make sure it is safe for your needs.
For nut-free variations, you can swap peanut butter for sun butter or soy nut butter. These options provide a similar taste and texture without nuts. They work well in this recipe and are safe for those with nut allergies.
Flavor Enhancements
To add a twist, try adding chocolate chips or chopped nuts to the dough. Mixing in 1/2 cup of chocolate chips gives a sweet touch. If you like a crunch, add 1/4 cup of chopped nuts.
Using flavored peanut butter is another great idea. Try chocolate or honey peanut butter for a new flavor. This small change makes a big difference in taste. Add about 1 cup of your favorite flavored butter to the dough.
Experimenting with these variations will keep your Peanut Butter Jelly Thumbprint Cookies exciting and enjoyable!
Storage Info
Storing Cookies
To keep your Peanut Butter Jelly Thumbprint Cookies fresh, store them in an airtight container. This way, they stay soft and tasty. Use a container made of glass or plastic. If you have a cookie tin, that works too! You can layer the cookies with parchment paper between them. This prevents sticking and keeps them intact.
Freezing Instructions
If you want to save some cookies for later, freezing is a great option. First, let the baked cookies cool completely. Then, place them in a single layer on a baking sheet. Freeze them for about one hour. Once frozen, transfer the cookies to a freezer bag. Make sure to remove as much air as possible before sealing.
When you're ready to enjoy, take out the cookies and let them thaw at room temperature. If you prefer them warm, pop them in the oven at 300°F (150°C) for 5-7 minutes. This will make them soft again and enhance the peanut butter flavor.
FAQs
Common Questions
How to fix dry cookies? If your cookies turn out dry, add a little more peanut butter. You can also add a splash of milk to the dough. This will help make them softer.
Can I make these cookies ahead of time? Yes! You can make the dough ahead. Just wrap it tightly and chill it in the fridge for up to three days. When ready, scoop and bake as usual.
Ingredient Substitutions
What can I use instead of peanut butter? If you cannot use peanut butter, try almond butter or sunflower seed butter. Both have a similar texture and taste great.
Alternatives for granulated sugar? You can use coconut sugar or honey as a sweetener. Just remember that honey adds more moisture, so you may need to adjust other liquids in the recipe.
Baking Advice
How to adjust baking time for different ovens? Ovens can vary. Check cookies a minute or two early. If they look golden, they’re ready. Adjust your time based on how your oven heats.
Can I make thumbprint cookies with other flavors? Yes! You can use any jelly or jam you like. Try raspberry, apricot, or even chocolate spread for a twist. Just make sure it fits in the thumbprint!
This blog provides a complete guide to making delicious thumbprint cookies. You learned about the necessary ingredients and some great optional flavors. I walked you through each step, so you can bake with confidence. Remember to store your cookies properly to keep them fresh. Have fun trying different flavors and variations to make these cookies your own. Enjoy the process and share your tasty results!