Peppermint Chocolate Bark Cups Festive and Tasty Treat

Looking for a tasty treat that’s fun to make? You’ll love these Peppermint Chocolate Bark Cups! They are perfect for holiday gatherings or just a sweet snack at home. With layers of semi-sweet and white chocolate, plus crushed candy canes, they deliver that festive flavor everyone craves. Let’s dive into creating this delicious dessert that will impress your friends and family!
Why I Love This Recipe
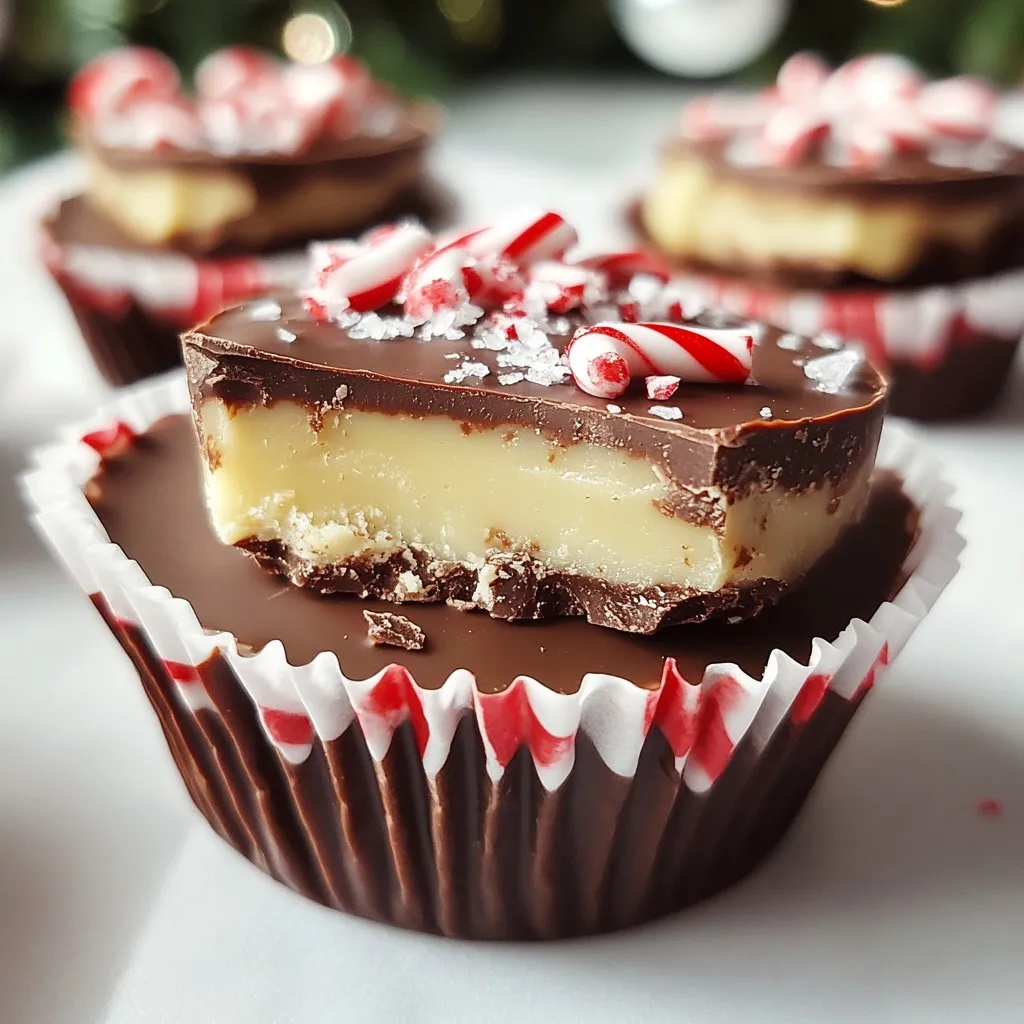
- Irresistible Flavor Combination: The rich semi-sweet chocolate pairs perfectly with the creamy white chocolate and refreshing peppermint, making every bite a delightful experience.
- Festive Presentation: These bark cups are visually appealing with their layers of chocolate and vibrant candy cane topping, perfect for holiday gatherings or gift-giving.
- Easy to Make: With simple ingredients and straightforward steps, this recipe is perfect for both novice and experienced bakers looking for a quick treat.
- Versatile Treat: These cups can be customized with different toppings or chocolate types, allowing for creativity while maintaining the delicious peppermint flavor.
Ingredients
To make Peppermint Chocolate Bark Cups, you need simple, tasty ingredients. Here is what you will need:
- 1 cup semi-sweet chocolate chips
- 1 cup white chocolate chips
- 1 teaspoon peppermint extract
- 1/2 cup crushed candy canes (plus extra for topping)
- 1/2 cup finely crushed graham crackers (for base)
- 1 tablespoon coconut oil (for easier melting)
- Sea salt flakes (optional, for garnish)
These ingredients come together to create a sweet, minty treat. The semi-sweet chocolate gives a rich base. The white chocolate adds creaminess. Peppermint extract brings a fresh flavor. Crushed candy canes add crunch and color. The graham crackers form a nice base. Coconut oil helps the chocolate melt smoothly. You can use sea salt for a touch of contrast. Each ingredient plays a special role in making these cups festive and fun.

Step-by-Step Instructions
Preparing the Cupcake Tin
Line a standard muffin tin with paper liners or silicone cups. This helps with easy removal later. Make sure to press the liners down well. This ensures your cups hold their shape.
Melting the Semi-Sweet Chocolate
Take a microwave-safe bowl and add 1 cup of semi-sweet chocolate chips. Mix in ½ tablespoon of coconut oil. Microwave this mix in 30-second intervals. Stir after each interval until smooth. The chocolate should be shiny and easy to pour.
Creating the Base for the Cups
Spoon a small amount of melted chocolate into each liner. Use the back of a spoon to spread it evenly across the bottom. You want just enough to cover it. Place the muffin tin in the freezer for about 10 minutes. This helps it set well.
Melting the White Chocolate
In another microwave-safe bowl, add 1 cup of white chocolate chips with the remaining ½ tablespoon of coconut oil. Use the same 30-second microwave method. Stir until the chocolate is fully melted and smooth. This will keep your white chocolate creamy.
Adding Flavor to the White Chocolate
Once melted, stir in 1 teaspoon of peppermint extract. Add half of the crushed candy canes into the mix. Stir until everything is evenly mixed. This adds a festive touch to your cups.
Filling and Topping the Cups
After the base is set, pour the white chocolate mix over the semi-sweet layer. Fill each cup about ¾ full. Then, sprinkle the remaining crushed candy canes on top. Press them in gently to stick. Optionally, sprinkle some sea salt for a nice contrast.
Final Setting Time
Return the muffin tin to the freezer. Let the cups set for at least 30 minutes. They should feel firm to the touch when done. Then they are ready to serve!
Tips & Tricks
How to Achieve Perfect Consistency
To get smooth melted chocolate, use the microwave. Start with a bowl of chocolate chips and a bit of coconut oil. Heat it for 30 seconds, then stir. Repeat until it melts. This method helps avoid burning. If you prefer, you can melt chocolate using a double boiler. Just set a bowl over simmering water. Stir it gently until melted.
Customizing Flavor Profiles
You can change the taste of these bark cups. Try using almond or vanilla extract instead of peppermint. This adds a unique twist. You can also adjust the sweetness by using more or less chocolate. If you want it sweeter, add more white chocolate. For a less sweet flavor, use dark chocolate.
Presentation Suggestions
For your holiday parties, serve these cups on a festive platter. You can stack them in a pyramid for an eye-catching display. Use colorful liners to match your theme. To make them extra special, drizzle melted chocolate on top. A sprinkle of extra crushed candy canes adds a nice touch.
Pro Tips
- Use Quality Chocolate: Choose high-quality chocolate chips for the best flavor and texture in your bark cups.
- Chill Between Layers: Ensure each layer is fully set in the freezer before adding the next to maintain distinct layers.
- Customize Flavors: Experiment with different extracts like almond or vanilla for a unique twist on the classic peppermint flavor.
- Presentation Matters: Consider using festive liners or adding decorative sprinkles for a more visually appealing treat.

Variations
Using Different Types of Chocolate
You can play with the chocolate in your cups. Dark chocolate gives a rich taste. It pairs well with peppermint for a bold flavor. Try using a 70% cocoa dark chocolate. This adds depth to your bark cups.
If you prefer a sweeter treat, use milk chocolate. Milk chocolate melts well and is creamy. It balances the minty taste nicely. You can mix it with white chocolate for a fun twist.
Incorporating Other Mix-Ins
Adding nuts or dried fruits can make your cups special. Chopped almonds or walnuts can add crunch. You might also try dried cranberries or apricots for a fruity touch.
If you want more candy, consider mini marshmallows or M&Ms. They add color and fun to the top. You can also swap crushed candy canes for crushed Oreos for a different flavor.
Dietary Adjustments
You can make bark cups that fit different diets. For gluten-free options, use gluten-free graham crackers. They work just as well for the base.
If you want a vegan version, choose dairy-free chocolate. There are many brands that offer great taste. You can also skip the graham crackers and use crushed nuts instead. This keeps the cups tasty and satisfying while meeting dietary needs.
Storage Info
Best Storage Practices
To keep your peppermint chocolate bark cups fresh, store them in an airtight container. Choose a container that fits snugly to prevent air from getting in. This helps keep the chocolate from getting dry or losing its flavor. Keep the container in a cool, dry place away from sunlight. Avoid areas that get too warm, as this can cause the chocolate to melt or lose shape.
Shelf Life
These peppermint chocolate bark cups stay fresh for about one to two weeks when stored properly. If you notice any white spots on the chocolate, this is called bloom. It happens when the fat or sugar separates. While it looks unappealing, the bark is still safe to eat. If you notice off smells or strange textures, it’s best to toss them.
How to Freeze Peppermint Chocolate Bark Cups
To freeze your bark cups, place them in a single layer in an airtight container. You can also use freezer-safe bags. Be sure to separate layers with parchment paper to avoid sticking. They can last up to three months in the freezer.
When you’re ready to enjoy them, remove the cups from the freezer. Let them thaw in the fridge for about an hour. You can also leave them out at room temperature for a quicker thaw. Avoid using a microwave, as this can change the texture. Enjoy your festive treats!
FAQs
What is the best way to melt chocolate?
The best way to melt chocolate is in the microwave. Use a microwave-safe bowl. Combine chocolate chips with coconut oil. Microwave for 30 seconds. Stir and repeat until smooth. This method keeps the chocolate from burning. Stirring helps it melt evenly.
Can I make these bark cups ahead of time?
Yes, you can make these bark cups ahead of time. They store well in the fridge. Just keep them in an airtight container. You can make them a few days in advance. This makes them great for parties or gifts.
How long do peppermint chocolate bark cups last?
Peppermint chocolate bark cups last about one week. Store them in the fridge to keep them fresh. Check for any off smells or changes in texture. If they look good, they are still good to eat!
Can I use different candy or toppings?
Absolutely! You can use any candy you love. Try crushed nuts or dried fruit. You can also use different types of candy canes. Get creative and mix flavors that you enjoy. Just keep the toppings balanced for a tasty treat.
What modifications can I make for dietary restrictions?
For gluten-free options, use gluten-free graham crackers. You can also find dairy-free chocolate. Check labels to ensure they meet your needs. If you want a vegan recipe, use plant-based chocolate and coconut oil. There are many ways to enjoy these treats!
You can create delicious peppermint chocolate bark cups with simple steps. Start with quality ingredients like chocolate and peppermint. Follow instructions carefully for melting and mixing. Remember to keep things fun by trying new flavors or toppings. Store your treats well to enjoy them later. By using my tips, you can impress at any gathering. Enjoy your tasty creation

Peppermint Chocolate Bark Cups
Ingredients
- 1 cup semi-sweet chocolate chips
- 1 cup white chocolate chips
- 1 teaspoon peppermint extract
- 0.5 cup crushed candy canes
- 0.5 cup finely crushed graham crackers
- 1 tablespoon coconut oil
- optional sea salt flakes
Instructions
- Prepare the Cupcake Tin: Line a standard muffin tin with paper liners or silicone baking cups for easy removal.
- Melt Semi-Sweet Chocolate: In a microwave-safe bowl, combine the semi-sweet chocolate chips and 1/2 tablespoon of coconut oil. Microwave in 30-second intervals, stirring in between, until fully melted and smooth.
- Create the Base: Spoon a small amount of the melted semi-sweet chocolate into each cupcake liner, just enough to cover the bottom. Use the back of a spoon or your fingers to spread it evenly. Place the muffin tin in the freezer to set for about 10 minutes.
- Melt White Chocolate: In another microwave-safe bowl, melt the white chocolate chips with the remaining 1/2 tablespoon of coconut oil in the same way used for the semi-sweet chocolate.
- Add Flavor: Once melted, stir in the peppermint extract and half of the crushed candy canes into the white chocolate mixture until evenly distributed.
- Fill the Cups: Remove the muffin tin from the freezer. Pour the white chocolate mixture over the set semi-sweet chocolate, filling each cup to about 3/4 full.
- Add Crushed Candy Canes: Sprinkle the remaining crushed candy canes on top of the white chocolate layer, gently pressing them in to adhere. Optionally, add a sprinkle of sea salt flakes for contrast.
- Set in Freezer: Return the muffin tin to the freezer and allow the bark cups to set for at least 30 minutes, or until completely firm.
- Serve: Once set, carefully remove the chocolate bark cups from the tin. You can serve them immediately or store them in an airtight container in the refrigerator until ready to enjoy.


![- 1 ½ cups all-purpose flour - 1 teaspoon baking powder - ½ teaspoon baking soda - ½ teaspoon salt - 1 cup unsalted butter, softened - 1 cup granulated sugar - 3 large eggs - 1 tablespoon lemon zest - 2 tablespoons lemon juice - 1 teaspoon vanilla extract - 1 cup fresh blueberries - Optional: 1 cup powdered sugar for glaze - Optional: 2 tablespoons lemon juice for glaze To create a Lemon Blueberry Pound Cake, you need some simple ingredients. The base combines flour, sugar, and butter for a rich texture. The eggs add moisture and help the cake rise. Lemon zest and juice give the cake its bright, fresh flavor. Fresh blueberries burst in your mouth with every bite. If you want to add a glaze, powdered sugar and more lemon juice make it shine. This cake is not just tasty; it looks great too! You can serve it on a nice plate with berries on top. - Calories per serving: Approximately 300 - Key nutrients: - Carbs: 40g - Fats: 15g - Proteins: 3g Knowing the nutritional facts helps you enjoy this treat wisely. Each slice has about 300 calories. It has a good mix of carbs for energy, some fats for flavor, and a bit of protein. This cake can fit well into a balanced diet. For the full recipe, check the [Full Recipe]. - Preheating the oven: Start by preheating your oven to 350°F (175°C). This helps the cake bake evenly. - Greasing the loaf pan: Next, grease and flour a 9x5-inch loaf pan. This step keeps the cake from sticking to the pan. - Creaming butter and sugar: In a large bowl, beat 1 cup of softened unsalted butter with 1 cup of granulated sugar. Use an electric mixer on medium speed for about 3-4 minutes. The mix should look light and fluffy. - Adding eggs and flavorings: Add 3 large eggs one at a time, mixing well after each. Then, stir in 1 tablespoon of lemon zest, 2 tablespoons of lemon juice, and 1 teaspoon of vanilla extract until combined. - Incorporating dry ingredients: In a separate bowl, whisk together 1 ½ cups of all-purpose flour, 1 teaspoon of baking powder, ½ teaspoon of baking soda, and ½ teaspoon of salt. Gradually add this mix to the wet ingredients. Mix until just combined to keep your cake light. - Folding in blueberries: Carefully fold in 1 cup of fresh blueberries with a rubber spatula. Make sure to spread them evenly throughout the batter. - Baking time and test for doneness: Pour the batter into your prepared loaf pan. Bake for 55-65 minutes. You will know it’s done when a toothpick inserted in the center comes out clean. For detailed instructions, check out the Full Recipe. - How to avoid overmixing: When you mix the batter, do it gently. After you add the dry ingredients, mix just until you see no more flour. Overmixing can make the cake tough. It’s okay if there are a few small lumps. - Ensuring even baking: Make sure your oven is at the right temperature. An oven thermometer can help with this. Place the cake in the center of the oven. This spot helps it bake evenly. Rotate the pan halfway through baking to avoid any hot spots. - Presentation ideas: The key to a great presentation is color. Serve the cake on a bright platter. Add fresh blueberries and mint leaves on top for a pop of color. You can also dust it with powdered sugar for a sweet touch. - Pairing with beverages: This lemon blueberry pound cake pairs well with tea or lemonade. The tartness of the lemon and sweetness of the blueberries complement these drinks perfectly. You can also serve it with a scoop of vanilla ice cream for an extra treat. - Dense cake: If your cake turns out dense, check your measurements. Too much butter or flour can cause this. Also, make sure you cream the butter and sugar well. This step adds air to the batter. - Sunken centers: A sunken center can happen if the oven is too hot. It can also happen if the batter is too heavy. To fix this, avoid adding too many blueberries. They make the batter heavy. Make sure to bake the cake long enough until a toothpick comes out clean. {{image_2}} You can make this lemon blueberry pound cake even more fun by adding other fruits. Raspberries and strawberries work great. They add a nice tartness that pairs well with lemon. You can also try different citrus zest. Lime or orange zest gives a fresh twist to the cake. Each fruit brings its own charm and flavor. If you need gluten-free options, use a 1-to-1 gluten-free flour blend. This swap will keep the cake tender and moist. For egg substitutions, consider using applesauce or flaxseed meal. One egg can be replaced with ¼ cup of applesauce or 1 tablespoon of flaxseed mixed with 2.5 tablespoons of water. These options work well in keeping the cake light and delicious. If you want to make mini loaves or muffins, adjust your baking time. Mini loaves take about 30-40 minutes, while muffins bake for 18-20 minutes. Check for doneness by inserting a toothpick in the center. This will help you get perfect little treats for any occasion. Enjoy the fun of sharing in smaller portions! You can store your lemon blueberry pound cake in two ways: at room temperature or in the fridge. If you keep it at room temperature, wrap it in plastic wrap. This keeps it moist and fresh. Make sure to place it in a cool, dry spot. Storing it this way works well for up to three days. If you want it to last longer, put it in the fridge. This will help it stay fresh for about a week. Just remember, cold air can dry out the cake. So, be sure to wrap it well. Freezing slices is a great option if you want to save some cake for later. First, let the cake cool completely. Then cut it into slices. Wrap each slice tightly in plastic wrap. After that, place the wrapped slices in a freezer bag. This way, they won’t stick together. You can freeze them for up to three months. When you want a slice, take it out and let it thaw. Simply leave it on the counter for a few hours or overnight in the fridge. Your lemon blueberry pound cake stays fresh for a while. If stored properly, it can last up to a week in the fridge. At room temperature, it stays good for about three days. Look for signs of spoilage. If the cake looks dry or has a strange smell, it’s best to throw it out. Also, any mold is a clear sign it’s time to say goodbye. Enjoy every bite while it’s fresh! To keep your pound cake moist, you can follow these tips: - Use fresh ingredients. - Measure flour correctly. Too much can dry the cake. - Avoid overbaking. Keep a close eye on baking time. - Wrap the cake in plastic wrap when cool. This helps lock in moisture. Yes, you can use frozen blueberries. They work well in this recipe. However, frozen blueberries may change the cake's texture. They can make the batter a little wetter. You might see some color bleed, turning the batter slightly blue. This won't affect the taste, and the cake will still be delicious! To check if your cake is done, insert a toothpick into the center. If it comes out clean or with just a few crumbs, the cake is ready. If it has wet batter on it, bake for a few more minutes. Be careful not to overbake, as this can dry out the cake. Yes, you can make this pound cake ahead of time. Bake it a day or two before serving. Just wrap it well to keep it fresh. You can serve it at room temperature. If you want, you can even freeze it for later. Just make sure to thaw it overnight in the fridge. Making a lemon glaze is simple. Here’s how: - Mix 1 cup of powdered sugar with 2 tablespoons of lemon juice. - Stir until smooth. - Drizzle it over the cooled pound cake for a sweet and tangy finish. This glaze adds a lovely shine and extra flavor. You now know how to make a delicious lemon blueberry pound cake. We covered key ingredients, step-by-step instructions, and helpful tips. Remember to avoid overmixing and adjust baking times for mini loaves. Consider flavor variations and storage advice for the best results. With these simple steps, you can bake an amazing treat that everyone will love. Enjoy the baking process and share your creation with others!](https://dailydishlab.com/wp-content/uploads/2025/07/b06ae976-d76d-41cd-a559-ecf5622799d5-768x768.webp)
![To make a delightful lemon zucchini sheet cake, gather these key ingredients: - 2 cups grated zucchini (about 2 medium zucchinis) - 1 cup granulated sugar - 1/2 cup vegetable oil - 1/2 cup unsweetened applesauce - 1/4 cup fresh lemon juice These ingredients work together to create a moist cake. The grated zucchini adds moisture and a subtle flavor. The sugar sweetens the cake, while the oil and applesauce keep it soft. Fresh lemon juice gives a bright and zesty taste. You can enhance your cake with a few optional ingredients: - Zest of 2 lemons - Whipped cream for serving - Fresh mint for garnish Adding lemon zest boosts the lemon flavor. Whipped cream makes a lovely topping, and fresh mint adds a pop of color and freshness. These options elevate your cake and make it even more enjoyable. If you want the full recipe, check out the complete details. First, preheat your oven to 350°F (175°C). This step helps the cake rise nicely. Next, grease and line a 9x13 inch sheet pan with parchment paper. This makes it easy to remove the cake later. In a large bowl, combine 1 cup of granulated sugar, 1/2 cup of vegetable oil, 1/2 cup of unsweetened applesauce, 3 large eggs, and 2 teaspoons of vanilla extract. Whisk these ingredients together until they blend well. This mix adds moisture and sweetness to your cake. Now, stir in 2 cups of grated zucchini, the zest of 2 lemons, and 1/4 cup of fresh lemon juice into your wet mix. The zucchini gives the cake a great texture. The lemon adds a lovely fresh flavor that brightens every bite. In another bowl, whisk together 2 cups of all-purpose flour, 1 teaspoon of baking powder, 1 teaspoon of baking soda, and 1/2 teaspoon of salt. This mix helps the cake rise and gives it structure. Gradually add the dry ingredients to the wet mixture. Stir gently until just combined. Be careful not to overmix; small lumps are okay. Overmixing can make the cake tough. Pour the batter into your prepared sheet pan. Use a spatula to smooth the top. Bake in your preheated oven for 25-30 minutes. To check if it's done, insert a toothpick into the center. If it comes out clean, your cake is ready! Let it cool in the pan for about 10 minutes before moving it to a wire rack to cool completely. You can find the full recipe [Full Recipe]. To make your Lemon Zucchini Sheet Cake moist, use both applesauce and oil. Applesauce adds moisture without extra fat. It gives a sweet taste and keeps the cake light. Oil helps keep the cake tender. Use half a cup of each. This mix makes your cake deliciously soft and moist. When you mix your batter, stop when it looks combined. Lumps are okay! Overmixing makes the cake tough. You want a light, airy texture. Just stir until no dry flour shows. Enjoy the small lumps; they will bake out and keep your cake fluffy. The baking time is key to a perfect cake. Use the toothpick test to check for doneness. Insert a toothpick into the center of the cake. If it comes out clean, your cake is ready. If it has wet batter on it, bake a few more minutes. Keep an eye on it so you don’t overbake. A perfectly baked cake is moist and soft. Try these tips for a delightful result! For the complete recipe, check the Full Recipe. {{image_2}} You can enhance your Lemon Zucchini Sheet Cake with fun add-ins. Consider adding nuts for crunch. Chopped walnuts or pecans work great. They add texture and a nutty flavor. If you love chocolate, mix in some chocolate chips. The sweet chocolate pairs well with the tangy lemon. You can also try adding dried fruits like raisins or cranberries. These will give your cake a chewy surprise. When it comes to frosting, you have choices. A lemon glaze is light and fresh. It adds a burst of flavor that complements the cake. To make it, mix powdered sugar with lemon juice until smooth. Drizzle it over the cooled cake for a sweet touch. On the other hand, cream cheese frosting gives a rich, creamy finish. It balances the tartness of the lemon. If you prefer a thicker layer, go for the cream cheese option. Both choices make your cake even more delightful. Want to make this cake gluten-free? It's easy! Substitute all-purpose flour with a gluten-free blend. Look for a mix that includes xanthan gum for better texture. Almond flour can also be a great option. Just note that it may change the taste slightly. You might need to adjust the baking time. Keep an eye on it while it bakes. With these swaps, everyone can enjoy this tasty cake! For the complete steps, check the Full Recipe. To keep your Lemon Zucchini Sheet Cake fresh, store it in the fridge. Place the cake in an airtight container. If you don't have one, wrap it tightly in plastic wrap. This helps prevent the cake from drying out. Remember to wait until it cools completely before storing it. Chilling the cake also helps it stay moist longer. To freeze your cake, first, let it cool down. Cut it into squares or leave it whole. Wrap each piece in plastic wrap, then in aluminum foil. This double wrap prevents freezer burn. Place the wrapped cake in a freezer-safe bag or container. When you're ready to enjoy it, take it out and let it thaw in the fridge overnight. This method keeps the cake soft and tasty. Your Lemon Zucchini Sheet Cake can last up to a week in the fridge. If stored correctly in the freezer, it can last for about three months. Always check for signs of spoilage, like off smells or mold. If it looks good and smells fine, it should be safe to eat! Yes, you can make this cake dairy-free! Here are some easy swaps: - Use almond milk or soy milk instead of any dairy milk. - Replace any butter with coconut oil or a dairy-free butter. - Ensure your applesauce is unsweetened and dairy-free. These swaps keep the cake moist and tasty. To check if your cake is done, look for these signs: - A toothpick inserted in the center comes out clean. - The edges of the cake pull away from the pan slightly. - The top feels firm and springs back when touched. These signs help ensure perfect baking every time. If you can't find zucchini, try these alternatives: - Grated carrots add sweetness and moisture. - Use finely shredded summer squash for a similar texture. - Apples can work well, adding a fruity flavor. These options can add fun twists to your cake! This blog post walks you through the steps to make a delicious Lemon Zucchini Sheet Cake. You learned about the must-have ingredients and some optional ones to add zest. I shared tips to keep your cake moist and avoid overmixing. You can even try variations, like adding nuts or going gluten-free. Baking should be fun and easy. Now, gather your ingredients and get started! Enjoy your baking adventure and make this cake shine!](https://dailydishlab.com/wp-content/uploads/2025/07/f8d12cbe-606d-4e9f-b3a7-8aa2f948db73-768x768.webp)
