Pesto Pasta Salad Flavorful and Fresh Recipe

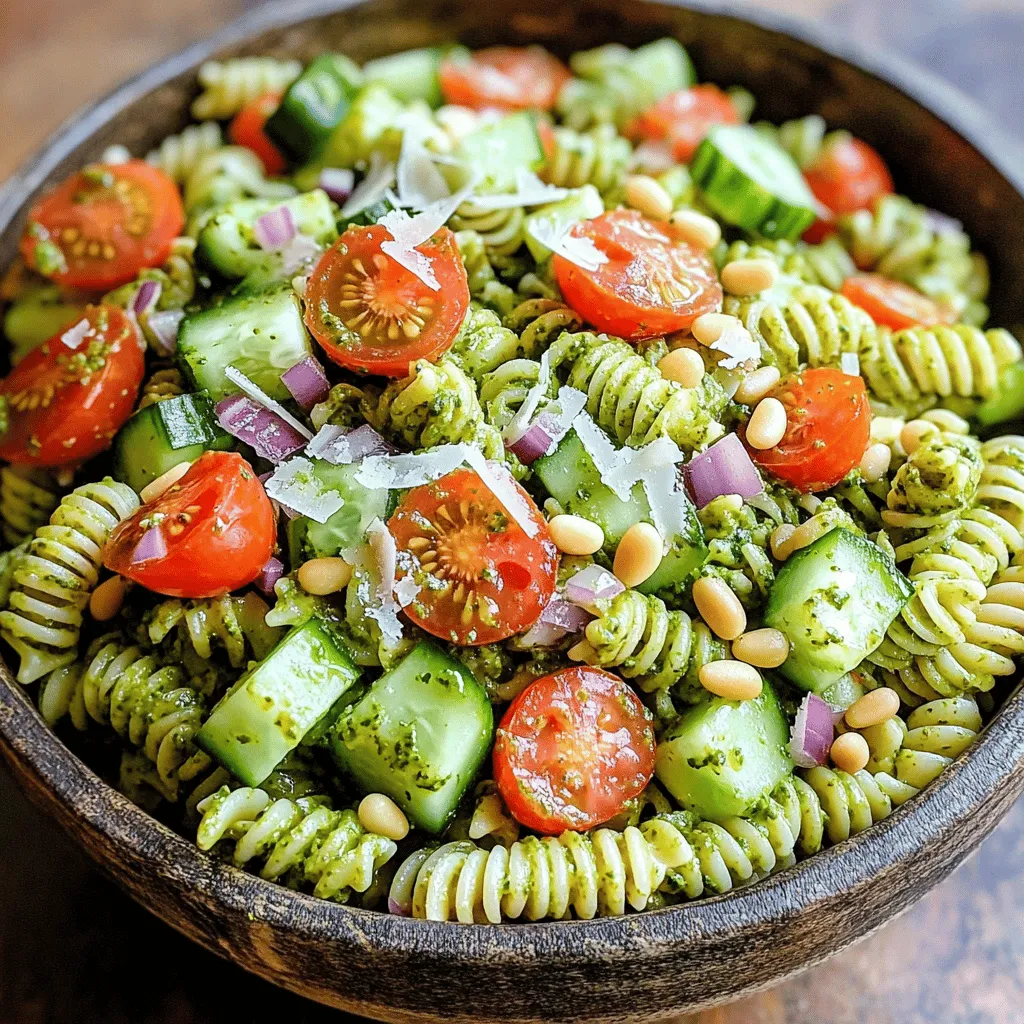
Are you ready to whip up a tasty treat that’s both simple and fresh? In this guide, I will show you how to make a delicious Pesto Pasta Salad that shines with flavor. You will learn about essential ingredients, easy steps for perfect pasta, and creative ways to customize your dish. Whether you’re planning a picnic or a cozy dinner, this recipe is perfect for every occasion. Let’s dive in!
Why I Love This Recipe
- Fresh Ingredients: This pasta salad features vibrant, fresh vegetables and aromatic basil that make every bite refreshing and flavorful.
- Easy to Prepare: With simple steps and minimal cooking time, this recipe is perfect for busy weeknights or gatherings.
- Versatile: Customize your salad with any vegetables or proteins you love, making it a flexible dish for any occasion.
- Make Ahead: It’s great for meal prep; just make it in advance and let the flavors develop in the fridge!
Ingredients
Essential Ingredients for Pesto Pasta Salad
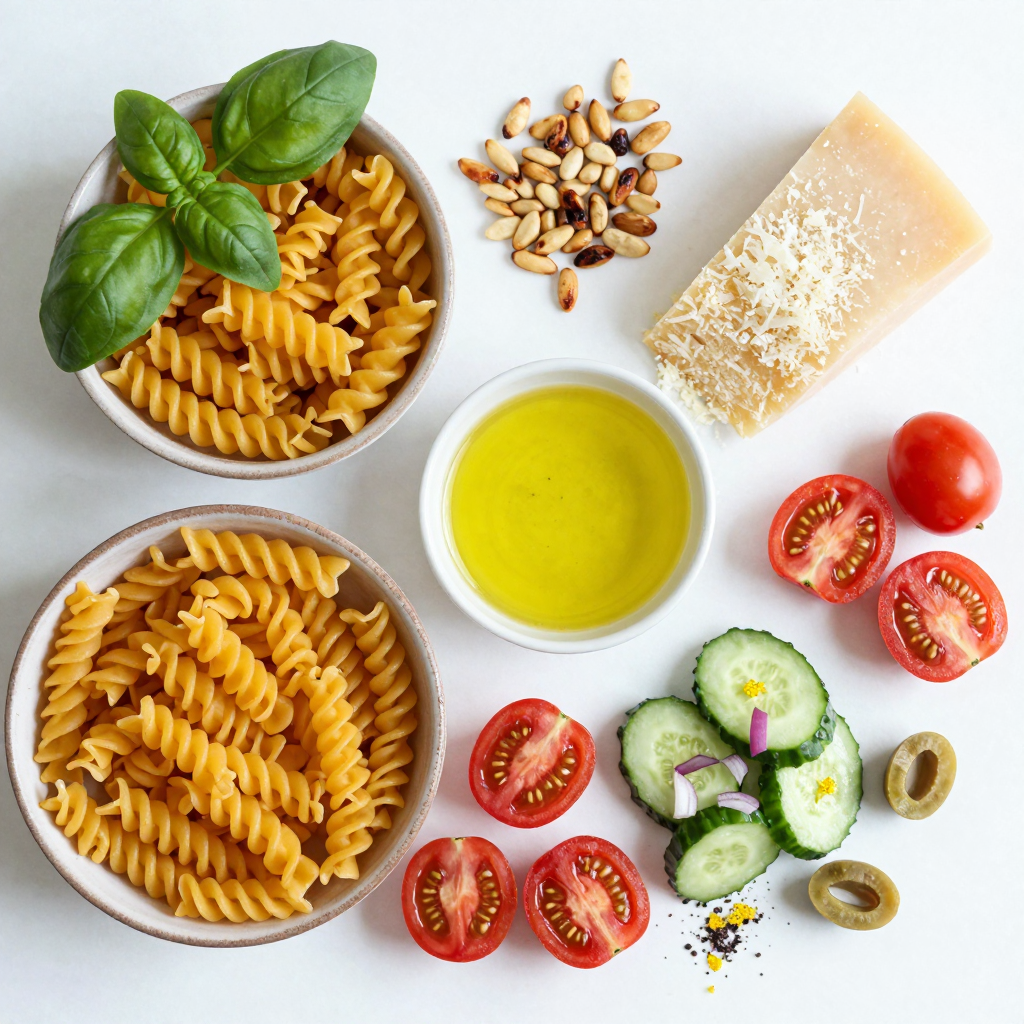
To make a great pesto pasta salad, you need a few key items. Here’s what you’ll need:
- 2 cups of fusilli or penne pasta
- 1 cup fresh basil leaves
- 1/2 cup pine nuts, lightly toasted
- 1/2 cup grated Parmesan cheese
- 1/2 cup extra virgin olive oil
- 1 cup cherry tomatoes, halved
- 1 cup cucumber, diced
- 1/4 cup red onion, finely chopped
- 1 teaspoon lemon zest
- Salt and pepper to taste
Each of these ingredients adds flavor and texture to the dish. The pasta serves as the base, while the pesto provides a rich, herbal taste.
Optional Ingredients for Customization
Want to make your salad special? You can add some optional items:
- 1/4 cup kalamata olives, pitted and sliced
These olives give a nice briny kick. Feel free to mix and match based on your taste.
Suggested Toppings for Added Flavor
Finish off your salad with some tasty toppings. Here are a few ideas:
- Extra grated Parmesan cheese
- Crushed red pepper flakes for a bit of heat
- Fresh herbs like parsley or arugula for freshness
These toppings can really enhance your salad. Try them out to find your favorite combo.

Step-by-Step Instructions
Cooking the Pasta: Tips for Perfect Texture
To make great pesto pasta salad, start with the right pasta. I prefer fusilli or penne. They hold the sauce well. Bring a big pot of salted water to a boil. Add your pasta and cook it until it is al dente. This means it should be firm but not hard. This usually takes about 8-10 minutes. After cooking, drain the pasta. Rinse it with cold water to stop it from cooking more. This keeps the pasta fresh and nice. Put the cooled pasta in a large mixing bowl.
Making Fresh Pesto: A Guide to Blending
Now, let’s make the pesto. You need fresh basil leaves, toasted pine nuts, and Parmesan cheese. Put these in a food processor. Add lemon zest for a bright touch. Pulse the mix until everything is finely chopped. With the processor running, slowly pour in extra virgin olive oil. This helps form a smooth paste. Taste your pesto and add salt and pepper as needed. Great pesto should have a rich flavor and aroma.
Combining Ingredients: Proper Mixing Techniques
It’s time to mix! Pour the fresh pesto over your cooled pasta. Use a spatula to fold it in gently. Make sure every piece of pasta gets coated well. Then, add in the cherry tomatoes, diced cucumber, and red onion. If you like olives, toss those in too. Mix everything until it’s nicely combined. Check the taste and add more salt or pepper if you want. Cover the bowl and chill the salad for at least 30 minutes. This helps the flavors mix well.
Pro Tips
- Choose the Right Pasta: Fusilli or penne are great choices because their shapes hold onto the pesto, ensuring each bite is flavorful.
- Toast the Nuts: Lightly toasting the pine nuts before blending adds a depth of flavor and enhances the overall taste of the pesto.
- Use Fresh Ingredients: Fresh basil, ripe tomatoes, and crisp cucumbers make a significant difference in taste and texture in your pasta salad.
- Chill for Flavor: Allowing the salad to chill for at least 30 minutes helps the flavors meld together, making it taste even better when served.
Tips & Tricks
How to Make the Best Pesto Pasta Salad
To make the best pesto pasta salad, start with fresh ingredients. Use high-quality olive oil for a rich taste. When blending the pesto, pulse the basil and nuts first. Then add cheese and olive oil gradually. This helps create a smooth texture. Don’t skip rinsing the pasta in cold water. It stops the cooking and keeps the pasta firm. Mix the pesto and pasta while the pasta is still warm. This helps the flavors soak in better. If you want a kick, add a pinch of red pepper flakes.
Storage Tips for Freshness
To keep your pesto pasta salad fresh, store it in an airtight container. This helps prevent it from drying out. If you make it a day ahead, it’s even better! The flavors blend well overnight. However, if you add tomatoes and cucumbers, wait until serving to mix them in. This keeps them crunchy and bright. Check the salad daily if you have leftovers. If it starts to smell off, it’s time to toss it.
Serving Suggestions & Pairings
Pesto pasta salad is great on its own but pairs well with many dishes. Serve it with grilled chicken or fish for a complete meal. You can also enjoy it with crusty bread for a nice crunch. Add a side of fresh fruit for a balanced plate. For a fun twist, try it as a filling for wraps or sandwiches. It makes a great picnic dish too! For a refreshing drink, pair it with lemonade or iced tea.

Variations
Protein Additions for a Heartier Salad
You can add protein to make your pesto pasta salad more filling. Grilled chicken is a popular choice. It adds a nice flavor and texture. Shrimp also works well and cooks quickly. For a meatless option, try chickpeas or black beans. They add protein and fiber. You can also use diced tofu for a plant-based protein. Just be sure to season your protein to blend well with the pesto.
Vegetable Substitutions for Different Flavors
Switching up the veggies can change the whole salad. Try adding bell peppers for a sweet crunch. Spinach or arugula can add a fresh green taste. Roasted veggies, like zucchini or bell peppers, can bring a warm flavor. You can even mix in artichoke hearts for a unique twist. Experimenting with different veggies keeps the salad exciting!
Vegan or Gluten-Free Modifications
If you want a vegan pesto pasta salad, swap out the cheese. Nutritional yeast gives a cheesy flavor without dairy. Use gluten-free pasta to make it gluten-free. There are many options, like rice or quinoa pasta. Always check labels to ensure they fit your needs. You can still enjoy a tasty salad while meeting dietary requirements!
Storage Info
How to Store Leftover Pesto Pasta Salad
To keep your pesto pasta salad fresh, store it in an airtight container. Make sure to seal it well to prevent air from getting in. Place the container in the fridge. It will stay good for about 3-4 days. If you notice any changes in smell or color, it’s best to toss it out.
Freezing Tips for Long-Term Storage
You can freeze pesto pasta salad, but it may change in texture. To freeze, place the salad in a freezer-safe container. Leave some space at the top for expansion. It’s best to eat it within 2-3 months for the best taste. When you’re ready to eat it, move it to the fridge to thaw overnight.
Reheating Suggestions for Optimal Taste
When reheating, do it gently. You can use a microwave or a skillet. If using a microwave, heat in short bursts. Stir in between to ensure even heating. If you use a skillet, add a splash of olive oil to keep it moist. This will help the flavors come back to life.
FAQs
Can I use store-bought pesto?
Yes, you can use store-bought pesto. It saves time and is often very tasty. Look for a brand with fresh ingredients. Check the label for quality. If you prefer, make your own for a unique flavor. Homemade pesto tastes bright and fresh.
What are the best pasta types for this salad?
Fusilli and penne are great choices. They hold the pesto well and add texture. You can also try rotini or farfalle. Any pasta shape that is bite-sized works well. Just cook until al dente for the best texture.
How long can I keep Pesto Pasta Salad in the fridge?
You can keep this salad in the fridge for about 3 to 5 days. Store it in an airtight container. The flavors will meld and get better over time. Just be sure to stir before serving. If it looks dry, add a little olive oil before enjoying it again.
In this blog post, we explored how to make a delicious pesto pasta salad. We covered essential and optional ingredients, step-by-step cooking tips, and creative variations for every taste. You learned how to store leftovers properly and answered some common questions.
Pesto pasta salad is easy to customize and fun to make. Experiment with flavors and enjoy your creation. You’ll impress your friends and family with your cooking skills. Enjoy every bite!

Pesto Pasta Salad
Ingredients
2 cups of fusilli or penne pasta
1 cup fresh basil leaves
1/2 cup pine nuts, lightly toasted
1/2 cup grated Parmesan cheese
1/2 cup extra virgin olive oil
1 cup cherry tomatoes, halved
1 cup cucumber, diced
1/4 cup red onion, finely chopped
1 teaspoon lemon zest
Salt and pepper to taste
Optional: 1/4 cup kalamata olives, pitted and sliced
Instructions
Cook the Pasta: In a large pot of salted boiling water, cook the pasta according to package instructions until al dente. Drain and rinse under cold water to stop the cooking process. Set aside in a large mixing bowl.
Make the Pesto: In a food processor, combine the basil, pine nuts, Parmesan cheese, and lemon zest. Pulse until finely chopped. While the processor is running, gradually add the olive oil until a smooth paste forms. Season with salt and pepper to taste.
Combine Ingredients: Add the pesto to the cooled pasta and mix well until the pasta is evenly coated.
Add Veggies: Fold in the cherry tomatoes, cucumber, red onion, and olives (if using) until well combined. Adjust seasoning with additional salt and pepper if needed.
Chill: Cover the salad and refrigerate for at least 30 minutes to allow the flavors to meld.
Serve: Toss the salad gently before serving, and drizzle with a bit more olive oil if desired.
Prep Time: 15 mins | Total Time: 45 mins | Servings: 4-6

Pesto Pasta Salad
Ingredients
- 2 cups fusilli or penne pasta
- 1 cup fresh basil leaves
- 0.5 cup pine nuts, lightly toasted
- 0.5 cup grated Parmesan cheese
- 0.5 cup extra virgin olive oil
- 1 cup cherry tomatoes, halved
- 1 cup cucumber, diced
- 0.25 cup red onion, finely chopped
- 1 teaspoon lemon zest
- to taste salt and pepper
- 0.25 cup kalamata olives, pitted and sliced (optional)
Instructions
- In a large pot of salted boiling water, cook the pasta according to package instructions until al dente. Drain and rinse under cold water to stop the cooking process. Set aside in a large mixing bowl.
- In a food processor, combine the basil, pine nuts, Parmesan cheese, and lemon zest. Pulse until finely chopped. While the processor is running, gradually add the olive oil until a smooth paste forms. Season with salt and pepper to taste.
- Add the pesto to the cooled pasta and mix well until the pasta is evenly coated.
- Fold in the cherry tomatoes, cucumber, red onion, and olives (if using) until well combined. Adjust seasoning with additional salt and pepper if needed.
- Cover the salad and refrigerate for at least 30 minutes to allow the flavors to meld.
- Toss the salad gently before serving, and drizzle with a bit more olive oil if desired.

![- 500g chicken breast, cubed - 1 large onion, finely chopped - 3 cloves garlic, minced - 1 inch ginger, grated - 2 tablespoons curry powder - 1 teaspoon turmeric powder - 1 teaspoon cumin powder - 400ml coconut milk - 1 tablespoon vegetable oil - Salt and pepper to taste To make my easy chicken curry, I focus on fresh and simple ingredients. Chicken breast is my main protein. The onions, garlic, and ginger create a rich base. The spices, like curry powder, turmeric, and cumin, bring warmth and depth. Coconut milk adds creaminess and a hint of sweetness, balancing the spices. - Fresh herbs like cilantro - Lime wedges for serving If you want to elevate your dish, add fresh herbs like cilantro. It gives a bright flavor and nice color. Lime wedges on the side add a zesty kick when served. They contrast well with the creamy curry. - Large skillet or pan - Measuring cups and spoons Having the right tools makes cooking easier. A large skillet or pan helps with even cooking. Use measuring cups and spoons for accuracy. Proper tools ensure your easy chicken curry turns out perfect every time. For the full recipe, check the section above. To start, I heat vegetable oil in a large skillet over medium heat. I add the finely chopped onion and sauté it for about five minutes. The onion should turn translucent. Next, I stir in the minced garlic and grated ginger. I cook this mixture for another one to two minutes until it smells great. Now comes the fun part: toasting the spices! I sprinkle curry powder, turmeric, and cumin into the pan. I stir well to coat the onions and toast the spices for about one minute. This step brings out their rich flavors. After preparing the base, I add the cubed chicken breast to the pan. I season it with salt and pepper for a balanced taste. It’s important to brown the chicken pieces thoroughly. I cook them for about five to seven minutes, ensuring they turn golden on all sides. Once the chicken is browned, I pour in the coconut milk. I bring the mixture to a gentle simmer and then reduce the heat to low. Covering the pan, I let it cook for 15 to 20 minutes. This allows the chicken to cook through and the sauce to thicken. Before serving, I taste the curry and adjust the seasoning if needed. A fresh garnish of chopped coriander adds a lovely touch. For the full recipe, check the details above. To make your chicken curry perfect, focus on the spice blend. Use fresh spices whenever you can. They add much more flavor than old ones. Toast the spices in the pan before adding other ingredients. This step releases their oils and boosts their taste. You can also adjust the spice levels to match your taste. If you prefer a milder curry, reduce the curry powder. For extra warmth, add a bit more cumin. Using fresh ingredients is key for a tasty curry. Fresh chicken, onions, garlic, and ginger make a big difference. Chop the onion finely to help it cook faster. Mince the garlic and grate the ginger for the best flavor. The coconut milk should be full-fat for a creamy texture. When you cook with quality items, your dish shines. Chicken curry pairs well with simple sides. Serve it over fluffy rice for a filling meal. You can also try naan or roti for a fun twist. These breads soak up the sauce nicely. Garnishing your dish can elevate its look. Sprinkle fresh coriander on top before serving. This adds color and a fresh taste. You might also squeeze some lime juice over the curry. The zest brightens the flavors and adds a nice touch. To manage your cooking time, prep before you cook. Chop all your ingredients first. This makes cooking smoother and faster. While the chicken simmers, clean up your workspace. This keeps your kitchen organized and less stressful. You can also start cooking rice or bread while the curry simmers. This multitasking saves time and lets you serve everything hot. For a quick meal, the full recipe of quick and creamy chicken curry takes just 35 minutes. With these tips, you’ll not only save time but also enjoy a delicious dinner! {{image_2}} You can easily make this chicken curry vegetarian or vegan. Simply replace the chicken with tofu or your favorite vegetables. Some great choices are bell peppers, carrots, and peas. For a delicious twist, use firm tofu. Cut it into cubes and sauté it until golden. This adds a nice texture. When using coconut milk, be sure to pick a full-fat version. It gives a rich flavor. If you want a lighter option, use light coconut milk but add a bit of vegetable broth for depth. You can also add extra spices to boost flavor. Try adding a dash of soy sauce for umami. You can create exciting versions of chicken curry by adding spices from different regions. For an Indian-inspired dish, add garam masala or fenugreek. These spices bring warmth and depth to the curry. If you prefer a Thai-style curry, add lemongrass and kaffir lime leaves. These ingredients bring a fresh and zesty flavor. Use fresh or dried lemongrass, and slice it finely. This will enhance the overall taste and give a unique twist. Adjusting the spice level is easy. To make the curry mild, use less curry powder and skip the hot peppers. For a medium heat, use a bit of chili powder or cayenne. If you like it hot, add fresh chili peppers, like jalapeños or serranos. You can also use hot sauce to kick it up a notch. Just start with a small amount and taste as you go. This way, you can control the heat to your liking. To keep your chicken curry fresh, first let it cool. Then, transfer the leftovers to airtight containers. This helps prevent moisture loss and keeps flavors intact. You can store it in the fridge for up to three days. For longer preservation, consider freezing. Divide the curry into portions, and freeze each in a separate container. It will last up to three months in the freezer. When you're ready to enjoy your chicken curry again, I recommend reheating it on the stove. This method warms the curry evenly. You can also use the microwave; just cover the bowl and heat it in short bursts. Stir in between to avoid hot spots. To maintain flavor and texture, add a splash of coconut milk or water if it seems thick. You can safely eat the leftovers within three days if stored in the fridge. If you freeze the curry, it should remain good for about three months. Always check for changes in smell or color. If you see any signs of spoilage, like a sour smell or odd texture, it’s best to toss it. To make easy chicken curry, follow these key steps: 1. Prepare your ingredients: Chop the onion, garlic, and ginger. 2. Heat oil: In a large pan, heat vegetable oil over medium heat. 3. Sauté onion: Add the chopped onion and cook until soft. 4. Add garlic and ginger: Stir in minced garlic and grated ginger for flavor. 5. Toast spices: Add curry powder, turmeric, and cumin. Stir to mix. 6. Cook chicken: Add cubed chicken, season, and brown on all sides. 7. Simmer with coconut milk: Pour in coconut milk, stir, and simmer until done. 8. Finish and serve: Taste, adjust seasoning, and garnish with coriander. These steps make it easy to create a rich and tasty chicken curry from scratch. Yes, you can use different meats. Here are some options: - Beef: Cut into small cubes, similar to chicken. - Lamb: Use tender pieces for a rich flavor. - Pork: Pork tenderloin works well in this curry. Each meat brings its unique taste. Adjust cooking times based on the meat you choose. The best side dishes for chicken curry include: - Cooked rice: Fluffy rice soaks up the sauce well. - Naan bread: Soft naan is perfect for dipping. - Raita: A yogurt sauce cools the spices. These sides complement the curry's rich flavors. Try mixing and matching to find your favorite! For the full recipe, check out the [Full Recipe]. In this article, we covered the key ingredients for chicken curry, including spices and optional items that boost flavor. You learned step-by-step instructions to cook, simmer, and serve your dish perfectly. We provided tips for enhancements, variations, and storage methods to keep your curry fresh. Cooking chicken curry is easy and fun. Experiment with flavors and share your creations. Enjoy your delicious meal!](https://dailydishlab.com/wp-content/uploads/2025/06/c5f0adf9-706c-4d08-bf07-c5d16fe1346d-768x768.webp)


![To make Easy Chicken and Dumplings, you'll need the following: - Chicken and vegetables needed: - 1 lb boneless, skinless chicken thighs, cut into bite-sized pieces - 1 medium onion, diced - 2 carrots, sliced - 2 celery stalks, sliced - 1 cup frozen peas - Spices and seasonings: - 4 cups chicken broth - 2 cloves garlic, minced - 1 teaspoon dried thyme - 1 teaspoon dried parsley - Salt and pepper to taste - Dumpling ingredients: - 2 cups all-purpose flour - 1 tablespoon baking powder - 1 teaspoon salt - 1 cup milk - 4 tablespoons unsalted butter, melted These ingredients create a warm and comforting meal. The chicken provides protein, while the vegetables add flavor and texture. The spices bring everything together, making each bite delightful. Don't forget the dumplings, as they are the star of the dish! For the full recipe, check out the details above. Start by sautéing the vegetables. In a large pot, heat a drizzle of olive oil over medium heat. Add the diced onion, sliced carrots, and sliced celery. Cook them for about 5 to 7 minutes until they are soft. This step adds a lot of flavor to the soup. Next, add the minced garlic. Cook it for another minute. This will make your kitchen smell amazing. Now, stir in the chicken pieces, dried thyme, dried parsley, salt, and pepper. Cook until the chicken is no longer pink. This should take about 5 minutes. After that, pour in the chicken broth. Bring it to a gentle boil. Once boiling, reduce the heat to low and let it simmer for 15 to 20 minutes. This helps all the flavors blend together perfectly. While the soup simmers, it’s time to make the dumplings. In a mixing bowl, combine 2 cups of all-purpose flour, 1 tablespoon of baking powder, and 1 teaspoon of salt. Mix these dry ingredients well. Now, stir in 1 cup of milk and 4 tablespoons of melted butter. Mix until just combined. Be careful not to overmix. Overmixing can make the dumplings tough. You want them light and fluffy. Once your soup is ready, gently fold in 1 cup of frozen peas. Then, drop spoonfuls of the dumpling batter into the simmering broth. Cover the pot with a lid. Let the dumplings cook undisturbed for about 15 to 20 minutes. This is key to getting them fluffy. Check your dumplings after 15 minutes. They should puff up and be cooked through. Taste the soup and adjust the seasoning if needed. For the full recipe, refer to the section above. Enjoy your comforting chicken and dumplings! To make chicken and dumplings shine, adjust your seasonings. Taste as you go. You may want more salt or herbs. This helps to bring out all the flavors. Each chicken piece needs to soak up those seasonings. Choosing the right chicken parts is key too. I recommend boneless thighs. They stay juicy and tender. You can also use breasts, but they may dry out faster. Experiment with what you like best. Sautéing and simmering are the heart of this dish. Start by sautéing the veggies well. It brings out their flavors. Keep the heat at medium. Too high, and you risk burning them. Simmering is just as important. Let the soup bubble gently. This helps all the tastes blend. For fluffy dumplings, don’t overmix the batter. Stir until just combined. This keeps them light and airy. Garnishing adds a lovely touch to your meal. Fresh parsley makes a simple, bright garnish. You can also sprinkle black pepper for a little kick. As for sides, serve with crusty bread or a fresh salad. These pair well with the rich soup. They balance the meal perfectly. Enjoy your comforting chicken and dumplings! For the complete recipe, check out the [Full Recipe]. {{image_2}} You can change up your chicken and dumplings with different veggies. Instead of carrots, try zucchini or bell peppers. Swap celery for green beans. These changes keep your dish fresh and exciting. If you want to use other proteins, you have options. Use shredded rotisserie chicken for quick prep. You can even try turkey or tofu for a meatless dish. Each choice brings unique flavors and textures. To boost flavor, add herbs and spices. Fresh thyme or rosemary works great. You can also sprinkle in a bit of paprika for warmth. These small tweaks make a big difference. Don’t stop at herbs. Incorporate other ingredients like corn or mushrooms. They add layers of taste and texture. You can also stir in a splash of cream for richness. All these enhancements make your meal even more delicious. For the full recipe, check out the Comforting Chicken and Dumplings section. After enjoying your easy chicken and dumplings, store any leftovers safely. Place them in an airtight container. This helps keep the flavors fresh. You can refrigerate the leftovers for up to three days. Always let the soup cool down before sealing it up. If you want to store it for longer, freezing is a great option. Use freezer-safe containers or bags. Make sure you remove as much air as possible to prevent freezer burn. You can freeze the chicken and dumplings for up to three months. Just remember to label your containers with the date. When it's time to enjoy your leftovers, reheating properly is key. The best way is to use the stovetop. Pour the chicken and dumplings into a pot over low heat. Stir often to heat it evenly. This method helps keep the dish moist. If you're short on time, you can use the microwave. Place the soup in a microwave-safe bowl. Cover it loosely to avoid spills. Heat it in short bursts, stirring in between. This keeps the dumplings from getting too tough. Sometimes, the soup may thicken after storing. If that happens, add a splash of chicken broth or water. Stir it well to adjust the consistency. Enjoy your comforting meal just like the first time! For a complete guide to making this dish, check out the Full Recipe. How to make chicken and dumplings from scratch? To make chicken and dumplings from scratch, start with fresh chicken, vegetables, and spices. Cook them in a pot with broth. For dumplings, mix flour, baking powder, and milk. Drop the dumpling batter into the simmering broth. Cook until the dumplings puff up. Can I use canned chicken broth? Yes, you can use canned chicken broth. It saves time and still tastes good. Just choose a low-sodium option if you prefer less salt. This makes your dish healthier and more flavorful. Can I substitute frozen peas? Yes, you can use other frozen vegetables. Carrots, corn, or green beans work well. They add different flavors and colors to your dish. What can I use instead of all-purpose flour? You can use gluten-free flour if needed. Almond flour or oat flour are good choices too. They can change the taste slightly but still make tasty dumplings. How long do dumplings take to cook? Dumplings take about 15-20 minutes to cook. You should not lift the lid while they cook. This helps them steam properly and stay fluffy. Can I make the dumplings ahead of time? It’s best to cook the dumplings fresh. However, you can prepare the batter ahead. Keep it in the fridge until you're ready to cook. This way, they stay light and fluffy. For a full recipe, check out the recipe section. This blog post explored how to make delicious chicken and dumplings. We started with the key ingredients, then moved on to preparing the soup and making the dumplings. I shared tips to ensure the perfect flavor and texture. You can also try variations for extra flair and learn how to store leftovers well. With these steps, anyone can create a warm, comforting dish. So, don’t hesitate to get started. Your homemade chicken and dumplings await!](https://dailydishlab.com/wp-content/uploads/2025/06/b55448b9-18f4-4b40-ba69-553d058622be-768x768.webp)
