

Are you ready to indulge in a sweet and crunchy treat that’s simple to make? Pomegranate Pistachio Bark combines rich dark chocolate, crunchy pistachios, and juicy pomegranate seeds, creating a delightful snack for any occasion. With just a few easy steps, you’ll achieve a delicious treat that impresses everyone. Let’s dive in and make this tasty bark together—your taste buds will thank you!
Why I Love This Recipe
- Decadent Chocolate Delight: This bark features rich dark chocolate that satisfies any sweet tooth while being a healthier option.
- Nutty and Fruity Crunch: The combination of crunchy pistachios and juicy pomegranate seeds adds a delightful texture and flavor contrast.
- Quick and Easy: With minimal prep time and simple steps, this recipe is perfect for a quick treat or last-minute dessert.
- Customizable Sweetness: You can adjust the sweetness by adding honey or maple syrup, making it suitable for different palates.
Ingredients
Main Ingredients
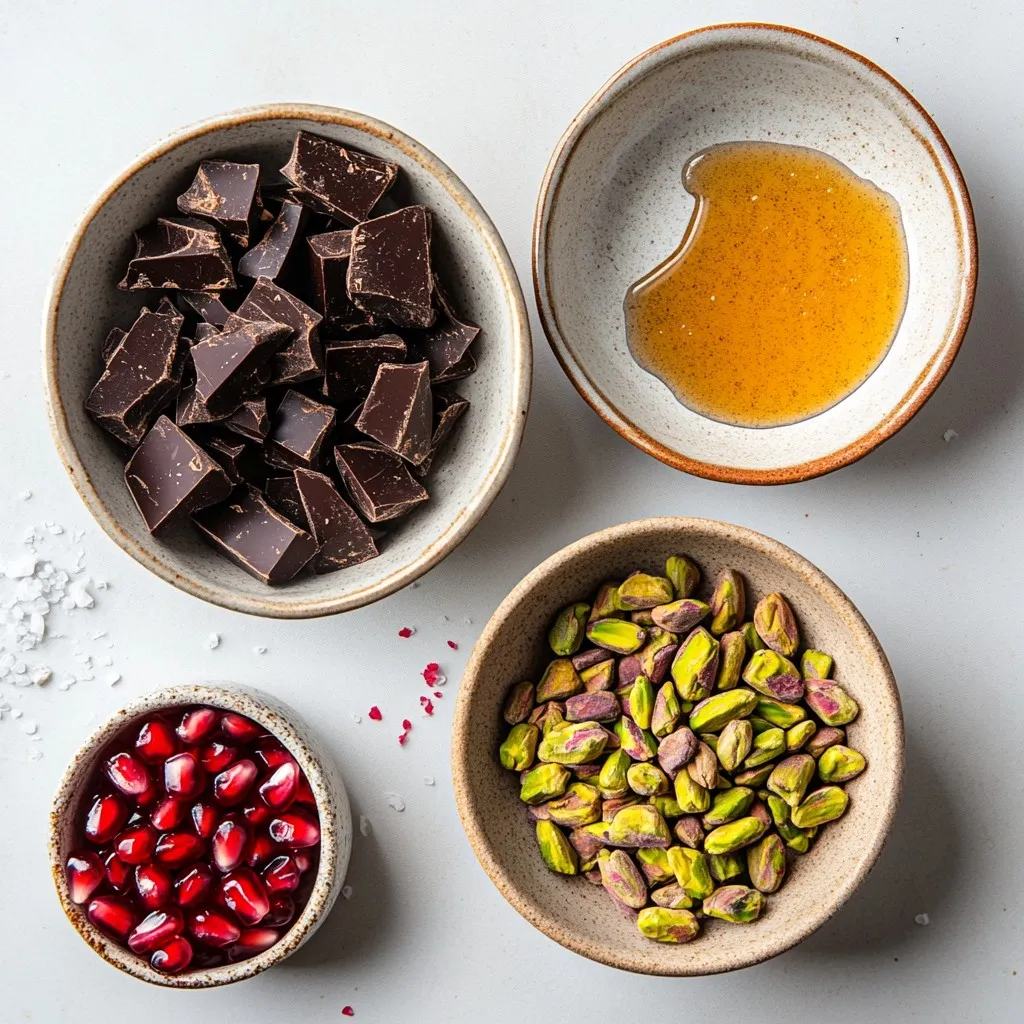
– 200g dark chocolate (70% cocoa or higher)
– 1/2 cup raw pistachios, roughly chopped
– 1/2 cup pomegranate seeds
Optional Ingredients
– 2 tablespoons honey or maple syrup for extra sweetness
– Sea salt, a few pinches
Pomegranate Pistachio Bark needs just a few simple ingredients. First, dark chocolate makes the base. I love using chocolate with at least 70% cocoa. It gives a rich taste.
Next, we add raw pistachios. I chop them roughly to keep some texture. They add a nice crunch to the bark. Pomegranate seeds are the final star. Their bright color and juicy burst make this treat special.
If you want more sweetness, honey or maple syrup works great. Just mix it into the melted chocolate. A pinch of sea salt on top brings out all the flavors. It makes each bite more exciting.
With these ingredients, you can create a delightful and simple treat. Enjoy making it!
Step-by-Step Instructions
Preparation Steps
– Prepare the baking sheet with parchment paper. Make sure it lies flat.
– Melt the chocolate using a double boiler or microwave. If using a microwave, heat in 30-second bursts, stirring in between.
Mixing and Spreading
– Mix in honey or maple syrup, if you want extra sweetness. This step is optional.
– Fold in the chopped pistachios and pomegranate seeds. Save a few seeds and nuts for later.
Finishing Touches
– Spread the mixture on the baking sheet evenly. Aim for about 1/4 inch thick.
– Add the reserved pistachios and pomegranate seeds on top. Then, sprinkle a few pinches of sea salt.
Setting and Serving
– Refrigerate until hardened. This usually takes about 1 to 2 hours.
– Break the bark into pieces when set. You can use your hands or a knife. Enjoy it right away or keep it in the fridge for a week.
Tips & Tricks
Achieving the Perfect Bark
How to melt chocolate without burning:
To melt chocolate well, use a double boiler. Place water in the bottom pot. Keep the heat low and stir often. If you use a microwave, heat it in 30-second bursts. Stir between each burst. This helps the chocolate melt evenly.
Best practices for mixing ingredients:
Once the chocolate melts, take it off the heat. If you want extra sweetness, mix in honey or maple syrup. Then, fold in the chopped pistachios and pomegranate seeds gently. Reserve some seeds and nuts for topping. This method keeps the bark crunchy and tasty.
Enhancing Flavor
Suggested ratios for sweetness:
If you like sweet treats, add two tablespoons of honey or maple syrup. Adjust this based on your taste. Some prefer less sweet bark. Try it without sweeteners for a rich cocoa flavor.
Recommended toppings and flavor variations:
Besides pistachios and pomegranates, think about other toppings. You can add dried cranberries or almonds for a twist. A sprinkle of sea salt brings out the chocolate’s flavor. Try a hint of orange zest for a fresh taste.
Pro Tips
- Choose Quality Chocolate: Using high-quality dark chocolate (70% cocoa or higher) not only enhances the flavor but also helps the bark set properly.
- Prep Ingredients in Advance: Having your pistachios chopped and pomegranate seeds ready before melting the chocolate will streamline the process and keep the chocolate warm.
- Cooling Tips: If your kitchen is warm, consider placing the bark in the freezer for a short period to speed up the setting process, but be cautious not to freeze it completely.
- Customize Your Bark: Feel free to swap out pistachios and pomegranate seeds for other nuts and dried fruits, like almonds or cranberries, for a unique twist on this recipe.
Variations
Ingredient Swaps
You can switch up the chocolate type to suit your taste. Instead of dark chocolate, try using white or milk chocolate. Both options will give a sweeter flavor to your bark. For a fun twist, you can also change the nuts and fruits. Substitute raw pistachios with almonds or walnuts. You can even replace pomegranate seeds with dried cranberries or cherries for a new taste.
Dietary Considerations
This recipe can fit different diets. For a vegan option, use dark chocolate that has no milk. Maple syrup can replace honey, keeping it plant-based. If you need a gluten-free treat, this bark is naturally gluten-free since it has no grains. Always check labels on chocolate to ensure it meets gluten-free standards. Enjoy this bark without worries about dietary restrictions!
Storage Info
Best Practices for Storage
To keep your Pomegranate Pistachio Bark fresh, store it in an airtight container. This helps prevent moisture and keeps it tasty. You can use a glass or plastic container with a tight lid. If you don’t have one, wrap the bark in plastic wrap, then place it in a bag. This also works well.
Shelf Life
Your bark stays fresh for about a week in the fridge. Just make sure it’s in that airtight container! If you want to keep it longer, you can freeze it. To freeze, wrap pieces in plastic wrap and then place them in a freezer bag. This keeps the flavors intact. When you want a piece, just take it out and let it sit at room temp for a few minutes. Enjoy!
FAQs
How long does it take for Pomegranate Pistachio Bark to set?
Pomegranate Pistachio Bark takes about 1 to 2 hours to set in the fridge. The chocolate needs to cool and harden fully. I recommend checking it after an hour. If it feels firm to touch, it is ready to enjoy!
Can I use salted pistachios instead of raw?
Yes, you can use salted pistachios if you like a salty kick. Just keep in mind that the salt will add extra flavor. If you choose salted nuts, you might want to skip adding sea salt on top.
What’s the best way to melt chocolate for this recipe?
The best way to melt chocolate is using a double boiler. This method lets you melt chocolate slowly and evenly. If you use a microwave, heat it in 30-second bursts. Stir in between to avoid burning the chocolate.
How can I make this recipe nut-free?
To make Pomegranate Pistachio Bark nut-free, simply omit the pistachios. You can add seeds like pumpkin or sunflower seeds for crunch. You can also try crushed pretzels for a fun twist!
This blog post covered how to make Pomegranate Pistachio Bark. We explored the key ingredients, like dark chocolate, pistachios, and pomegranate seeds, along with optional sweeteners like honey. I also provided clear steps for preparation, tips for perfecting your bark, and variations to fit dietary needs.
In the end, you can enjoy a tasty treat that’s easy to make. With these guidelines, you can customize it to your tastes. Enjoy your cooking and impress others with your skill


