Pumpkin Pie Overnight Chia Pudding Tasty Fall Treat

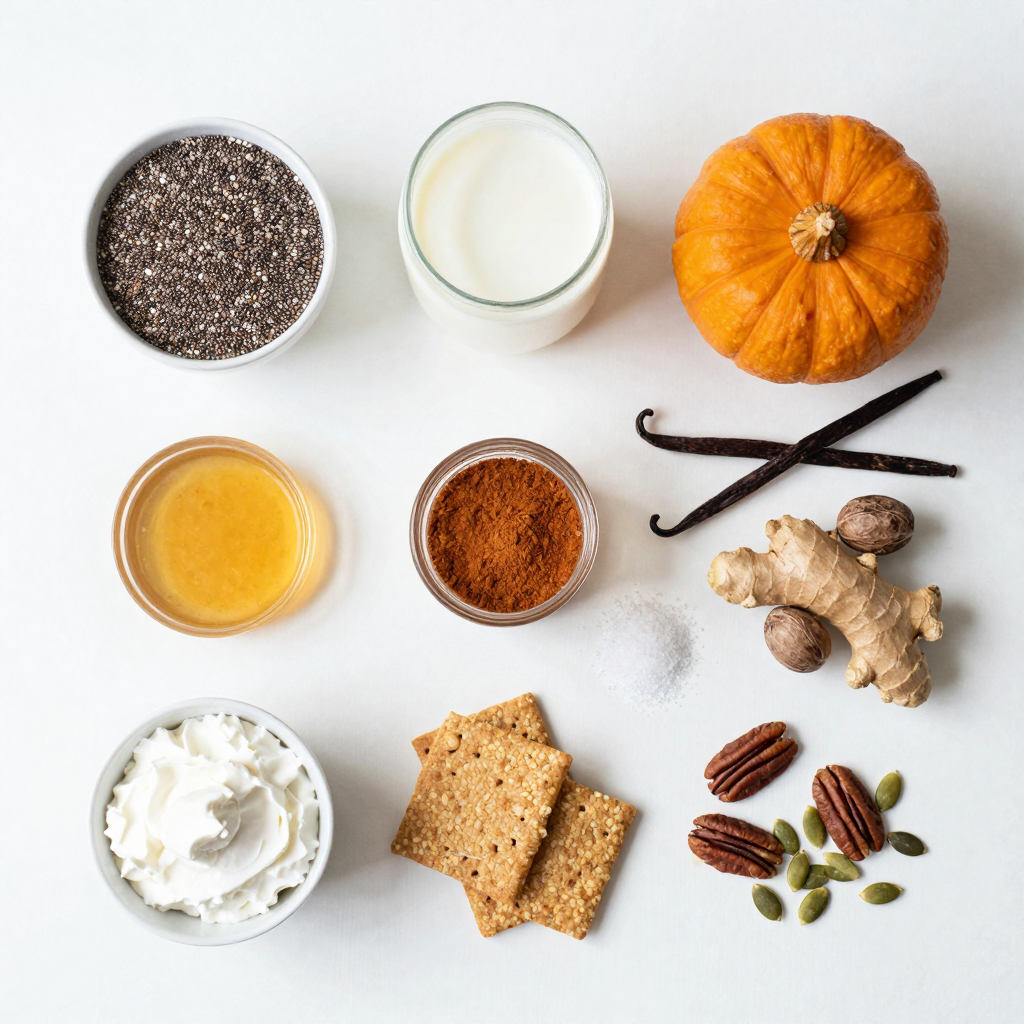
Pumpkin pie lovers, get ready for a tasty twist! I’m excited to share my Pumpkin Pie Overnight Chia Pudding recipe. This fall treat combines the cozy flavors of pumpkin pie with the health benefits of chia seeds. It’s easy to make, perfect for breakfast, or a snack. Plus, you’ll find tips on how to customize it! Let’s dive into this delicious recipe that will brighten your autumn days.They help make the pudding thick. Almond milk adds creaminess without dairy. Pumpkin puree gives that fall flavor we love. Maple syrup or honey sweetens it up nicely. Vanilla extract adds a warm touch. Ground cinnamon, nutmeg, and ginger bring the spice. A pinch of salt balances everything out.
Optional Toppings and Enhancements
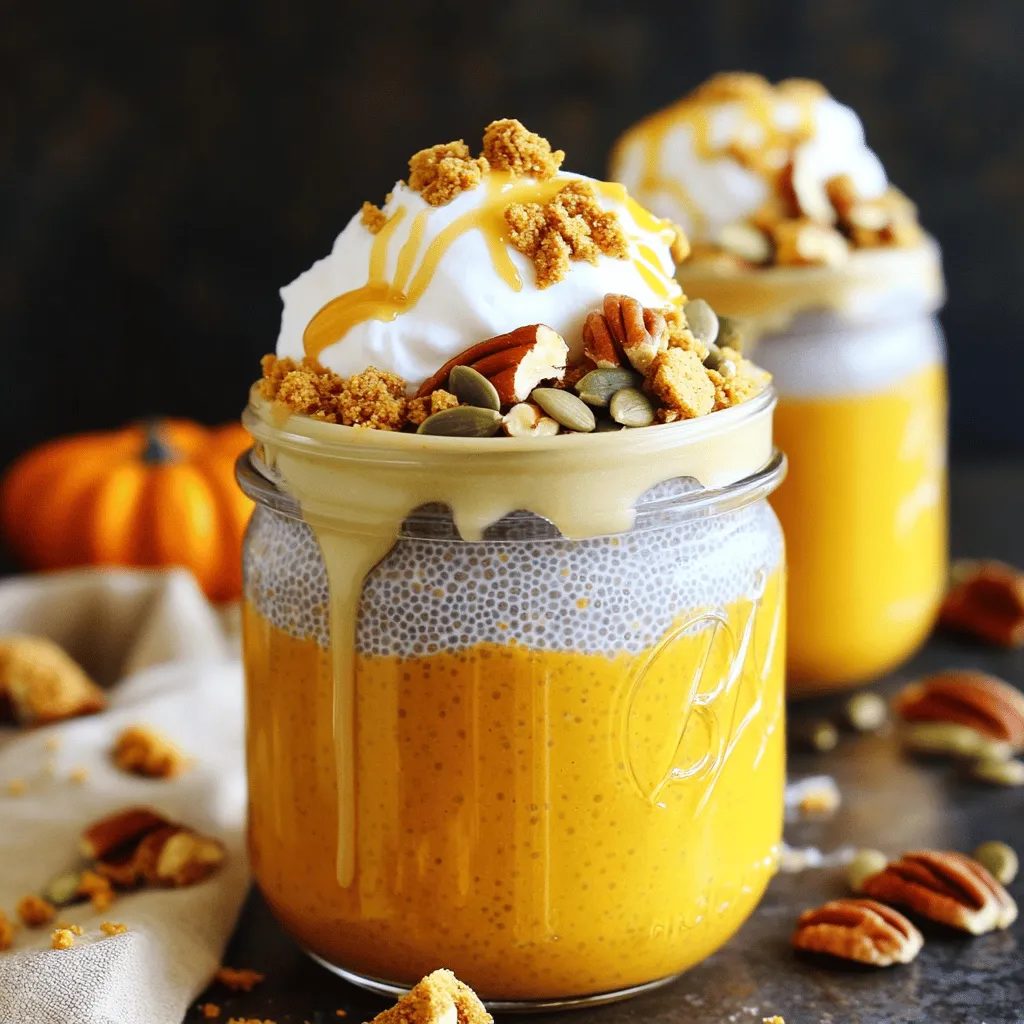
Toppings can make your pudding extra special. Try whipped coconut cream for a rich finish. Crushed graham crackers add a nice crunch. Pecans or pumpkin seeds give it a nutty flavor. Feel free to mix and match. Each topping adds a unique twist. Enjoy customizing your Pumpkin Pie Overnight Chia Pudding!
Why I Love This Recipe
- Healthy and Nourishing: This chia pudding is packed with omega-3 fatty acids, fiber, and protein, making it a wholesome breakfast or snack option.
- Seasonal Flavor: The pumpkin puree combined with warm spices captures the essence of fall, bringing a cozy, comforting taste to your mornings.
- Easy to Prepare: With just 10 minutes of prep time, you can set this pudding in the fridge overnight and wake up to a delicious treat.
- Customizable Toppings: You can get creative with toppings like whipped coconut cream, nuts, or graham crackers, making each serving unique and delightful.

Step-by-Step Instructions
Preparation Overview
First, gather your ingredients. You need just a few simple items. This recipe takes only 10 minutes to prepare. You will make enough for four servings.
Combining Ingredients
Start by mixing the chia seeds and almond milk in a large bowl. Stir them well. Make sure there are no clumps. Next, take another bowl. Combine pumpkin puree, maple syrup, and vanilla extract. Add the ground spices: cinnamon, nutmeg, ginger, and a pinch of salt. Whisk it until smooth.
Now, pour the pumpkin mix into the chia bowl. Stir everything together. You want the chia seeds spread evenly through the mixture.
Chilling and Serving Tips
Cover the bowl with a lid or plastic wrap. Place it in the fridge. Let it chill overnight for the best texture. If you’re short on time, leave it for at least 4 hours.
When ready to serve, stir the pudding again. Scoop it into bowls or jars. Top with your favorite extras. You can use whipped coconut cream, graham crackers, or nuts. Enjoy your Pumpkin Pie Overnight Chia Pudding!
Pro Tips
- Use Fresh Pumpkin Puree: If possible, use fresh pumpkin puree for a more vibrant flavor. Simply roast a small pumpkin, scoop out the flesh, and blend until smooth.
- Adjust Sweetness to Taste: Depending on your preference, you can adjust the amount of maple syrup or honey. Start with less and add more if you prefer it sweeter.
- Experiment with Spices: Feel free to add other spices like allspice or clove to give your chia pudding a unique twist.
- Make Ahead for Meal Prep: This chia pudding is perfect for meal prepping! Make a batch at the beginning of the week and enjoy it as a quick breakfast or snack.
Tips & Tricks
How to Achieve the Perfect Texture
To get the best texture, mix your chia seeds with almond milk first. Stir well to avoid clumps. Let it sit for 5-10 minutes before adding the pumpkin. This gives the chia time to soak and swell. When you add the pumpkin mix, stir until everything is smooth. Make sure the chia is evenly spread. The longer you let it chill, the thicker it gets. Ideally, let it sit overnight for a great pudding-like feel.
Common Mistakes to Avoid
One common mistake is not mixing enough. If the chia seeds clump together, your pudding won’t be smooth. Another mistake is using too little liquid. Chia seeds need enough liquid to expand. Skipping the chill time will also affect the texture. Your pudding won’t set properly if you don’t let it rest. Lastly, don’t forget to taste your mixture. You may want more sweetener or spices.
Enhancing Flavor with Additional Spices
If you want to spice things up, consider adding allspice or cloves. These spices add warmth and depth. You can also mix in a little cocoa powder for a twist. If you’re in the mood for something extra creamy, try adding a splash of coconut milk. This gives a nice tropical flavor. Experiment with flavors until you find your favorite mix. The key is to balance the spices with the sweetness.

Variations
Vegan and Non-Vegan Modifications
You can easily adjust this recipe to fit your diet. For a vegan option, use almond milk and maple syrup. If you prefer a non-vegan version, just swap maple syrup for honey. Both versions taste great!
Gluten-Free Options
Good news! Chia seeds are naturally gluten-free. This recipe is safe for people with gluten sensitivities. Just make sure any added toppings, like crushed graham crackers, are also gluten-free.
Alternative Sweeteners
If you want to experiment with sweeteners, consider using agave syrup or stevia. Each option brings a unique flavor. Just keep in mind that the sweetness level may vary. Adjust according to your taste.
Storage Info
Best Practices for Storing Leftovers
Store your Pumpkin Pie Overnight Chia Pudding in airtight containers. This keeps the pudding fresh and tasty. You can use glass jars or plastic containers. Make sure the lids fit tight to avoid leaks. If you layer toppings, keep them separate. This prevents them from getting soggy.
How Long Does It Last in the Fridge?
Your chia pudding lasts about five days in the fridge. After that, it may lose flavor and texture. I recommend checking for any changes before you eat it. If it smells bad or looks off, toss it out. Fresh is best for enjoying this fall treat.
Freezing Instructions
You can freeze the chia pudding if you want to keep it longer. Divide it into single servings before freezing. Use freezer-safe containers or bags. When you want to eat it, just thaw it in the fridge overnight. Stir well before enjoying. It may change texture slightly, but the flavor stays delicious.
FAQs
Can I use different types of milk for this recipe?
Yes, you can use various types of milk. Almond milk works great, but you can try oat, coconut, or soy milk. Each milk adds a unique taste. If you prefer dairy, regular milk works too. Choose what you love!
How can I personalize my chia pudding flavors?
You can add many flavors to your pudding. Try mixing in cocoa powder for chocolate. You can also add a spoonful of peanut butter for richness. Fresh fruits like bananas or berries can brighten the taste. Don’t be afraid to experiment!
What are the health benefits of chia seeds and pumpkin?
Chia seeds are tiny but mighty. They are full of fiber, protein, and omega-3 fatty acids. These help with digestion and keep you full. Pumpkin is rich in vitamins A and C. It’s also low in calories but high in nutrients. Both ingredients work together to make this pudding a healthy treat.
This blog post covered how to make Pumpkin Pie Overnight Chia Pudding. We went through the ingredients, detailed instructions, and tips to get the best texture. I shared variations for vegan and gluten-free diets. Storage tips ensure your pudding stays fresh.
Remember, make it your own by adding flavors you love. Enjoy this tasty treat as a healthy option any time!

Pumpkin Pie Overnight Chia Pudding
Ingredients
1/2 cup chia seeds
2 cups almond milk (or any plant-based milk)
1 cup pumpkin puree (canned or homemade)
1/4 cup maple syrup (or honey for non-vegan)
1 teaspoon vanilla extract
1 teaspoon ground cinnamon
1/2 teaspoon ground nutmeg
1/4 teaspoon ground ginger
Pinch of salt
Optional toppings: whipped coconut cream, crushed graham crackers, pecans, or pumpkin seeds
Instructions
In a large mixing bowl, combine the chia seeds and almond milk. Stir well to ensure there are no clumps and that the chia seeds are fully immersed in the liquid.
In a separate bowl, whisk together the pumpkin puree, maple syrup, vanilla extract, ground cinnamon, nutmeg, ginger, and a pinch of salt until smooth and well combined.
Pour the pumpkin mixture into the bowl with the chia seeds and almond milk. Stir until fully mixed, making sure the chia seeds are evenly distributed throughout the pumpkin mixture.
Cover the bowl with a lid or plastic wrap and place it in the refrigerator. Allow the chia pudding to set overnight (or at least for 4 hours) to achieve the desired pudding-like texture.
Once set, give the chia pudding a good stir. Serve in individual bowls or jars, adding your choice of toppings such as whipped coconut cream, crushed graham crackers, nuts, or pumpkin seeds for added crunch and flavor.
Prep Time: 10 minutes | Total Time: 8 hours (including overnight chilling) | Servings: 4
– Presentation Tips: Layer the chia pudding with your chosen toppings in mason jars for an attractive visual effect. Drizzle a little more maple syrup on top for added sweetness before serving. Enjoy your delightful Pumpkin Pie Overnight Chia Pudding!

Pumpkin Pie Overnight Chia Pudding
Ingredients
- 0.5 cup chia seeds
- 2 cups almond milk (or any plant-based milk)
- 1 cup pumpkin puree (canned or homemade)
- 0.25 cup maple syrup (or honey for non-vegan)
- 1 teaspoon vanilla extract
- 1 teaspoon ground cinnamon
- 0.5 teaspoon ground nutmeg
- 0.25 teaspoon ground ginger
- 1 pinch salt
- optional whipped coconut cream, crushed graham crackers, pecans, or pumpkin seeds
Instructions
- In a large mixing bowl, combine the chia seeds and almond milk. Stir well to ensure there are no clumps and that the chia seeds are fully immersed in the liquid.
- In a separate bowl, whisk together the pumpkin puree, maple syrup, vanilla extract, ground cinnamon, nutmeg, ginger, and a pinch of salt until smooth and well combined.
- Pour the pumpkin mixture into the bowl with the chia seeds and almond milk. Stir until fully mixed, making sure the chia seeds are evenly distributed throughout the pumpkin mixture.
- Cover the bowl with a lid or plastic wrap and place it in the refrigerator. Allow the chia pudding to set overnight (or at least for 4 hours) to achieve the desired pudding-like texture.
- Once set, give the chia pudding a good stir. Serve in individual bowls or jars, adding your choice of toppings such as whipped coconut cream, crushed graham crackers, nuts, or pumpkin seeds for added crunch and flavor.


![To make these brownies, you need specific ingredients. Here’s what you’ll gather: - 1 cup unsalted butter (2 sticks) - 2 cups granulated sugar - 4 large eggs - 1 teaspoon vanilla extract - 1 cup all-purpose flour - 1 cup unsweetened cocoa powder - 1/2 teaspoon salt - 1 cup chopped pecans - 1 cup caramel sauce (store-bought or homemade) - 1/2 cup chocolate chips (semi-sweet or dark) - 1/4 teaspoon sea salt (for topping) Each ingredient plays a key role in creating the rich, fudgy texture and flavor you will love. While the essential ingredients are perfect, you can add more for extra flavor. Consider these options: - A dash of espresso powder can deepen the chocolate taste. - A splash of bourbon or rum brings warmth and complexity. - Use dark chocolate chips for a richer finish. - Add sea salt flakes on top for a contrast in taste. These optional ingredients can take your brownies to the next level. To make the process smooth, you'll need some tools. Here’s what I recommend: - A medium saucepan for melting butter. - A mixing bowl for combining wet ingredients. - A separate bowl for dry ingredients. - A whisk for mixing eggs and vanilla. - A spatula to fold in the nuts and chips. - A 9x13 inch baking pan lined with parchment paper. These tools help you create the perfect caramel pecan turtle brownies. For the full recipe, you can check the complete steps and tips. Enjoy your baking! To create your brownie batter, start with the basics. First, preheat your oven to 350°F (175°C). Next, grease a 9x13 inch baking pan and line the bottom with parchment paper. This step helps with easy removal later. In a medium saucepan, melt 1 cup of unsalted butter over low heat. Once it melts, add 2 cups of granulated sugar and stir until mixed well. Remove the saucepan from heat and let it cool for a few minutes. This cooling step is important to avoid cooking the eggs. Now, whisk in 4 large eggs, one at a time. Add 1 teaspoon of vanilla extract and mix until smooth. In another bowl, sift together 1 cup of all-purpose flour, 1 cup of unsweetened cocoa powder, and 1/2 teaspoon of salt. Gradually add the dry mix to the wet mix. Stir gently until just combined. Overmixing can lead to tough brownies. Fold in 1 cup of chopped pecans and 1/2 cup of chocolate chips, saving a few pecans for the topping. Now it’s time to layer your brownies. Pour half of the brownie batter into the prepared pan and spread it evenly. Drizzle half of the caramel sauce over this layer. Then spoon the rest of the batter on top and spread it gently. Drizzle the remaining caramel sauce over this layer. Sprinkle the reserved pecans on top and add a pinch of sea salt to enhance the flavor. Bake in your preheated oven for 30 to 35 minutes. To check for doneness, insert a toothpick in the center. It should come out with a few moist crumbs, not wet batter. After baking, remove the pan from the oven. Let the brownies cool in the pan for at least 30 minutes. Use the parchment paper to lift them out. Slice them into squares for serving. For a special touch, serve the brownies warm. Drizzle with extra caramel sauce and sprinkle with sea salt. This adds a lovely finishing touch that enhances the flavor. Enjoy your delicious creation! For the complete recipe, check out the [Full Recipe]. One big mistake is overmixing the batter. When you mix too much, it makes brownies tough. Mix until just combined for a softer bite. Another common error is not measuring ingredients well. Use dry measuring cups for flour and cocoa powder. Level the tops with a knife for accuracy. For that perfect chewy texture, use melted butter. This gives your brownies a rich flavor. Don't forget to let the batter rest for a few minutes before baking. It helps the ingredients meld together. Also, bake just until a toothpick shows a few moist crumbs. Too long makes them dry. Serve brownies warm to enjoy their gooey center. Drizzle extra caramel sauce on top for added sweetness. A sprinkle of sea salt can enhance the flavors. Pair with a scoop of vanilla ice cream for a delightful treat. Enjoy your Caramel Pecan Turtle Brownies with friends and family for a memorable dessert. Check out the Full Recipe for more tips! {{image_2}} If you want to change the taste, try other nuts. Almonds, walnuts, or hazelnuts can work well. Each nut gives a unique flavor. Almonds add a sweet crunch. Walnuts bring a rich, earthy taste. Hazelnuts give a hint of chocolate flavor. Just chop them as you would with pecans and mix them in. You can even toast the nuts lightly for extra flavor! Making your own caramel sauce is easy and fun. You need just sugar, butter, and cream. Start by melting sugar in a pan. Watch it closely so it doesn’t burn. Once it melts and turns golden, add butter and let it melt. Then, pour in heavy cream slowly and stir. Let it cool before using it in your brownies. This sauce adds a fresh taste that store-bought cannot match. Want to make these brownies gluten-free? Use gluten-free all-purpose flour instead of regular flour. Check that your caramel sauce is also gluten-free. Many brands are safe, but always read the label. This way, you can enjoy rich, gooey brownies without worry. The taste remains just as delightful, and your friends will never know the difference! Don't forget to check out the Full Recipe for all the details on making these sweet treats! To keep your caramel pecan turtle brownies fresh, store them in an airtight container. Place parchment paper between layers to avoid sticking. They can last up to a week at room temperature. For longer storage, put them in the fridge. This helps maintain their chewy texture and flavor. Freezing brownies is a great way to save some for later. First, allow them to cool completely. Then, cut them into squares. Wrap each piece tightly in plastic wrap. Put them in a freezer-safe bag or container. They can stay frozen for up to three months. When you’re ready to enjoy, just thaw them in the fridge overnight. To enjoy your brownies warm, reheat them in the microwave. Use a low power setting to avoid drying them out. Heat for about 10-15 seconds. You can also warm them in the oven. Set the oven to 350°F (175°C) and place the brownies in for about 5-10 minutes. This brings back that fresh-baked taste. For extra delight, drizzle some caramel sauce on top before serving. Turtle brownies get their name from the classic turtle candy. This candy has caramel, pecans, and chocolate. In our brownies, I mix these same flavors. The caramel adds sweetness, the pecans give a nice crunch, and the chocolate ties it all together. When you bite into these brownies, you taste the rich chocolate and gooey caramel. It's like a treat you can hold in your hand! Yes, you can. If you want to skip the eggs, you can use a few substitutes. Applesauce is a great choice. Use 1/4 cup of unsweetened applesauce for each egg. You can also use a flaxseed meal. Mix one tablespoon of flaxseed meal with three tablespoons of water. Let it sit for a few minutes until it gets thick. Both options work well and keep the brownies moist. These brownies stay fresh for about four to five days when stored properly. Keep them in an airtight container at room temperature. If you want them to last longer, you can freeze them. Just wrap them well in plastic wrap and place them in a freezer bag. They can last up to three months in the freezer. When you're ready to enjoy, just thaw them at room temperature or warm them in the microwave for a few seconds. Remember, for the full recipe, check our earlier section! In this post, we explored how to make delicious caramel pecan turtle brownies. We discussed essential and optional ingredients, the tools you need, and easy step-by-step instructions. I also shared useful tips to avoid common mistakes and achieve the perfect texture. Plus, we looked at variations, storage info, and common questions. Enjoying these brownies can be a fun baking adventure. I hope you try these tips and enjoy every bite!](https://dailydishlab.com/wp-content/uploads/2025/07/cd6252c4-9eb9-4ecc-b5d9-7ffc816e6e24-768x768.webp)
