
Are you craving a sweet treat that feels fancy but is easy to make? Look no further! This Raspberry Cheesecake Mousse is a creamy dessert delight you’ll want to whip up again and again. With fresh raspberries and a smooth cheesecake mixture, it strikes the perfect balance between fruity and rich. In this guide, I’ll share the simple steps, tips, and variations that will make your mousse a standout dessert. Let’s dive into this tasty adventure!
Why I Love This Recipe
- Delicious Flavor: The combination of creamy cheesecake and tart raspberries creates a delightful balance that is simply irresistible.
- Easy to Make: This mousse comes together quickly, making it a perfect dessert for any occasion without spending hours in the kitchen.
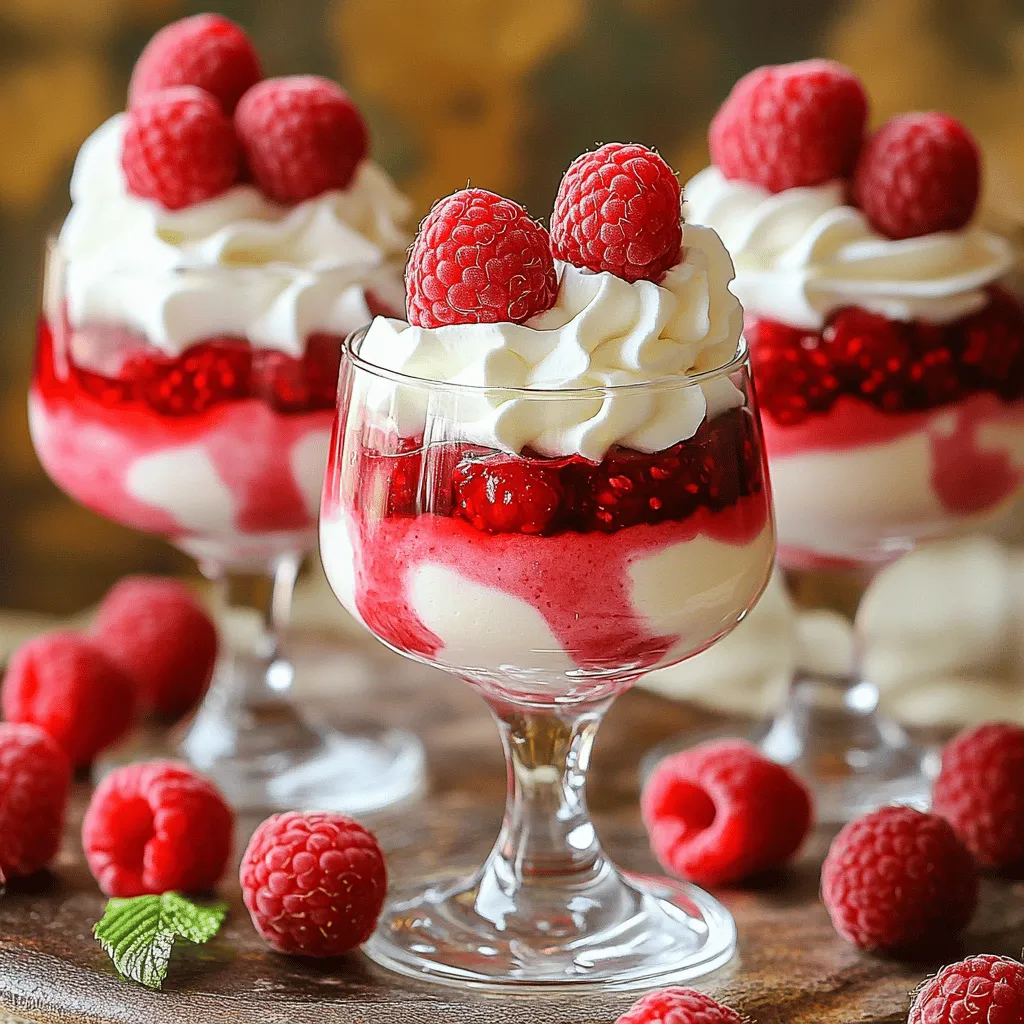
- Elegant Presentation: Serving this dessert in individual glasses adds a touch of sophistication, making it perfect for entertaining guests.
- Versatile Recipe: You can easily customize this mousse with different fruits or flavors, allowing you to make it your own.
Ingredients
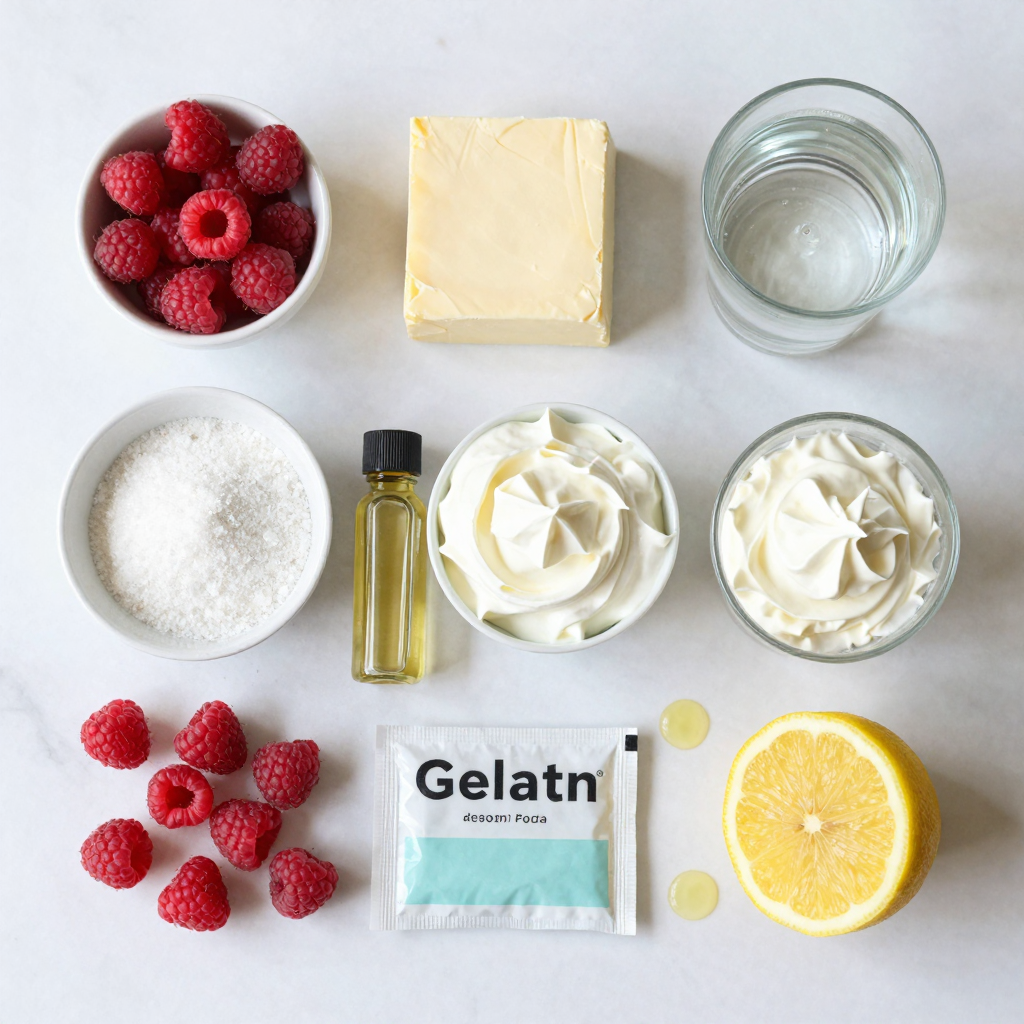
List of Ingredients
– Fresh raspberries
– Sugar
– Cream cheese
– Powdered sugar
– Vanilla extract
– Heavy whipping cream
– Gelatin powder
– Cold water
– Lemon juice
The ingredients in this raspberry cheesecake mousse create a perfect balance of flavors. Fresh raspberries give a sweet and tart taste. Sugar enhances their natural sweetness. Cream cheese adds that rich, creamy base we all love. Powdered sugar blends smoothly, making the texture lovely. Vanilla extract brings warmth and depth. Heavy whipping cream provides that light, airy feel. Gelatin powder helps set the mousse, giving it structure. Cold water activates the gelatin. Finally, lemon juice adds a bright note that cuts through the creaminess.
Special Equipment Needed
– Mixing bowls
– Whisk or electric mixer
– Measuring cups and spoons
– Serving glasses or bowls
Having the right tools makes this dessert easy to make. Use mixing bowls to combine ingredients. A whisk or electric mixer speeds up the mixing process and ensures a smooth texture. Measuring cups and spoons help you get the amounts just right. Finally, serving glasses or bowls are perfect for showcasing your beautiful mousse.
Step-by-Step Instructions
Preparation Steps
1. Prepare the raspberries by mashing and marinating: Start by placing 1 cup of fresh raspberries in a small bowl. Add 1 tablespoon of sugar. Use a fork to gently mash the raspberries. This helps release their sweet juices. After mashing, let them sit for about 10 minutes to marinate.
2. Dissolve gelatin properly: In another small bowl, sprinkle 2 tablespoons of gelatin powder over ¼ cup of cold water. This step is called blooming. Let it sit for about 5 minutes. After blooming, microwave the mixture for 10 seconds. Stir until all the gelatin is dissolved. Allow it to cool slightly before using.
Cheesecake Mixture
1. Beat cream cheese, powdered sugar, and vanilla: In a large mixing bowl, beat 8 ounces of softened cream cheese with ½ cup of powdered sugar and 1 teaspoon of vanilla extract. Use a whisk or electric mixer. Mix until the mixture is smooth and creamy. This is the base of your cheesecake mousse.
2. Add marinated raspberries into the mixture: Once the cream cheese is smooth, fold in the marinated raspberries. Make sure to include the juices from the raspberries. This will add flavor and color to your mousse.
Final Assembly
1. Whip the cream and fold it into the mixture: In a separate bowl, whip 1 cup of heavy whipping cream. Whip until soft peaks form. Gently fold the whipped cream into the cheesecake mixture. Be careful not to deflate the mixture. This keeps it light and airy.
2. Combine gelatin mix and set the mousse: Pour the cooled gelatin and ½ teaspoon of lemon juice into the cheesecake mixture. Fold gently until everything is well combined. Now, spoon the mousse into serving glasses or bowls. Refrigerate for at least 4 hours to set.
Pro Tips
- Use Fresh Raspberries: Fresh raspberries yield the best flavor and texture for this mousse, enhancing the overall dessert experience.
- Gelatin Temperature: Ensure that the gelatin is slightly cooled before adding it to the mixture to prevent it from clumping.
- Whipping Cream: Whip the heavy cream just until soft peaks form to maintain a light and airy texture in your mousse.
- Chill Time: Allow the mousse to chill for at least 4 hours; this helps it set properly and enhances the flavors.
Tips & Tricks
Achieving the Perfect Texture
To get that light and airy texture in your raspberry cheesecake mousse, you need to whip the cream just right. Start with cold heavy cream. Use a chilled bowl and beaters for the best results. Whip until soft peaks form. This means the cream should hold its shape but still look smooth. If you whip too long, it may turn grainy.
When folding in the whipped cream, use a gentle touch. Start by adding a small amount of whipped cream to the cheesecake mix. Stir it in to lighten the mixture. Then, add the rest of the whipped cream. Use a spatula and fold carefully. This helps keep the air in the mix. If you stir too hard, you may deflate the mousse.
Flavor Enhancements
To make your mousse even more special, consider adding extra flavors. For a bright twist, add a bit of lemon zest. This gives a nice zing. If you love chocolate, try mixing in cocoa powder for a chocolate raspberry mousse.
You can also switch up the fruit. Instead of raspberries, use strawberries or blueberries. Each fruit brings its own charm. This way, you can enjoy different flavors and colors in your mousse.
Variations
Fruit Variations
You can change up the fruit in this mousse. Instead of raspberries, try strawberries, blueberries, or mixed berries. Each fruit adds its special taste. Strawberries give a sweet touch, while blueberries add a hint of tartness. You can use seasonal fruits too. In summer, fresh peaches or cherries work well. In fall, consider apples or pears. Each option makes the mousse unique and fun.
Dietary Adjustments
You might want to make this cheesecake mousse fit your diet. For a gluten-free version, check your ingredients. All the main ingredients are gluten-free. Just ensure your gelatin is safe. You can also lower the sugar. Use sugar substitutes like stevia or monk fruit sweetener. This change keeps the mousse tasty while making it healthier. These adjustments let everyone enjoy this creamy dessert delight without worry.
Storage Info
Proper Storage Methods
To keep your raspberry cheesecake mousse fresh, store it in the fridge. Use airtight containers to prevent odors from mixing. Cover each serving glass tightly with plastic wrap or a lid. This keeps the mousse creamy and safe.
If you want to freeze it, use freezer-safe containers. Leave some space at the top for expansion. The mousse can freeze well but may change texture after thawing. To serve, thaw it in the fridge overnight.
Shelf Life
You can keep the mousse in the fridge for about three days. After that, the texture may change, and it may not taste as fresh. Always check for any off smells or discoloration before eating.
Signs of spoilage include a watery texture or an odd smell. If you notice any of these, it’s best to throw it away. Enjoy the mousse while it’s fresh for the best taste!
FAQs
Can I make Raspberry Cheesecake Mousse in advance?
Yes, you can make Raspberry Cheesecake Mousse ahead of time. This dessert tastes great when chilled for a few hours or even overnight. I recommend preparing it up to two days in advance. Just store it in the fridge. Make sure to cover it well with plastic wrap or a lid. This keeps it fresh and prevents it from absorbing other flavors.
How do I serve Raspberry Cheesecake Mousse?
Serving Raspberry Cheesecake Mousse can be fun! You can spoon it into pretty glasses or bowls. For a nice touch, add some fresh raspberries on top. You might also want to add a dollop of whipped cream. Mint leaves can add a pop of color too. For a crunchy contrast, consider crumbling some graham crackers on top. This dessert looks great and tastes even better!
Can I use frozen raspberries?
Yes, frozen raspberries work well for this recipe. Just thaw them first and drain excess liquid. You can mash them just like fresh raspberries. This way, you still get that fruity flavor and color. Using frozen fruit is a great way to enjoy this dish year-round.
Raspberry cheesecake mousse is simple and fun to make. You learned about the key ingredients, special tools, and steps needed. We covered tips for texture and flavor, plus tasty variations. Proper storage keeps your dessert fresh, and you can even make it in advance.
Now, get ready to impress your friends with this sweet treat! Enjoy your delicious creation and share it with others.


