Refreshing Strawberry Kiwi Agua Fresca Recipe Guide

Looking for a refreshing drink that’s easy to make? You’ll love this Strawberry Kiwi Agua Fresca! In this guide, I’ll walk you through simple steps to blend sweet strawberries and tangy kiwis into a delightful summer drink. Whether you want to enjoy it with friends or savor it solo, I’ll share tips for choosing the best fruit, adjusting sweetness, and even fun variations. Let’s dive into this tasty recipe!
Why I Love This Recipe
- Refreshing Flavor: This agua fresca combines the sweet taste of strawberries with the tartness of kiwis, creating a perfectly balanced and refreshing drink for any occasion.
- Quick and Easy: In just 10 minutes, you can whip up this delicious beverage, making it a fantastic choice for last-minute gatherings or hot summer days.
- Healthy Ingredients: With fresh fruits, agave syrup, and lime juice, this recipe is not only delicious but also a healthier alternative to sugary drinks.
- Customizable: You can easily adjust the sweetness or add other fruits to this agua fresca, making it a versatile recipe that you can adapt to your taste preferences.
Ingredients
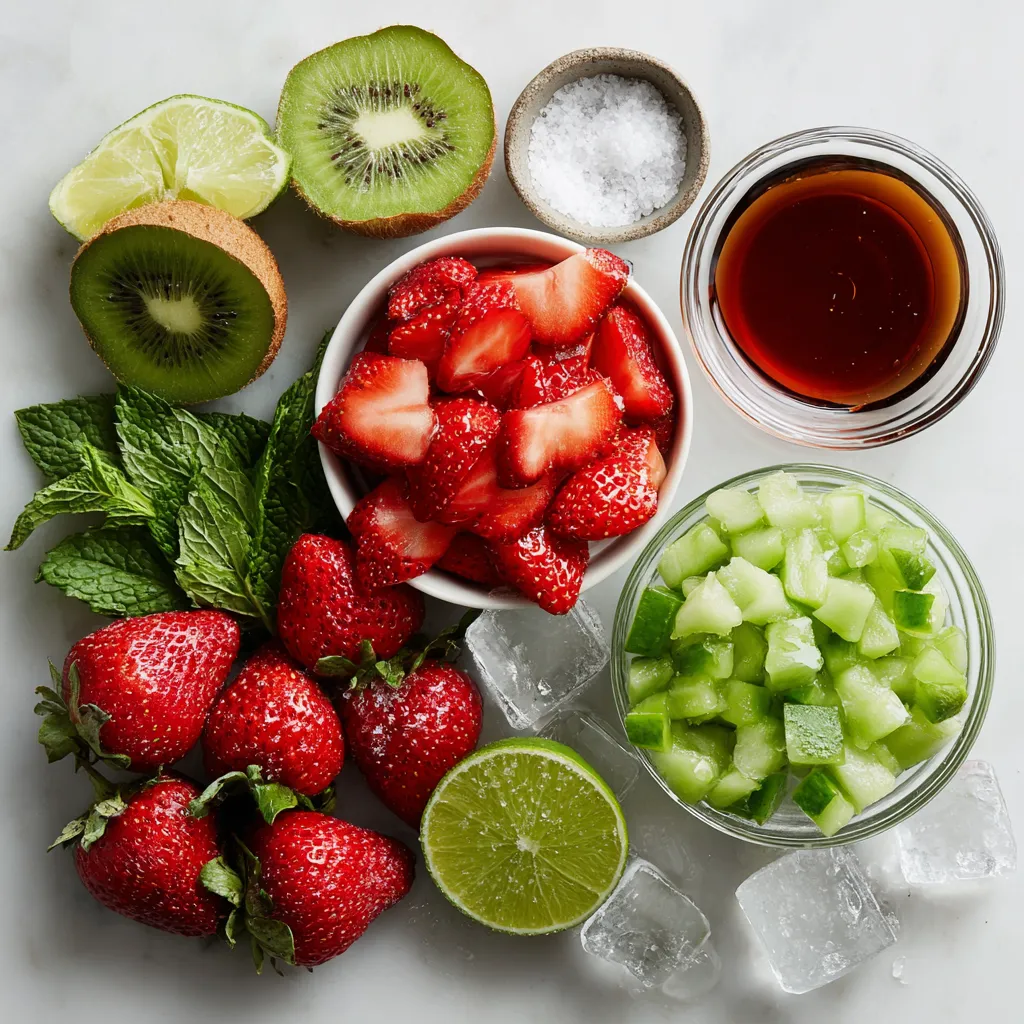
Fresh ingredients for Strawberry Kiwi Agua Fresca
To make the best Strawberry Kiwi Agua Fresca, you need fresh and ripe ingredients. Here’s what to gather:
- 2 cups fresh strawberries, hulled and sliced
- 3 ripe kiwis, peeled and chopped
- 4 cups cold water
- Juice of 1 lime
- Pinch of salt
These fresh fruits give the drink a bright flavor. The strawberries add sweetness, while kiwis bring a tart taste.
Optional sweetness adjustments
You might want to adjust the sweetness based on your taste. Here’s how:
- 3 tablespoons agave syrup (or honey to taste)
Start with three tablespoons. Taste the agua fresca after mixing. If it’s not sweet enough, you can add more agave syrup or honey. This step lets you control the sweetness.
Serving suggestions and garnishes
Serving is fun and creative! Here are some ideas:
- Ice cubes
- Fresh mint leaves for garnish
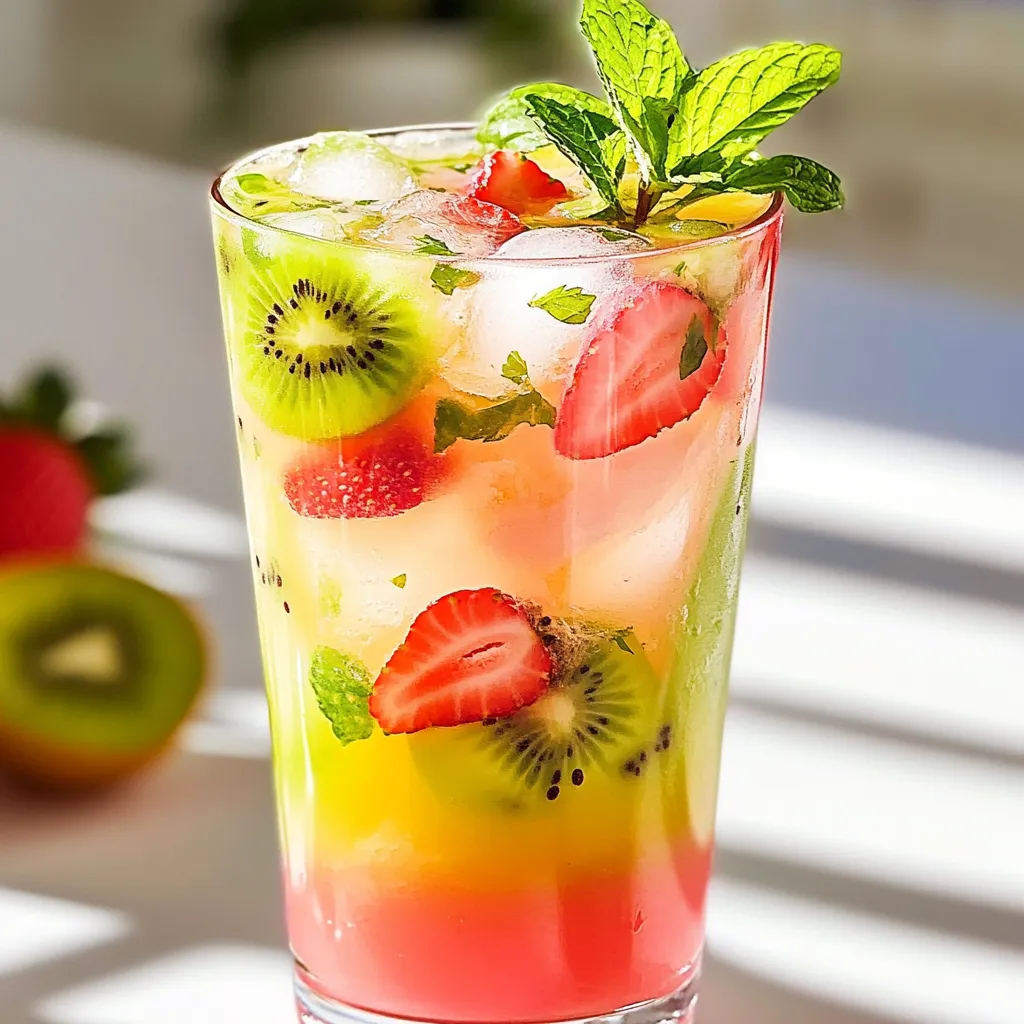
Serve the agua fresca over ice in tall glasses. The ice keeps it cold and refreshing. Add fresh mint leaves on top for a nice touch. They also add a lovely aroma to the drink.

Step-by-Step Instructions
Blending strawberries and kiwis
First, take your fresh strawberries and slice them. You need about 2 cups of these. Next, peel and chop 3 ripe kiwis. Add both fruits to your blender. Blend until smooth. This step makes a tasty base for our agua fresca.
Straining the mixture for smoothness
Now, pour this blended mixture through a fine mesh strainer. This helps remove any pulp. Use a spatula to push the liquid through. This step gives your drink a smooth, refreshing texture.
Finalizing the agua fresca
In a large pitcher, mix the remaining 2 cups of cold water. Add the agave syrup, lime juice, and a pinch of salt. Stir well to combine everything. Taste your agua fresca. If you want it sweeter, add more agave syrup. Serve over ice cubes in tall glasses. Garnish with fresh mint leaves for a lovely look. Enjoy your drink!
Tips & Tricks
Best practices for selecting ripe fruit
When picking strawberries, look for bright red color and shiny skin. They should smell sweet. Ripe strawberries will be firm but not hard. For kiwis, choose ones that feel slightly soft when you press them. A good kiwi has a smooth skin and a rich brown color. If they are too hard, they are not ripe yet.
Adjusting sweetness and acidity
Taste your agua fresca after mixing. If it’s not sweet enough, add more agave syrup or honey. You can also squeeze in more lime juice for a tangy kick. A pinch of salt can help balance the flavors, too. This small touch brightens up the taste.
Enhancing flavors with additional ingredients
Try adding other fruits for extra flavor. Pineapple or mango can add a tropical twist. Fresh herbs like basil or mint give a fresh taste. If you want a spicy kick, a small piece of jalapeño can add a fun twist. Just blend it with the fruit for a unique flavor.
Pro Tips
- Use Ripe Fruits: Ensure your strawberries and kiwis are perfectly ripe for the best flavor and sweetness.
- Chill Your Ingredients: For a refreshingly cold drink, chill your fruits and water beforehand.
- Experiment with Sweeteners: Feel free to substitute agave syrup with other sweeteners like maple syrup or stevia, depending on your preference.
- Add More Citrus: For an extra zing, consider adding more lime juice or even a splash of lemon juice to enhance the flavor profile.

Variations
Tropical twist with additional fruits
You can add other fruits to your Strawberry Kiwi Agua Fresca. Try using mango or pineapple for a tropical twist. Just chop them up and blend them with the strawberries and kiwis. This mix gives your drink a new flavor and a bright color. You can also use coconut water instead of regular water for a fun, sweet taste.
Infused suggestions (herbs and spices)
Adding herbs can change the flavor of your agua fresca. Mint is a great choice. Just toss in a handful while blending the fruits. You can also try basil or cilantro for something unique. If you like spice, a touch of ginger can give it a nice kick. Remember to blend well to mix the flavors.
Non-sweetened versions for health-conscious options
If you want a healthier drink, skip the agave syrup or honey. Use ripe fruits for natural sweetness instead. You can also add a little extra lime juice. This helps balance the flavors without added sugar. Enjoy a refreshing drink that tastes great and fits your healthy lifestyle!
Storage Info
How to store leftovers properly
To store your leftover Strawberry Kiwi Agua Fresca, pour it into a clean pitcher. Use a lid or plastic wrap to cover it tightly. This keeps the drink fresh and prevents spills. If you have any ice in the drink, remove it before storing. Ice can make the agua fresca too watery.
Shelf life of Strawberry Kiwi Agua Fresca
Your agua fresca will stay fresh in the fridge for about 2 to 3 days. After that, the flavors may fade. If you notice any strange smells or changes in taste, it’s best to toss it out. Always check for freshness before serving.
Tips for keeping it fresh
To keep your agua fresca fresh longer, try these tips:
- Store it in a glass container. Glass helps maintain flavor.
- Keep it away from strong-smelling foods in the fridge.
- Add fresh mint leaves just before serving. This adds a nice touch and helps it taste fresh.
With these storage tips, you can enjoy your Strawberry Kiwi Agua Fresca for days!
FAQs
How to make Strawberry Kiwi Agua Fresca without a blender?
You can make Strawberry Kiwi Agua Fresca without a blender. First, mash the strawberries and kiwis with a fork or potato masher. Then, add the mashed fruit to a large pitcher. Pour in the cold water. Stir well to mix the fruit and water. Use a fine mesh strainer to remove the pulp. Add agave syrup, lime juice, and a pinch of salt. Stir until well mixed. Serve over ice and garnish with mint leaves. This method gives you a chunkier texture.
Can I use frozen fruit for this recipe?
Yes, you can use frozen fruit for this recipe. Frozen strawberries and kiwis work well. Just let them thaw a bit before you mash them. This helps them break down easier. You may need to add a little more water since frozen fruit can be a bit thicker. The flavors stay fresh and tasty, and it’s a great way to enjoy this drink anytime.
What are the nutritional benefits of Strawberry Kiwi Agua Fresca?
Strawberry Kiwi Agua Fresca is packed with benefits. Strawberries are rich in vitamin C and fiber. They help your immune system and digestion. Kiwis also provide a good dose of vitamin C and potassium. They can boost your heart health and improve digestion. Adding lime juice gives an extra vitamin C kick. This drink is low in calories, making it a great choice for hydration. Plus, it’s a fun way to enjoy fruit!
Strawberry Kiwi Agua Fresca is refreshing and easy to make. We covered the key ingredients, blending techniques, and tips for great taste. Remember to store leftovers well to enjoy later. Explore variations to keep it exciting. My final thought: enjoy crafting your own version of this drink. It’s delicious and a fun way to enjoy fresh frui

Strawberry Kiwi Agua Fresca
Ingredients
- 2 cups fresh strawberries, hulled and sliced
- 3 whole ripe kiwis, peeled and chopped
- 4 cups cold water
- 3 tablespoons agave syrup (or honey to taste)
- 1 whole lime, juiced
- 1 pinch salt
- as needed cubes ice
- for garnish leaves fresh mint
Instructions
- In a blender, combine the sliced strawberries and chopped kiwis. Blend until smooth.
- Add 2 cups of cold water to the blender and blend again to combine all the ingredients fully.
- Pour the blended mixture through a fine mesh strainer into a large pitcher to remove any pulp, using a spatula to help push the liquid through.
- Mix in the remaining 2 cups of cold water, agave syrup, lime juice, and a pinch of salt. Stir well until everything is combined.
- Taste the agua fresca and adjust sweetness by adding more agave syrup if desired.
- Serve the agua fresca over ice cubes in tall glasses.
- Garnish with fresh mint leaves for a refreshing touch.


![- 1 cup fresh or frozen blueberries - 1 medium banana - 1 cup unsweetened almond milk (or any milk of choice) - 1 scoop vanilla protein powder - 1 tablespoon lemon juice (freshly squeezed) - 1 tablespoon honey or maple syrup (optional, for added sweetness) - 1/2 teaspoon vanilla extract - A handful of spinach or kale - Ice cubes (optional, for a thicker smoothie) When making a Blueberry Lemon Protein Smoothie, fresh ingredients matter. Blueberries burst with flavor and nutrients. They are rich in antioxidants and fiber. Bananas add creaminess and natural sweetness. They also offer potassium, which is great for muscles. For dairy or dairy alternatives, I recommend unsweetened almond milk. It keeps the smoothie light and adds a nutty flavor. You can use any milk you like, such as soy or oat milk. Protein is key for staying full. A scoop of vanilla protein powder boosts the smoothie. It adds taste and helps with recovery after exercise. The lemon juice gives a zing and balances sweetness. Honey or maple syrup can add extra sweetness, but it’s optional. The vanilla extract enhances all the flavors. If you want more nutrients, add a handful of spinach or kale. These greens are packed with vitamins and minerals. Ice cubes can make the smoothie thicker and colder, perfect for hot days. This recipe is quick and easy. You’ll find the full recipe in the next section. Enjoy your healthy drink! Start by measuring your fresh ingredients. Use a cup for the blueberries. If you have frozen blueberries, that works too. Next, grab a medium banana. Peel it and break it into chunks. For the almond milk, one cup is the right amount. If you prefer another milk, feel free to swap it out. Squeeze the lemon for one tablespoon of juice. If you want extra sweetness, get your honey or maple syrup ready. Finally, if you want to add greens, wash a handful of spinach or kale. Now it's time to blend! Place all your ingredients into the blender. Add the blueberries, banana, almond milk, protein powder, lemon juice, and sweetener. If you are using greens, add them here too. Secure the lid on the blender. Blend on high until the mixture is smooth and creamy. If you like a thicker texture, toss in a few ice cubes and blend again. Keep blending until you reach your desired consistency. Taste your smoothie. If you want it sweeter, add more honey or maple syrup and blend again. Pour your smoothie into a tall glass. To make it look pretty, garnish it. Add a few whole blueberries on top or place a slice of lemon on the rim. This adds a nice pop of color. Enjoy your Blueberry Lemon Protein Smoothie! For the complete recipe, check [Full Recipe]. To get a smooth and creamy texture, blend for about 30 to 60 seconds. Start on low speed and then increase to high. If the smoothie is too thick, add a splash of almond milk. If it's too thin, toss in a few ice cubes. Blend again until it reaches your desired texture. Taste the smoothie after blending. If you want it sweeter, add more honey or maple syrup. Start with a small amount, like half a tablespoon, and blend again. You can always add more, but you can't take sweetness out once it's in. Want to supercharge your smoothie? Try adding a tablespoon of chia seeds or flaxseeds for fiber. You can also mix in a scoop of nut butter for healthy fats. If you're feeling adventurous, add a handful of spinach or kale for extra vitamins without changing the taste much. Check out the Full Recipe for more ideas! {{image_2}} You can change the taste of your smoothie by adding different fruits. Strawberries add a sweet twist. Mango brings a tropical vibe. You could mix in raspberries for a tart kick. Each fruit offers unique flavors and nutrients. Experiment with what you like best! If you want a dairy-free option, use almond milk or coconut milk. These milks work well in this smoothie. For a vegan version, skip honey and use maple syrup instead. You can also make it low-carb by omitting the banana. Instead, use avocado for creaminess without extra carbs. Not all protein powders are the same. For this smoothie, a whey or plant-based protein works best. Pea protein is a great choice for vegans. Egg white protein is also a solid option. Each type gives you protein without changing the flavor much. Choose what fits your diet and taste! For the full recipe, check out the Blueberry Lemon Protein Smoothie section. Store any leftover smoothie in a sealed container. Glass jars work great. Keep it in the fridge. It stays fresh for up to 24 hours. If you notice separation, just shake it well before drinking. This smoothie tastes best when fresh, so try to finish it soon. You can freeze your smoothie if you have extras. Pour it into ice cube trays or freezer-safe bags. Once frozen, transfer cubes to a bag for easy use. They last for about three months in the freezer. When you want a quick drink, blend the frozen cubes with more liquid. Smoothies are best cold, but you can warm them up if you prefer. Thaw frozen smoothies in the fridge overnight. To reheat, use a microwave on low power. Stir often to ensure even heating. Avoid boiling the smoothie, as it can change the taste and texture. Try this Blueberry Lemon Protein Smoothie recipe for a refreshing boost! [Full Recipe] A blueberry lemon protein smoothie brings many health benefits. Blueberries are full of antioxidants. They help fight free radicals and keep your body healthy. They also support heart health and may boost brain function. Lemons add vitamin C, which helps your immune system. Vitamin C also aids in skin health. The banana gives you potassium, which is great for your heart and muscles. Adding protein powder helps build and repair muscles, making this drink perfect post-workout. This smoothie is not just tasty; it is packed with nutrients that support overall health. Yes, you can make this smoothie without protein powder. If you want to skip it, there are great alternatives. Greek yogurt is a fantastic choice. It adds creaminess and extra protein. Silken tofu also works well for a creamy texture. If you want a vegan option, consider adding nut butter or seeds. Chia seeds or hemp seeds are good protein sources too. They will give your smoothie a nice boost without the protein powder. You can easily adjust the thickness of your smoothie. Want it thicker? Add ice cubes or more frozen fruit. Bananas also help make smoothies thicker. If you like it thinner, just add more liquid. Almond milk or water will work well. Start with a little extra and blend until you reach your desired texture. It’s all about what you enjoy! This blog post walks you through making a delicious blueberry lemon protein smoothie. You learned about fresh ingredients, protein enhancement, and fun variations. I shared tips on achieving the perfect texture and how to store your smoothies. If you try it, remember to customize the recipe to suit your tastes. Enjoy the health benefits while keeping it simple and tasty. Your next smoothie adventure starts now!](https://dailydishlab.com/wp-content/uploads/2025/06/1fca42f8-3635-4508-8894-b84f3456bdc7-768x768.webp)

![- 2 shots of freshly brewed espresso - 2 tablespoons brown sugar - 1 tablespoon vanilla syrup - 1/2 cup milk (dairy or non-dairy) - Ice cubes - A pinch of sea salt - Whipped cream (optional for topping) - Cinnamon or nutmeg for garnish (optional) What are the best types of espresso to use? I recommend using a medium or dark roast espresso. These have rich flavors that stand out. They work well with the sweetness of brown sugar. How do I choose the right milk option? You can use whole milk for creaminess. Almond or oat milk adds a nice twist. If you want a lighter drink, use skim milk. Can I substitute brown sugar with alternatives? Yes! You can use coconut sugar for a similar taste. Agave syrup is another good choice. It will change the flavor slightly but still taste great. To make the Iced Brown Sugar Shaken Espresso, start with quick prep steps: - Gather all your ingredients. - Brew your espresso first to cool it down. Following the order of steps helps with the overall taste. When you brew the espresso first, it can steep and mix better with the sugar. The best brewing methods include using an espresso machine or a stovetop moka pot. Both can give you a strong, rich flavor. Make sure to use fresh coffee beans for the best taste. If you grind your beans right before brewing, you will get the best flavor. For optimal extraction, use hot water that is just off the boil. This helps to draw out the coffee's oils. Aim for about 9 bars of pressure if using an espresso machine. This ensures a great crema on top. To achieve the perfect froth, shake your mixture with energy. Use a shaker or a jar with a lid. Pour the hot espresso over the sugar mix before shaking. This helps dissolve the sugar better. Shake for about 10-15 seconds. You want to feel the cold from the ice as you shake. If you shake too little, you won’t get the frothy texture. If you shake too much, the ice may melt and water down your drink. Find that sweet spot! You can find the complete instructions in the Full Recipe. To make your Iced Brown Sugar Shaken Espresso just right, start with the sweetness. Adjust the brown sugar to suit your taste. Some like it sweeter, while others prefer a hint of sugar. Next, play around with the shake duration. A quick shake brings light froth. A longer shake gives a creamier texture. Find the balance that makes your drink perfect. To add more fun to your drink, try flavored syrups. Caramel or hazelnut can take your espresso to new heights. You can also add a hint of vanilla or almond for a twist. Spices like cinnamon or nutmeg can enhance the flavor too. A sprinkle on top adds warmth and aroma. Toppings like whipped cream can make it extra special. Be careful not to over-shake or under-shake your drink. Too much shaking can make it watery. Too little will leave it flat. Watch the ice-to-espresso ratio. Too much ice can dilute the flavor. Aim for a nice balance to keep your drink bold and rich. For the complete recipe, check out the Full Recipe section. {{image_2}} You can customize your Iced Brown Sugar Shaken Espresso with fun flavors. One tasty option is to add caramel. Just drizzle some caramel syrup into your drink after shaking. The sweet and buttery taste pairs well with the brown sugar. Seasonal flavors also shine in this drink. During fall, try adding pumpkin spice. Just mix in some pumpkin spice syrup after shaking. This change gives your drink a cozy vibe, perfect for chilly days. If you're looking for dairy-free recipes, there are plenty of milk options. Almond milk is light and nutty, while oat milk is creamy and smooth. Coconut milk adds a tropical twist, and soy milk has a nice protein boost. Each milk alters the drink's texture. Almond milk makes it thinner, while oat milk creates a rich mouthfeel. Experiment to find your favorite! You can turn this drink into a cold brew version with ease. Start by making cold brew coffee instead of espresso. Use the same amount of coffee grounds, but steep them in cold water for 12 to 24 hours. Adjust the ingredient ratios, too. Use 4 tablespoons of brown sugar for a stronger flavor. Mix your cold brew with milk and ice just like in the original recipe. Now you have a refreshing cold drink for hot days! For the full recipe, check out the [Full Recipe]. To store unused espresso, let it cool first. Place it in an airtight container. This helps keep it fresh. Store it in the fridge for up to three days. For best flavor, use it within one day. To maintain flavor over time, avoid exposing the espresso to air. Use a dark container to block light. This keeps the taste strong. If you notice any off-flavors, it is best to discard it. You can make Iced Brown Sugar Shaken Espresso ahead for the week. Brew extra espresso and cool it down. Store in a sealed container in your fridge. For reheating, gently warm the espresso in a small pot. Do not boil it. Serve it chilled over ice. If you want, add fresh milk and sugar before serving. Brown sugar lasts a long time. It can stay good for up to two years if stored well. Keep it in a cool, dry place. Syrups usually last about one year. Store them in a cool area away from sunlight. Always check for any signs of spoilage. Espresso should be used fresh. If you brew a large batch, drink it within three days. After that, the flavor fades quickly. You can use a jar with a lid instead of a shaker. Just mix the brown sugar, vanilla syrup, and sea salt in the jar. Pour in the hot espresso. Seal the jar tightly and shake it well. If you don’t have a jar, you can whisk the mixture in a bowl. This method works too, though it may not froth as much. Yes, you can easily make this drink decaf. Just use decaffeinated espresso instead of regular espresso. Follow the same steps in the Full Recipe. The taste will still be great, but you won’t get the caffeine kick. Many popular coffee shops offer this drink. Look for it at Starbucks or local cafes. You can also find pre-made versions in stores. Brands like Starbucks and Dunkin' have bottled options. Check your grocery store for these convenient choices. This guide covered how to make Iced Brown Sugar Shaken Espresso. You learned about each ingredient, preparation steps, and various tips. I shared how to enhance flavors and avoid common mistakes. You can even adapt the drink to suit your taste with variations. Making this drink at home saves money and lets you enjoy it anytime. Give it a try, and perfect your own version! Enjoy your delicious creation and impress your friends with your new skills.](https://dailydishlab.com/wp-content/uploads/2025/06/cb466296-3a62-4cc5-b7e7-aa8e24de9043-768x768.webp)

