Roasted Brussels Sprouts with Balsamic Glaze Dish

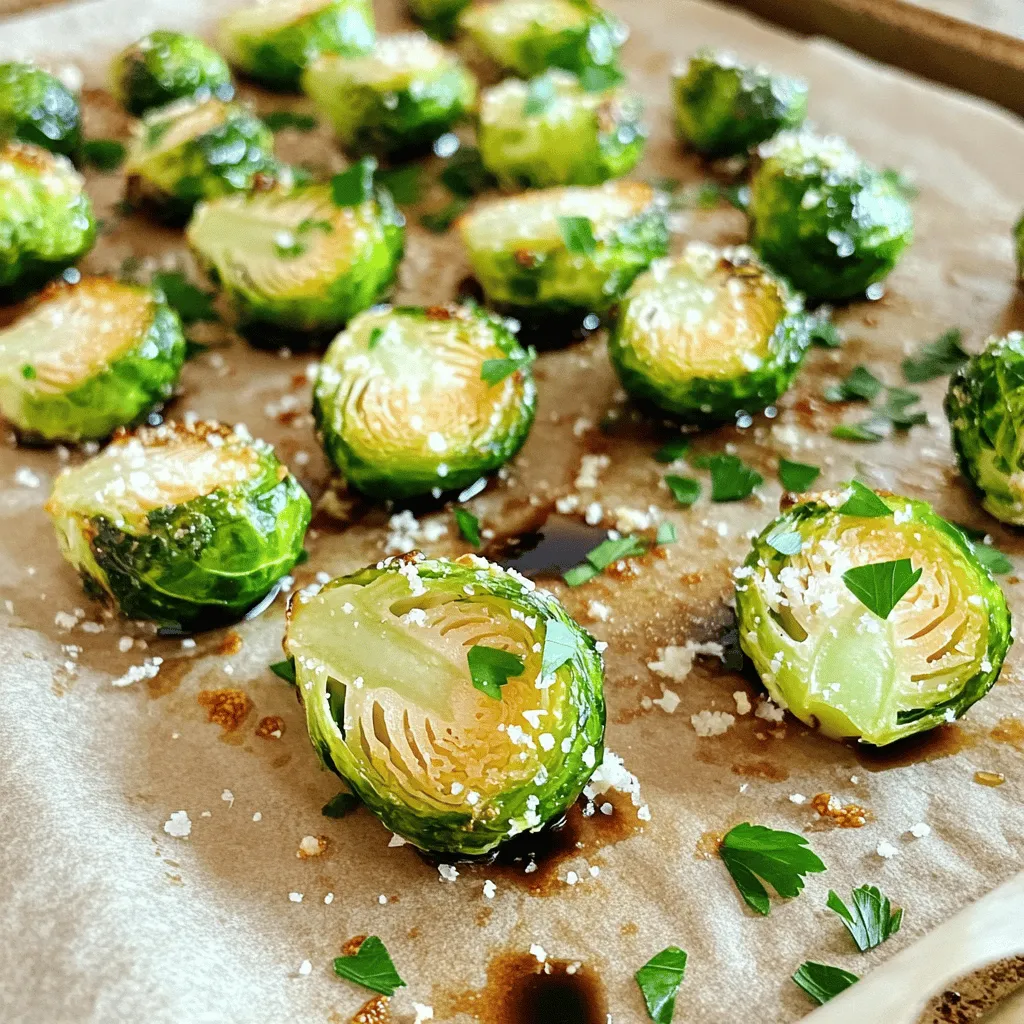
Are you ready to elevate your vegetable game? Roasted Brussels Sprouts with Balsamic Glaze combines rich flavor with simple cooking techniques. This dish is not only healthy but also delicious. In this guide, I’ll walk you through essential ingredients, easy steps, and handy tips to get the perfect roast. Whether you are a seasoned chef or a beginner, you will impress everyone at your table! Let’s dive in!
Why I Love This Recipe
- Easy Preparation: This recipe requires minimal prep time and uses simple ingredients, making it a go-to for busy weeknights.
- Delicious Flavor: The combination of balsamic glaze and honey gives the Brussels sprouts a sweet and tangy flavor that is irresistible.
- Versatile Side Dish: These roasted Brussels sprouts pair well with a variety of main dishes, making them a perfect side for any meal.
- Healthy and Nutritious: Brussels sprouts are packed with vitamins and fiber, making this dish a healthy addition to your table.
Ingredients
Essential Ingredients for Roasted Brussels Sprouts
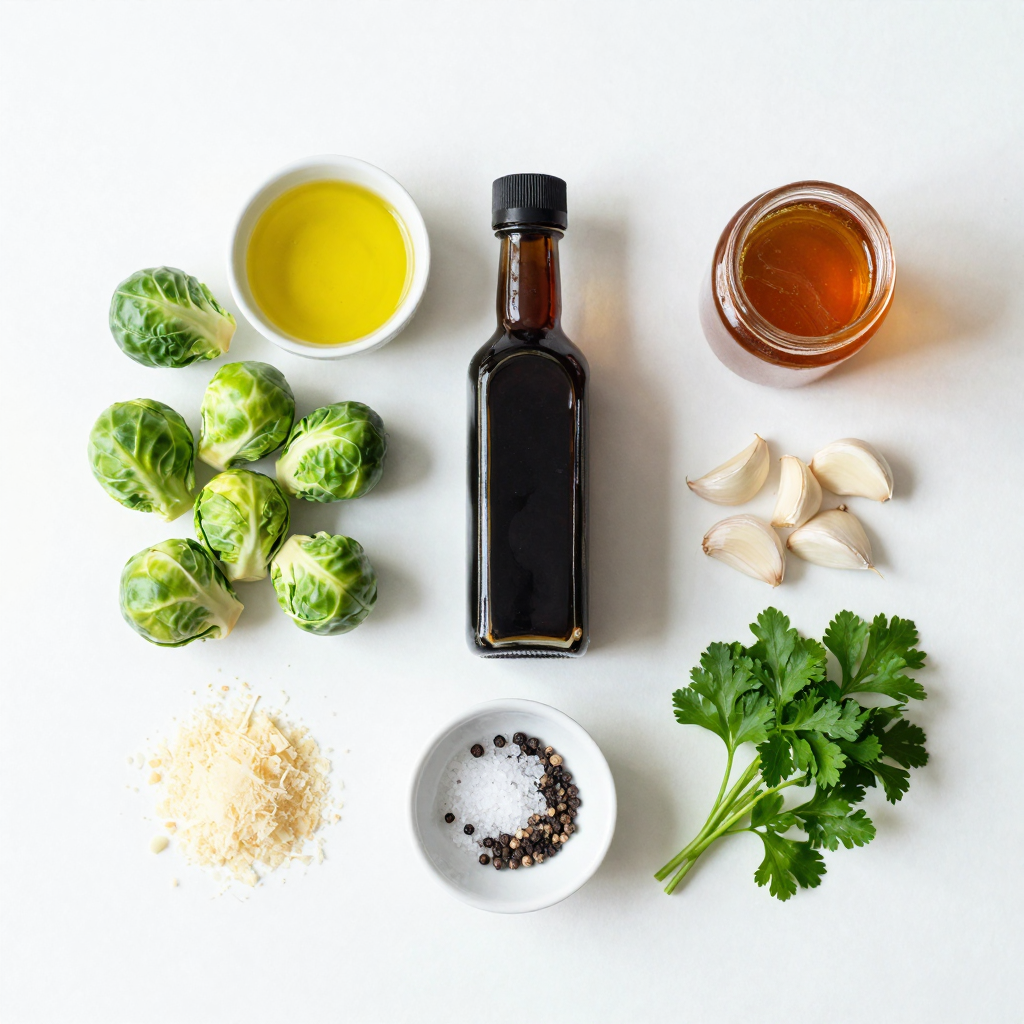
To make Roasted Brussels Sprouts with Balsamic Glaze, you need these key items:
- 1 pound Brussels sprouts, trimmed and halved
- 3 tablespoons olive oil
- 2 tablespoons balsamic vinegar
- 1 tablespoon honey
- 2 cloves garlic, minced
- Salt and pepper, to taste
These ingredients form the base of our dish. The Brussels sprouts give a nice crunch and earthy flavor. Olive oil helps with roasting, adding richness. Balsamic vinegar and honey create a sweet and tangy glaze. Garlic adds a savory kick. Salt and pepper enhance all the tastes.
Ingredients for Balsamic Glaze
For the balsamic glaze, you primarily use balsamic vinegar and honey. This mix creates a syrup-like texture when heated. Here’s how to make it:
- Combine 2 tablespoons balsamic vinegar
- Add 1 tablespoon honey
You simmer this mixture until thick. It adds a delicious finish to your Brussels sprouts.
Optional Ingredients to Enhance the Recipe
While the main ingredients are great on their own, you can add more:
- ¼ cup grated Parmesan cheese (optional)
- Fresh parsley, chopped for garnish
Parmesan cheese adds a salty, creamy element that many love. Chopped parsley gives a fresh pop of color and flavor. Feel free to customize your dish with these extras.

Step-by-Step Instructions
Prepping the Brussels Sprouts
Start by trimming the ends of each Brussels sprout. Cut them in half to help them cook evenly. Rinse them under cold water to remove any dirt. Pat them dry with a towel. This step is key for crispiness.
Making the Balsamic Glaze
In a bowl, mix balsamic vinegar and honey. Add minced garlic for flavor. This mix adds a sweet and tangy taste to the sprouts. You can also add salt and pepper to enhance the flavor. Stir until well combined.
Roasting Process
Preheat your oven to 425°F (220°C). Line a baking sheet with parchment paper. This helps with easy cleanup. In a large bowl, toss the Brussels sprouts with olive oil and the balsamic glaze. Spread them in a single layer on the baking sheet, cut side down.
Roast for 20-25 minutes. Halfway through, give them a good toss. This ensures even cooking. The sprouts should be tender and golden brown when done. If you want, sprinkle grated Parmesan cheese on top. Return to the oven for 5 more minutes. This will melt the cheese.
Once done, drizzle more balsamic vinegar if you like. Finish with chopped parsley for color. Enjoy your delicious roasted Brussels sprouts!
Pro Tips
- Perfecting Crispiness: For extra crispy Brussels sprouts, make sure to place them cut side down on the baking sheet and avoid overcrowding them.
- Enhancing Flavor: Marinate the Brussels sprouts in the olive oil, balsamic vinegar, and honey mixture for 30 minutes before roasting to deepen the flavor.
- Vegan Option: Omit the Parmesan cheese or replace it with a vegan cheese alternative to keep this dish plant-based.
- Garnishing Tips: Experiment with different herbs like thyme or rosemary for a unique twist, or add toasted nuts for an added crunch.
Tips & Tricks
How to Achieve Extra Crispiness
To get your Brussels sprouts crispy, start with a hot oven. Preheat it to 425°F (220°C). Cut the sprouts in half and place them cut-side down on the baking sheet. This helps them brown better. Use enough olive oil. A good coating keeps them from drying out. Toss them halfway through roasting for even crispiness.
Timing Adjustments for Different Oven Types
Ovens can vary. If you have a fan or convection oven, reduce the temperature by 25°F. This helps the sprouts cook evenly. Always check them a few minutes early. If they look golden and smell great, they are likely ready. You want a nice balance between crisp and tender.
Serving Suggestions for Roasted Brussels Sprouts
Roasted Brussels sprouts pair well with many dishes. Serve them alongside roasted meats or as part of a veggie platter. They also shine in salads. Try adding them to a grain bowl with quinoa or rice. For a touch of sweetness, drizzle extra balsamic glaze on top.

Variations
Adding Different Seasonings or Spices
You can make roasted Brussels sprouts even better by adding spices. Try using garlic powder for extra flavor. Smoked paprika gives a nice depth and warmth. If you like heat, sprinkle some red pepper flakes on top. You can even add a bit of lemon zest for a fresh twist that brightens the dish.
Vegetarian or Vegan Modifications
You can easily make this recipe vegan. Simply skip the Parmesan cheese or use a plant-based alternative. The balsamic glaze is already vegan-friendly. This way, everyone can enjoy the dish without missing out on flavor.
Pairing with Other Ingredients
Roasted Brussels sprouts pair well with many foods. Try adding cooked bacon or pancetta for a savory kick. You can also mix in nuts like walnuts or pecans for crunch. If you’re feeling adventurous, toss in some dried cranberries or pomegranate seeds for a sweet touch. These additions elevate the dish and make it more exciting.
Storage Info
Best Practices for Storing Leftovers
To keep your roasted Brussels sprouts fresh, let them cool down first. Then, place them in an airtight container. You can store them in the fridge for about 3 to 5 days. Make sure to layer a paper towel in the container. This helps absorb excess moisture, keeping the sprouts crispy.
Reheating Techniques
When you’re ready to enjoy leftovers, the best way to reheat Brussels sprouts is in the oven. Preheat your oven to 350°F (175°C). Spread the sprouts on a baking sheet and heat for about 10 to 15 minutes. This method helps restore their crispiness. You can also use a skillet over medium heat. Just add a bit of olive oil and stir until warm.
Freezing Roasted Brussels Sprouts
If you want to store your roasted Brussels sprouts for longer, freezing is a great option. First, cool them completely. Then, spread them in a single layer on a baking sheet and freeze for a few hours. Once frozen, transfer them to a freezer bag. They can last up to 3 months. When you’re ready to eat, cook them straight from the freezer. Just add a few extra minutes to your cooking time.
FAQs
How long do Roasted Brussels Sprouts last in the fridge?
Roasted Brussels sprouts can last about 3 to 5 days in the fridge. Store them in an airtight container for best results. Keep in mind that the longer they sit, the softer they may become.
Can I make Balsamic Glaze ahead of time?
Yes, you can make balsamic glaze ahead of time. Just cook it until it thickens, then let it cool. Store it in a jar in the fridge for up to a week. It makes for an easy addition to many dishes.
What can I substitute for honey in the recipe?
If you need a substitute for honey, consider maple syrup or agave nectar. Both options add sweetness and work well in the recipe. Adjust the amount to your taste, as they may vary in sweetness.
Roasting Brussels sprouts is simple with the right steps. You learned the key ingredients, made a tasty balsamic glaze, and discovered tips for crispy sprouts. I shared variations to match your taste and how to store leftovers. These sprouts will be a hit at your next meal. Experiment and enjoy!

Roasted Brussels Sprouts with Balsamic Glaze
Ingredients
1 pound Brussels sprouts, trimmed and halved
3 tablespoons olive oil
2 tablespoons balsamic vinegar
1 tablespoon honey
2 cloves garlic, minced
Salt and pepper, to taste
¼ cup grated Parmesan cheese (optional)
Fresh parsley, chopped for garnish
Instructions
Preheat your oven to 425°F (220°C). Line a baking sheet with parchment paper for easy cleanup.
In a large mixing bowl, combine the halved Brussels sprouts, olive oil, balsamic vinegar, honey, minced garlic, salt, and pepper. Toss everything together until the Brussels sprouts are evenly coated.
Spread the Brussels sprouts in a single layer on the prepared baking sheet, cut side down for extra crispiness.
Roast in the preheated oven for 20-25 minutes, tossing halfway through, until the sprouts are tender and golden brown on the edges.
If using, remove the Brussels sprouts from the oven and sprinkle the grated Parmesan cheese over them. Return to the oven for an additional 5 minutes, until the cheese is melted and bubbly.
Once done, remove from the oven and drizzle a little more balsamic vinegar if desired. Garnish with chopped fresh parsley before serving.
Prep Time: 10 minutes | Total Time: 35 minutes | Servings: 4

Roasted Brussels Sprouts with Balsamic Glaze
Ingredients
- 1 pound Brussels sprouts, trimmed and halved
- 3 tablespoons olive oil
- 2 tablespoons balsamic vinegar
- 1 tablespoon honey
- 2 cloves garlic, minced
- to taste Salt and pepper
- 0.25 cup grated Parmesan cheese (optional)
- for garnish Fresh parsley, chopped
Instructions
- Preheat your oven to 425°F (220°C). Line a baking sheet with parchment paper for easy cleanup.
- In a large mixing bowl, combine the halved Brussels sprouts, olive oil, balsamic vinegar, honey, minced garlic, salt, and pepper. Toss everything together until the Brussels sprouts are evenly coated.
- Spread the Brussels sprouts in a single layer on the prepared baking sheet, cut side down for extra crispiness.
- Roast in the preheated oven for 20-25 minutes, tossing halfway through, until the sprouts are tender and golden brown on the edges.
- If using, remove the Brussels sprouts from the oven and sprinkle the grated Parmesan cheese over them. Return to the oven for an additional 5 minutes, until the cheese is melted and bubbly.
- Once done, remove from the oven and drizzle a little more balsamic vinegar if desired. Garnish with chopped fresh parsley before serving.


![- 6 large eggs - 1 ripe avocado, peeled and pitted - 2 tablespoons lime juice - 1 teaspoon lime zest - 1 teaspoon Dijon mustard - Salt and pepper to taste - 1 tablespoon fresh cilantro, chopped (for garnish) - A pinch of chili powder (optional, for a hint of spice) These ingredients make your Avocado Lime Deviled Eggs fresh and tasty. The eggs provide a great base. The creamy avocado adds richness. Lime juice and zest give a bright flavor. Dijon mustard adds a gentle tang. Adjust salt and pepper to your taste. The cilantro adds a fresh touch. If you like spice, sprinkle in some chili powder. You can find the Full Recipe for step-by-step guidance. Enjoy making these delightful bites! To boil eggs perfectly, start with cold water. Place your eggs in a pot and fill it with water. Make sure the water covers the eggs by about an inch. Heat the pot over medium-high heat until it boils. When it starts to boil, cover the pot and turn off the heat. Let the eggs sit for 10-12 minutes. This method keeps them tender and easy to peel. Timing is key, as undercooked eggs will be runny, while overcooked eggs will turn green. Next, prepare the avocado filling. Halve the ripe avocado and take out the pit. Scoop the flesh into a mixing bowl. Mash it until it is smooth and creamy. To avoid browning, add lime juice right away. The acid in lime helps keep the green color. Mix in the egg yolks, lime zest, and Dijon mustard for flavor. The right texture is creamy but not too runny. Now it's time to fill the egg whites. After peeling and halving the boiled eggs, remove the yolks. Add the yolks to the avocado mixture and stir well. Use a piping bag for neat filling. This allows for even distribution. If you don’t have a piping bag, a spoon works too. Just make sure the filling is heaped nicely in each half. This step makes them look beautiful and appetizing. For a complete recipe, check out the [Full Recipe]. To make your avocado lime deviled eggs shine, you need to balance the lime and avocado perfectly. The lime adds a bright taste, while the avocado brings creaminess. I suggest starting with two tablespoons of lime juice. You can add more if you prefer a stronger lime flavor. Adjusting seasonings is key. After mixing the filling, taste it. If it needs more zing, add a pinch of salt or a dash of pepper. If you like a kick, consider a sprinkle of chili powder. These small tweaks can elevate your dish. Garnishing enhances the look of your deviled eggs. Fresh cilantro adds a lovely green touch. A sprinkle of chili powder not only adds color but also hints at spice. When serving, arrange the eggs on a bright platter. This will catch the eye at any party. You can also place them in an egg carton for a fun and unique display. One common mistake is overcooking the eggs. This can make the yolks dry and crumbly. Follow the cooking time closely for perfect results. Another mistake is not mixing the filling well. Ensure all ingredients blend smoothly. This makes a creamy, cohesive filling that tastes great. You want every bite to be delicious. {{image_2}} For a kick, add jalapeños or hot sauce. This spice brings a nice heat to the creamy filling. Start with a small amount of diced jalapeños. You can always add more if you like it spicier. A few drops of your favorite hot sauce can also do the trick. Mix it into the avocado filling for heat in every bite. You can make your deviled eggs even better by adding veggies. Chopped bell peppers, diced tomatoes, or shredded carrots can give a nice crunch. You can also use fresh herbs like dill or basil. They add unique flavors and brighten up your eggs. Just mix them into the filling for an extra layer of taste. If you need to make this dish vegan, swap the eggs for chickpeas. Mash cooked chickpeas with the avocado and lime. This keeps the creamy texture and adds protein. For a low-carb option, skip the eggs altogether. Use avocado, lime, and your choice of herbs. These modifications keep the flavors fresh and tasty. Use the Full Recipe to try these variations and discover your favorite twist on this classic dish! To keep your Avocado Lime Deviled Eggs fresh, store them in the fridge. Place them in an airtight container. This helps prevent the eggs from drying out or absorbing other smells. If you don’t have a container, cover the eggs tightly with plastic wrap. Aim to eat them within two days for the best taste and texture. Can you freeze Avocado Lime Deviled Eggs? No, you should not freeze these deviled eggs. The avocado can change texture when frozen. It may become grainy and lose its creamy flavor. How to properly freeze and thaw Since freezing is not a good option, focus on eating your deviled eggs fresh. If you want to make them ahead, prepare the filling and store it separately. You can fill the egg whites just before serving. How long do they last in the fridge? These eggs will last up to two days in the fridge. After that, they may start to lose their fresh taste. Signs of spoilage Look for changes in color or texture. If the filling turns brown or smells off, it’s best to discard the eggs. Always trust your senses when it comes to food safety. Yes, you can use different types of avocados. Hass avocados are creamy and rich, making them perfect for this recipe. Florida avocados are larger and milder in flavor. They can work too but may change the taste and texture slightly. If you want a rich, smooth filling, go with Hass. If you prefer a lighter flavor, choose Florida avocados. You can use other citrus fruits instead of lime. Lemon juice is a great option and adds a nice tang. Grapefruit juice can also work well if you want a unique twist. Just remember to adjust the amount to your taste. Each citrus fruit brings its own flavor and can change the dish's overall taste. You can make these deviled eggs ahead of time. Prepare the filling and store it in the fridge. Fill the egg whites just before serving to keep them fresh. This method ensures the eggs stay firm and the filling remains vibrant. You can also boil the eggs a day before and store them in the fridge. These deviled eggs pair well with many dishes. They make a great starter for brunch or a party. You can serve them with cocktails like margaritas or mojitos. They also go well with fresh salads or light soups. Feel free to be creative and mix them with your favorite dishes! Yes, you can make these deviled eggs gluten-free. All the ingredients in this recipe are naturally gluten-free. Just ensure that the Dijon mustard you use is also gluten-free. Most brands offer gluten-free options, so check the label to be sure. Enjoy this tasty treat without any worries! In this post, we explored Avocado Lime Deviled Eggs, covering ingredients, tips, and variations. You learned how to boil eggs perfectly, prepare the filling, and assemble the dish. We also discussed storage methods and answers to common questions. Remember, balancing flavors and avoiding overcooking are key. With a few simple tweaks or additions, you can make this dish your own. Enjoy this tasty twist on a classic!](https://dailydishlab.com/wp-content/uploads/2025/07/08a04e97-d91e-4bc2-a0e0-9f1f6250904f-768x768.webp)


