Roasted Butternut Squash Quinoa Salad Vibrant Delight

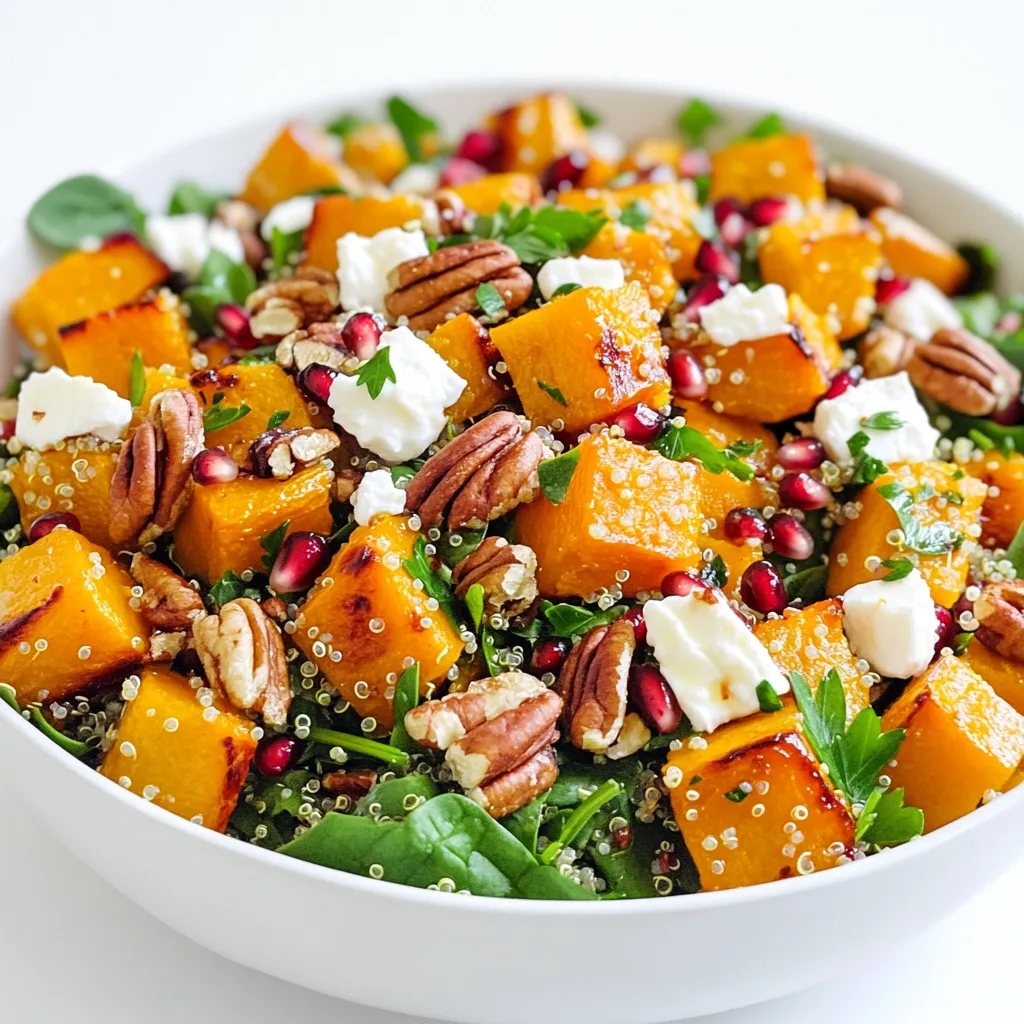
Looking for a fresh and tasty salad that warms your heart? You’ve found it! My Roasted Butternut Squash Quinoa Salad is vibrant and full of flavor. It’s packed with healthy ingredients and easy to make. Whether you enjoy it warm or cold, this salad will please your taste buds. Join me as we dive into the simple steps of crafting this nutritious delight!
Why I Love This Recipe
- Flavorful Combination: This salad beautifully combines sweet roasted butternut squash with the nutty flavor of quinoa, making each bite a delightful experience.
- Nutrient-Packed: With ingredients like spinach, pomegranate seeds, and pecans, this salad is loaded with vitamins, antioxidants, and healthy fats.
- Versatile Serving: It can be served warm as a side dish or at room temperature as a light lunch, perfect for any occasion.
- Easy to Prepare: With simple ingredients and straightforward steps, this recipe is perfect for both novice and experienced cooks.
Ingredients
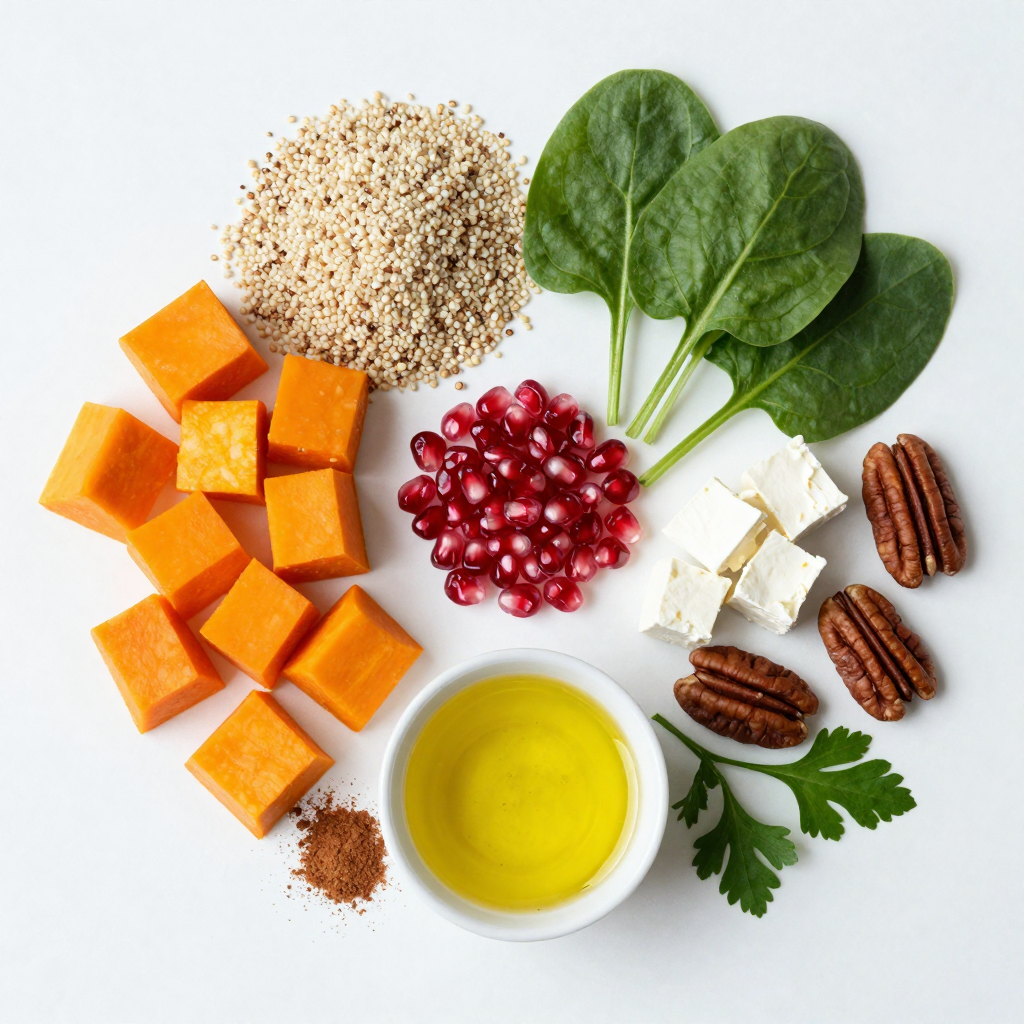
List of Ingredients for Roasted Butternut Squash Quinoa Salad
- 1 medium butternut squash, peeled and diced
- 1 cup quinoa, rinsed
- 2 cups vegetable broth
- 1 cup baby spinach
- 1/2 cup pomegranate seeds
- 1/4 cup feta cheese, crumbled
- 1/4 cup pecans, chopped
- 2 tablespoons olive oil
- 1 teaspoon ground cinnamon
- Salt and pepper to taste
- 2 tablespoons balsamic vinegar
- Fresh parsley, chopped for garnish
Nutritional Information per Serving
Each serving of this salad packs a nutritious punch. It offers protein from quinoa, healthy fats from pecans, and vitamins from butternut squash. You can expect about:
- Calories: 300
- Protein: 10g
- Carbohydrates: 40g
- Fiber: 6g
- Fat: 12g
This blend makes it great for energy and health.
Tips for Selecting Fresh Ingredients
To make this salad shine, choose the best ingredients. Here are some tips:
- Butternut Squash: Look for firm squash with a smooth skin. Avoid any with soft spots.
- Quinoa: Buy organic quinoa if possible. Rinsing it helps reduce bitterness.
- Spinach: Fresh baby spinach should be vibrant green and crisp.
- Pomegranate Seeds: Look for bright red seeds. They should be juicy and plump.
- Feta Cheese: Choose blocks or crumbles that are creamy and white.
- Pecans: Opt for raw or lightly roasted pecans for a fresh taste.
By selecting fresh ingredients, you’ll enhance the flavor and nutrition of your salad.

Step-by-Step Instructions
Prepping the Butternut Squash
To start, I peel and dice the butternut squash into small cubes. This helps it roast evenly. In a bowl, I toss these cubes with olive oil, ground cinnamon, salt, and pepper. I make sure every piece gets coated. Next, I spread the squash on a baking sheet in a single layer. This step is key for even roasting. I then pop it into a preheated oven at 425°F (220°C) and roast for about 25 to 30 minutes. Halfway through, I stir the squash to help it caramelize.
Cooking Quinoa Perfectly
While the squash is roasting, I focus on the quinoa. I take one cup of rinsed quinoa and place it in a medium pot. I pour in two cups of vegetable broth and bring it to a boil. Once boiling, I reduce the heat to low and cover the pot. I let it simmer for about 15 minutes. When the liquid is gone, I fluff the quinoa with a fork. This gives it a nice, light texture.
Combining Ingredients for the Salad
In a large mixing bowl, I combine the roasted butternut squash and cooked quinoa. Next, I add in one cup of baby spinach, half a cup of pomegranate seeds, and a quarter cup of crumbled feta cheese. I also include a quarter cup of chopped pecans for crunch. To dress the salad, I drizzle two tablespoons of balsamic vinegar over it. Finally, I gently toss everything together to mix the flavors. I taste and adjust the salt and pepper as needed. This salad can be served warm or at room temperature, and I like to garnish it with freshly chopped parsley before serving.
Pro Tips
- Choosing the Right Squash: Opt for a medium-sized butternut squash that feels heavy for its size and has a smooth, unblemished skin for the best flavor and texture.
- Perfectly Cooked Quinoa: To achieve fluffy quinoa, make sure to rinse it thoroughly before cooking to remove any bitterness from the saponins.
- Add Depth of Flavor: Consider roasting the pecans for a few minutes before adding them to the salad. This will enhance their flavor and add a delightful crunch.
- Rainbow of Colors: Feel free to add other colorful ingredients like roasted red peppers or shredded carrots to make your salad even more visually appealing and nutritious.
Tips & Tricks
How to Achieve Perfectly Roasted Squash
To get the best roasted butternut squash, choose a medium squash. Cut it into even cubes. This helps it cook evenly. Toss the cubes with olive oil, salt, pepper, and ground cinnamon. The cinnamon adds warmth and flavor. Spread the squash on a baking sheet in one layer. Roast it at 425°F for 25 to 30 minutes. Stir halfway for even roasting. When done, the squash should be tender and slightly caramelized.
Substitutions for Quinoa
If you want to switch up the quinoa, try using farro or brown rice. Both grains have a nice texture. They also add different flavors. If you need a gluten-free option, stick with quinoa. It is naturally gluten-free and healthy. You can also try red or black quinoa for added color and taste.
Dressing Variations to Enhance Flavor
The balsamic vinegar in the salad gives a nice tang. For a twist, try lemon juice or apple cider vinegar. You could also whisk in a bit of honey or maple syrup for sweetness. If you like creamy dressings, mix in some yogurt or avocado. These options will make the salad richer and more exciting. Experiment with different dressings to find your favorite mix!

Variations
Adding Different Proteins (Chicken, Tofu)
You can make this salad heartier by adding protein. Grilled chicken works great. Simply slice it and mix it in. If you prefer plant-based options, try adding cubed tofu. You can marinate it in soy sauce and bake it for extra taste. Both options give you protein and make the salad more filling.
Unique Flavor Additions (Herbs, Spices)
Herbs and spices can change the salad’s flavor. Try adding fresh herbs like cilantro or basil for a fresh twist. You can also sprinkle in some chili flakes for heat. If you love a sweet touch, add a hint of maple syrup. These tweaks let you play with flavors and find your favorite mix.
Serving Suggestions (Warm vs. Cold)
This salad is tasty both warm and cold. Serving it warm brings out the squash’s sweetness. If you want a refreshing meal, chill it in the fridge before serving. I often serve it warm in winter and cold in summer. You can also pair it with grilled meats or eat it alone as a light meal.
Storage Info
Proper Storage Techniques for Leftover Salad
To store leftover Roasted Butternut Squash Quinoa Salad, place it in an airtight container. Make sure the container is clean and dry. This keeps the salad fresh and prevents it from drying out. Store it in the fridge for the best results. Avoid leaving it out at room temperature for long periods.
How Long Does Roasted Butternut Squash Quinoa Salad Last?
When stored properly, this salad lasts about 3 to 5 days in the fridge. The butternut squash and quinoa stay good, but the spinach may wilt over time. For the best taste and texture, eat it within the first few days. If you notice any off smells or changes in color, it’s best to toss it.
Reheating Instructions for Best Results
To reheat your salad, use the microwave or stovetop. If using the microwave, place the salad in a bowl and cover it. Heat on low power for 1-2 minutes, stirring halfway through. This helps warm it evenly. If using the stovetop, add a splash of water or broth in a pan. Heat on low, stirring until warm. Be careful not to overheat, as this can make the quinoa mushy. Enjoy your delicious salad!
FAQs
Can I make this salad ahead of time?
Yes, you can make this salad ahead of time. Prepare the roasted butternut squash and quinoa in advance. Store them in separate containers in the fridge. When ready to eat, mix them with the fresh spinach, pomegranate seeds, and feta cheese. Drizzle with balsamic vinegar just before serving. This keeps everything fresh and tasty.
Is this salad suitable for a vegan diet?
This salad can be made vegan with one simple swap. Just leave out the feta cheese. All other ingredients are vegan-friendly. The butternut squash, quinoa, spinach, and pomegranate seeds all fit a vegan diet. You can also add more nuts or seeds for extra flavor and protein.
What can I pair with Roasted Butternut Squash Quinoa Salad for a complete meal?
This salad pairs well with several dishes. For a hearty meal, consider grilled chicken or roasted chickpeas. If you want a lighter option, serve it with a soup, like tomato basil or a veggie broth. You could also enjoy it with whole-grain bread or a wrap filled with fresh veggies.
In this blog post, we covered the ingredients, preparation, and variations for a delicious Roasted Butternut Squash Quinoa Salad. We discussed tips for choosing fresh ingredients and achieving the best texture. You learned how to store leftovers and enhance flavors with different dressings and proteins.
This salad is not only tasty but also gives you many options. Enjoy making this dish as a side or a meal on its own!

Roasted Butternut Squash Quinoa Salad
Ingredients
1 medium butternut squash, peeled and diced
1 cup quinoa, rinsed
2 cups vegetable broth
1 cup baby spinach
1/2 cup pomegranate seeds
1/4 cup feta cheese, crumbled
1/4 cup pecans, chopped
2 tablespoons olive oil
1 teaspoon ground cinnamon
Salt and pepper to taste
2 tablespoons balsamic vinegar
Fresh parsley, chopped for garnish
Instructions
Preheat your oven to 425°F (220°C).
In a bowl, toss the diced butternut squash with olive oil, ground cinnamon, salt, and pepper until evenly coated.
Spread the squash out on a baking sheet in a single layer. Roast in the preheated oven for 25-30 minutes, or until tender and lightly caramelized, stirring halfway through.
While the squash is roasting, in a medium-sized pot, bring the vegetable broth to a boil. Add the rinsed quinoa, reduce heat to low, cover, and simmer for about 15 minutes or until all the liquid is absorbed. Fluff with a fork and set aside.
In a large mixing bowl, combine the roasted butternut squash, cooked quinoa, baby spinach, pomegranate seeds, feta cheese, and chopped pecans.
Drizzle balsamic vinegar over the salad and gently toss to combine all ingredients. Adjust salt and pepper to taste.
Serve warm or at room temperature, garnished with freshly chopped parsley.
Prep Time: 15 min | Total Time: 45 min | Servings: 4

Roasted Butternut Squash Quinoa Salad
Ingredients
- 1 medium butternut squash, peeled and diced
- 1 cup quinoa, rinsed
- 2 cups vegetable broth
- 1 cup baby spinach
- 1/2 cup pomegranate seeds
- 1/4 cup feta cheese, crumbled
- 1/4 cup pecans, chopped
- 2 tablespoons olive oil
- 1 teaspoon ground cinnamon
- to taste salt and pepper
- 2 tablespoons balsamic vinegar
- for garnish fresh parsley, chopped
Instructions
- Preheat your oven to 425°F (220°C).
- In a bowl, toss the diced butternut squash with olive oil, ground cinnamon, salt, and pepper until evenly coated.
- Spread the squash out on a baking sheet in a single layer. Roast in the preheated oven for 25-30 minutes, or until tender and lightly caramelized, stirring halfway through.
- While the squash is roasting, in a medium-sized pot, bring the vegetable broth to a boil. Add the rinsed quinoa, reduce heat to low, cover, and simmer for about 15 minutes or until all the liquid is absorbed. Fluff with a fork and set aside.
- In a large mixing bowl, combine the roasted butternut squash, cooked quinoa, baby spinach, pomegranate seeds, feta cheese, and chopped pecans.
- Drizzle balsamic vinegar over the salad and gently toss to combine all ingredients. Adjust salt and pepper to taste.
- Serve warm or at room temperature, garnished with freshly chopped parsley.


![To make Easy Chicken and Dumplings, you'll need the following: - Chicken and vegetables needed: - 1 lb boneless, skinless chicken thighs, cut into bite-sized pieces - 1 medium onion, diced - 2 carrots, sliced - 2 celery stalks, sliced - 1 cup frozen peas - Spices and seasonings: - 4 cups chicken broth - 2 cloves garlic, minced - 1 teaspoon dried thyme - 1 teaspoon dried parsley - Salt and pepper to taste - Dumpling ingredients: - 2 cups all-purpose flour - 1 tablespoon baking powder - 1 teaspoon salt - 1 cup milk - 4 tablespoons unsalted butter, melted These ingredients create a warm and comforting meal. The chicken provides protein, while the vegetables add flavor and texture. The spices bring everything together, making each bite delightful. Don't forget the dumplings, as they are the star of the dish! For the full recipe, check out the details above. Start by sautéing the vegetables. In a large pot, heat a drizzle of olive oil over medium heat. Add the diced onion, sliced carrots, and sliced celery. Cook them for about 5 to 7 minutes until they are soft. This step adds a lot of flavor to the soup. Next, add the minced garlic. Cook it for another minute. This will make your kitchen smell amazing. Now, stir in the chicken pieces, dried thyme, dried parsley, salt, and pepper. Cook until the chicken is no longer pink. This should take about 5 minutes. After that, pour in the chicken broth. Bring it to a gentle boil. Once boiling, reduce the heat to low and let it simmer for 15 to 20 minutes. This helps all the flavors blend together perfectly. While the soup simmers, it’s time to make the dumplings. In a mixing bowl, combine 2 cups of all-purpose flour, 1 tablespoon of baking powder, and 1 teaspoon of salt. Mix these dry ingredients well. Now, stir in 1 cup of milk and 4 tablespoons of melted butter. Mix until just combined. Be careful not to overmix. Overmixing can make the dumplings tough. You want them light and fluffy. Once your soup is ready, gently fold in 1 cup of frozen peas. Then, drop spoonfuls of the dumpling batter into the simmering broth. Cover the pot with a lid. Let the dumplings cook undisturbed for about 15 to 20 minutes. This is key to getting them fluffy. Check your dumplings after 15 minutes. They should puff up and be cooked through. Taste the soup and adjust the seasoning if needed. For the full recipe, refer to the section above. Enjoy your comforting chicken and dumplings! To make chicken and dumplings shine, adjust your seasonings. Taste as you go. You may want more salt or herbs. This helps to bring out all the flavors. Each chicken piece needs to soak up those seasonings. Choosing the right chicken parts is key too. I recommend boneless thighs. They stay juicy and tender. You can also use breasts, but they may dry out faster. Experiment with what you like best. Sautéing and simmering are the heart of this dish. Start by sautéing the veggies well. It brings out their flavors. Keep the heat at medium. Too high, and you risk burning them. Simmering is just as important. Let the soup bubble gently. This helps all the tastes blend. For fluffy dumplings, don’t overmix the batter. Stir until just combined. This keeps them light and airy. Garnishing adds a lovely touch to your meal. Fresh parsley makes a simple, bright garnish. You can also sprinkle black pepper for a little kick. As for sides, serve with crusty bread or a fresh salad. These pair well with the rich soup. They balance the meal perfectly. Enjoy your comforting chicken and dumplings! For the complete recipe, check out the [Full Recipe]. {{image_2}} You can change up your chicken and dumplings with different veggies. Instead of carrots, try zucchini or bell peppers. Swap celery for green beans. These changes keep your dish fresh and exciting. If you want to use other proteins, you have options. Use shredded rotisserie chicken for quick prep. You can even try turkey or tofu for a meatless dish. Each choice brings unique flavors and textures. To boost flavor, add herbs and spices. Fresh thyme or rosemary works great. You can also sprinkle in a bit of paprika for warmth. These small tweaks make a big difference. Don’t stop at herbs. Incorporate other ingredients like corn or mushrooms. They add layers of taste and texture. You can also stir in a splash of cream for richness. All these enhancements make your meal even more delicious. For the full recipe, check out the Comforting Chicken and Dumplings section. After enjoying your easy chicken and dumplings, store any leftovers safely. Place them in an airtight container. This helps keep the flavors fresh. You can refrigerate the leftovers for up to three days. Always let the soup cool down before sealing it up. If you want to store it for longer, freezing is a great option. Use freezer-safe containers or bags. Make sure you remove as much air as possible to prevent freezer burn. You can freeze the chicken and dumplings for up to three months. Just remember to label your containers with the date. When it's time to enjoy your leftovers, reheating properly is key. The best way is to use the stovetop. Pour the chicken and dumplings into a pot over low heat. Stir often to heat it evenly. This method helps keep the dish moist. If you're short on time, you can use the microwave. Place the soup in a microwave-safe bowl. Cover it loosely to avoid spills. Heat it in short bursts, stirring in between. This keeps the dumplings from getting too tough. Sometimes, the soup may thicken after storing. If that happens, add a splash of chicken broth or water. Stir it well to adjust the consistency. Enjoy your comforting meal just like the first time! For a complete guide to making this dish, check out the Full Recipe. How to make chicken and dumplings from scratch? To make chicken and dumplings from scratch, start with fresh chicken, vegetables, and spices. Cook them in a pot with broth. For dumplings, mix flour, baking powder, and milk. Drop the dumpling batter into the simmering broth. Cook until the dumplings puff up. Can I use canned chicken broth? Yes, you can use canned chicken broth. It saves time and still tastes good. Just choose a low-sodium option if you prefer less salt. This makes your dish healthier and more flavorful. Can I substitute frozen peas? Yes, you can use other frozen vegetables. Carrots, corn, or green beans work well. They add different flavors and colors to your dish. What can I use instead of all-purpose flour? You can use gluten-free flour if needed. Almond flour or oat flour are good choices too. They can change the taste slightly but still make tasty dumplings. How long do dumplings take to cook? Dumplings take about 15-20 minutes to cook. You should not lift the lid while they cook. This helps them steam properly and stay fluffy. Can I make the dumplings ahead of time? It’s best to cook the dumplings fresh. However, you can prepare the batter ahead. Keep it in the fridge until you're ready to cook. This way, they stay light and fluffy. For a full recipe, check out the recipe section. This blog post explored how to make delicious chicken and dumplings. We started with the key ingredients, then moved on to preparing the soup and making the dumplings. I shared tips to ensure the perfect flavor and texture. You can also try variations for extra flair and learn how to store leftovers well. With these steps, anyone can create a warm, comforting dish. So, don’t hesitate to get started. Your homemade chicken and dumplings await!](https://dailydishlab.com/wp-content/uploads/2025/06/b55448b9-18f4-4b40-ba69-553d058622be-768x768.webp)

![To make a tasty Easy Broccoli Cheese Casserole, you need a few simple ingredients. Each one plays a key role in creating a rich flavor and creamy texture. Here’s what you will need: - 4 cups fresh broccoli florets - 1 cup cooked quinoa - 2 cups shredded cheddar cheese - 1 cup cream of mushroom soup - 1/2 cup milk - 1/4 cup sour cream - 1 teaspoon garlic powder - 1/2 teaspoon onion powder - Salt and pepper to taste - 1/2 cup breadcrumbs - 2 tablespoons olive oil Fresh broccoli florets give this dish its bright color and crunch. I like using cooked quinoa for a boost of protein. It makes the casserole more filling. The shredded cheddar cheese melts beautifully, adding a rich, creamy layer. Cream of mushroom soup is the secret to a dreamy texture. Milk and sour cream make everything extra smooth. Don’t forget the spices! Garlic powder and onion powder add depth to the flavor. You can adjust the salt and pepper to match your taste. The breadcrumbs on top add a nice crispiness, thanks to the olive oil. For the Full Recipe, check the detailed instructions. Enjoy making this dish with your family! First, preheat your oven to 350°F (175°C). This helps the casserole cook evenly. Next, grab a 9x13 inch baking dish and lightly grease it. This prevents sticking. Now, let’s steam the broccoli florets. Place them in a steamer for about 4-5 minutes. You want them tender but not mushy. Once done, set them aside to cool. In a large mixing bowl, combine the cooked quinoa, 1 1/2 cups of shredded cheddar cheese, cream of mushroom soup, milk, sour cream, garlic powder, onion powder, salt, and pepper. Mix everything well. You want a smooth, cheesy blend. This mix is the heart of your casserole, so make sure it's well combined. Now it’s time to fold in the steamed broccoli. Gently stir it into the cheesy mixture until coated. This adds a nice green color and texture. Pour this mixture into your prepared baking dish, spreading it out evenly. For the topping, mix breadcrumbs with olive oil in a small bowl. Sprinkle this mixture over the casserole. Finally, add the remaining 1/2 cup of shredded cheddar cheese on top. Place the casserole in the preheated oven. Bake it for 25-30 minutes. You will know it’s done when the top is golden brown and the cheese is bubbly. This creates a nice crust. After baking, let it cool for a few minutes before serving. This helps the flavors settle and makes it easier to serve. Enjoy your Easy Broccoli Cheese Casserole! For the full recipe, check the earlier section. To cook broccoli for the best texture, steam it lightly. This method keeps it bright green and crisp. Steam the florets for about 4-5 minutes. They should be tender but not mushy. This step helps them hold their shape and adds a nice bite to your casserole. Choosing the right cheese is key for flavor. I recommend using sharp cheddar. It melts well and gives a rich taste. If you want a creamier texture, try adding mozzarella. Mixing different cheeses can also add depth to your dish. You can easily make ingredient substitutions. If you don’t have quinoa, use rice or even pasta. For a lighter option, swap cream of mushroom soup with plain yogurt. This change keeps the dish creamy while cutting calories. Add-ins can boost flavor and nutrition. Consider mixing in cooked chicken or turkey for protein. Diced bell peppers or carrots can add color and crunch. You can also throw in some nuts for a nice crunch. These options make it fun and unique every time you make it. For the full recipe, check out the [Full Recipe]. {{image_2}} For a lighter version of this casserole, swap out some ingredients. Use low-fat cheese to cut calories. You can also replace cream of mushroom soup with a homemade version or low-sodium broth. This gives you control over the fat and salt levels. If you want a gluten-free option, use gluten-free breadcrumbs. You can also make your own with gluten-free bread if you prefer. These small changes keep the dish tasty while making it healthier. To add more flavor, you can include other vegetables. Bell peppers, carrots, or even spinach work well. These not only boost nutrition but also add great color. Mixing in proteins like cooked chicken or turkey makes the dish heartier. It turns a side dish into a full meal. For the best flavor, try adding fresh herbs like thyme or rosemary. These herbs brighten up the taste and add a nice aroma. You can also use a mix of cheeses for a more complex flavor profile. Just remember to keep it balanced so the broccoli shines through. For the complete recipe, check out the Full Recipe section. To keep your Easy Broccoli Cheese Casserole fresh, let it cool first. Once cool, cover it tightly with plastic wrap or aluminum foil. Store it in the fridge for up to three days. Use a clean spoon when serving, so you avoid cross-contamination. This way, you can enjoy your leftovers without worry. If you want to freeze your casserole, here’s what to do. First, let it cool completely. Then, cut it into portions. Wrap each piece in plastic wrap, then place them in a freezer bag. This helps keep the flavor and texture intact. When you are ready to eat, thaw it overnight in the fridge. Reheat in the oven at 350°F (175°C) until hot. This method works well to enjoy your Easy Broccoli Cheese Casserole later. For the complete recipe, check out the Full Recipe. How can I make this broccoli cheese casserole in advance? You can prepare this casserole a day ahead. Simply follow the recipe until you layer the casserole in the dish. Cover it tightly with plastic wrap and store it in the fridge. When ready to bake, remove the wrap and add a few extra minutes to the baking time. This method saves time and lets the flavors mix well. Can I use frozen broccoli instead of fresh? Yes, frozen broccoli works well in this casserole. Just thaw and drain it before mixing. This saves prep time and still gives you that great broccoli flavor. Make sure to squeeze out extra water to avoid a soggy casserole. What is the calorie count per serving? Each serving of this broccoli cheese casserole has about 300 calories. This count can vary based on your specific ingredients. If you use low-fat cheese or a lighter soup, the calories may drop. Does this casserole freeze well? Yes, this casserole freezes nicely. After baking, let it cool completely. Then, cover it tightly with foil or plastic wrap. Store it in the freezer for up to three months. When you want to eat it, thaw it overnight in the fridge and reheat in the oven. This helps keep the flavors fresh and delicious. For the full recipe, check out the Cheesy Broccoli Bliss Casserole! This blog covered a simple and tasty broccoli cheese casserole. You learned about the key ingredients, from fresh broccoli to spices. I shared step-by-step instructions for mixing and baking. Also, you discovered tips for perfecting the dish and ways to customize it. Finally, we discussed storage methods for leftovers. I hope you feel ready to make this dish! Enjoy your cooking and create a meal that everyone will love.](https://dailydishlab.com/wp-content/uploads/2025/07/a9a80e4c-75b2-4ae9-8984-ae1ea083217d-768x768.webp)
