
Are you ready to dive into a creamy delight that redefines comfort food? This Roasted Cauliflower Mac and Cheese recipe is not just a twist on a classic; it’s packed with flavor and healthy goodness. With perfect cauliflower and cheesy goodness, I promise it will be a hit in your kitchen. Join me as we explore simple steps, helpful tips, and variations that cater to every taste. Let’s get cooking!
Why I Love This Recipe
- Comfort Food Reimagined: This dish combines the nostalgic flavors of mac and cheese with the nutritious benefits of roasted cauliflower, making it a delicious and healthier comfort food option.
- Easy to Prepare: The recipe is straightforward and requires minimal ingredients, perfect for busy weeknights when you want something quick yet satisfying.
- Crispy Topping Delight: The panko bread crumbs add a delightful crunch that contrasts beautifully with the creamy cheese sauce, elevating the entire dish.
- Customizable Ingredients: This recipe allows for easy substitutions, whether you want to use different cheeses or even add in your favorite vegetables for added flavor.
Ingredients
List of Required Ingredients
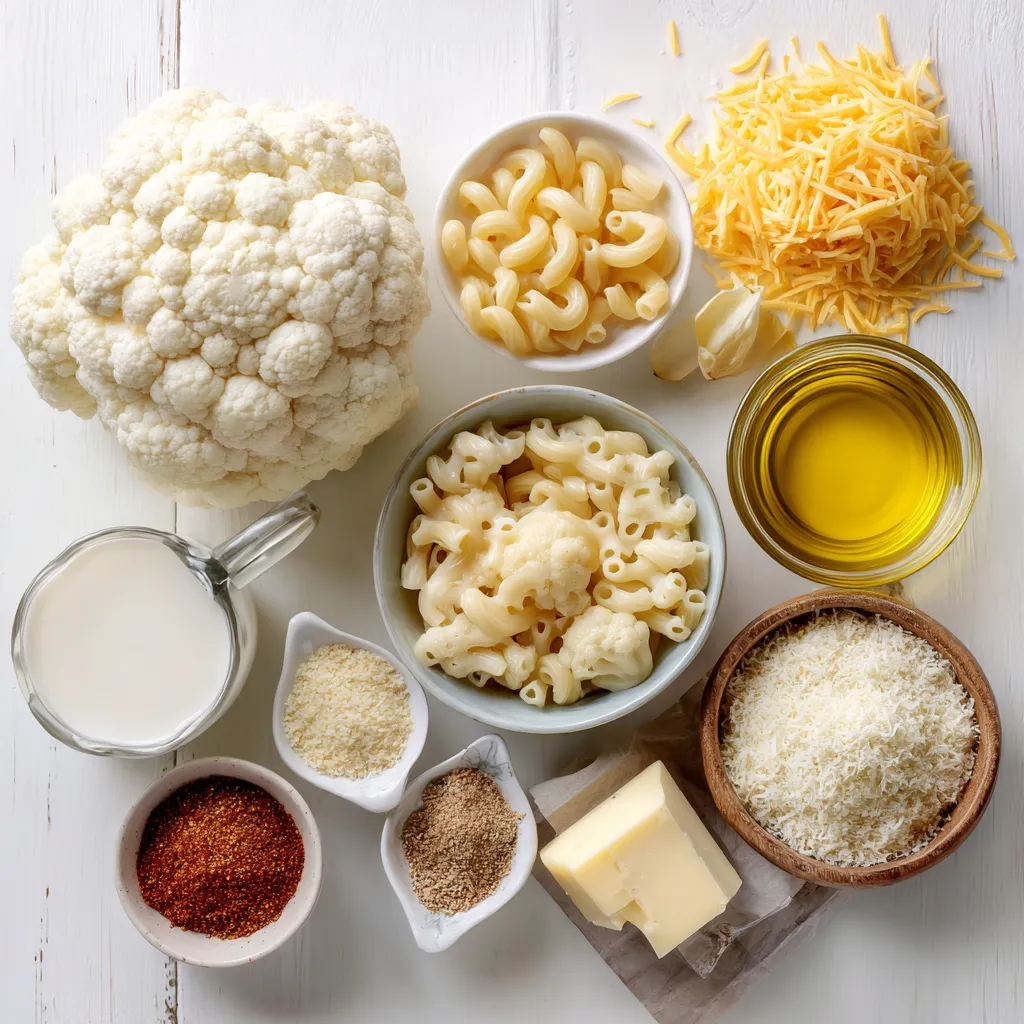
To make your roasted cauliflower mac and cheese, gather these ingredients:
– 1 medium head of cauliflower, cut into florets
– 8 ounces elbow macaroni
– 2 tablespoons olive oil
– Salt and pepper to taste
– 1 cup shredded sharp cheddar cheese
– 1/2 cup grated Parmesan cheese
– 2 cups milk
– 2 tablespoons butter
– 2 tablespoons all-purpose flour
– 1 teaspoon garlic powder
– 1/2 teaspoon onion powder
– 1/4 teaspoon smoked paprika
– 1/4 teaspoon nutmeg
– 1/2 cup panko bread crumbs
Recommended Ingredient Substitutions
If you want to change things up, consider these swaps:
– Use gluten-free pasta if you need a gluten-free option.
– Swap sharp cheddar for mild cheddar for a milder taste.
– Try using cream instead of milk for a richer sauce.
– Replace Parmesan with nutritional yeast for a vegan version.
Equipment Needed
You will need a few tools to make this dish:
– A large mixing bowl for the cauliflower
– A baking sheet for roasting
– A medium saucepan for the cheese sauce
– A whisk to mix the sauce
– A baking dish to combine everything
– A pot for cooking the macaroni
– A knife and cutting board for prep
Step-by-Step Instructions
Preparation of Cauliflower
To start, preheat your oven to 425°F (220°C). Take your medium head of cauliflower and cut it into small florets. In a mixing bowl, toss these florets with 2 tablespoons of olive oil. Add salt and pepper to taste. Make sure they are well coated. Spread the florets on a baking sheet in a single layer. Roast the cauliflower in the oven for 20 to 25 minutes. Check them halfway through and turn them for even roasting. They should be golden brown and tender when done.
Cooking the Elbow Macaroni
Now, let’s cook the elbow macaroni. Bring a pot of salted water to a boil. Add 8 ounces of macaroni and cook according to the package directions. You want it to be al dente, which means it should still have a slight bite to it. This usually takes about 7 to 9 minutes. Once cooked, drain the macaroni in a colander and set it aside.
Creating the Cheese Sauce
Next, we’ll make the cheese sauce. In a medium saucepan, melt 2 tablespoons of butter over medium heat. Once melted, stir in 2 tablespoons of all-purpose flour. Cook this for about 1 minute while whisking constantly. This creates a roux. Gradually pour in 2 cups of milk, whisking until smooth. Keep stirring until the sauce thickens. Then, add 1 teaspoon of garlic powder, 1/2 teaspoon of onion powder, 1/4 teaspoon of smoked paprika, and 1/4 teaspoon of nutmeg. Stir in 1 cup of shredded sharp cheddar cheese and 1/2 cup of grated Parmesan cheese. Mix everything until the cheese is melted and creamy.
Combining Ingredients
Now it’s time to combine everything. In a large bowl, gently stir together the cooked elbow macaroni and the roasted cauliflower. Pour the creamy cheese sauce over this mixture. Gently mix until all the macaroni and cauliflower are coated in cheese.
Baking Instructions
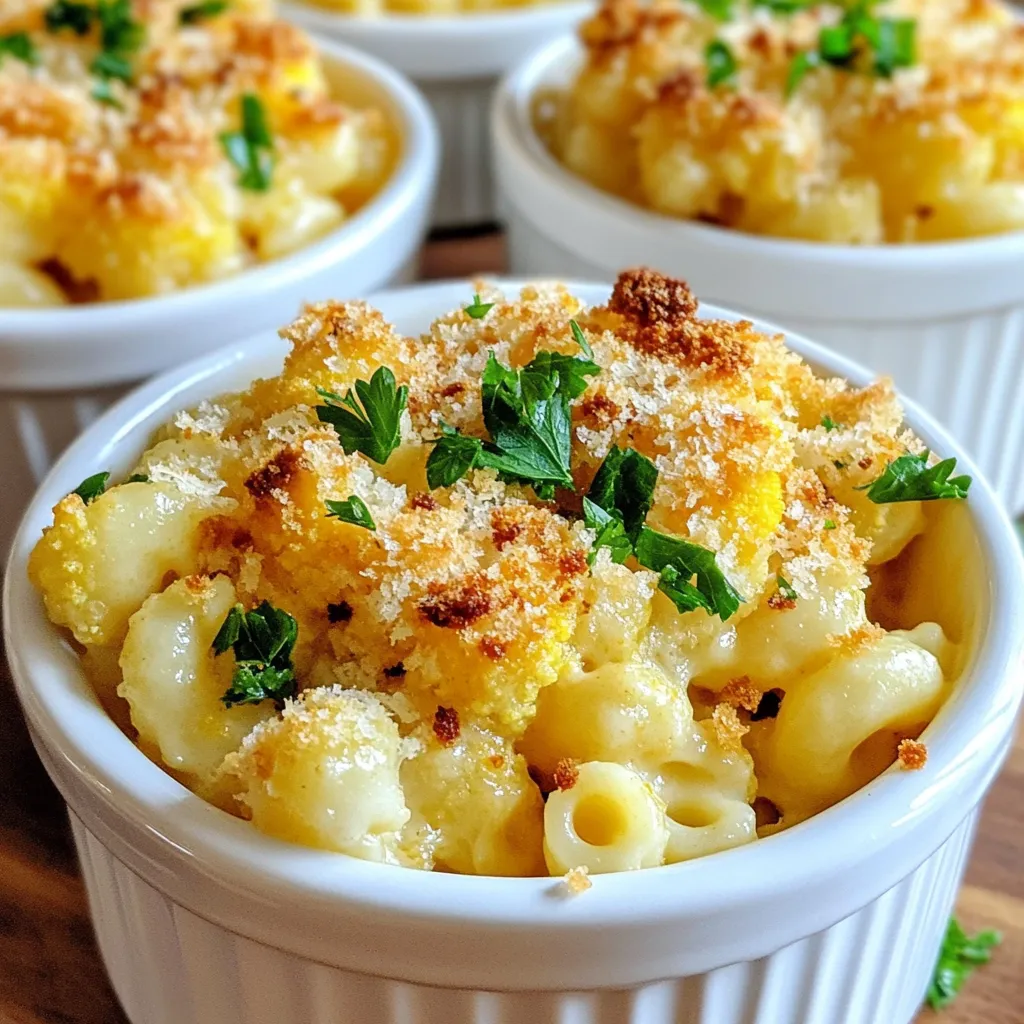
For the final step, transfer the combined mixture into a greased baking dish. Top it with 1/2 cup of panko bread crumbs. This will give your dish a nice, crispy finish. Bake in the oven for an additional 15 to 20 minutes. Look for a golden, crispy top as the sign that it’s ready. Enjoy your creamy delight!
Tips & Tricks
Perfecting the Roast
To get the best roast on your cauliflower, follow these steps:
– Cut the cauliflower into equal-sized florets. This helps them cook evenly.
– Toss the florets with olive oil, salt, and pepper. Make sure each piece is coated.
– Spread them out on the baking sheet. Avoid crowding; this allows for even roasting.
– Roast at 425°F (220°C) for 20-25 minutes. Turn them halfway through for a nice brown.
This method gives you tender cauliflower with crispy edges. The flavor really shines in your mac and cheese.
Cheese Sauce Consistency
Getting the right thickness for your cheese sauce is key.
– Start by making a roux with butter and flour. Cook for about one minute.
– Gradually add the milk while whisking. This prevents lumps.
– Keep whisking until the mixture thickens slightly. It should coat the back of a spoon.
– Stir in your cheeses slowly. They melt better this way.
If the sauce is too thick, add more milk. If too thin, cook a bit longer. Your sauce should be creamy but not runny.
Serving Suggestions
When it’s time to serve your Roasted Cauliflower Mac and Cheese, think about presentation:
– Serve in individual bowls for a nice touch.
– Top with fresh parsley for color and flavor.
– Pair with a side salad for balance, like a crisp green salad.
These simple garnishes make the dish even more appealing. Enjoy every creamy bite!
Pro Tips
- Perfectly Roasted Cauliflower: For maximum flavor, ensure the cauliflower is cut into even-sized florets to promote uniform roasting.
- Cheese Sauce Consistency: If your cheese sauce is too thick, stir in a bit more milk until you reach your desired creaminess before combining with pasta.
- Flavor Boost: Add a pinch of cayenne pepper or hot sauce to the cheese sauce for a subtle kick that complements the creamy flavors.
- Crispy Topping: For an extra crispy topping, mix the panko bread crumbs with a tablespoon of melted butter before sprinkling them on top.
Variations
Dietary Modifications
You can easily adjust this recipe to fit different diets. For a vegan version, swap the cheese for plant-based options. Use almond milk or soy milk instead of regular milk. For gluten-free needs, select gluten-free pasta. You can also use cornstarch instead of flour to thicken the sauce. Lower-calorie options include using less cheese or low-fat milk.
Flavor Enhancements
Add some fun flavors to your mac and cheese! Try mixing in spices like cayenne pepper or chili powder for a kick. You can also add veggies like spinach, broccoli, or bell peppers for extra nutrition. Fresh herbs like thyme or basil can brighten the dish too. Feel free to experiment until you find your favorite combo.
Different Cheeses to Use
The choice of cheese can change everything! Instead of sharp cheddar, try gouda for a creamy texture. Mozzarella melts well and gives a lovely stretch. You can also use blue cheese for a bold taste. Mixing different cheeses creates unique flavors that will wow your taste buds. Don’t be afraid to explore!
Storage Info
How to Store Leftovers
To keep your roasted cauliflower mac and cheese fresh, let it cool first. Place it in an airtight container. It’s best to refrigerate leftovers within two hours. You can also freeze it for longer storage. Just make sure to use a freezer-safe container. This keeps the dish tasting great.
Reheating Instructions
When you’re ready to enjoy your leftovers, reheat them carefully. The best way is to use an oven. Preheat to 350°F (175°C). Place the dish in the oven for about 20-25 minutes. This helps the top stay crispy. You can also use a microwave. Heat in short bursts, stirring in between. This keeps the texture nice.
Shelf Life
In the fridge, your roasted cauliflower mac and cheese stays good for about 3-4 days. If you freeze it, it can last for up to 2-3 months. Just remember to label the container with the date. This way, you know when it’s time to eat it. Enjoy your creamy delight whenever you want!
FAQs
Can I make this recipe ahead of time?
Yes, you can make this dish ahead of time. To do so, prepare the cauliflower and cheese sauce as directed. Combine the cooked macaroni, roasted cauliflower, and cheese sauce in a baking dish. Cover it and store it in the fridge. When you are ready to bake, just preheat the oven and bake for about 20-25 minutes. This method keeps the flavors fresh and saves you time.
Can I use frozen cauliflower?
You can use frozen cauliflower, but there are a few things to keep in mind. Frozen cauliflower is often pre-blanched, which means it cooks faster. Thaw it first and pat it dry to remove excess moisture. Since frozen cauliflower can be softer, it may not get as crispy when roasted. Adjust your roasting time to ensure it cooks well.
How can I make it spicier?
To add some heat to your dish, try these ideas. You can add a pinch of cayenne pepper or red pepper flakes to the cheese sauce. If you like a smoky flavor, try adding chipotle powder. For a fresh kick, mix in some diced jalapeños with the cauliflower. Experimenting with these spices will give your mac and cheese a fun twist!
In this blog post, we explored how to create a delicious cauliflower mac and cheese. We covered required ingredients, kitchen tools, and step-by-step cooking instructions. You learned helpful tips for perfecting your dish and ways to customize it for different diets. Remember to store leftovers properly and to reheat them without losing their great taste. I hope these insights inspire you to make this tasty meal your own. Enjoy your cookin


