Rosemary Garlic Focaccia Bread Savory and Simple Delight

Are you craving warm, homemade bread that bursts with flavor? Look no further! My Rosemary Garlic Focaccia Bread recipe combines simple ingredients—like fresh rosemary and garlic—for a savory delight. You’ll find that this easy, step-by-step guide makes baking delicious focaccia a breeze, even for beginners. Join me as we explore the process, tips, and variations that will impress your family and friends. Let’s get started and fill your kitchen with mouthwatering aromas!
Why I Love This Recipe
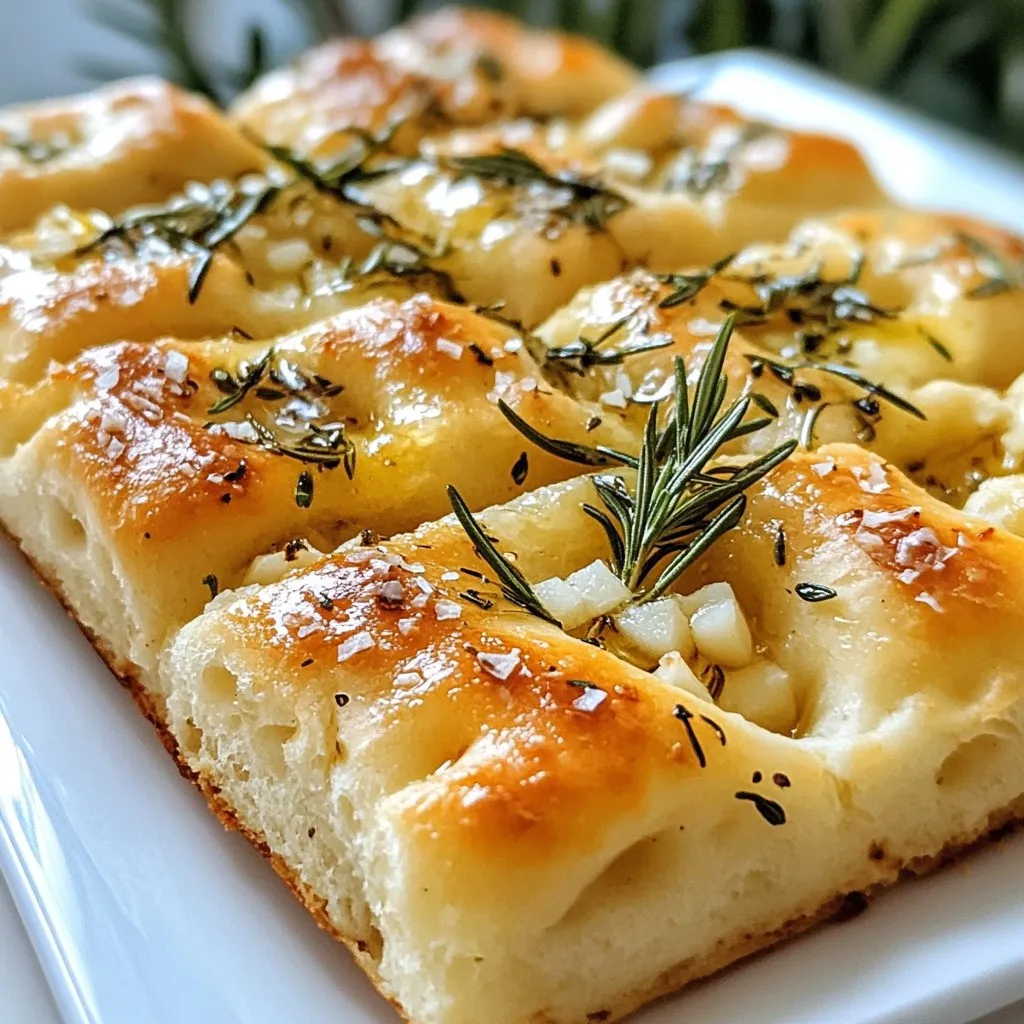
- Delicious Flavor Combination: The fragrant rosemary and savory garlic create a mouthwatering aroma and flavor that elevates this focaccia to a whole new level.
- Easy to Make: This recipe is straightforward, making it perfect for both novice and experienced bakers. With just a few simple steps, you’ll have fresh bread in no time.
- Versatile Serving Options: Serve it as a side dish, a sandwich base, or simply with olive oil for dipping. It pairs well with various meals, enhancing any dining experience.
- Impressive Presentation: The dimples and toppings not only add flavor but also create a beautiful, rustic look that’s sure to impress your guests.
Ingredients
To make your rosemary garlic focaccia, you need a few simple items. Here’s the list:
- 2 cups all-purpose flour
- 1 cup warm water (about 110°F)
- 2 teaspoons active dry yeast
- 1 teaspoon sugar
- 1 teaspoon salt
- 1/4 cup olive oil, plus extra for drizzling
- 2 tablespoons fresh rosemary, chopped
- 4 cloves garlic, thinly sliced
- Flaky sea salt, for topping
These ingredients come together to create a soft, flavorful bread. The warm water helps the yeast wake up, while the olive oil adds richness. Fresh rosemary and garlic bring a fragrant touch. Each bite delivers a savory experience that’s hard to resist!

Step-by-Step Instructions
Preparing the Dough
- First, combine 1 cup of warm water, 1 teaspoon of sugar, and 2 teaspoons of active dry yeast in a small bowl. Let it sit for about 5 minutes. You want it to get frothy.
- In a large bowl, mix 2 cups of all-purpose flour and 1 teaspoon of salt. Make a well in the center. Pour in the yeast mixture and 1/4 cup of olive oil.
Kneading and Rising
- Now, mix until a dough forms. Knead the dough on a floured surface for about 5 minutes. You want it to be smooth and elastic.
- Place the dough in a lightly oiled bowl. Cover it with a damp cloth. Let it rise in a warm spot for about 1 hour. It should double in size.
Shaping and Baking
- Preheat your oven to 425°F (220°C).
- Once the dough has risen, punch it down. Transfer it to a greased baking sheet or an oiled skillet.
- Using your fingers, stretch and press the dough into a rectangular shape or a circle if you use a skillet. Create dimples in the dough using your fingertips. Drizzle with olive oil.
- Evenly sprinkle chopped rosemary, sliced garlic, and flaky sea salt on top.
- Let the dough rest for another 20-30 minutes to puff up slightly.
- Bake in the preheated oven for 20-25 minutes. It should turn golden brown and smell great.
- Remove it from the oven and let it cool slightly before slicing and serving.
Tips & Tricks
Perfecting Your Focaccia
For perfect focaccia, start with the yeast. Use warm water around 110°F. This helps the yeast grow. If the water is too hot, it can kill the yeast. If it’s too cold, the yeast will not grow well.
Next, knead the dough. Kneading builds strength and texture. I suggest kneading for about five minutes. Your dough should feel smooth and elastic. This gives the focaccia a nice bite.
Serving Suggestions
Rosemary garlic focaccia pairs well with many foods. Serve it with olive oil for dipping. You can also enjoy it with soup or salad.
For a rustic look, place the focaccia on a wooden board. Add fresh rosemary on top for color. This makes your dish look more inviting and delicious.
Enhancing Flavor
You can make your focaccia even better with toppings. Consider adding cheese like mozzarella or parmesan. Fresh herbs like thyme or oregano can also add depth.
Another idea is to infuse your olive oil. Try adding garlic or chili for a spicy kick. These simple changes can take your focaccia to the next level.
Pro Tips
- Use Fresh Ingredients: The flavor of your focaccia will greatly improve with fresh rosemary and garlic. Opt for high-quality olive oil for a richer taste.
- Perfect Temperature: Ensure your water is at the right temperature (about 110°F) to activate the yeast without killing it. Use a thermometer for accuracy.
- Resting Time Matters: Allowing the dough to rest before baking helps it achieve a better texture and flavor. Don’t rush this step!
- Experiment with Toppings: Feel free to add other toppings like olives, sun-dried tomatoes, or cheese before baking for extra flavor and variety.

Variations
Cheese and Herb Focaccia
You can change up your focaccia by adding cheese. Mozzarella and parmesan work well. Just sprinkle them on top before baking. This adds creaminess and flavor.
You can also use different herbs. Try thyme or oregano instead of rosemary. These herbs bring a lovely taste and smell. It’s a fun way to change the dish.
Seasonal Ingredient Focaccia
Incorporate fresh vegetables for a seasonal twist. Sliced tomatoes or olives are great choices. They add color and taste to the bread.
You can adapt the recipe for holidays too. For example, add pumpkin spice in fall or cranberries in winter. This keeps the focaccia exciting all year long.
Gluten-Free Focaccia
If you need gluten-free options, use alternative flours. Almond flour or rice flour are good choices. Just keep in mind that these may change the texture.
You may also need to adjust the rising time. Gluten-free dough often takes longer to rise. Watch for a nice puff before baking.
Storage Info
How to Store Focaccia
To keep your focaccia fresh, store it in a paper bag at room temperature. This allows air to flow while preventing it from getting too dry. If you have extra focaccia, you can place it in a plastic bag. However, it may lose some crispness. For the best taste, eat it within two days. If you need more time, put it in the fridge. Refrigerated focaccia lasts about a week, but it may dry out.
Reheating Focaccia
When reheating focaccia, the oven is your best friend. Preheat it to 350°F (175°C). Wrap the focaccia in foil to keep it moist. Heat for about 10 minutes or until warm. If you’re in a hurry, you can use the microwave. Place a slice on a plate and cover it with a damp paper towel. Heat for 20 seconds, but check for moisture. You want it warm but not soggy.
Freezing Focaccia
Freezing focaccia is simple. Wrap it tightly in plastic wrap or foil. You can also use a freezer bag. Make sure to remove as much air as possible. Focaccia stays fresh in the freezer for up to three months. When you’re ready to eat it, take it out and let it defrost at room temperature. For the best results, reheat it in the oven after defrosting. This keeps the texture nice and fluffy.
FAQs
What is focaccia bread?
Focaccia bread is a flat oven-baked bread. It comes from Italy. The name “focaccia” means “hearth” in Latin. Traditionally, bakers cook it on the hearth of a wood-fired oven. Focaccia has a soft texture and a crunchy crust. You can top it with herbs, garlic, or olives. It is great for dipping in olive oil or serving with meals.
Can I make this focaccia recipe vegan?
Yes, you can make this focaccia vegan. To do so, replace the honey with agave syrup or maple syrup. Use a plant-based oil like avocado oil instead of olive oil, if desired. Ensure your yeast is vegan-friendly, which most brands are. This way, you can enjoy delicious focaccia that fits your diet.
How do I know when my focaccia is done baking?
You can tell your focaccia is done by checking its color and texture. It should be golden brown on top. Gently press the bread; it should feel firm and spring back. If it looks pale or feels doughy, it needs more time. Signs of overbaking include a dark crust and a dry texture. Keep an eye on it while baking to get the best results.
You learned how to make delicious rosemary garlic focaccia from scratch. We covered the key ingredients and detailed steps to prepare, knead, and bake it. I shared tips to enhance flavor, serving ideas, variations, and storage instructions. Remember, cooking is fun, and there is room for creativity. So, don’t hesitate to try new toppings and flavors. Enjoy your focaccia journey and impress everyone with your fresh brea

Rosemary Garlic Focaccia Bread
Ingredients
- 2 cups all-purpose flour
- 1 cup warm water (about 110°F)
- 2 teaspoons active dry yeast
- 1 teaspoon sugar
- 1 teaspoon salt
- 0.25 cup olive oil, plus extra for drizzling
- 2 tablespoons fresh rosemary, chopped
- 4 cloves garlic, thinly sliced
- 1 pinch flaky sea salt, for topping
Instructions
- In a small bowl, combine warm water, sugar, and active dry yeast. Let sit for about 5 minutes, or until frothy.
- In a large mixing bowl, combine the flour and salt. Create a well in the center and pour in the yeast mixture and olive oil.
- Mix until a dough forms. Knead the dough on a floured surface for about 5 minutes, until smooth and elastic.
- Place the dough in a lightly oiled bowl, cover with a damp cloth, and let it rise in a warm spot for about 1 hour, or until doubled in size.
- Preheat your oven to 425°F (220°C).
- Once the dough has risen, punch it down and transfer it to a greased baking sheet or a large, oiled cast-iron skillet.
- Using your fingers, stretch and press the dough into a rectangular shape (or a circle, if using a skillet).
- Create dimples in the dough using your fingertips, then drizzle with olive oil. Sprinkle the chopped rosemary and sliced garlic evenly over the top.
- Finish by sprinkling flaky sea salt over the dough.
- Let the dough rest for another 20-30 minutes, allowing it to puff up slightly.
- Bake in the preheated oven for 20-25 minutes, or until golden brown and fragrant.
- Remove from the oven and let cool slightly before slicing and serving.


![- 1 can (15 oz) chickpeas, rinsed and drained - 2 tablespoons olive oil - Spices: smoked paprika, cayenne pepper, garlic powder, ground cumin - Garnish: Salt and fresh parsley, chopped - Substitute olive oil with avocado oil - Alternative spices and blends for different flavors Using the right ingredients is key to making these spicy roasted chickpeas. First, start with a can of chickpeas. Rinse them well and drain them. This step removes excess sodium and gets rid of any canning liquid. Next, grab some olive oil. You can also use avocado oil if you prefer a different taste. The oil helps the spices stick and makes the chickpeas crispy. Now let's talk spices! I love using smoked paprika for that deep, smoky flavor. Adjust the cayenne pepper to match your spice level. Garlic powder adds a nice kick, while ground cumin brings warmth. Finally, don't forget the salt! It enhances all the flavors. For a fresh touch, chop some parsley to sprinkle on top. This makes your dish look and taste great. If you want to mix it up, try different spices or blends. You could add curry powder for an Indian twist or taco seasoning for a Mexican flair. There are so many options! For the full recipe, check out the complete steps to make this snack. - Preheat your oven to 400°F (200°C). - Rinse and dry the chickpeas thoroughly. Start by preheating your oven. This step helps the chickpeas roast evenly. While the oven heats, grab a can of chickpeas. Rinse them well under cold water. Use a colander to drain the chickpeas. It's key to dry them with a clean kitchen towel. Removing moisture will make the chickpeas crisp. - Toss the chickpeas with olive oil. - Mix in spices for optimal flavor coating. Next, place the dried chickpeas in a mixing bowl. Pour in two tablespoons of olive oil. This oil helps the spices stick and adds flavor. Now, it’s time to add the spices. Use smoked paprika, cayenne pepper, garlic powder, ground cumin, and salt. Mix everything well, so each chickpea gets coated. This step really boosts the taste. - Spread seasoned chickpeas on a baking sheet. - Roast and shake pan halfway through for even cooking. Now, line a baking sheet with parchment paper. Spread the coated chickpeas in a single layer. This spacing helps them roast evenly. Place the baking sheet in your preheated oven. Roast them for 25-30 minutes. Halfway through, shake the pan to move the chickpeas around. This action ensures they cook well and get crispy. When they are golden brown, they are ready. Let them cool a bit before tasting. You can adjust the seasoning at this point. If you want to make them even better, garnish with fresh parsley before serving. For the full recipe, refer to the section above. To get that perfect crunch, start by drying the chickpeas thoroughly. After rinsing, drain them well. Then, pat them with a clean towel. The less moisture, the crispier they get. Also, do not overcrowd the baking sheet. Give them space to roast evenly. If they touch, they will steam instead of crisp. You can adjust the spice levels to your taste. If you like it hot, add more cayenne pepper. For a milder flavor, reduce it. You can also add extra herbs or citrus zest before serving. Fresh herbs like rosemary or thyme add a great twist. A touch of lemon zest brightens the flavors. Keep an eye on the roasting time. You want them golden brown, not burnt. Check for doneness by looking at the color. They should be crispy and firm to the touch. If they feel soft, give them a few more minutes. The right timing ensures a delightful crunch. {{image_2}} You can switch up the flavors of your spicy roasted chickpeas easily. Try using curry powder for a warm and earthy taste. Taco seasoning gives a fun, zesty kick. If you're in the mood for something sweet, mix cinnamon and sugar. This creates a tasty dessert version that is hard to resist. For a cheesy flavor, sprinkle in some nutritional yeast. This adds a delightful twist and boosts nutrients. You can also mix in seeds or nuts. This adds extra crunch and makes your snack even more satisfying. These roasted chickpeas are not just a snack. Use them as a topping for salads to add texture and taste. They also work great in wraps, giving a crunchy surprise. Pair them with dips like hummus or tzatziki for a fun flavor combo. Enjoy your crunchy treat in many ways! For the complete recipe, check out the [Full Recipe]. To keep your spicy roasted chickpeas crunchy, store them in an airtight container. This helps prevent moisture from making them soggy. They stay good for about 3 to 5 days at room temperature. Make sure to place them in a cool, dry spot away from sunlight. If you store them in the fridge, they may lose their crunch faster. If your chickpeas lose their crunch, you can easily fix them. Preheat your oven to 400°F (200°C). Spread the chickpeas on a baking sheet. Bake for about 10 minutes or until they are crispy again. Keep an eye on them so they don’t burn. If your chickpeas smell off or feel too soft, it’s best to discard them. Enjoy them fresh for the best taste! For the full recipe, check out the details above. Spicy roasted chickpeas can last about four to five days when stored properly. Keep them in an airtight container at room temperature. Avoid storing them in the fridge, as moisture can make them soggy. If you want them to stay crunchy, check the container daily. Yes, you can use dried chickpeas. First, soak them in water overnight. This helps them soften. After soaking, cook them in boiling water for about 1 to 1.5 hours until tender. Once cooked, drain and dry them well before following the full recipe for roasting. Chickpeas are packed with nutrients. They are rich in protein and fiber. This makes them great for your diet. They also help keep you full longer. Chickpeas are low in fat and have no cholesterol. They support heart health and help with digestion. Enjoying chickpeas can be a tasty way to boost your health. Spicy roasted chickpeas are easy and fun to make. We covered main and optional ingredients, step-by-step roasting instructions, and storage tips. You can also tailor flavors with various spices and add ingredients for crunch. These chickpeas make a tasty snack or a top-notch salad addition. When you try this recipe, I hope you enjoy every bite and explore your favorite flavors. Keep experimenting for the best version that suits you!](https://dailydishlab.com/wp-content/uploads/2025/06/6814540d-e3cb-4f17-9659-76d9cffed5c2-768x768.webp)


![To make a spicy mango cucumber salad, gather these fresh ingredients: - 1 ripe mango, peeled and diced - 1 large cucumber, diced - 1 red bell pepper, diced - 1 small red onion, finely chopped - 1 to 2 red chilies, deseeded and finely chopped - 2 tablespoons lime juice - 1 tablespoon olive oil - Fresh cilantro leaves, chopped - Salt and pepper to taste These ingredients bring together sweet, spicy, and crunchy textures. The ripe mango adds sweetness, while the cucumber provides a refreshing crunch. The red bell pepper and onion contribute flavor and color, making the dish vibrant. If you want to change things up, consider these options: - Substitute mango with pineapple or peach for a twist. - Use zucchini or yellow squash instead of cucumber for variety. - Swap red bell pepper with green or yellow for a different taste. - Add herbs like mint or basil for extra flavor. These substitutions can keep your salad exciting and fresh. This salad is not only tasty but also healthy. Each serving has: - Approximately 120 calories - 3g of protein - 5g of fat - 18g of carbohydrates - 3g of fiber This salad is a great choice for a light lunch or a side dish. The mix of fruits and veggies gives you vitamins and minerals too. Enjoy the burst of flavors while keeping your meal nutritious! Step 1: Chopping Vegetables Start by peeling and dicing one ripe mango. Make sure you get nice, small pieces. Next, grab a large cucumber and dice it into similar-sized chunks. Then, take a red bell pepper, remove the seeds, and chop it up. Finally, finely chop one small red onion. The colors will really pop! Step 2: Making the Dressing In a small bowl, mix together one to two finely chopped red chilies, two tablespoons of lime juice, and one tablespoon of olive oil. Stir this well. This dressing adds the spicy kick and tangy flavor. Step 3: Combining Ingredients In a large mixing bowl, combine all your chopped vegetables. Pour the dressing over them and toss gently. Be careful not to bruise the ingredients. You want everything to stay fresh and crisp. How to toss ingredients without bruising To toss without bruising, use a gentle motion. Lift the ingredients from the bottom and turn them over. You want to coat everything without mashing it. Importance of letting flavors meld Let the salad sit for about 10 minutes before serving. This time helps the flavors blend nicely. You’ll be amazed at how much better it tastes! Garnishing with cilantro Right before serving, chop some fresh cilantro leaves and sprinkle them on top. This adds a burst of freshness and color. Presentation tips for serving Serve the salad in a chilled bowl for a nice touch. You can add extra slices of mango or cucumber on top for a pretty finish. A sprinkle of sesame seeds also gives a nice crunch. For the full recipe, check the detailed instructions above. Choosing ripe mangoes is key. Look for mangoes that feel soft but not mushy. The skin should have a nice color, usually a mix of green and yellow. A ripe mango will smell sweet at the stem end. For cucumbers, pick firm ones. They should be dark green and free of spots. Choose red bell peppers that are shiny and smooth. Fresh peppers add a crisp bite to the salad. You can add sweetness by mixing in a bit of honey or agave syrup. This pairs well with the spicy chilies. If you want more heat, add extra red chilies. For a fun twist, try adding sliced jalapeños. Pair this salad with grilled chicken or fish for a complete meal. It also works well as a side with tacos or burritos. To make this salad gluten-free, skip any sauces that contain gluten. This recipe is already vegan, but you can add chickpeas for extra protein. If you want to make it low-carb, use zucchini noodles instead of cucumbers. This keeps the crunch while cutting down on carbs. Check the [Full Recipe] for more ideas on how to customize your salad. {{image_2}} You can make this salad even better by adding more fruits. Pineapple brings a sweet and tangy flavor. Papaya adds a soft texture and a hint of sweetness. You can also mix in avocados for creaminess. They make the salad rich and filling. Each fruit adds its own twist. Consider adding nuts or seeds for crunch. Toasted cashews or sunflower seeds work great. They add a nice texture and flavor boost. You can also try different dressings. A honey-lime dressing gives a sweet touch. A spicy vinaigrette can add more heat. Change the dressing to match your taste. You can switch up the recipe based on the season. In summer, keep it light and fresh. Add juicy tomatoes or fresh herbs for a bright taste. In fall or winter, try roasted butternut squash or apples. These ingredients bring warmth and comfort. Adjust the salad to fit what is in season for the best flavors. If you're looking for the full recipe, check out the [Full Recipe] for all the details! To store leftover salad, place it in an airtight container. This keeps moisture in and air out. Make sure to seal it tightly. You can add a paper towel in the container to absorb excess moisture. This helps keep the ingredients crisp. To keep ingredients fresh, store any unused mango or cucumber separately. These can spoil quickly when mixed with dressing. If you plan to use them later, store them in the fridge. The salad lasts about three days in the fridge. After that, it may lose its taste and crunch. Always check for signs before eating. If the mango or cucumber looks soggy or has dark spots, it’s best to toss it. You should also look for any off smells. If it smells sour or unusual, do not eat it. Fresh ingredients are key to enjoying this dish. You can incorporate leftover salad into other meals. For example, add it to tacos or wrap it in a tortilla. It can also be a great topping on grilled chicken or fish. Transforming it into a salsa is another fun idea. Just chop the salad more finely and serve it with chips. You can also mix it into a grain bowl for extra flavor and crunch. These ideas keep meals exciting and reduce food waste. You can swap out mango for other fruits or vegetables. - Fruit alternatives: Pineapple and peach work well. They add sweetness and a juicy texture. - Vegetable options: Try using diced bell peppers or zucchini for a crunch without the fruit flavor. Yes, this salad can be spicy, depending on the chilies you use. - Adjusting heat levels: Use one chili for a mild taste or two for more heat. You can also remove the seeds for less spice. - Tips for non-spicy versions: Skip the chilies and add a touch of honey. It keeps the sweetness without the heat. The salad stays fresh for a short time. - Storage duration: It lasts up to 2 days in the fridge. After that, it can become soggy. - Best time to consume: Enjoy it within the first day for the best taste and crunch. Yes, you can prep it ahead of time. - Recommended time frames: Make it up to 4 hours before serving. This way, flavors blend well. - Storage tips prior to serving: Keep the dressing separate until just before you serve. This keeps the salad crisp. For the Full Recipe, please check the main article. This blog post guided you through making a spicy mango cucumber salad. I covered the essential ingredients and tips for choosing the best ones. You learned how to prepare and mix the salad while adjusting flavors to fit your taste. I also shared storage info and ways to use leftovers effectively. Enjoy experimenting with variations and substitutions to make this salad yours. With fresh ingredients and simple steps, your dish will shine. Happy cooking!](https://dailydishlab.com/wp-content/uploads/2025/06/903f86d3-1577-467f-b884-054eeff054cc-768x768.webp)