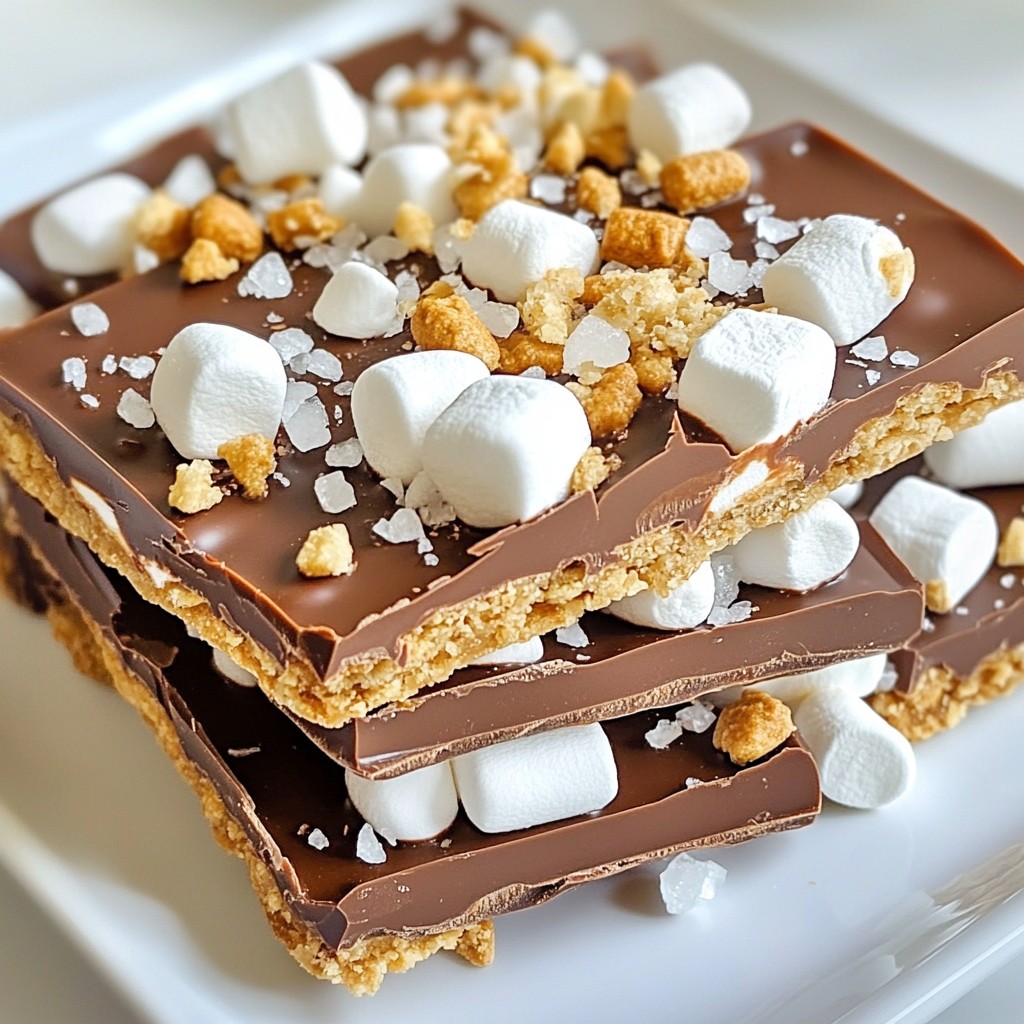
Craving a sweet treat? Let's dive into the world of S’mores Chocolate Bark! This simple and tasty treat combines the classic flavors of s’mores in a fun twist. I’ll guide you through easy steps, essential ingredients, and clever variations. Whether you’re sharing with friends or enjoying a quiet night, this recipe will surely satisfy your sweet tooth. Ready to get started? Let’s make some chocolate magic!
Why I Love This Recipe
- Decadent Flavor: This S’mores Chocolate Bark combines the rich taste of chocolate with the nostalgic flavors of graham crackers and marshmallows, making each bite a delightful treat.
- Easy to Make: With just a few simple steps and minimal ingredients, this recipe is perfect for both novice cooks and experienced bakers looking for a quick dessert.
- Customizable: You can easily modify this recipe by adding your favorite nuts, dried fruits, or even different types of chocolate, allowing for endless variations.
- Perfect for Sharing: This recipe yields multiple servings, making it an ideal treat for parties, gatherings, or just a sweet snack to share with friends and family.
Ingredients
Complete Ingredient List
To make S’mores Chocolate Bark, you need:
- 2 cups semi-sweet chocolate chips
- 1 cup graham cracker crumbs
- 1 cup mini marshmallows
- ½ cup milk chocolate bars, broken into pieces
- ¼ teaspoon sea salt (optional)
These ingredients create the classic s’mores taste in a fun, crunchy form.
Optional Additions
You can add some tasty extras if you like. Try:
- Chopped nuts for crunch
- Peanut butter chips for a nutty twist
- Dried fruit for a sweet touch
These options can change the flavor and texture, making it your own.
Substitutions for Dietary Needs
If you have dietary needs, there are great swaps. Use:
- Dark chocolate chips for a richer taste
- Gluten-free graham crackers for a gluten-free treat
- Vegan chocolate to keep it plant-based
These substitutions help you enjoy S’mores Chocolate Bark while keeping your diet in mind.

Step-by-Step Instructions
Preparing the Baking Sheet
Start by lining a baking sheet with parchment paper. Make sure the paper covers the whole sheet. This helps the chocolate bark come off easily later. Using parchment paper saves time and mess. You want to have a clean surface for your tasty treat.
Melting the Chocolate Properly
Take a microwave-safe bowl and add the semi-sweet chocolate chips. Heat them in the microwave in 30-second bursts. Stir the chips after each interval. Keep heating until the chocolate is smooth and melted. This method helps avoid burning the chocolate. Smooth chocolate makes a perfect base for your bark.
Combining Ingredients
Once your chocolate is melted, take it out of the microwave. Add half of the graham cracker crumbs and half of the mini marshmallows to the bowl. Stir gently to coat them in chocolate. Make sure everything is mixed well. Now, pour the mixture onto the lined baking sheet. Use a spatula to spread it evenly. This layer will hold all the yummy toppings. After that, sprinkle the rest of the graham cracker crumbs and mini marshmallows on top. Press them down lightly into the chocolate. Add broken pieces of milk chocolate and some sea salt if you want. This adds a nice touch!
Tips & Tricks
Achieving the Perfect Texture
To get the best texture for your S’mores Chocolate Bark, it is key to melt the chocolate slowly. Use a microwave and heat it in short bursts. Stir the chocolate well after each burst. This helps avoid burning. Make sure to fold in the graham cracker crumbs and marshmallows gently. This keeps them crunchy and light.
Serving Suggestions
For serving, cut the bark into fun shapes or break it into pieces. You can place it on a rustic wooden board or in a cute bowl. This makes it look inviting. Pair it with some fresh fruit or a scoop of ice cream. This adds a nice touch to your treat.
Creative Presentation Ideas
Get creative with how you present your S’mores Chocolate Bark. Drizzle some melted chocolate on top for a fancy look. You can also sprinkle extra graham crumbs or mini marshmallows on top. For a festive vibe, add colorful sprinkles or edible glitter. Use parchment paper to wrap pieces as gifts. This gives a personal touch to your homemade treat.
Pro Tips
- Use Quality Chocolate: The better the chocolate, the better the flavor of your bark. Choose high-quality semi-sweet and milk chocolate for the best results.
- Customize Your Toppings: Feel free to add other toppings like nuts, crushed candy bars, or different types of chocolate to make your bark unique.
- Store Properly: Keep the bark in an airtight container at room temperature for up to a week, or in the refrigerator for longer freshness.
- Experiment with Flavors: Try adding a sprinkle of cinnamon or a dash of vanilla extract to the melted chocolate for an extra layer of flavor.
Variations
Flavor Modifications
You can change the flavor of your S’mores chocolate bark easily. Try using dark chocolate instead of semi-sweet. This gives a richer taste. You can also mix in some peanut butter chips. This adds a nutty twist. For a fruity kick, add dried cherries or strawberries. They pair well with chocolate. You can also experiment with flavored chocolate, like mint or orange. Each choice brings a new taste to this treat.
Seasonal Variations
Change your S’mores chocolate bark with the seasons. In spring, add pastel-colored candies for a festive look. You can use mini eggs or jelly beans. In summer, use fresh berries like raspberries or blueberries. These add a bright flavor. For fall, mix in crushed candy corn or pumpkin spice. This gives a warm autumn vibe. In winter, sprinkle some crushed peppermint candies for a holiday twist. Each season lets your bark shine in a new way.
Dietary-Friendly Versions
For a dairy-free version, use dairy-free chocolate chips. There are many good options now. If you want a gluten-free treat, make sure to choose gluten-free graham crackers. You can also add nuts like almonds or walnuts for extra crunch. For a vegan option, use vegan chocolate and marshmallows. This way, everyone can enjoy your tasty S’mores chocolate bark. These tweaks let you cater to different diets while keeping the fun alive.
Storage Info
Best Practices for Storing Chocolate Bark
To keep your S’mores chocolate bark fresh, store it in an airtight container. This helps prevent moisture and keeps the bark crunchy. Place parchment paper between layers if you stack pieces. Avoid direct sunlight, as it can melt the chocolate.
Shelf Life and Freshness Tips
S’mores chocolate bark stays fresh for about two weeks at room temperature. If you store it in the fridge, it can last up to a month. Always check for any signs of spoilage. If it looks dull or has white spots, it may not be good to eat.
How to Freeze S'mores Chocolate Bark
To freeze your S’mores chocolate bark, wrap it tightly in plastic wrap. Place it in a freezer-safe bag or container. It can stay frozen for up to three months. When you're ready to enjoy it, let it thaw in the fridge for a few hours before eating.
FAQs
How do I make S'mores Chocolate Bark without a microwave?
You can melt chocolate using a double boiler. Fill a pot with water and place it on low heat. Put a heat-safe bowl on top of the pot. Add the chocolate chips to the bowl. Stir until it melts. This method gives you nice, smooth chocolate. It helps prevent burning too.
Can I use other types of chocolate?
Yes, you can use different chocolates! Try dark chocolate for a richer taste. White chocolate gives a sweet twist. You can mix chocolates too. Just keep the ratios the same for a good texture. The flavors can change, but it will still taste great!
What's the best way to cut chocolate bark?
Wait until the chocolate is fully set. Use a sharp knife to cut it. You can also break it by hand for a rustic look. If it's too hard, let it sit for a few minutes at room temperature. This will make it easier to handle.
In this blog post, I shared how to make tasty S'mores Chocolate Bark. You learned about the key ingredients, along with some optional additions and smart substitutions. I provided clear steps for preparing, melting, and mixing everything together. Then, I offered tips for the best texture and fun serving ideas. You also discovered various flavor options and storage tips.
Now you can impress your friends with this easy treat. Enjoy your baking adventure!