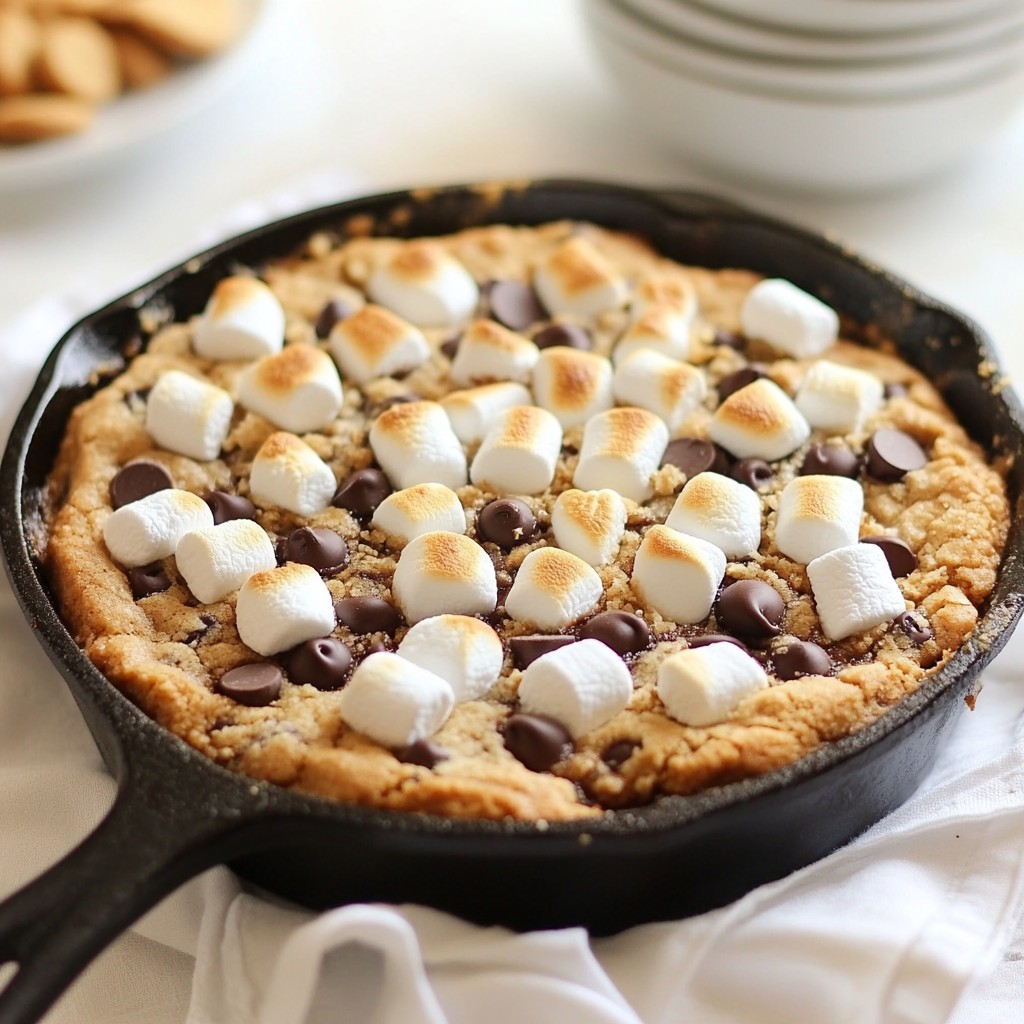
If you love s’mores, get ready for a new twist! My S’mores Cookie Skillet takes the classic campfire treat and turns it into a warm, gooey dessert. Imagine a cookie packed with chocolate, marshmallows, and graham crackers, all baked in one skillet. It's perfect for sharing—and trust me, everyone will want seconds! Ready to dive into this easy and fun recipe? Let’s get started!
Why I Love This Recipe
- Decadent Flavor: This cookie skillet combines the rich taste of chocolate, gooey marshmallows, and the crunch of graham crackers, creating a perfect s'mores experience in every bite.
- Easy to Make: With simple ingredients and straightforward steps, this recipe is perfect for both beginners and experienced bakers looking for a quick dessert option.
- Shareable Treat: Made in a skillet, this dessert is ideal for sharing with friends and family, making it a great centerpiece for gatherings or movie nights.
- Customizable: You can easily adapt this recipe by adding nuts, different types of chocolate, or even fruits to suit your taste preferences.
Ingredients
List of Ingredients
- 1 cup unsalted butter, softened
- 1 cup brown sugar, packed
- ½ cup granulated sugar
- 2 large eggs
- 2 teaspoons vanilla extract
- 3 cups all-purpose flour
- 1 teaspoon baking soda
- ½ teaspoon salt
- 1 cup chocolate chips
- 1 cup mini marshmallows
- 1 cup graham cracker crumbs
To make the S'mores Cookie Skillet, you need simple ingredients. Each one plays a key role. The butter gives the cookie its rich taste. The sugars add sweetness and help it rise. The eggs bind the mix together. Flour forms the base. Baking soda helps it puff up. Salt enhances the flavors. Chocolate chips bring the classic s'mores flavor. Mini marshmallows add that gooey touch. Graham cracker crumbs give a crunchy bite.
Ingredient Substitutions
You can swap some ingredients if needed. Use coconut oil instead of butter for a dairy-free option. Brown sugar can be replaced with coconut sugar for a healthier choice. If you want to skip eggs, use applesauce or a flaxseed mix. You can also switch chocolate chips for white chocolate or peanut butter chips. For a gluten-free version, use gluten-free flour or almond flour.
Measurement Tips
Be precise when measuring ingredients for best results. Use dry measuring cups for flour and graham crumbs. Level off the top with a knife for accuracy. For sticky ingredients like butter, pack it into the cup. Use a scale for more exact measurements, especially with flour. Weighing gives you the best chance for success. Always spoon flour into the cup before leveling it off, never scoop directly.

Step-by-Step Instructions
Prepping the Oven and Skillet
First, you need to preheat your oven to 350°F (175°C). This step is key for even baking. Next, grab your cast-iron skillet or a round baking dish. Make sure it’s clean and dry. No need to grease it, as the butter in the dough will keep it from sticking.
Mixing the Batter
In a large mixing bowl, cream together 1 cup of softened butter, 1 cup of brown sugar, and ½ cup of granulated sugar. Mix until it’s light and fluffy. Next, add 2 large eggs one at a time, mixing well after each. Don’t forget to add 2 teaspoons of vanilla extract for great flavor. In another bowl, whisk together 3 cups of all-purpose flour, 1 teaspoon of baking soda, and ½ teaspoon of salt. Gradually add this dry mix to the wet mix. Stir until just combined. Finally, fold in 1 cup of chocolate chips and 1 cup of graham cracker crumbs. Make sure everything is evenly mixed.
Baking the Cookie Skillet
Now it’s time to pour the cookie dough into your prepared skillet. Spread it out evenly with a spatula. Place the skillet in the preheated oven. Bake for 20-25 minutes. Look for the edges to turn golden brown. The center should be set. Once done, take it out and immediately sprinkle 1 cup of mini marshmallows on top. Put it back into the oven for 2-3 more minutes until the marshmallows are puffy and lightly browned. Let it cool for a few minutes before serving. Enjoy the warm, gooey goodness!
Tips & Tricks
Ensuring Perfect Texture
To get the best texture, cream the butter and sugars well. This makes the dough light. Use room temperature butter for easy mixing. When you add flour, mix until just combined. Overmixing can make cookies tough. The dough should be thick, but not dry.
Serving Suggestions
Serve the S’mores Cookie Skillet warm. Top it with extra chocolate chips and graham cracker crumbs. For a special treat, drizzle melted chocolate on top. Use spoons for serving to make it easy. Pair with ice cream for added flavor and fun.
Common Mistakes to Avoid
One mistake is not preheating the oven. This can affect how the cookie bakes. Don't skip the mini marshmallows on top; they add a great touch. Make sure to check the baking time closely. If you bake it too long, the center will dry out.
Pro Tips
- Use Room Temperature Butter: Make sure your butter is softened to room temperature for easier creaming with the sugars, resulting in a lighter cookie texture.
- Don’t Overmix: When combining the dry and wet ingredients, mix just until incorporated to keep your cookies tender and chewy.
- Customize the Toppings: Feel free to add more chocolate chips, nuts, or even peanut butter chips for a unique twist on the classic s'mores flavor.
- Serving Warm: For the best experience, serve the skillet straight from the oven while the marshmallows are still gooey and melty!
Variations
Flavor Add-Ins
You can make your S’mores Cookie Skillet even better. Try adding nuts for crunch. Chopped walnuts or pecans work well. You can also swap out the chocolate chips. Use dark chocolate or white chocolate for a twist. These small changes bring new flavors to each bite.
Gluten-Free Options
If you need a gluten-free dessert, don't worry! You can use gluten-free flour instead of all-purpose flour. This swap keeps the cookie soft and chewy. Make sure to check that your chocolate chips and graham crackers are gluten-free too. This way, everyone can enjoy this tasty treat!
Alternative Toppings
Mix things up with different toppings! Fresh fruit like strawberries or bananas can add a nice touch. You can also use different candies, like peanut butter cups or caramel bits. They will melt and create a delicious surprise. Get creative! Each topping gives your S’mores Cookie Skillet a new flavor.
Storage Info
How to Store Leftovers
To keep your S’mores Cookie Skillet fresh, wait until it cools. Once cool, cover the skillet with plastic wrap or foil. You can also transfer it to an airtight container. Store it at room temperature for up to 2 days. If you want it to last longer, refrigerate it for up to a week.
Reheating Instructions
When you're ready to enjoy leftovers, preheat your oven to 350°F (175°C). Place the skillet in the oven for about 10-15 minutes. This warms it up and makes the marshmallows gooey again. You can also microwave a single serving for 20-30 seconds. Just be careful not to overheat it.
Freezing Tips
To freeze your S’mores Cookie Skillet, let it cool completely. Cut it into slices or keep it whole. Wrap each piece tightly in plastic wrap, then place them in a freezer-safe bag. It can freeze for up to 2 months. When you want to eat it, let it thaw in the fridge overnight before reheating.
FAQs
How do I know when the S’mores Cookie Skillet is done?
The S’mores Cookie Skillet is done when the edges turn golden brown. The center should look set but slightly soft. A toothpick inserted in the middle should come out with a few moist crumbs. If it comes out clean, it might be overbaked.
Can I make this recipe ahead of time?
Yes, you can prepare the cookie dough ahead of time. Store it in the fridge for up to two days. When ready to bake, spread the dough in the skillet. Bake as directed.
What other desserts can I make in a skillet?
You can make many desserts in a skillet! Some popular options include brownies, fruit cobblers, or cookie cakes. Skillets add a fun twist to classic recipes. They also create a warm, gooey treat that everyone loves!
This blog post covered how to make a delicious S’mores Cookie Skillet. We discussed key ingredients, substitutions, and tips for perfect baking. You learned how to prep your oven and skillet, mix the batter, and achieve the ideal texture. We even explored fun variations and storage tips.
Baking is fun and creative. Don't hesitate to try your ideas. Enjoy this tasty treat and make it your own!