
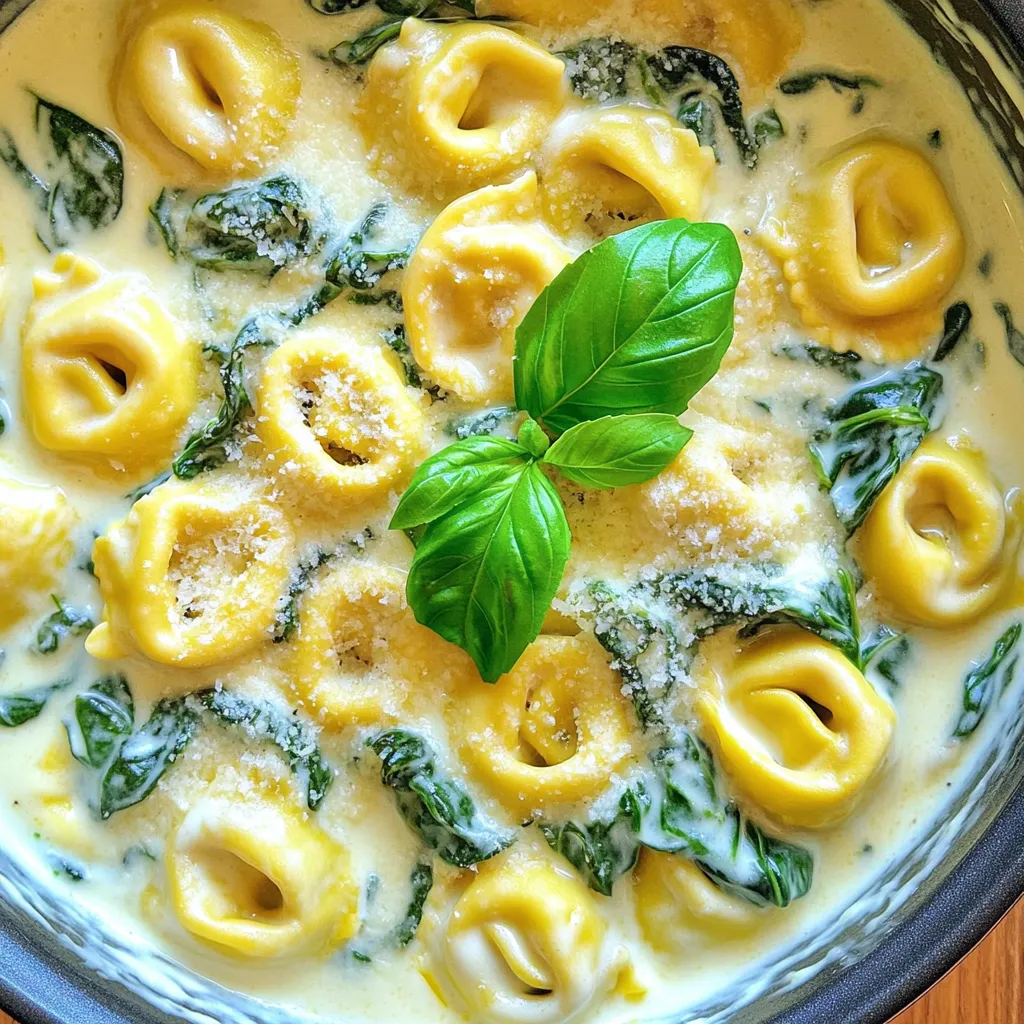
If you crave a quick, creamy meal that bursts with flavor, you’re in the right place! My Savory One-Pot Alfredo Spinach Tortellini Delight is easy to make and requires just one pot. With cheesy tortellini, fresh spinach, and rich Alfredo sauce, it’s perfect for busy nights or cozy weekends. Join me as we dive into this simple recipe that’s sure to please everyone at the table!
Why I Love This Recipe
- Quick and Easy: This recipe takes only 15 minutes from start to finish, making it perfect for busy weeknights.
- One-Pot Wonder: Minimal cleanup is required since everything is cooked in one pot, saving you time and effort.
- Deliciously Creamy: The combination of heavy cream and Parmesan cheese creates a rich and indulgent sauce that coats the tortellini beautifully.
- Healthy Spinach Boost: Adding fresh spinach not only enhances the flavor but also increases the nutritional value of the dish.
Ingredients
Main Ingredients
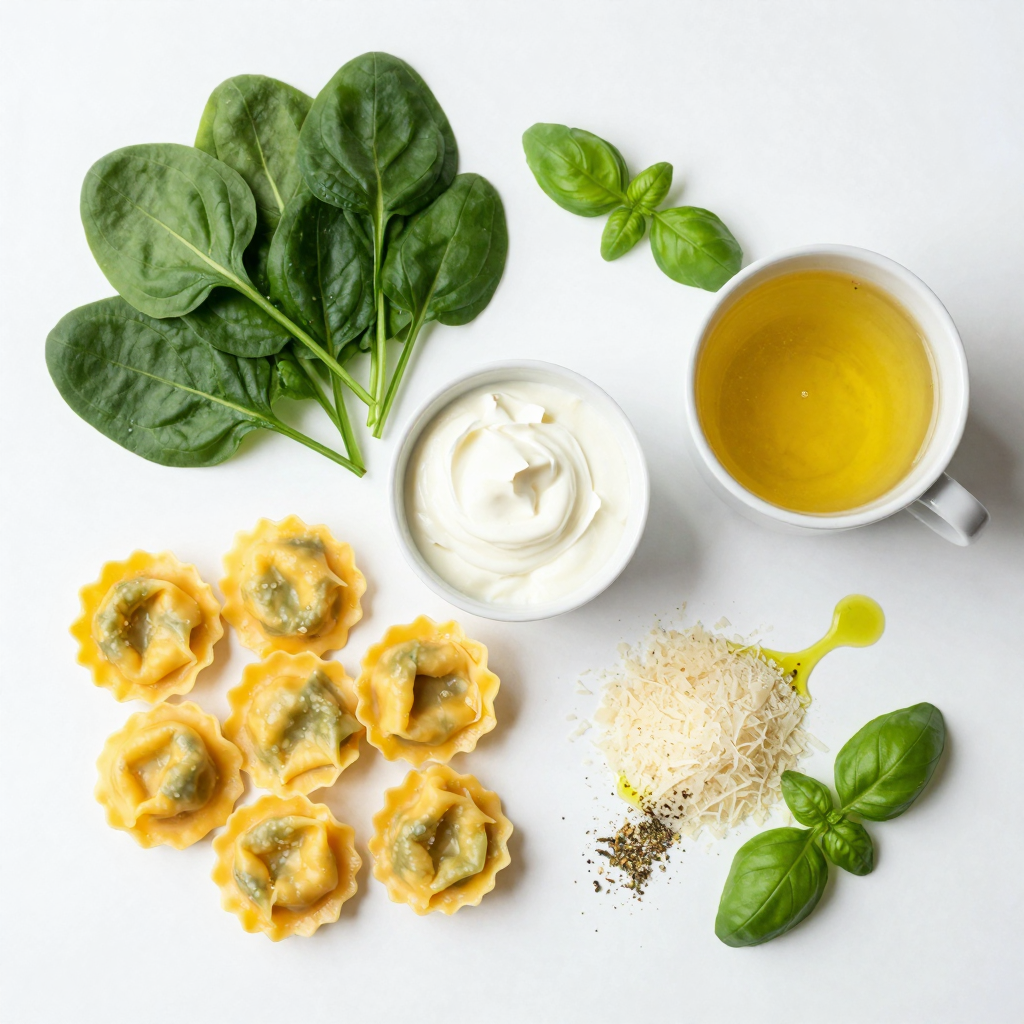
– 10 oz refrigerated cheese tortellini
– 2 cups fresh spinach
– 1 cup heavy cream
– 1 cup vegetable broth
– 1 cup grated Parmesan cheese
The main ingredients are easy to find. You’ll need cheese tortellini, fresh spinach, heavy cream, vegetable broth, and Parmesan cheese. Each part brings its own taste. The tortellini gives a nice bite. The spinach adds color and nutrients. Cream makes the dish rich, while broth boosts flavor.
Aromatics and Seasoning
– 2 cloves garlic, minced
– 1 tablespoon olive oil
– 1 teaspoon Italian seasoning
– Salt and pepper to taste
For flavor, I use garlic, olive oil, and Italian seasoning. Garlic gives a warm and savory aroma. Olive oil adds richness. Italian seasoning brings herbs together for a classic taste. Use salt and pepper to round it all out. Adjust these to match your taste.
Garnish
– Fresh basil leaves
To finish, I add fresh basil leaves. They give a pop of color and a fresh taste. Just sprinkle them on top before serving. This small touch makes a big difference. It’s all about those little details in cooking.
Step-by-Step Instructions
Preparing the Base
First, I heat one tablespoon of olive oil in a large pot over medium heat. When the oil is hot, I add two minced garlic cloves. I sauté the garlic for about one minute until it smells great. This step builds a strong flavor base for the dish.
Creating the Sauce
Next, I pour in one cup of vegetable broth and one cup of heavy cream. I stir them well to mix. This creamy mix will form the heart of the sauce. It adds a rich taste and smooth texture that makes the dish so special.
Cooking the Tortellini
Now, I add 10 ounces of refrigerated cheese tortellini to the pot. I bring the mixture to a gentle simmer. I cook the tortellini for about 5 to 7 minutes while stirring occasionally. I check them until they feel tender. This step ensures the tortellini absorbs all the tasty flavors.
Final Steps
Once the tortellini is ready, I lower the heat. I stir in one cup of grated Parmesan cheese and one teaspoon of Italian seasoning. I mix until the cheese melts and the sauce becomes creamy. Then, I add 2 cups of fresh spinach to the pot. I let it cook for another 2 to 3 minutes until it wilts down. Finally, I season with salt and pepper to taste. The dish is now ready to serve. I like to garnish it with fresh basil leaves for extra flavor.
Pro Tips
- Use Fresh Ingredients: Fresh spinach and high-quality Parmesan cheese will elevate the flavor of your dish significantly.
- Adjust Creaminess: If you prefer a lighter sauce, you can substitute half of the heavy cream with more vegetable broth.
- Customize the Seasoning: Feel free to add additional spices such as crushed red pepper flakes for a bit of heat or fresh herbs for enhanced flavor.
- Leftover Storage: Store any leftovers in an airtight container in the fridge for up to 3 days. Reheat gently on the stove with a splash of broth to loosen the sauce.
Tips & Tricks
Enhancing the Flavor
To make this dish pop, you can add spices and herbs. Try a pinch of red pepper flakes for heat. Fresh herbs like parsley or thyme add brightness. Lemon zest can bring a nice tang too. Don’t forget, fresh garlic can boost taste. Experiment and find what you love!
Achieving the Perfect Creaminess
To keep the sauce creamy, use full-fat heavy cream. If it seems too thick, add a bit more broth. Stir often to make sure it blends well. If it is too thin, let it simmer longer. You want a smooth, rich sauce that coats the tortellini nicely.
Cooking it Right
Cooking the tortellini just right is key. Add it to the pot only when the sauce is simmering. Stir it gently to prevent sticking. Cook for 5-7 minutes until it’s tender. Taste a piece to check doneness. Perfectly cooked tortellini is the secret to this dish!
Variations
Ingredient Swaps
You can switch up the greens in this dish. Try kale or arugula for a new twist. These greens will add different flavors and textures. Also, you can use different pastas. Whole wheat or gluten-free tortellini will work well. Each swap will change the dish while keeping it creamy and tasty.
Protein Add-Ins
Want to make this dish heartier? Add cooked chicken or shrimp! Just sauté them first and toss them in with the tortellini. Chicken adds a mild flavor, while shrimp brings a sweet taste. Both options make your meal more filling and satisfying.
Vegan Modifications
You can make this dish vegan too. Use plant-based cheese and cream for a creamy texture. Almond or coconut milk works well in place of heavy cream. Nutritional yeast adds a cheesy flavor without dairy. These swaps keep the dish rich and tasty while being plant-based.
Storage Info
Refrigeration
To store leftovers, let the dish cool first. Use an airtight container. This keeps the flavors fresh. Place it in the fridge within two hours. It stays good for about 3-4 days. When you’re ready to eat, just reheat it in a pan.
Freezing Options
If you want to freeze your One-Pot Alfredo Spinach Tortellini, use a freezer-safe container. It helps to divide the dish into smaller portions. This makes it easier to thaw. You can freeze it for up to 3 months. To reheat, thaw it in the fridge overnight. Heat it gently on the stove with a splash of broth or cream for best results.
Shelf Life
In the fridge, the dish lasts 3-4 days. In the freezer, you can keep it for 3 months. However, for the best taste and texture, enjoy it fresh!
FAQs
Can I use frozen tortellini instead?
Yes, you can use frozen tortellini. Just add a few extra minutes to cook it. The frozen tortellini will work well in the dish. Make sure to stir it gently so it cooks evenly.
What can I substitute for heavy cream?
You can use half-and-half or whole milk. For a lighter option, try Greek yogurt. If you want a dairy-free choice, use coconut milk or cashew cream. Each will change the taste a bit, but they keep the dish creamy.
How do I make this dish gluten-free?
To make it gluten-free, use gluten-free tortellini. Many brands offer this option now. Just check the label to ensure it fits your needs. The rest of the recipe is gluten-free, so you can enjoy this dish without worry.
Can I prepare this dish in advance?
Yes, you can prep this dish ahead of time. Cook the tortellini and sauce, then store them separately. When you’re ready, reheat them together. This keeps the tortellini from getting mushy. Enjoy a quick meal on a busy day!
This blog post detailed a creamy tortellini dish. We explored the key ingredients like cheese tortellini, spinach, and heavy cream. I shared steps for creating a flavorful sauce and tips for perfecting the recipe. Variations on ingredients let you customize it, whether you prefer protein or vegan options. Finally, proper storage ensures your leftovers stay tasty. Enjoy experimenting with this dish, and find your favorite version!


