Savory Shrimp and Grits Classic Southern Delight
![- 1 cup stone-ground grits (preferably) - 4 cups water or low-sodium chicken broth - 1 lb large shrimp, peeled and deveined - 1 cup sharp cheddar cheese, shredded The heart of shrimp and grits lies in its key ingredients. Stone-ground grits provide a rich, creamy base. They have a coarse texture that enhances the dish. You must use high-quality grits for the best flavor. Large shrimp add a nice sweetness and texture. They should be fresh and deveined for easy cooking. Sharp cheddar cheese brings a salty, rich taste that melts beautifully into the grits. This combination creates a comforting dish that warms the soul. - 4 slices turkey bacon, chopped - Sliced green onions, for garnish While the key ingredients are vital, optional ingredients can elevate your dish. Turkey bacon adds a crispy, smoky flavor. You can cook it in the same skillet as the shrimp. This adds depth and richness to your meal. Sliced green onions provide a fresh, crunchy contrast. They also add a pop of color to your plate. Feel free to add these for extra flair! - 1 teaspoon smoked paprika - ½ teaspoon cayenne pepper (adjust according to spice preference) Seasoning is crucial for flavor. Smoked paprika gives a warm, smoky taste. It enhances the shrimp and grits without overwhelming them. Cayenne pepper adds heat. You can adjust the amount based on your spice preference. Together, these seasonings create a balanced flavor that makes shrimp and grits truly delightful. The right seasoning can transform your dish from good to great! For the full recipe, check out the [Full Recipe]. First, you need to boil water or chicken broth. Use a medium saucepan for this. Bring it to a rolling boil over high heat. Once boiling, gradually whisk in 1 cup of stone-ground grits. This helps avoid lumps. After adding the grits, lower the heat to a gentle simmer. Cover the saucepan and cook for about 20-25 minutes. Stir occasionally until the grits become creamy. Once cooked, stir in 1 cup of sharp cheddar cheese. The cheese gives a rich flavor. Season with salt and pepper to taste. Keep the grits warm over low heat. While the grits cook, grab a large skillet. Heat it over medium heat and add 4 slices of chopped turkey bacon. Cook until crispy, turning occasionally. Use a slotted spoon to remove the bacon. Leave the bacon fat in the skillet. In the same skillet, add 1 small finely chopped onion. Sauté for about 4-5 minutes until soft and translucent. Next, stir in 2 minced garlic cloves, 1 teaspoon of smoked paprika, and ½ teaspoon of cayenne pepper. Cook for about a minute. This mix will smell amazing! Now, add 1 pound of peeled and deveined shrimp. Cook for 3-4 minutes, flipping halfway through. When the shrimp turn pink and opaque, they are ready. Season with salt and pepper to taste. Add 2 tablespoons of unsalted butter and stir gently until melted. To serve, spoon a generous helping of cheesy grits onto each plate. This creamy base is comforting and delicious. Top with the shrimp mixture. This allows all the flavors to blend nicely. Finally, sprinkle the crispy bacon over the dish. Garnish with sliced green onions for a pop of color and crunch. Enjoy this savory shrimp and grits delight! For the full recipe, check out the details above. Using stone-ground grits makes a big difference. They have a rich taste and great texture. These grits cook slowly, giving them a creamy finish. For added creaminess, mix in butter or cream. You can adjust the consistency by changing the liquid amount. If you like thicker grits, use less water. For smoother grits, add more liquid. Seasoning is key for great shrimp. I love using smoked paprika and cayenne pepper. These spices add depth and warmth. You can also try garlic powder or lemon zest for a fresh twist. Cook the shrimp just right; about 3-4 minutes is perfect. They should turn pink and opaque. Overcooking makes them tough, so keep an eye on them. Serving shrimp and grits nicely makes a big impact. Use a large white plate to make the colors pop. Start with a big scoop of cheesy grits as your base. Then, layer the shrimp mixture on top. For a final touch, sprinkle crispy turkey bacon over the dish. Add sliced green onions for color and crunch. Drizzling melted butter adds a nice shine too. These small details make your meal feel special. For the complete recipe, check the Full Recipe. {{image_4}} When it comes to shrimp and grits, the options are endless. You can play with flavors and ingredients to make this dish your own. - Adding andouille sausage: This spicy sausage brings a rich flavor. It adds a nice kick to the dish. Just slice it and sauté with the onions. The smoky taste works well with shrimp. - Using different types of cheese: While sharp cheddar is a classic choice, feel free to experiment. Gouda or pepper jack can give a new twist. Each cheese adds its own character to the creamy grits. - Cauliflower grits: If you're looking for a lighter option, try cauliflower grits. Simply steam cauliflower and blend it until smooth. It gives a similar texture with fewer carbs. - Low-sodium bacon options: You can still enjoy that savory flavor without too much salt. Turkey bacon or even tempeh can work well. These options keep the dish tasty while being healthier. - Cajun-style shrimp and grits: Bring the heat with Cajun spices. Use a blend of paprika, onion powder, and cayenne. This gives a vibrant flavor that will awaken your taste buds. - Incorporating international spices: Try adding spices like curry powder or turmeric. These spices offer a new take on shrimp and grits. They bring warmth and a touch of the exotic to your plate. Feel free to mix and match these ideas to create your perfect shrimp and grits. For the full recipe, check out the details in the main article. To keep your shrimp and grits fresh, store them in airtight containers. This method helps prevent moisture loss and keeps flavors intact. Place the leftovers in the fridge within two hours of cooking. They will stay fresh for up to three days. Beyond that, the shrimp may lose quality and texture. When reheating grits, add a splash of water or broth. This helps restore creaminess. Heat them slowly over low heat. Stir often to avoid sticking. For the shrimp, use a skillet on low heat. This method warms them gently, keeping them tender. Avoid microwaving shrimp as it can make them tough. You can freeze shrimp and grits, but it's best to freeze them separately. For grits, let them cool completely and then transfer to freezer-safe bags. They will last up to three months in the freezer. For shrimp, place them in a single layer on a baking sheet to freeze first. Once frozen, transfer to a bag. This prevents clumping. When ready to eat, thaw both in the fridge overnight. Reheat as described above for the best results. Shrimp and grits come from the Lowcountry of the southern U.S. It started as a breakfast dish for working-class folks. In the early days, fishermen ate shrimp with their grits. Grits are made from ground corn, a staple in southern cooking. Over time, this dish evolved into a beloved meal across the region. Today, chefs put their own spins on it, making it popular in fine dining. To amp up the heat, you can add more cayenne pepper. You can also try hot sauce, like Tabasco, for a kick. Consider diced jalapeños or red pepper flakes for a different flavor. If you prefer a smoky element, add chipotle peppers in adobo sauce. Remember to taste as you go, so you find the right level of heat for you. Yes, you can substitute grits with other grains. Polenta is a popular choice and has a similar texture. Quinoa can also work, offering a nutty flavor and extra protein. Another option is farro, which gives a chewy bite. Just adjust the cooking time and liquid according to the grain you choose. Several sides pair nicely with shrimp and grits. A fresh salad can add a crisp contrast. Consider a simple mixed green salad with a light vinaigrette. Roasted vegetables also work well, adding color and nutrition. You might enjoy collard greens or sautéed green beans for a classic southern touch. Try serving cornbread for a comforting side that complements the dish beautifully. In summary, shrimp and grits is a dish that blends flavor and comfort. We explored key ingredients, from stone-ground grits to large shrimp. I shared steps to prepare creamy grits and flavorful shrimp, plus tips to enhance the taste. You can customize variations like healthy options or Cajun styles. Lastly, I provided storage info to keep your leftovers fresh. Enjoy making this dish your own and impressing those at your table!](https://dailydishlab.com/wp-content/uploads/2025/06/fc5e452b-7ec2-413c-a498-40e4879e0d90.webp)
Ready to dive into a classic Southern dish? Shrimp and grits combine creamy grits with juicy shrimp for a meal that warms your heart. With just a few key ingredients, you can whip up this tasty treat at home. I’ll guide you through each step, from selecting the best flavors to serving it beautifully. Let’s elevate your cooking game and bring a taste of the South to your table!
Ingredients
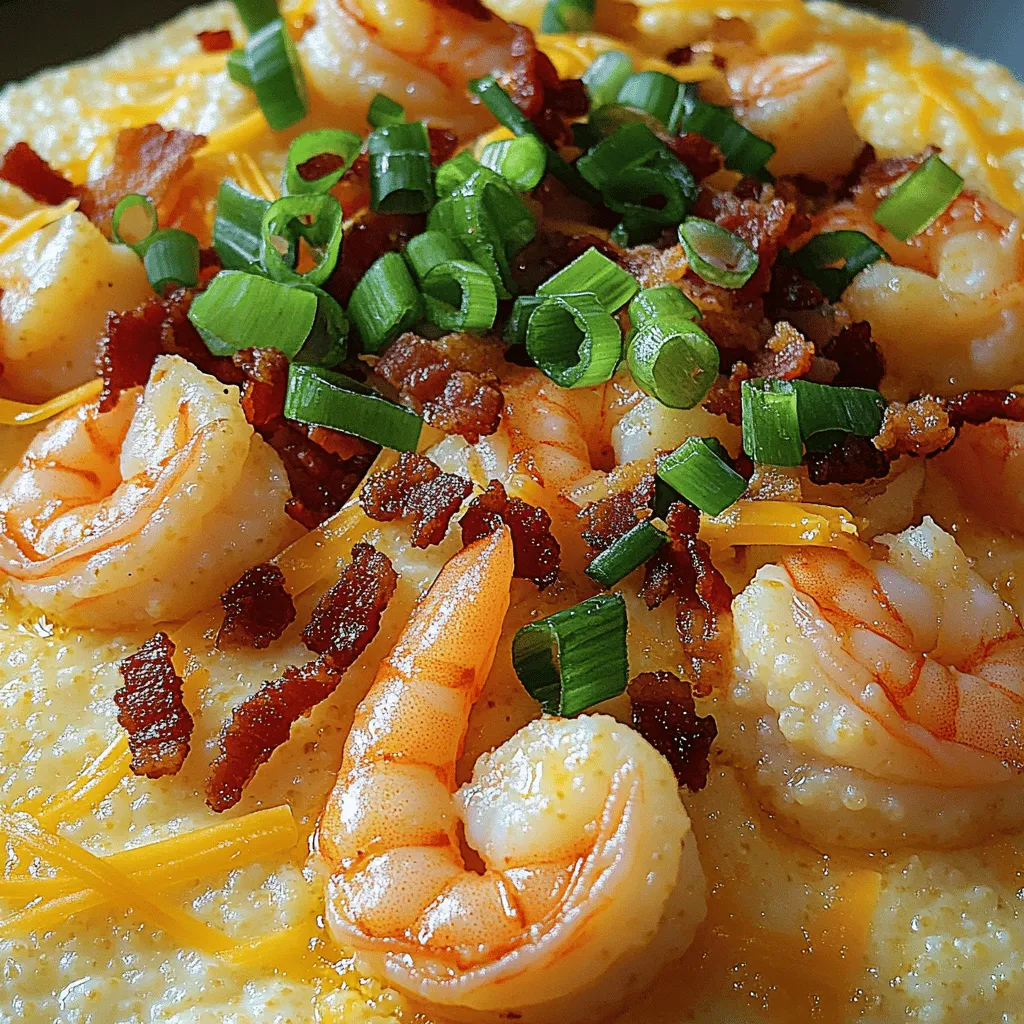
Key Ingredients for Shrimp and Grits
- 1 cup stone-ground grits (preferably)
- 4 cups water or low-sodium chicken broth
- 1 lb large shrimp, peeled and deveined
- 1 cup sharp cheddar cheese, shredded
The heart of shrimp and grits lies in its key ingredients. Stone-ground grits provide a rich, creamy base. They have a coarse texture that enhances the dish. You must use high-quality grits for the best flavor. Large shrimp add a nice sweetness and texture. They should be fresh and deveined for easy cooking. Sharp cheddar cheese brings a salty, rich taste that melts beautifully into the grits. This combination creates a comforting dish that warms the soul.
Optional Ingredients
- 4 slices turkey bacon, chopped
- Sliced green onions, for garnish
While the key ingredients are vital, optional ingredients can elevate your dish. Turkey bacon adds a crispy, smoky flavor. You can cook it in the same skillet as the shrimp. This adds depth and richness to your meal. Sliced green onions provide a fresh, crunchy contrast. They also add a pop of color to your plate. Feel free to add these for extra flair!
Seasoning Essentials
- 1 teaspoon smoked paprika
- ½ teaspoon cayenne pepper (adjust according to spice preference)
Seasoning is crucial for flavor. Smoked paprika gives a warm, smoky taste. It enhances the shrimp and grits without overwhelming them. Cayenne pepper adds heat. You can adjust the amount based on your spice preference. Together, these seasonings create a balanced flavor that makes shrimp and grits truly delightful. The right seasoning can transform your dish from good to great!
Step-by-Step Instructions
Preparing the Grits
First, you need to boil water or chicken broth. Use a medium saucepan for this. Bring it to a rolling boil over high heat. Once boiling, gradually whisk in 1 cup of stone-ground grits. This helps avoid lumps. After adding the grits, lower the heat to a gentle simmer. Cover the saucepan and cook for about 20-25 minutes. Stir occasionally until the grits become creamy. Once cooked, stir in 1 cup of sharp cheddar cheese. The cheese gives a rich flavor. Season with salt and pepper to taste. Keep the grits warm over low heat.
Cooking the Shrimp
While the grits cook, grab a large skillet. Heat it over medium heat and add 4 slices of chopped turkey bacon. Cook until crispy, turning occasionally. Use a slotted spoon to remove the bacon. Leave the bacon fat in the skillet. In the same skillet, add 1 small finely chopped onion. Sauté for about 4-5 minutes until soft and translucent. Next, stir in 2 minced garlic cloves, 1 teaspoon of smoked paprika, and ½ teaspoon of cayenne pepper. Cook for about a minute. This mix will smell amazing! Now, add 1 pound of peeled and deveined shrimp. Cook for 3-4 minutes, flipping halfway through. When the shrimp turn pink and opaque, they are ready. Season with salt and pepper to taste. Add 2 tablespoons of unsalted butter and stir gently until melted.
Combining and Serving
To serve, spoon a generous helping of cheesy grits onto each plate. This creamy base is comforting and delicious. Top with the shrimp mixture. This allows all the flavors to blend nicely. Finally, sprinkle the crispy bacon over the dish. Garnish with sliced green onions for a pop of color and crunch. Enjoy this savory shrimp and grits delight!
Tips & Tricks
Perfecting the Grits
Using stone-ground grits makes a big difference. They have a rich taste and great texture. These grits cook slowly, giving them a creamy finish. For added creaminess, mix in butter or cream. You can adjust the consistency by changing the liquid amount. If you like thicker grits, use less water. For smoother grits, add more liquid.
Enhancing the Shrimp Flavor
Seasoning is key for great shrimp. I love using smoked paprika and cayenne pepper. These spices add depth and warmth. You can also try garlic powder or lemon zest for a fresh twist. Cook the shrimp just right; about 3-4 minutes is perfect. They should turn pink and opaque. Overcooking makes them tough, so keep an eye on them.
Presentation Tips
Serving shrimp and grits nicely makes a big impact. Use a large white plate to make the colors pop. Start with a big scoop of cheesy grits as your base. Then, layer the shrimp mixture on top. For a final touch, sprinkle crispy turkey bacon over the dish. Add sliced green onions for color and crunch. Drizzling melted butter adds a nice shine too. These small details make your meal feel special.

Variations of Shrimp and Grits
When it comes to shrimp and grits, the options are endless. You can play with flavors and ingredients to make this dish your own.
Southern Comfort Variations
- Adding andouille sausage: This spicy sausage brings a rich flavor. It adds a nice kick to the dish. Just slice it and sauté with the onions. The smoky taste works well with shrimp.
- Using different types of cheese: While sharp cheddar is a classic choice, feel free to experiment. Gouda or pepper jack can give a new twist. Each cheese adds its own character to the creamy grits.
Healthy Alternatives
- Cauliflower grits: If you’re looking for a lighter option, try cauliflower grits. Simply steam cauliflower and blend it until smooth. It gives a similar texture with fewer carbs.
- Low-sodium bacon options: You can still enjoy that savory flavor without too much salt. Turkey bacon or even tempeh can work well. These options keep the dish tasty while being healthier.
Global Influences
- Cajun-style shrimp and grits: Bring the heat with Cajun spices. Use a blend of paprika, onion powder, and cayenne. This gives a vibrant flavor that will awaken your taste buds.
- Incorporating international spices: Try adding spices like curry powder or turmeric. These spices offer a new take on shrimp and grits. They bring warmth and a touch of the exotic to your plate.
Feel free to mix and match these ideas to create your perfect shrimp and grits.
Storage Info
Storing Leftovers
To keep your shrimp and grits fresh, store them in airtight containers. This method helps prevent moisture loss and keeps flavors intact. Place the leftovers in the fridge within two hours of cooking. They will stay fresh for up to three days. Beyond that, the shrimp may lose quality and texture.
Reheating Tips
When reheating grits, add a splash of water or broth. This helps restore creaminess. Heat them slowly over low heat. Stir often to avoid sticking. For the shrimp, use a skillet on low heat. This method warms them gently, keeping them tender. Avoid microwaving shrimp as it can make them tough.
Freezing Considerations
You can freeze shrimp and grits, but it’s best to freeze them separately. For grits, let them cool completely and then transfer to freezer-safe bags. They will last up to three months in the freezer. For shrimp, place them in a single layer on a baking sheet to freeze first. Once frozen, transfer to a bag. This prevents clumping. When ready to eat, thaw both in the fridge overnight. Reheat as described above for the best results.
FAQs
What are the origins of shrimp and grits?
Shrimp and grits come from the Lowcountry of the southern U.S. It started as a breakfast dish for working-class folks. In the early days, fishermen ate shrimp with their grits. Grits are made from ground corn, a staple in southern cooking. Over time, this dish evolved into a beloved meal across the region. Today, chefs put their own spins on it, making it popular in fine dining.
How can I make shrimp and grits spicier?
To amp up the heat, you can add more cayenne pepper. You can also try hot sauce, like Tabasco, for a kick. Consider diced jalapeños or red pepper flakes for a different flavor. If you prefer a smoky element, add chipotle peppers in adobo sauce. Remember to taste as you go, so you find the right level of heat for you.
Can I substitute grits with other grains?
Yes, you can substitute grits with other grains. Polenta is a popular choice and has a similar texture. Quinoa can also work, offering a nutty flavor and extra protein. Another option is farro, which gives a chewy bite. Just adjust the cooking time and liquid according to the grain you choose.
What sides pair well with shrimp and grits?
Several sides pair nicely with shrimp and grits. A fresh salad can add a crisp contrast. Consider a simple mixed green salad with a light vinaigrette. Roasted vegetables also work well, adding color and nutrition. You might enjoy collard greens or sautéed green beans for a classic southern touch. Try serving cornbread for a comforting side that complements the dish beautifully.
In summary, shrimp and grits is a dish that blends flavor and comfort. We explored key ingredients, from stone-ground grits to large shrimp. I shared steps to prepare creamy grits and flavorful shrimp, plus tips to enhance the taste. You can customize variations like healthy options or Cajun styles. Lastly, I provided storage info to keep your leftovers fresh. Enjoy making this dish your own and impressing those at your table!
![- 1 cup stone-ground grits (preferably) - 4 cups water or low-sodium chicken broth - 1 lb large shrimp, peeled and deveined - 1 cup sharp cheddar cheese, shredded The heart of shrimp and grits lies in its key ingredients. Stone-ground grits provide a rich, creamy base. They have a coarse texture that enhances the dish. You must use high-quality grits for the best flavor. Large shrimp add a nice sweetness and texture. They should be fresh and deveined for easy cooking. Sharp cheddar cheese brings a salty, rich taste that melts beautifully into the grits. This combination creates a comforting dish that warms the soul. - 4 slices turkey bacon, chopped - Sliced green onions, for garnish While the key ingredients are vital, optional ingredients can elevate your dish. Turkey bacon adds a crispy, smoky flavor. You can cook it in the same skillet as the shrimp. This adds depth and richness to your meal. Sliced green onions provide a fresh, crunchy contrast. They also add a pop of color to your plate. Feel free to add these for extra flair! - 1 teaspoon smoked paprika - ½ teaspoon cayenne pepper (adjust according to spice preference) Seasoning is crucial for flavor. Smoked paprika gives a warm, smoky taste. It enhances the shrimp and grits without overwhelming them. Cayenne pepper adds heat. You can adjust the amount based on your spice preference. Together, these seasonings create a balanced flavor that makes shrimp and grits truly delightful. The right seasoning can transform your dish from good to great! For the full recipe, check out the [Full Recipe]. First, you need to boil water or chicken broth. Use a medium saucepan for this. Bring it to a rolling boil over high heat. Once boiling, gradually whisk in 1 cup of stone-ground grits. This helps avoid lumps. After adding the grits, lower the heat to a gentle simmer. Cover the saucepan and cook for about 20-25 minutes. Stir occasionally until the grits become creamy. Once cooked, stir in 1 cup of sharp cheddar cheese. The cheese gives a rich flavor. Season with salt and pepper to taste. Keep the grits warm over low heat. While the grits cook, grab a large skillet. Heat it over medium heat and add 4 slices of chopped turkey bacon. Cook until crispy, turning occasionally. Use a slotted spoon to remove the bacon. Leave the bacon fat in the skillet. In the same skillet, add 1 small finely chopped onion. Sauté for about 4-5 minutes until soft and translucent. Next, stir in 2 minced garlic cloves, 1 teaspoon of smoked paprika, and ½ teaspoon of cayenne pepper. Cook for about a minute. This mix will smell amazing! Now, add 1 pound of peeled and deveined shrimp. Cook for 3-4 minutes, flipping halfway through. When the shrimp turn pink and opaque, they are ready. Season with salt and pepper to taste. Add 2 tablespoons of unsalted butter and stir gently until melted. To serve, spoon a generous helping of cheesy grits onto each plate. This creamy base is comforting and delicious. Top with the shrimp mixture. This allows all the flavors to blend nicely. Finally, sprinkle the crispy bacon over the dish. Garnish with sliced green onions for a pop of color and crunch. Enjoy this savory shrimp and grits delight! For the full recipe, check out the details above. Using stone-ground grits makes a big difference. They have a rich taste and great texture. These grits cook slowly, giving them a creamy finish. For added creaminess, mix in butter or cream. You can adjust the consistency by changing the liquid amount. If you like thicker grits, use less water. For smoother grits, add more liquid. Seasoning is key for great shrimp. I love using smoked paprika and cayenne pepper. These spices add depth and warmth. You can also try garlic powder or lemon zest for a fresh twist. Cook the shrimp just right; about 3-4 minutes is perfect. They should turn pink and opaque. Overcooking makes them tough, so keep an eye on them. Serving shrimp and grits nicely makes a big impact. Use a large white plate to make the colors pop. Start with a big scoop of cheesy grits as your base. Then, layer the shrimp mixture on top. For a final touch, sprinkle crispy turkey bacon over the dish. Add sliced green onions for color and crunch. Drizzling melted butter adds a nice shine too. These small details make your meal feel special. For the complete recipe, check the Full Recipe. {{image_4}} When it comes to shrimp and grits, the options are endless. You can play with flavors and ingredients to make this dish your own. - Adding andouille sausage: This spicy sausage brings a rich flavor. It adds a nice kick to the dish. Just slice it and sauté with the onions. The smoky taste works well with shrimp. - Using different types of cheese: While sharp cheddar is a classic choice, feel free to experiment. Gouda or pepper jack can give a new twist. Each cheese adds its own character to the creamy grits. - Cauliflower grits: If you're looking for a lighter option, try cauliflower grits. Simply steam cauliflower and blend it until smooth. It gives a similar texture with fewer carbs. - Low-sodium bacon options: You can still enjoy that savory flavor without too much salt. Turkey bacon or even tempeh can work well. These options keep the dish tasty while being healthier. - Cajun-style shrimp and grits: Bring the heat with Cajun spices. Use a blend of paprika, onion powder, and cayenne. This gives a vibrant flavor that will awaken your taste buds. - Incorporating international spices: Try adding spices like curry powder or turmeric. These spices offer a new take on shrimp and grits. They bring warmth and a touch of the exotic to your plate. Feel free to mix and match these ideas to create your perfect shrimp and grits. For the full recipe, check out the details in the main article. To keep your shrimp and grits fresh, store them in airtight containers. This method helps prevent moisture loss and keeps flavors intact. Place the leftovers in the fridge within two hours of cooking. They will stay fresh for up to three days. Beyond that, the shrimp may lose quality and texture. When reheating grits, add a splash of water or broth. This helps restore creaminess. Heat them slowly over low heat. Stir often to avoid sticking. For the shrimp, use a skillet on low heat. This method warms them gently, keeping them tender. Avoid microwaving shrimp as it can make them tough. You can freeze shrimp and grits, but it's best to freeze them separately. For grits, let them cool completely and then transfer to freezer-safe bags. They will last up to three months in the freezer. For shrimp, place them in a single layer on a baking sheet to freeze first. Once frozen, transfer to a bag. This prevents clumping. When ready to eat, thaw both in the fridge overnight. Reheat as described above for the best results. Shrimp and grits come from the Lowcountry of the southern U.S. It started as a breakfast dish for working-class folks. In the early days, fishermen ate shrimp with their grits. Grits are made from ground corn, a staple in southern cooking. Over time, this dish evolved into a beloved meal across the region. Today, chefs put their own spins on it, making it popular in fine dining. To amp up the heat, you can add more cayenne pepper. You can also try hot sauce, like Tabasco, for a kick. Consider diced jalapeños or red pepper flakes for a different flavor. If you prefer a smoky element, add chipotle peppers in adobo sauce. Remember to taste as you go, so you find the right level of heat for you. Yes, you can substitute grits with other grains. Polenta is a popular choice and has a similar texture. Quinoa can also work, offering a nutty flavor and extra protein. Another option is farro, which gives a chewy bite. Just adjust the cooking time and liquid according to the grain you choose. Several sides pair nicely with shrimp and grits. A fresh salad can add a crisp contrast. Consider a simple mixed green salad with a light vinaigrette. Roasted vegetables also work well, adding color and nutrition. You might enjoy collard greens or sautéed green beans for a classic southern touch. Try serving cornbread for a comforting side that complements the dish beautifully. In summary, shrimp and grits is a dish that blends flavor and comfort. We explored key ingredients, from stone-ground grits to large shrimp. I shared steps to prepare creamy grits and flavorful shrimp, plus tips to enhance the taste. You can customize variations like healthy options or Cajun styles. Lastly, I provided storage info to keep your leftovers fresh. Enjoy making this dish your own and impressing those at your table!](https://dailydishlab.com/wp-content/uploads/2025/06/fc5e452b-7ec2-413c-a498-40e4879e0d90-300x300.webp)

![- 1 lb ground beef or turkey - 1 packet taco seasoning - 1 can black beans, rinsed and drained - 1 cup corn, frozen or canned - 1 large head of romaine lettuce, chopped For a tasty loaded taco salad, you need a few key items. The star is ground beef or turkey. This meat gives the salad its savory flavor. Next, you will need taco seasoning. This mix adds spice and zest. Black beans bring in protein and fiber. They also add a nice texture. Corn sweetens the dish and adds a pop of color. Lastly, chopped romaine lettuce makes a great base. It stays crisp and fresh. - 1 cup cherry tomatoes, halved - 1 avocado, diced - 1 cup shredded cheddar cheese - 1/2 cup sour cream - 1/4 cup fresh cilantro, chopped Now, let’s talk toppings! Cherry tomatoes add a juicy bite and bright color. Diced avocado brings creaminess and healthy fats. Shredded cheddar cheese gives a rich flavor and melty touch. Sour cream adds a cool contrast to the spices. Finally, fresh cilantro brings a burst of herbal taste. You can mix these toppings in or add them on top for a fun look. - Salsa, for drizzling - Tortilla chips, for garnish - Lime wedges, for serving - Salt and pepper to taste If you want to jazz up your salad, consider add-ins. Salsa adds more flavor and a bit of heat. Crushed tortilla chips give a crunchy texture. Lime wedges offer a zesty kick when squeezed over the top. Don’t forget to season with salt and pepper to taste. These optional items can turn a good salad into a great one. For the full recipe, check out the complete guide! 1. Brown the ground beef or turkey: Heat a large skillet over medium heat. Add the ground meat and cook until it turns brown. This usually takes about 5 to 7 minutes. Stir often to ensure it cooks evenly. 2. Drain excess fat: Once the meat is browned, carefully drain any extra fat. This step keeps your salad lighter and healthier. 3. Add taco seasoning and simmer: Open the taco seasoning packet and sprinkle it over the meat. Follow the instructions on the packet. Typically, you will add some water and let it simmer for about 5 minutes. This allows the flavors to blend perfectly. 1. Create a base with lettuce: Take a large serving bowl and layer the chopped romaine lettuce at the bottom. This will be your fresh and crunchy base. 2. Layer with cooked meat and other ingredients: Evenly distribute the cooked meat over the lettuce. Next, add a layer of black beans, followed by corn, cherry tomatoes, and diced avocado. Each layer adds texture and flavor. 3. Add toppings and garnishes: Sprinkle shredded cheddar cheese on top. Then, add dollops of sour cream and drizzle salsa over everything. Finally, garnish with fresh cilantro and crushed tortilla chips for that extra crunch. 1. Present in a large bowl or individual bowls: You can serve this salad in one large bowl for sharing or in individual bowls for each guest. 2. Arrange in sections for visual appeal: To make your salad eye-catching, arrange the ingredients in sections. This way, each component shines and looks delicious. Consider adding a sprinkle of cheese and a few extra tortilla chips on top for even more visual appeal. For more detailed steps and tips, check out the Full Recipe for Loaded Taco Salad. To make your loaded taco salad shine, adjust the seasoning to your taste. You might want more spice or salt. Taste as you go to get it just right. Fresh ingredients boost flavor. Try to use ripe tomatoes and crisp lettuce. Fresh cilantro adds a bright touch, too. You can save time by preparing ingredients in advance. Chop your veggies the night before. This way, you can mix the salad fast. Canned or frozen items work well. Black beans from a can save time and taste great. Frozen corn can also cut down on prep time. The way you present your salad matters. Create colorful layers to catch the eye. Start with green lettuce and add bright tomatoes. Layering makes it look fun and tasty. Garnish with extra tortilla chips and cheese for crunch. This adds flair and makes your dish pop. {{image_2}} You can easily switch the meat in your loaded taco salad. If you prefer, use shredded chicken or tofu. Shredded chicken adds a tender texture. Tofu gives a nice bite and works well for vegetarians. You can even try black bean burgers for a fun twist. These options keep the dish tasty while meeting different dietary needs. Feel free to get creative with ingredients. You can use different beans, like pinto or kidney beans. Each type brings its own flavor and texture. Cheese is another area to explore—try pepper jack for a spicy kick or queso fresco for a milder taste. For the greens, mix it up with spinach or arugula. These changes can give your salad a fresh spin. Don't forget about the dressing! A creamy ranch pairs well with the flavors in your salad. If you want a zing, try a vinaigrette for brightness. For those who love heat, add a spicy chipotle dressing. It amps up the flavor and makes the salad even more exciting. Each dressing can change your taco salad experience, so have fun experimenting! For the full recipe, check [Full Recipe]. To keep your loaded taco salad fresh, store it in an airtight container. This step keeps moisture out and preserves flavors. It’s best to keep the meat and toppings separate. This way, your salad stays crisp and tasty. You can refrigerate the salad for up to 3 days. Make sure to eat it within this time for the best taste. I recommend avoiding freezing. Freezing can change the texture of the ingredients, especially the lettuce and tomatoes. When you are ready to enjoy leftovers, reheat the meat separately. This method helps maintain the meat's flavor and warmth. After reheating, add fresh toppings like avocado and cilantro. This keeps your salad looking and tasting great. For a full recipe, check out the loaded taco salad instructions above. You can make your loaded taco salad even better with fun toppings. Consider adding: - Jalapeños for heat - Olives for saltiness - Bell peppers for crunch - Radishes for a fresh bite - Greek yogurt as a sour cream swap - Fresh corn for sweetness Feel free to mix and match toppings. The more colors, the better it looks! Yes, you can prepare parts of your taco salad ahead of time! Here are some tips: - Cook the meat and store it in the fridge for up to three days. - Chop your veggies and keep them in airtight containers. - Wait to add toppings like avocado and sour cream until right before serving. This keeps them fresh. Layering is key for both taste and looks. Here’s how I do it: 1. Start with a base of romaine lettuce. 2. Add the cooked meat evenly over the lettuce. 3. Next, layer black beans, corn, tomatoes, and avocado. 4. Sprinkle cheese on top for a nice finish. 5. Finally, dollop sour cream and drizzle salsa for flavor. This way, each bite is packed with flavor! Making a lighter taco salad is simple. Try these swaps: - Use lean ground turkey or chicken instead of beef. - Swap sour cream for Greek yogurt to cut calories. - Add more veggies like spinach or kale instead of lettuce. - Use low-fat cheese or skip it altogether for fewer calories. These changes keep your salad tasty and nutritious! For the full recipe, check out the Loaded Taco Salad section. This blog post showed you how to make a delicious loaded taco salad. You learned about essential ingredients, cooking steps, and tasty toppings. I shared tips for flavor and presentation, plus fun variations and storage info. Now you can create your own loaded taco salad that fits your taste. Enjoy experimenting with the ingredients. Make it colorful and flavorful, and share it with friends!](https://dailydishlab.com/wp-content/uploads/2025/06/0bf67b06-348e-48f5-b73f-4698b039c9e8-768x768.webp)


