Sesame Garlic Ramen Salad Fresh and Flavorful Delight

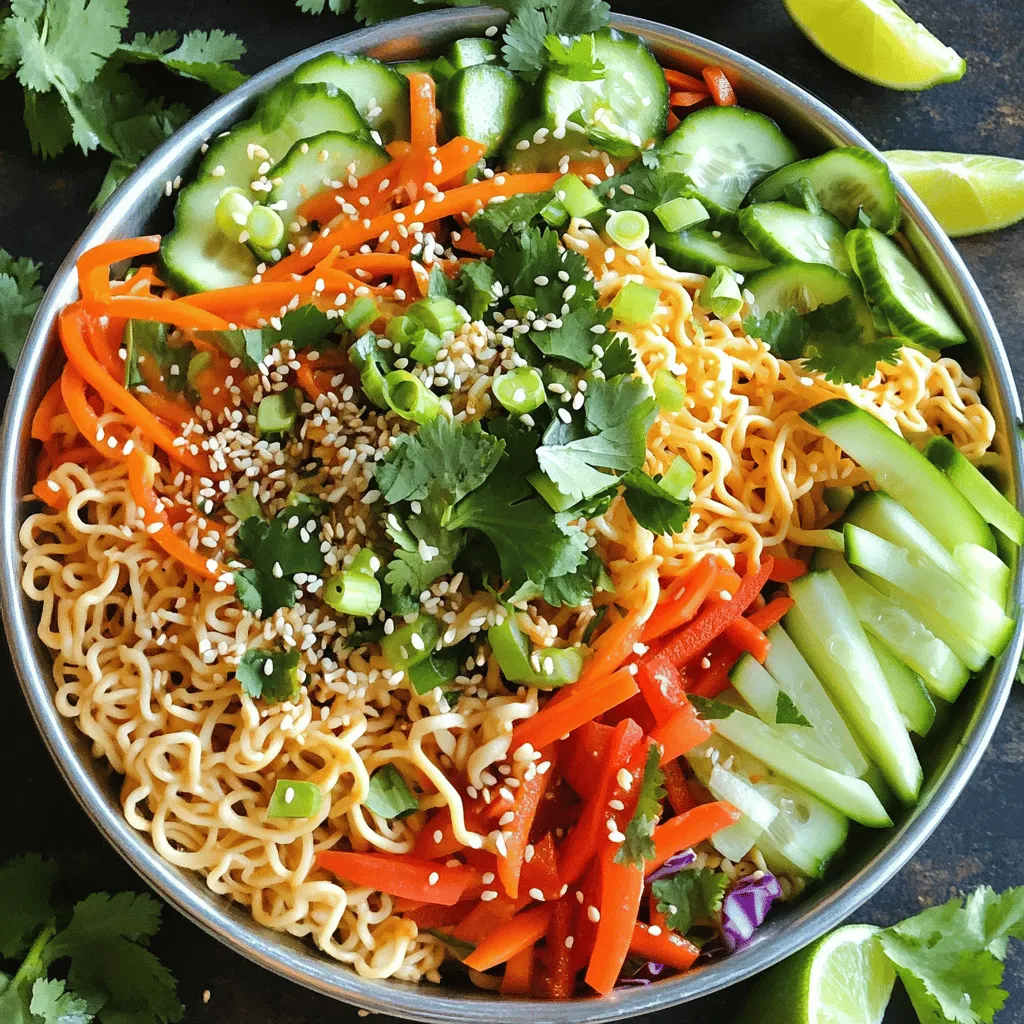
Looking for a fresh and exciting dish? Try my Sesame Garlic Ramen Salad! This vibrant salad blends ramen noodles with crisp veggies and a tasty dressing. It’s simple, quick, and bursting with flavor. You can make it a main dish or a side. Let’s dive into the ingredients and get started on this delightful recipe that’ll impress everyone at your table!
Why I Love This Recipe
- Quick and Easy: This salad comes together in just 25 minutes, making it a perfect choice for busy weeknights or last-minute gatherings.
- Fresh and Colorful: Loaded with vibrant vegetables, this salad is not only visually appealing but also packed with nutrients.
- Flavorful Dressing: The combination of sesame oil, soy sauce, and fresh garlic elevates the dish, giving it a delightful umami flavor.
- Versatile: This recipe can easily be customized with your favorite vegetables or proteins, making it a flexible option for any meal.
Ingredients
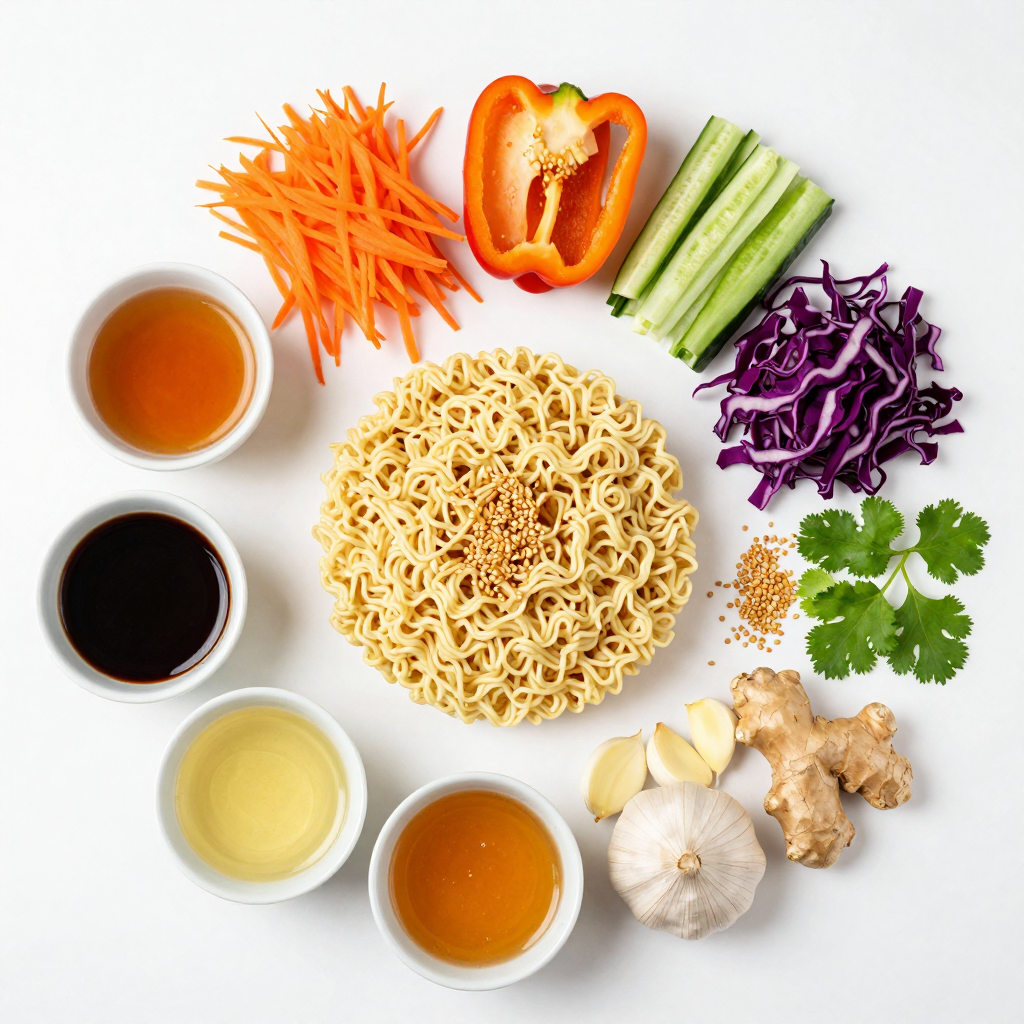
Main Ingredients for the Salad
- 4 oz ramen noodles
- 1 cup shredded carrots
- 1 bell pepper, thinly sliced
- 1 cup cucumbers, julienned
- 1/2 cup red cabbage, shredded
- 1/4 cup green onions, sliced
- 1/4 cup sesame seeds (toasted)
- 1/4 cup cilantro leaves, chopped
The main ingredients for this salad make it bright and fresh. The ramen noodles form a chewy base. I love using colorful veggies like carrots, bell pepper, cucumbers, and red cabbage. They add crunch and flavor. Green onions bring a mild onion taste that complements the other ingredients. The herbs and seeds, like cilantro and sesame seeds, give it a burst of freshness.
Dressing Ingredients
- 1/3 cup sesame oil
- 2 tablespoons soy sauce
- 2 tablespoons rice vinegar
- 2 tablespoons honey or maple syrup
- 3 cloves garlic, minced
- 1 teaspoon grated fresh ginger
- Salt and pepper to taste
The dressing is the heart of this dish. Sesame oil adds a nutty flavor that ties everything together. Soy sauce brings umami and depth. Rice vinegar adds tang, while honey or maple syrup gives a touch of sweetness. Garlic and ginger make the dressing aromatic and lively. Adjust the seasoning with salt and pepper, ensuring the flavors pop.

Step-by-Step Instructions
Cooking the Ramen Noodles
First, boil a pot of water. Add the ramen noodles and cook them according to the package instructions. Usually, this takes about 3 to 5 minutes. Stir gently to prevent them from sticking. Once done, drain the noodles and rinse them under cold water. This step cools the noodles quickly, stopping the cooking process.
Preparing the Vegetable Mixture
Next, grab a cutting board and a sharp knife. Start by shredding the carrots using a grater. Slice the bell pepper into thin strips. For the cucumber, julienne it into small sticks. Shred the red cabbage finely. Finally, slice the green onions. In a large mixing bowl, combine the cooled ramen noodles with all the prepared vegetables. Toss them together until they mix well.
Making the Dressing
In a small bowl, add the sesame oil, soy sauce, rice vinegar, honey or maple syrup, minced garlic, and grated ginger. Whisk these ingredients together until they form a smooth dressing. Taste it and adjust the seasoning with salt and pepper as needed. You want a balance of flavors that makes your taste buds happy.
Assembling the Salad
Now, pour the dressing over the noodle and vegetable mixture. Toss everything gently so that all the noodles and veggies get coated with the dressing. For the final touch, sprinkle toasted sesame seeds and chopped cilantro on top. Give it one last toss to mix everything together. Let the salad sit for about 10 minutes. This waiting time helps the flavors blend beautifully.
Serving Suggestions
For serving, you can use a large bowl or individual portions. Garnish each serving with a bit more sesame seeds and cilantro for a nice look. You can also include lime wedges for an extra zesty kick. This salad is fresh, colorful, and packed with flavor.
Pro Tips
- Fresh Ingredients: Always use fresh vegetables for the best flavor and crunch in your salad.
- Chill Before Serving: Allow the salad to sit in the refrigerator for at least 10 minutes before serving to enhance the flavors.
- Customize Your Veggies: Feel free to add or substitute your favorite vegetables like snap peas or radishes for added texture and taste.
- Make It Ahead: This salad can be made a few hours in advance; just keep the dressing separate until ready to serve to avoid sogginess.
Tips & Tricks
Achieving the Best Flavor
To get the best flavor in your sesame garlic ramen salad, you can tweak a few ingredients. For a spicy kick, add a teaspoon of chili paste to the dressing. If you want a sweeter taste, increase the honey or maple syrup. Letting the salad rest for about 10 minutes helps the flavors blend. This step makes every bite taste better.
Texture and Freshness Enhancements
Using fresh ingredients is key to a great salad. Choose bright, crisp vegetables. Look for carrots that snap when you break them. For crunch, cut bell peppers and cucumbers just before you serve. This keeps them firm and tasty in the salad. You can also add sliced radishes for extra crunch and color.
Meal Prep and Quick Serving Ideas
If you have leftovers, store them in an airtight container. The salad stays fresh for up to three days in the fridge. To make it a full meal, add proteins like grilled chicken or tofu. You can mix them in or serve on top. This salad is great for lunch or dinner, and it’s easy to make ahead.

Variations
Adding Proteins
You can make your Sesame Garlic Ramen Salad even heartier by adding proteins. Chicken, tofu, or shrimp work great! For chicken, use grilled or rotisserie chicken for ease. For tofu, try marinated varieties for extra flavor. Shrimp should be cooked until pink and tender. Each option adds a nice touch and boosts the protein.
Different Dressings
Want to shake things up? You can swap out the dressing! Try a spicy sriracha sauce for heat or a tangy sesame ginger blend. These flavors can transform the salad completely. Keep experimenting to find your favorite mix. A good dressing makes every bite exciting!
Seasonal Variations
You can adjust your salad based on what’s fresh each season. In spring, add peas or asparagus. Summer calls for juicy tomatoes or corn. In fall, think about roasted carrots or sweet potatoes. Each season brings new flavors, and you can adapt the salad to match. This keeps your meals fun and fresh!
Storage Info
Best Ways to Store Leftovers
To keep your Sesame Garlic Ramen Salad fresh, store it in an airtight container. This helps prevent moisture from ruining the crunch of your veggies. You can keep it in the fridge for about three days. After that, the salad may lose its flavor and texture.
Reheating and Freshening Up
If your salad needs a little boost after storage, don’t worry! You can revive it easily. Just give it a good toss and check if it needs more dressing. If the original dressing gets thick, adding a splash of fresh sesame oil or soy sauce will help.
Freezing Options
Freezing is not the best choice for this salad. The noodles and veggies can become mushy once thawed. However, if you want to freeze components, consider freezing the dressing separately. When you are ready to eat, thaw the dressing in the fridge and mix it with fresh noodles and veggies. This keeps your salad tasty and fresh!
FAQs
Can I make Sesame Garlic Ramen Salad ahead of time?
Yes, you can prepare this salad ahead of time. Cook the ramen noodles and cool them. Chop the veggies and mix them in a bowl. Keep the dressing separate until serving. This helps keep the salad fresh. It will taste better if you let it chill for a bit. Just remember to store it in the fridge.
Is this salad suitable for meal prep?
This salad is perfect for meal prep. It stays fresh in the fridge for about three days. Just make sure to store the dressing separately. When you are ready to eat, shake and mix everything together. You can add protein like chicken or tofu for a complete meal.
What can I substitute for ramen noodles?
If you don’t have ramen noodles, try rice noodles or soba noodles. These are easy to find and tasty. For a gluten-free option, use rice noodles or zucchini noodles. Both of these choices add great texture and flavor.
How long does the dressing last?
Homemade dressing lasts about one week in the fridge. Store it in an airtight container. To keep it fresh longer, add a bit of vinegar. This helps preserve the flavors. Always give it a good shake before using it again.
This blog post covered how to make a fresh and tasty Sesame Garlic Ramen Salad. You learned about the main ingredients, from the ramen noodles to the veggies and herbs. We discussed how to cook, prepare, and mix everything together, plus tips for flavor and texture. You can experiment with proteins and different dressings, too.
In the end, this salad is versatile and full of flavor. Enjoy making it your own!

Sesame Garlic Ramen Salad
Ingredients
4 oz ramen noodles
1 cup shredded carrots
1 bell pepper, thinly sliced
1 cup cucumbers, julienned
1/2 cup red cabbage, shredded
1/4 cup green onions, sliced
1/4 cup sesame seeds (toasted)
1/4 cup cilantro leaves, chopped
For the Dressing:
1/3 cup sesame oil
2 tablespoons soy sauce
2 tablespoons rice vinegar
2 tablespoons honey or maple syrup
3 cloves garlic, minced
1 teaspoon grated fresh ginger
Salt and pepper to taste
Instructions
Begin by cooking the ramen noodles according to package instructions. Drain and rinse under cold water to cool them down.
In a large mixing bowl, combine the cooled ramen noodles, shredded carrots, sliced bell pepper, julienned cucumbers, shredded red cabbage, and sliced green onions. Toss the vegetables with the noodles until they are evenly mixed.
In a separate small bowl, whisk together the sesame oil, soy sauce, rice vinegar, honey (or maple syrup), minced garlic, and grated ginger until well combined. Adjust seasoning with salt and pepper if necessary.
Pour the dressing over the noodle and vegetable mixture. Toss everything together gently until the noodles and vegetables are coated in the dressing.
Lastly, sprinkle the toasted sesame seeds and chopped cilantro over the salad and give it a final toss.
Let the salad sit for about 10 minutes to allow the flavors to meld together before serving.
Prep Time: 15 minutes | Total Time: 25 minutes | Servings: 4
– Presentation Tips: Serve the salad in a large bowl or individual servings, garnishing with additional sesame seeds and cilantro on top for a vibrant finish. You can also place lime wedges alongside for an extra citrusy kick!

Sesame Garlic Ramen Salad
Ingredients
- 4 oz ramen noodles
- 1 cup shredded carrots
- 1 whole bell pepper, thinly sliced
- 1 cup cucumbers, julienned
- 0.5 cup red cabbage, shredded
- 0.25 cup green onions, sliced
- 0.25 cup sesame seeds, toasted
- 0.25 cup cilantro leaves, chopped
- 0.33 cup sesame oil
- 2 tablespoons soy sauce
- 2 tablespoons rice vinegar
- 2 tablespoons honey or maple syrup
- 3 cloves garlic, minced
- 1 teaspoon grated fresh ginger
- to taste salt and pepper
Instructions
- Begin by cooking the ramen noodles according to package instructions. Drain and rinse under cold water to cool them down.
- In a large mixing bowl, combine the cooled ramen noodles, shredded carrots, sliced bell pepper, julienned cucumbers, shredded red cabbage, and sliced green onions. Toss the vegetables with the noodles until they are evenly mixed.
- In a separate small bowl, whisk together the sesame oil, soy sauce, rice vinegar, honey (or maple syrup), minced garlic, and grated ginger until well combined. Adjust seasoning with salt and pepper if necessary.
- Pour the dressing over the noodle and vegetable mixture. Toss everything together gently until the noodles and vegetables are coated in the dressing.
- Lastly, sprinkle the toasted sesame seeds and chopped cilantro over the salad and give it a final toss.
- Let the salad sit for about 10 minutes to allow the flavors to meld together before serving.
- Presentation Tips: Serve the salad in a large bowl or individual servings, garnishing with additional sesame seeds and cilantro on top for a vibrant finish.


![For a hearty bowl of Classic Chicken Tortilla Soup, gather the following: - 1 pound boneless, skinless chicken breasts - 1 tablespoon olive oil - 1 medium onion, chopped - 2 cloves garlic, minced - 1 red bell pepper, diced - 1 can (14.5 ounces) diced tomatoes - 4 cups chicken broth - 1 can (4 ounces) diced green chilies - 1 tablespoon ground cumin - 1 teaspoon smoked paprika - Salt and pepper to taste - 1 cup corn kernels (fresh, frozen, or canned) - 1 lime, juiced - Fresh cilantro, chopped for garnish - Tortilla strips (store-bought or homemade) - Avocado, sliced for serving (optional) - Shredded cheese (Mexican blend or cheddar, optional) Using fresh ingredients can really boost the flavor. I recommend choosing chicken breasts that are plump and firm. When picking your onion, look for one that feels heavy for its size. Opt for garlic with tight, dry skins for the best taste. For spices, always check the date on the label. Fresh spices make a big difference. When it comes to tomatoes, use diced ones in juice, not the ones in sauce. The broth should be low-sodium to control the salt level. If you prefer a richer flavor, use homemade chicken broth. You can elevate your soup with a few tasty garnishes. Fresh avocado adds creaminess. A sprinkle of shredded cheese gives a nice touch. Crispy tortilla strips add crunch and fun. Lastly, do not skip the cilantro; it brightens up the dish. You can also serve it with lime wedges for an extra zing! For a twist, consider adding sliced jalapeños for heat or black beans for more depth. Each addition creates a unique take on this classic dish. To see the full recipe, check out the complete instructions. To start, heat 1 tablespoon of olive oil in a large pot over medium heat. Once it warms, add 1 chopped onion. Sauté the onion for about 5 minutes until it softens. Then, stir in 2 minced garlic cloves and 1 diced red bell pepper. Cook for another 3 minutes until you smell the garlic. Next, add 1 pound of boneless, skinless chicken breasts to the pot. Season the chicken with salt, pepper, 1 tablespoon of ground cumin, and 1 teaspoon of smoked paprika. Cook the chicken for 2-3 minutes, stirring often. After that, pour in 1 can of diced tomatoes, 4 cups of chicken broth, and 1 can of diced green chilies. Stir well, and bring the mixture to a gentle boil. Once it boils, reduce the heat and let it simmer for 20 minutes. This cooks the chicken fully. Once done, take the chicken out of the pot. Let it cool for a bit. Use two forks to shred the chicken into bite-sized pieces. Return the shredded chicken back to the soup. Now, stir in 1 cup of corn kernels and the juice of 1 lime. Taste the soup and adjust the salt and pepper as needed. Let it simmer for 5 more minutes. Start by prepping ingredients first. Chop the onion and red bell pepper before cooking. This saves time and keeps you organized. While the chicken simmers, you can clean up your workspace. This makes cooking feel less chaotic. Also, use a timer for each step, so you stay on track. Lastly, make sure you have all your ingredients ready before you start. This way, you avoid last-minute searching. Shredding chicken can feel tricky, but I have a simple way. First, let the chicken cool after you take it out of the pot. This makes it easier to handle. Use two forks to pull the chicken apart. Hold one fork in each hand. Use the first fork to hold the chicken in place. With the second fork, pull the chicken apart into strips. If you have a stand mixer, you can use it too! Just place the cooked chicken in the bowl and use the paddle attachment. Turn it on low for a few seconds, and watch the chicken shred easily. This method saves time and gives you perfect shreds for your soup! To boost the taste of your soup, try these ideas: - Add a splash of lime juice. It brightens the flavors. - Use fresh herbs like cilantro or oregano. They add depth. - Consider roasted peppers for a smoky touch. They enhance the flavor. - Top your soup with crumbled queso fresco. It adds creaminess. - Spice it up with jalapeños or hot sauce. This adds heat. Many home cooks make a few common errors. Here’s how to avoid them: - Don’t skip the sauté step. It builds flavor in the base. - Be careful not to overcook the chicken. It should be juicy and tender. - Avoid using low-quality broth. Good broth makes a big difference. - Don’t forget to taste as you cook. Adjust seasonings early on. - Skip the tortilla strips at the end. They add a nice crunch. Having the right tools makes cooking easier. Here’s what you need: - A large pot or Dutch oven for cooking. - A sharp knife for chopping. - A cutting board for prep work. - Two forks for shredding chicken. - Ladles for serving soup. For more details, check the [Full Recipe]. {{image_2}} You can make a great vegetarian or vegan tortilla soup. Swap the chicken with hearty beans like black or pinto beans. Use vegetable broth instead of chicken broth for the base. Add more veggies, like zucchini or carrots, to boost flavor and texture. You can use tofu or tempeh for protein. Top your soup with avocado and tortilla strips for crunch. This version remains rich and satisfying. If you love heat, try my spicy version. Add sliced jalapeños or serrano peppers to the pot when you cook the onions. Use a spicier salsa instead of diced tomatoes. You can also add a few dashes of hot sauce right before serving. This will give a nice kick to your soup. Adjust the spice level to your liking, but remember to taste as you go! You can switch ingredients to create a regional twist. For a Southwest flair, add roasted corn or poblano peppers. If you want a Mexican touch, try using hominy instead of corn. Swap fresh cilantro for epazote for a unique flavor. Each change gives your soup a new taste. Let yourself explore and enjoy the cooking process. For the full recipe, check out the detailed instructions above! To keep your chicken tortilla soup fresh, store it in an airtight container. This helps lock in flavor and moisture. Allow the soup to cool to room temperature before sealing the container. It keeps well in the fridge for about 3 to 4 days. Make sure to label the container with the date. This way, you know when it was made. If you want to save your soup for later, freezing is a great option. First, allow the soup to cool completely. Pour the soup into freezer-safe bags or containers. Leave some space at the top, as liquids expand when frozen. The soup stays good for about 2 to 3 months in the freezer. When you’re ready to enjoy it again, simply thaw it overnight in the fridge. When reheating, do so gently to keep the soup tasty. Pour the soup into a pot over medium heat. Stir often to help it heat evenly. If it seems thick, add a bit of chicken broth or water to loosen it up. You can also reheat individual portions in the microwave. Just remember to stir halfway through for even heating. For more details on making this delicious dish, check out the Full Recipe. To make Classic Chicken Tortilla Soup gluten-free, you need to swap out the tortilla strips. Use gluten-free tortilla chips instead. You can also make homemade strips using gluten-free tortillas. Just cut them into strips and bake until crispy. Always check your canned ingredients, like broth and tomatoes, for gluten-free labels. For storing leftover soup, let it cool first. Then, place it in an airtight container. You can store it in the fridge for up to three days. If you want to keep it longer, freeze the soup. Use freezer-safe containers and leave some space for expansion. When you’re ready to eat, just thaw and reheat. Yes, using rotisserie chicken is a great shortcut! It saves time and adds flavor. Just shred the chicken and add it after the soup simmers. This method gives you a tasty dish without much effort. You can still follow the rest of the recipe as usual. For the full recipe, check the details above. This article covered all you need for making chicken tortilla soup. We talked about essential ingredients and their quality. You learned step-by-step instructions and helpful cooking tips. I shared tricks to avoid common mistakes and suggestions for equipment. We explored tasty variations and smart storage methods. Now, you can confidently create a flavorful soup. Enjoy your cooking journey and make it your own!](https://dailydishlab.com/wp-content/uploads/2025/07/be748eb7-43aa-4443-8b13-5155a2eb28e7-768x768.webp)
. In this post, we explored how to make spicy garlic shrimp tacos. We covered key ingredients like shrimp, garlic, and spices. I shared step-by-step instructions for marinating, cooking, and assembling the tacos. We also discussed tips for perfect shrimp and different tortilla options. You can customize these tacos to your taste or use other proteins too. Don’t forget to check out the full recipe for quick reference. Enjoy creating and sharing this tasty meal with friends and family!](https://dailydishlab.com/wp-content/uploads/2025/06/f3f63153-6df6-4664-b699-490f731c66b6-768x768.webp)


