
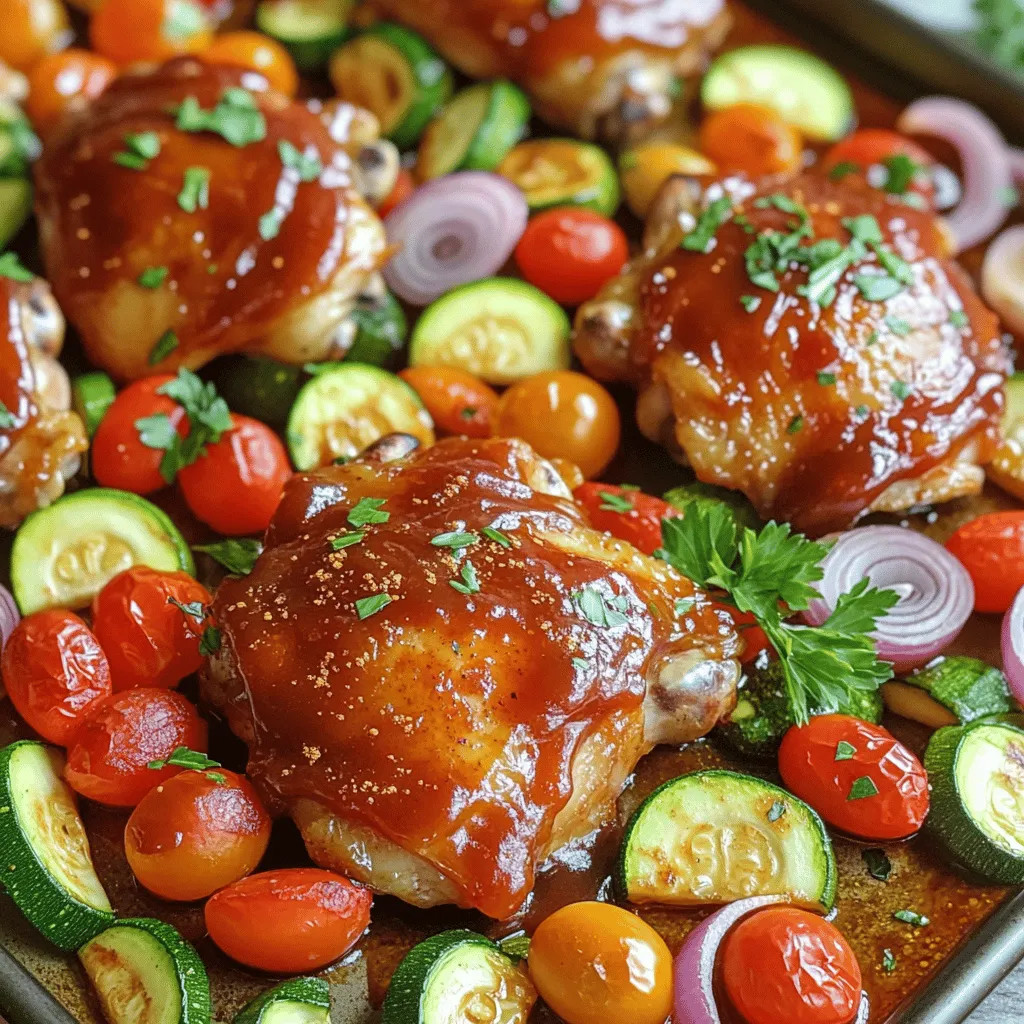
Looking for a simple, tasty meal? This Sheet Pan BBQ Chicken and Veggies recipe is your answer! With juicy chicken thighs, zesty BBQ sauce, and fresh veggies, dinner is easy and fun. I’ll guide you through every step, from prepping to baking. Plus, I’ll share tips for making it extra special. Get ready to impress your family with this quick recipe that packs flavor and joy!
Why I Love This Recipe
- One-Pan Convenience: This recipe allows you to cook both the protein and vegetables on a single sheet pan, making cleanup a breeze!
- Flavorful BBQ Finish: The BBQ sauce adds a deliciously smoky and sweet flavor that perfectly complements the crispy chicken and roasted veggies.
- Healthy and Colorful: With a variety of fresh vegetables, this dish is not only nutritious but also visually appealing, making it a feast for the eyes.
- Quick and Easy: This dish comes together in about 45 minutes, making it perfect for a weeknight dinner without sacrificing flavor.
Ingredients
Main Ingredients
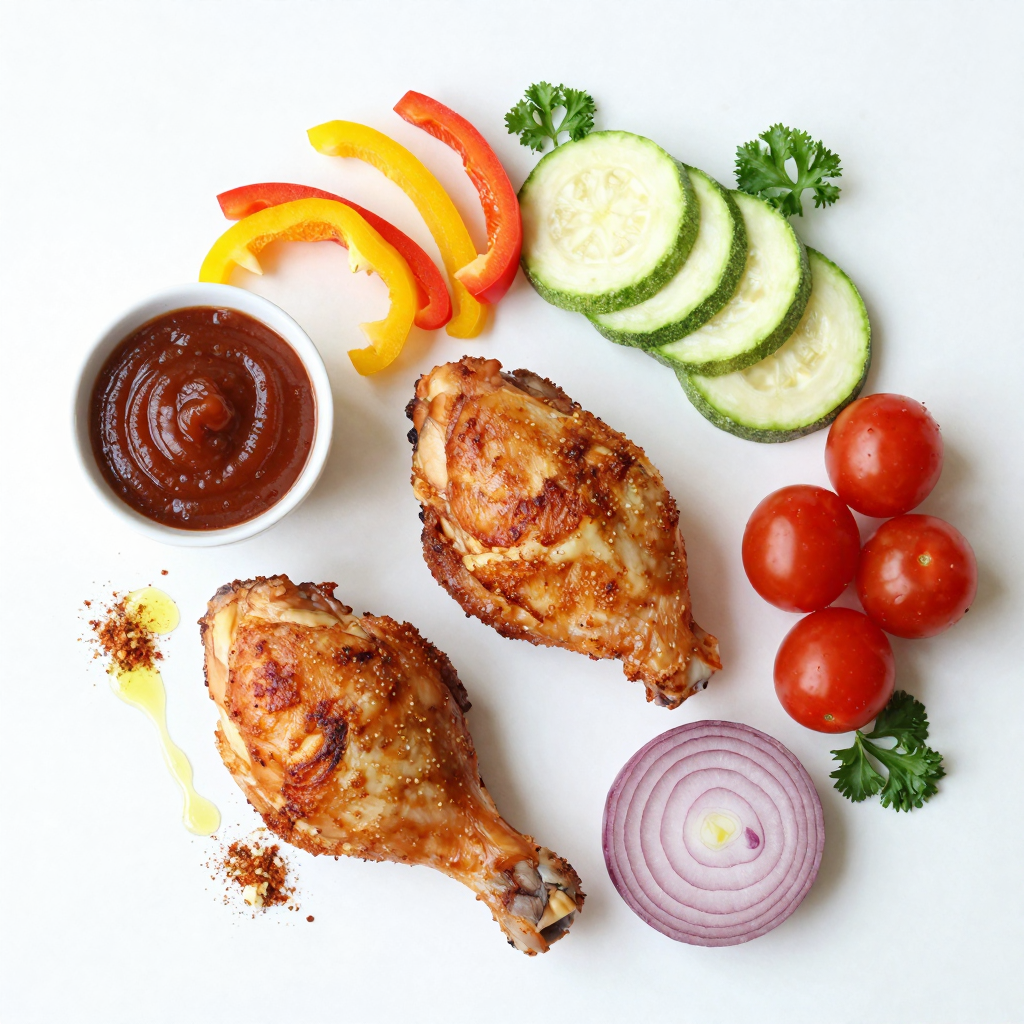
– 4 chicken thighs (bone-in, skin-on for crispiness)
– 1 cup BBQ sauce (your choice)
– 2 medium zucchini, sliced into rounds
– 1 bell pepper (red or yellow), sliced into strips
– 1 cup cherry tomatoes (whole)
– 1 red onion, cut into wedges
The main ingredients give this dish flavor and texture. Chicken thighs work well because they stay juicy. The BBQ sauce adds a sweet and tangy taste. Assorted veggies bring color and crunch. I love using zucchini and bell peppers since they roast nicely. Cherry tomatoes burst with flavor, while red onion adds sweetness.
Seasoning and Oil
– 2 tablespoons olive oil
– 1 teaspoon garlic powder
– 1 teaspoon smoked paprika
– Salt and pepper to taste
Using olive oil helps the veggies get that lovely golden color. Garlic powder gives a nice kick. Smoked paprika adds depth and a hint of smokiness. Salt and pepper are key to enhancing all the flavors. I always taste my veggies before cooking. This way, I know they’re seasoned just right.
Fresh Garnish
– Fresh parsley, chopped (for garnish)
Fresh parsley brightens the dish. It adds a pop of color and a fresh taste. Just chop it finely and sprinkle it on top before serving. It makes the meal look beautiful. If you like, you can also use other herbs like cilantro or basil for a twist.Enjoy making this delicious dish.
Step-by-Step Instructions
Preparing the Chicken
To start, take your chicken thighs. Marinate them in a bowl with half of the BBQ sauce. Make sure they get a nice coat. This adds flavor and moisture. Let them sit while you prep the veggies. This marinating step is key for juicy chicken.
Preparing the Vegetables
Next, grab your veggies. Chop the zucchini, bell pepper, red onion, and cherry tomatoes. I like to slice the zucchini into rounds for even cooking. Toss the veggies in a bowl with olive oil, garlic powder, smoked paprika, salt, and pepper. This blend gives them great taste. Once seasoned, arrange them on the sheet pan. Place them around the edges, leaving space in the middle for the chicken.
Baking
Now, preheat your oven to 425°F (220°C). This high heat helps crisp everything up. After arranging the chicken in the center, pour the remaining BBQ sauce on top. Bake everything for 25-30 minutes. Check that the chicken reaches 165°F (75°C) for safe eating. If you want extra crispness, switch to broil for 3-5 minutes at the end. Keep an eye on it to avoid burning. When done, let it rest for a few minutes before serving. Enjoy your meal!
Pro Tips
- Marinate for Flavor: Allow the chicken to marinate in BBQ sauce for at least 30 minutes, or preferably overnight, to enhance the flavor.
- Even Cooking: Ensure that the chicken thighs are of similar size for even cooking; this will prevent some pieces from being undercooked while others are overcooked.
- Veggie Variations: Feel free to substitute or add other vegetables like asparagus, carrots, or broccoli for variety and nutrition.
- Resting Time: Let the chicken rest for a few minutes after baking; this helps retain its juices and keeps it moist when serving.
Tips & Tricks
Achieving Crispiness
To get that perfect crispiness, you need to broil. Broiling at the end makes the chicken skin crispy. Set your oven to broil for the last 3-5 minutes. Watch closely so it doesn’t burn. Cooking with skin-on chicken is key. The fat in the skin helps keep the meat juicy while adding flavor.
Enhancing Flavor
Marinating is great for flavor. Use your favorite BBQ sauce, but try adding apple cider vinegar or honey. These can boost the taste even more. You can also add spices. Smoked paprika adds a nice smokey flavor. Consider garlic powder or chili powder for a little kick.
Presentation Tips
Serve right from the sheet pan. This gives it a rustic look. If you want a fancier touch, plate each portion separately. Add a sprinkle of fresh parsley on top for color. You can also serve with extra BBQ sauce on the side for dipping.
Variations
Different Proteins
You can swap chicken for many proteins. Try using pork chops or turkey thighs. Both work well with BBQ flavors. If you’re in the mood for red meat, steak can be a tasty choice. Just make sure to adjust cooking times based on the thickness.
For those who prefer plant-based meals, tofu is a great option. It absorbs flavors well. Tempeh is another fantastic choice. Both options can be marinated just like chicken.
Seasonal Vegetables
Using seasonal veggies enhances your dish. In spring, asparagus and snap peas shine. Summer offers a bounty of sweet corn and bell peppers. Fall is perfect for root veggies like carrots and sweet potatoes. Winter calls for hearty options like Brussels sprouts and butternut squash.
Cooking times vary for each veggie. Zucchini takes about 20 minutes, while carrots may need 30 minutes. Always check for tenderness as you cook.
BBQ Sauce Choices
BBQ sauce can make or break your dish. You can use store-bought sauces for convenience. Look for sauces that match your flavor preferences. Sweet, tangy, or spicy options are all available.
If you want a homemade touch, try making your own sauce. Combine ketchup, vinegar, brown sugar, and spices for a quick mix. Experiment with ingredients to find your unique flavor profile.
Storage Info
Storing Leftovers
To keep your Sheet Pan BBQ Chicken and Veggies fresh, cool them down first. Store leftovers in airtight containers. Glass or plastic containers work well. Make sure to use a container that fits the food snugly. This helps prevent spills and keeps the food from drying out. Label the container with the date so you know when to use it.
Reheating
When you’re ready to enjoy your leftovers, there are a few methods to reheat them. The oven is great for keeping the chicken crispy. Preheat your oven to 350°F (175°C). Place the chicken and veggies on a baking sheet and heat for about 15-20 minutes. You can also use a microwave for quick reheating. Just cover the dish with a microwave-safe lid. Make sure the chicken reaches 165°F (75°C) to ensure safety. This helps keep the flavor and moisture intact.
Freezing Options
Yes, you can freeze leftovers! To freeze, place the cooled chicken and veggies in freezer-safe bags or containers. Remove as much air as possible to prevent freezer burn. Mark the date on the bags. They can last up to three months in the freezer. When you’re ready to eat, thaw them in the fridge overnight. For a quicker option, you can use the microwave’s defrost setting. Once thawed, reheat as mentioned above.
FAQs
How long do I bake Sheet Pan BBQ Chicken and Veggies?
Bake the dish at 425°F (220°C) for 25-30 minutes. Check the chicken’s internal temperature. It should reach 165°F (75°C) for safety. The veggies will become tender and flavorful. If you want them crispier, broil for an extra 3-5 minutes at the end.
Can I use boneless chicken?
Yes, you can use boneless chicken. It cooks faster, which is a big plus. However, it may not get as crispy as bone-in chicken. Bone-in chicken has more flavor and moisture, making it great for this dish. Boneless chicken will still taste good, so it’s your choice!
What can I serve with BBQ chicken and veggies?
You can serve many sides with this dish. Here are some ideas:
– Rice: White or brown rice pairs well.
– Potatoes: Mashed or roasted potatoes add heartiness.
– Salad: A fresh green salad gives a nice crunch.
– Cornbread: This adds a sweet touch to the meal.
These sides complement the BBQ chicken and veggies nicely. You can also add a tangy coleslaw for extra crunch and flavor.
You learned how to create a delicious sheet pan BBQ chicken and veggies meal. We covered the main ingredients, like chicken thighs and assorted vegetables, and shared clear steps for preparation and cooking. I gave you tips for crispiness and flavor enhancement, plus ideas for variations and storage.
Remember, cooking is about enjoying the process and sharing good food. Experiment with what you love, and make it your own. Simple meals can be the best! Enjoy your cooking adventure!


