Sheet Pan Chicken Fajitas Flavorful and Easy Meal
 for all the details! {{image_2}} You can easily change the protein in your fajitas. Try using steak or shrimp instead of chicken. Both options add great flavor and texture. For steak, slice it thinly to cook evenly. Shrimp cooks fast, so watch it closely. You can also mix up the veggies. Instead of just bell peppers and onion, consider adding zucchini, mushrooms, or corn. Each veggie brings its own taste. This way, you can create your own flavor profile. If you need a gluten-free option, skip the tortillas and serve the fajitas on a bed of lettuce. This keeps the meal light and crunchy. For a vegetarian version, swap the chicken for black beans or tofu. Season them the same way as chicken. This adds protein and keeps it filling. You can also add extra veggies to enhance the dish. These swaps and modifications make it easy to customize your sheet pan chicken fajitas. Enjoy making them your own! You can find the full recipe above. After cooking, let your fajitas cool down. This helps keep the taste fresh. Store leftovers in the fridge. Use airtight containers to keep them safe. Make sure the lid seals tight to prevent air from getting in. You can keep them in the fridge for up to three days. If you want to save them longer, try freezing them. They will last about three months in the freezer. You can reheat your fajitas in two main ways: the microwave or the oven. - Microwave: Place the fajitas on a microwave-safe plate. Cover them with a damp paper towel to keep moisture. Heat for about one minute. Check if they are warm enough. If not, heat in 30-second bursts until hot. - Oven: Preheat your oven to 350°F (175°C). Place the fajitas on a baking sheet. Cover with foil to keep them moist. Heat for about 10-15 minutes. This method keeps the texture nice and crispy. To keep flavor and texture, avoid overheating. This way, your fajitas taste just as good as when you first made them. Enjoy your meal again with the same great taste! For the full recipe, check the recipe section. How long to bake chicken fajitas? Bake chicken fajitas for 20-25 minutes at 400°F (200°C). Check that the chicken is fully cooked. The veggies should be tender and slightly caramelized. This timing helps the flavors blend well. Can I use frozen chicken for this recipe? Yes, you can use frozen chicken. However, thaw it first to ensure even cooking. If you cook it from frozen, increase the baking time by 10-15 minutes. Always check the chicken’s internal temperature for safety. What toppings go well with fajitas? Toppings can make your fajitas special. Here are some great ideas: - Fresh cilantro - Sour cream - Guacamole - Salsa - Shredded cheese How to make homemade tortillas? Making homemade tortillas is easy and fun. You need flour, water, salt, and oil. Mix the ingredients, knead the dough, and let it rest. Then, roll out small balls and cook them on a hot skillet. This adds a fresh touch to your fajitas. What sauces pair best with chicken fajitas? Many sauces can enhance your chicken fajitas. A few popular choices are: - Salsa verde - Chipotle sauce - Creamy ranch dressing - Spicy barbecue sauce These sauces add extra flavor and make each bite even better. This blog post covered how to make delicious sheet pan chicken fajitas. We discussed the key ingredients, preparation steps, and cooking instructions. I shared tips for perfecting your dish and suggested ways to serve it. We also explored ingredient swaps and dietary options to suit your needs. Lastly, I provided storage and reheating advice to enjoy leftovers. With these insights, you can create flavorful fajitas that impress your family and friends. Enjoy your cooking adventure!](https://dailydishlab.com/wp-content/uploads/2025/06/92060734-80b3-49a4-9e1c-290f85b37bb8.webp)
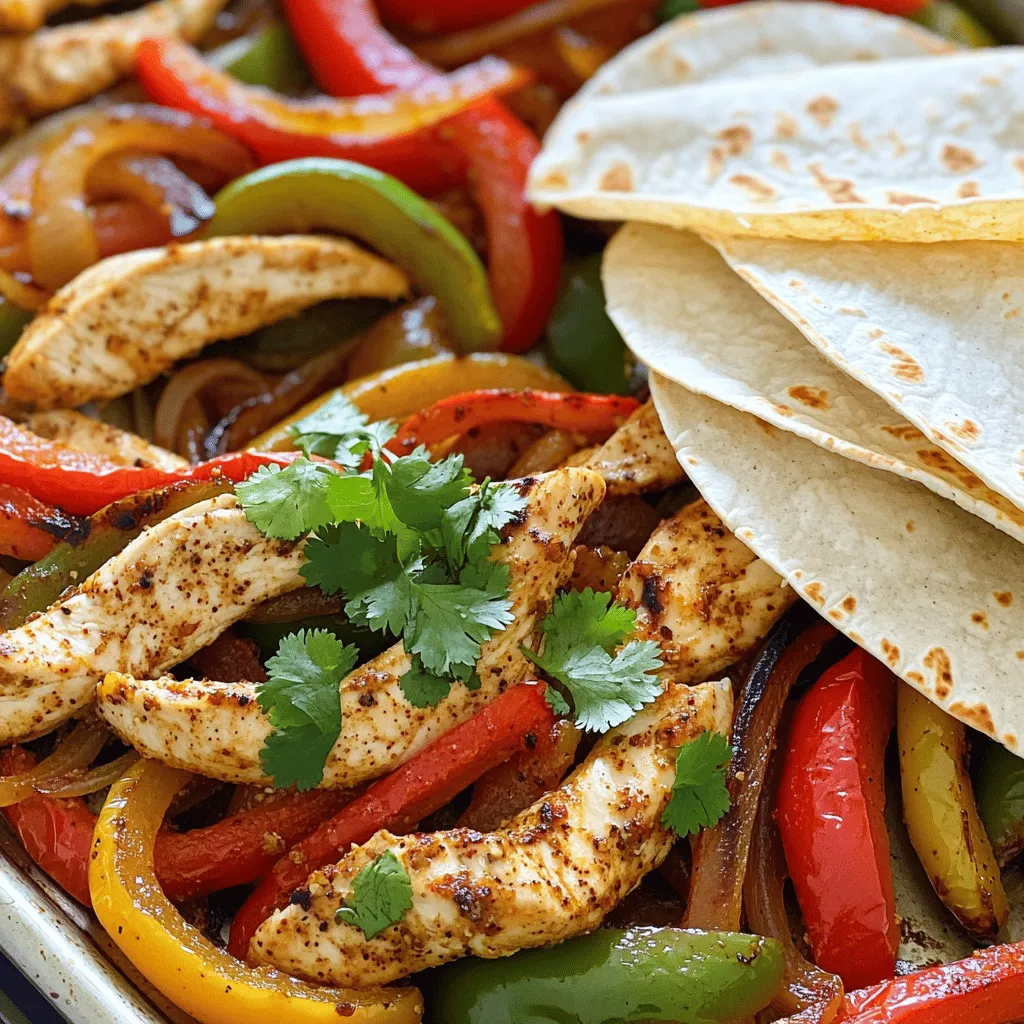
Welcome to a tasty adventure with my Sheet Pan Chicken Fajitas! This dish packs vibrant flavors and is super simple to make. With just one pan, you’ll have a complete meal that’s sure to please your family. Whether you’re a busy parent or a beginner cook, I’ll guide you through each step. Grab your ingredients, and let’s create something delicious that everyone will love!
Why I Love This Recipe
- Quick and Easy: This recipe is incredibly simple, making it perfect for busy weeknights when you want a homemade meal without a lot of fuss.
- Flavorful: The combination of spices infuses the chicken and vegetables with vibrant flavors that will make your taste buds dance.
- One-Pan Wonder: Cooking everything on a single sheet pan means less cleanup, allowing you to enjoy your meal without the hassle of doing dishes.
- Customizable: You can easily modify this recipe to include your favorite vegetables or adjust the spices to suit your taste preferences.
Ingredients
Main Ingredients for Sheet Pan Chicken Fajitas
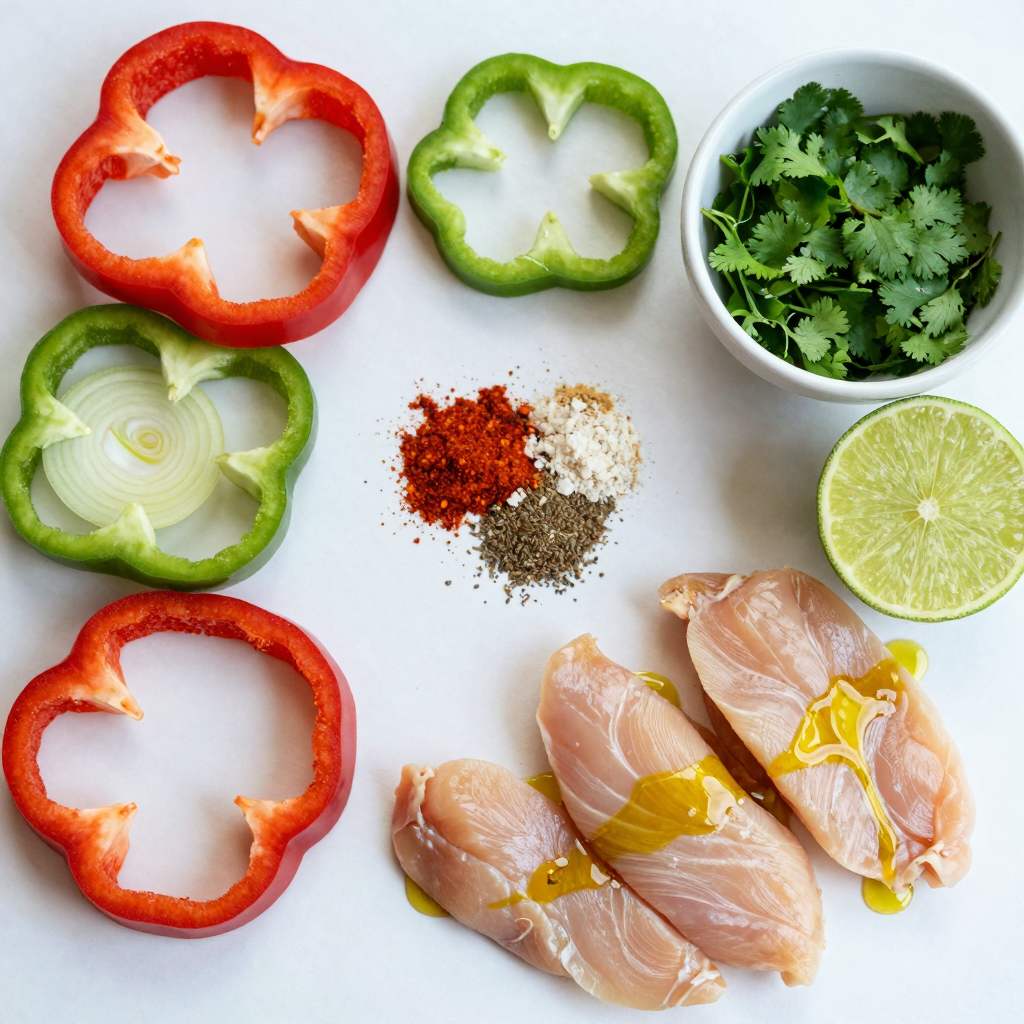
- 1 lb boneless, skinless chicken breasts, sliced into strips
- 1 red bell pepper, sliced
- 1 green bell pepper, sliced
- 1 yellow onion, sliced
- 3 tablespoons olive oil
- 2 teaspoons chili powder
- 1 teaspoon cumin
- 1 teaspoon smoked paprika
- ½ teaspoon garlic powder
- ½ teaspoon onion powder
- Salt and pepper to taste
The main ingredients for Sheet Pan Chicken Fajitas are simple but full of flavor. The chicken gives a hearty base, while the peppers and onion add a sweet crunch. Olive oil helps the spices stick and keeps everything moist.
Optional Ingredients for Added Flavor
- Juice of 1 lime
- Fresh cilantro, chopped (for garnish)
- Tortillas (for serving)
To enhance the taste, add lime juice for a zesty kick. Fresh cilantro brightens the dish and adds color. Don’t forget to serve it with warm tortillas for a complete meal. These extra touches make your fajitas pop with flavor.

Step-by-Step Instructions
Preparation Steps
1. Preheat the oven: First, set your oven to 400°F (200°C). This step ensures your fajitas cook evenly and quickly.
2. Prepare the chicken and veggies: Take 1 lb of boneless, skinless chicken breasts and slice them into strips. Next, slice one red bell pepper, one green bell pepper, and one yellow onion. It’s fun to add colors to your dish!
3. Season the mixture: In a large mixing bowl, combine the chicken and veggies. Drizzle 3 tablespoons of olive oil over them. Then, sprinkle in 2 teaspoons of chili powder, 1 teaspoon of cumin, 1 teaspoon of smoked paprika, ½ teaspoon of garlic powder, and ½ teaspoon of onion powder. Add salt and pepper to taste. Squeeze in the juice of 1 lime and toss everything together. Make sure the chicken and veggies are well coated!
Cooking Instructions
1. Arrange on a sheet pan: Spread the seasoned chicken and veggies evenly on a large sheet pan. Keep them in a single layer for even cooking. This helps everything cook perfectly and brown nicely.
2. Bake in the oven: Place the sheet pan in the preheated oven. Bake for 20-25 minutes. Check that the chicken is cooked through and the veggies are tender and slightly caramelized.
3. Garnish and serve: After baking, take the pan out of the oven. Sprinkle chopped fresh cilantro on top for added flavor and color. Serve the fajitas with warm tortillas, letting everyone fill their own wraps with the tasty chicken and veggies.
Pro Tips
- Use Fresh Ingredients: Fresh vegetables and chicken will provide the best flavor and texture. Try to use organic produce if possible for an even better taste.
- Don’t Overcrowd the Pan: Ensure the chicken and vegetables are in a single layer on the sheet pan to allow for even cooking and caramelization.
- Customize Your Seasoning: Feel free to adjust the spices according to your taste preferences. Adding a pinch of cayenne can give it an extra kick!
- Serve with Variety: Enhance your fajitas by offering a variety of toppings such as guacamole, salsa, or sour cream for a more customized meal experience.
Tips & Tricks
Cooking Tips for Perfect Fajitas
To make great fajitas, ensure everything cooks evenly. Spread the chicken and veggies in a single layer on your sheet pan. This helps them cook well, without steaming. If they crowd each other, they can become soggy.
Keep an eye on the cooking time. Bake the fajitas at 400°F (200°C) for 20-25 minutes. Check the chicken for doneness. It should reach an internal temperature of 165°F (74°C). The veggies should be tender and a bit caramelized for the best flavor.
Serving Suggestions
Presentation can make your meal more fun! Serve your fajitas with colorful plates. Add salsa, guacamole, and sour cream on the side. These add extra taste and make your meal look great.
For side dishes, consider serving rice or beans. They pair well with the fajitas and make a filling meal. You could also add a fresh salad for a refreshing crunch.

Variations
Ingredient Swaps
You can easily change the protein in your fajitas. Try using steak or shrimp instead of chicken. Both options add great flavor and texture. For steak, slice it thinly to cook evenly. Shrimp cooks fast, so watch it closely.
You can also mix up the veggies. Instead of just bell peppers and onion, consider adding zucchini, mushrooms, or corn. Each veggie brings its own taste. This way, you can create your own flavor profile.
Dietary Modifications
If you need a gluten-free option, skip the tortillas and serve the fajitas on a bed of lettuce. This keeps the meal light and crunchy.
For a vegetarian version, swap the chicken for black beans or tofu. Season them the same way as chicken. This adds protein and keeps it filling. You can also add extra veggies to enhance the dish.
These swaps and modifications make it easy to customize your sheet pan chicken fajitas. Enjoy making them your own!
Storage Info
How to Store Leftovers
After cooking, let your fajitas cool down. This helps keep the taste fresh. Store leftovers in the fridge. Use airtight containers to keep them safe. Make sure the lid seals tight to prevent air from getting in. You can keep them in the fridge for up to three days. If you want to save them longer, try freezing them. They will last about three months in the freezer.
Reheating Instructions
You can reheat your fajitas in two main ways: the microwave or the oven.
- Microwave: Place the fajitas on a microwave-safe plate. Cover them with a damp paper towel to keep moisture. Heat for about one minute. Check if they are warm enough. If not, heat in 30-second bursts until hot.
- Oven: Preheat your oven to 350°F (175°C). Place the fajitas on a baking sheet. Cover with foil to keep them moist. Heat for about 10-15 minutes. This method keeps the texture nice and crispy.
To keep flavor and texture, avoid overheating. This way, your fajitas taste just as good as when you first made them. Enjoy your meal again with the same great taste!
FAQs
Common Questions About Sheet Pan Chicken Fajitas
How long to bake chicken fajitas?
Bake chicken fajitas for 20-25 minutes at 400°F (200°C). Check that the chicken is fully cooked. The veggies should be tender and slightly caramelized. This timing helps the flavors blend well.
Can I use frozen chicken for this recipe?
Yes, you can use frozen chicken. However, thaw it first to ensure even cooking. If you cook it from frozen, increase the baking time by 10-15 minutes. Always check the chicken’s internal temperature for safety.
What toppings go well with fajitas?
Toppings can make your fajitas special. Here are some great ideas:
- Fresh cilantro
- Sour cream
- Guacamole
- Salsa
- Shredded cheese
Related Recipe Inquiries
How to make homemade tortillas?
Making homemade tortillas is easy and fun. You need flour, water, salt, and oil. Mix the ingredients, knead the dough, and let it rest. Then, roll out small balls and cook them on a hot skillet. This adds a fresh touch to your fajitas.
What sauces pair best with chicken fajitas?
Many sauces can enhance your chicken fajitas. A few popular choices are:
- Salsa verde
- Chipotle sauce
- Creamy ranch dressing
- Spicy barbecue sauce
These sauces add extra flavor and make each bite even better.
This blog post covered how to make delicious sheet pan chicken fajitas. We discussed the key ingredients, preparation steps, and cooking instructions. I shared tips for perfecting your dish and suggested ways to serve it. We also explored ingredient swaps and dietary options to suit your needs. Lastly, I provided storage and reheating advice to enjoy leftovers.
With these insights, you can create flavorful fajitas that impress your family and friends. Enjoy your cooking adventure!
 for all the details! {{image_2}} You can easily change the protein in your fajitas. Try using steak or shrimp instead of chicken. Both options add great flavor and texture. For steak, slice it thinly to cook evenly. Shrimp cooks fast, so watch it closely. You can also mix up the veggies. Instead of just bell peppers and onion, consider adding zucchini, mushrooms, or corn. Each veggie brings its own taste. This way, you can create your own flavor profile. If you need a gluten-free option, skip the tortillas and serve the fajitas on a bed of lettuce. This keeps the meal light and crunchy. For a vegetarian version, swap the chicken for black beans or tofu. Season them the same way as chicken. This adds protein and keeps it filling. You can also add extra veggies to enhance the dish. These swaps and modifications make it easy to customize your sheet pan chicken fajitas. Enjoy making them your own! You can find the full recipe above. After cooking, let your fajitas cool down. This helps keep the taste fresh. Store leftovers in the fridge. Use airtight containers to keep them safe. Make sure the lid seals tight to prevent air from getting in. You can keep them in the fridge for up to three days. If you want to save them longer, try freezing them. They will last about three months in the freezer. You can reheat your fajitas in two main ways: the microwave or the oven. - Microwave: Place the fajitas on a microwave-safe plate. Cover them with a damp paper towel to keep moisture. Heat for about one minute. Check if they are warm enough. If not, heat in 30-second bursts until hot. - Oven: Preheat your oven to 350°F (175°C). Place the fajitas on a baking sheet. Cover with foil to keep them moist. Heat for about 10-15 minutes. This method keeps the texture nice and crispy. To keep flavor and texture, avoid overheating. This way, your fajitas taste just as good as when you first made them. Enjoy your meal again with the same great taste! For the full recipe, check the recipe section. How long to bake chicken fajitas? Bake chicken fajitas for 20-25 minutes at 400°F (200°C). Check that the chicken is fully cooked. The veggies should be tender and slightly caramelized. This timing helps the flavors blend well. Can I use frozen chicken for this recipe? Yes, you can use frozen chicken. However, thaw it first to ensure even cooking. If you cook it from frozen, increase the baking time by 10-15 minutes. Always check the chicken’s internal temperature for safety. What toppings go well with fajitas? Toppings can make your fajitas special. Here are some great ideas: - Fresh cilantro - Sour cream - Guacamole - Salsa - Shredded cheese How to make homemade tortillas? Making homemade tortillas is easy and fun. You need flour, water, salt, and oil. Mix the ingredients, knead the dough, and let it rest. Then, roll out small balls and cook them on a hot skillet. This adds a fresh touch to your fajitas. What sauces pair best with chicken fajitas? Many sauces can enhance your chicken fajitas. A few popular choices are: - Salsa verde - Chipotle sauce - Creamy ranch dressing - Spicy barbecue sauce These sauces add extra flavor and make each bite even better. This blog post covered how to make delicious sheet pan chicken fajitas. We discussed the key ingredients, preparation steps, and cooking instructions. I shared tips for perfecting your dish and suggested ways to serve it. We also explored ingredient swaps and dietary options to suit your needs. Lastly, I provided storage and reheating advice to enjoy leftovers. With these insights, you can create flavorful fajitas that impress your family and friends. Enjoy your cooking adventure!](https://dailydishlab.com/wp-content/uploads/2025/06/92060734-80b3-49a4-9e1c-290f85b37bb8-300x300.webp)
Sheet Pan Chicken Fajitas
Ingredients
1 lb boneless, skinless chicken breasts, sliced into strips
1 red bell pepper, sliced
1 green bell pepper, sliced
1 yellow onion, sliced
3 tablespoons olive oil
2 teaspoons chili powder
1 teaspoon cumin
1 teaspoon smoked paprika
½ teaspoon garlic powder
½ teaspoon onion powder
Salt and pepper to taste
Juice of 1 lime
Fresh cilantro, chopped (for garnish)
Tortillas (for serving)
Instructions
Preheat the oven to 400°F (200°C).
Prepare the chicken and veggies: In a large mixing bowl, combine the sliced chicken, bell peppers, and onion.
Season the mixture: Drizzle the olive oil over the chicken and veggies. Add the chili powder, cumin, smoked paprika, garlic powder, onion powder, salt, and pepper. Squeeze in the lime juice and toss everything together until coated well.
Arrange on a sheet pan: Spread the seasoned chicken and vegetables evenly on a large sheet pan, ensuring they are in a single layer for even cooking.
Bake in the oven: Place the sheet pan in the preheated oven and bake for 20-25 minutes, until the chicken is cooked through and the vegetables are tender and slightly caramelized.
Garnish: Once out of the oven, sprinkle chopped fresh cilantro over the top for added flavor and color.
Serve: Serve the fajitas with warm tortillas, allowing people to fill their own wraps with the chicken and veggies.
Prep Time: 10 minutes | Total Time: 35 minutes | Servings: 4
– Presentation Tips: Consider serving the fajitas with a side of salsa, guacamole, and a small bowl of sour cream to enhance the dining experience. You can also serve them on colorful plates for a festive look!
 for all the details! {{image_2}} You can easily change the protein in your fajitas. Try using steak or shrimp instead of chicken. Both options add great flavor and texture. For steak, slice it thinly to cook evenly. Shrimp cooks fast, so watch it closely. You can also mix up the veggies. Instead of just bell peppers and onion, consider adding zucchini, mushrooms, or corn. Each veggie brings its own taste. This way, you can create your own flavor profile. If you need a gluten-free option, skip the tortillas and serve the fajitas on a bed of lettuce. This keeps the meal light and crunchy. For a vegetarian version, swap the chicken for black beans or tofu. Season them the same way as chicken. This adds protein and keeps it filling. You can also add extra veggies to enhance the dish. These swaps and modifications make it easy to customize your sheet pan chicken fajitas. Enjoy making them your own! You can find the full recipe above. After cooking, let your fajitas cool down. This helps keep the taste fresh. Store leftovers in the fridge. Use airtight containers to keep them safe. Make sure the lid seals tight to prevent air from getting in. You can keep them in the fridge for up to three days. If you want to save them longer, try freezing them. They will last about three months in the freezer. You can reheat your fajitas in two main ways: the microwave or the oven. - Microwave: Place the fajitas on a microwave-safe plate. Cover them with a damp paper towel to keep moisture. Heat for about one minute. Check if they are warm enough. If not, heat in 30-second bursts until hot. - Oven: Preheat your oven to 350°F (175°C). Place the fajitas on a baking sheet. Cover with foil to keep them moist. Heat for about 10-15 minutes. This method keeps the texture nice and crispy. To keep flavor and texture, avoid overheating. This way, your fajitas taste just as good as when you first made them. Enjoy your meal again with the same great taste! For the full recipe, check the recipe section. How long to bake chicken fajitas? Bake chicken fajitas for 20-25 minutes at 400°F (200°C). Check that the chicken is fully cooked. The veggies should be tender and slightly caramelized. This timing helps the flavors blend well. Can I use frozen chicken for this recipe? Yes, you can use frozen chicken. However, thaw it first to ensure even cooking. If you cook it from frozen, increase the baking time by 10-15 minutes. Always check the chicken’s internal temperature for safety. What toppings go well with fajitas? Toppings can make your fajitas special. Here are some great ideas: - Fresh cilantro - Sour cream - Guacamole - Salsa - Shredded cheese How to make homemade tortillas? Making homemade tortillas is easy and fun. You need flour, water, salt, and oil. Mix the ingredients, knead the dough, and let it rest. Then, roll out small balls and cook them on a hot skillet. This adds a fresh touch to your fajitas. What sauces pair best with chicken fajitas? Many sauces can enhance your chicken fajitas. A few popular choices are: - Salsa verde - Chipotle sauce - Creamy ranch dressing - Spicy barbecue sauce These sauces add extra flavor and make each bite even better. This blog post covered how to make delicious sheet pan chicken fajitas. We discussed the key ingredients, preparation steps, and cooking instructions. I shared tips for perfecting your dish and suggested ways to serve it. We also explored ingredient swaps and dietary options to suit your needs. Lastly, I provided storage and reheating advice to enjoy leftovers. With these insights, you can create flavorful fajitas that impress your family and friends. Enjoy your cooking adventure!](https://dailydishlab.com/wp-content/uploads/2025/06/92060734-80b3-49a4-9e1c-290f85b37bb8-300x300.webp)
Sheet Pan Chicken Fajitas
Ingredients
- 1 lb boneless, skinless chicken breasts, sliced into strips
- 1 red bell pepper, sliced
- 1 green bell pepper, sliced
- 1 yellow onion, sliced
- 3 tablespoons olive oil
- 2 teaspoons chili powder
- 1 teaspoon cumin
- 1 teaspoon smoked paprika
- ½ teaspoon garlic powder
- ½ teaspoon onion powder
- Salt and pepper to taste
- 1 Juice of lime
- Fresh cilantro, chopped (for garnish)
- Tortillas (for serving)
Instructions
- Preheat the oven to 400°F (200°C).
- In a large mixing bowl, combine the sliced chicken, bell peppers, and onion.
- Drizzle the olive oil over the chicken and veggies. Add the chili powder, cumin, smoked paprika, garlic powder, onion powder, salt, and pepper. Squeeze in the lime juice and toss everything together until coated well.
- Spread the seasoned chicken and vegetables evenly on a large sheet pan, ensuring they are in a single layer for even cooking.
- Place the sheet pan in the preheated oven and bake for 20-25 minutes, until the chicken is cooked through and the vegetables are tender and slightly caramelized.
- Once out of the oven, sprinkle chopped fresh cilantro over the top for added flavor and color.
- Serve the fajitas with warm tortillas, allowing people to fill their own wraps with the chicken and veggies.


![- 2 cans (15 oz each) of white beans (cannellini or great northern), drained and rinsed - 1 medium onion, chopped - 4 cloves garlic, minced - 4 cups vegetable broth - 1 cup coconut milk (or heavy cream for a richer flavor) - 2 tablespoons olive oil - 1 teaspoon dried thyme - 1 teaspoon smoked paprika - Salt and pepper to taste - Fresh parsley, chopped (for garnish) When making creamy garlic white bean soup, you need simple and fresh ingredients. White beans serve as the base. They provide creaminess and protein. I prefer cannellini or great northern beans. Both are soft and smooth. A medium onion adds depth and sweetness to the soup. Garlic brings strong flavor. I use four cloves for a nice kick. Vegetable broth adds rich taste. You can use homemade or store-bought broth. Coconut milk gives the soup its creamy texture. For a richer taste, heavy cream works well too. Olive oil is essential for sautéing the onion and garlic. Dried thyme and smoked paprika add warmth and earthiness. Season with salt and pepper to make the flavors pop. Finally, fresh parsley brightens the dish when you serve it. This soup is easy to make and very satisfying. You can find the full recipe for this dish above. This soup is not only tasty but also healthy. It is high in fiber and protein due to the beans. The coconut milk adds healthy fats. Each serving provides a good balance of nutrients. You can change some ingredients to suit your taste. If you want a different bean, try chickpeas or navy beans. Red onion works well instead of yellow. For a spicy kick, add a pinch of red pepper flakes. If you need a dairy-free option, stick with coconut milk. This soup is flexible and can fit many diets. Start by gathering all your ingredients. You need two cans of white beans, an onion, garlic, vegetable broth, coconut milk, olive oil, dried thyme, smoked paprika, salt, and pepper. Chop the onion into small pieces. Mince the garlic cloves. Drain and rinse the beans well to remove excess sodium. This prep work makes cooking quick and easy. In a large pot, heat the olive oil over medium heat. Once hot, add the chopped onion. Sauté for about five minutes or until the onion turns clear. Next, add the minced garlic. Cook it for two more minutes. This helps to release the garlic’s flavor. Stir in the drained white beans, thyme, smoked paprika, salt, and pepper. Mix everything well to coat the beans in flavor. Now, pour in the vegetable broth. Bring the mixture to a boil. When it starts to boil, lower the heat and let it simmer for 15 to 20 minutes. This time allows the flavors to blend. After simmering, it’s time to blend the soup. I recommend using an immersion blender for this. Blend until the soup is smooth and creamy. If you want some texture, blend just half of the soup. This way, you still have chunks of beans to enjoy. Stir in the coconut milk and heat the soup for another five minutes. Taste it and adjust the seasoning if needed. Serve hot and garnish with fresh parsley. For the full recipe, check out the details above. Enjoy your creamy garlic white bean soup! To make your soup nice and creamy, blend well. I use an immersion blender. This tool lets you puree the soup right in the pot. If you want some texture, blend only half. For extra creaminess, add coconut milk or heavy cream. This makes the soup rich and smooth. Good seasonings can make a big difference. I love using dried thyme and smoked paprika. These give the soup depth and warmth. You can also add a pinch of cayenne for some heat. Don't forget to taste and adjust the salt and pepper. This will bring out all the flavors. Serve your soup hot, topped with fresh parsley. This adds color and a fresh taste. You can pair it with crusty bread or a light salad. For a complete meal, try adding grilled chicken or sautéed greens. Enjoy it with friends or family for a cozy meal. Check out the Full Recipe for more tips! {{image_2}} You can easily add protein to your creamy garlic white bean soup. For a heartier meal, try adding cooked chicken or turkey. Just shred the meat and stir it in during the last few minutes of cooking. If you want a plant-based option, add cooked quinoa or chickpeas. Both will blend well with the creamy texture of the soup without overpowering its flavor. This soup is naturally vegetarian. To make it vegan, simply use coconut milk instead of heavy cream. The coconut milk gives a rich taste and keeps it creamy. You can also add nutritional yeast for a cheesy flavor without dairy. This way, you can enjoy a warm, fulfilling dish that fits your dietary needs. To boost the flavor, try adding fresh herbs like rosemary or basil. They add a nice touch and aroma. You can also play with spices. A pinch of red pepper flakes gives a nice kick. If you love a smoky flavor, add more smoked paprika. For a fresh twist, squeeze a little lemon juice right before serving. These simple changes keep the soup exciting each time you make it. For the full recipe, check out the detailed cooking steps! Store any leftover creamy garlic white bean soup in an airtight container. Make sure it is cool before sealing the lid. You can keep it in the fridge for up to four days. If you want to enjoy it later, storing it properly will keep it fresh. You can freeze this soup for longer storage. Use freezer-safe containers or bags. Leave some space at the top, as the soup will expand when it freezes. The soup can last in the freezer for up to three months. When you're ready to eat it, thaw it in the fridge overnight. To reheat the soup, pour it into a pot over medium heat. Stir it gently as it warms. You can also microwave it in a safe bowl. Heat in short bursts, stirring in between. If the soup seems too thick, add a splash of vegetable broth or water to reach your desired consistency. Enjoy it warm for a cozy meal! For the full recipe, check out the link provided. Creamy garlic white bean soup lasts about 4 to 5 days in the fridge. Keep it in a sealed container. This way, it stays fresh and safe to eat. Always check for any off smells or changes in color before enjoying leftovers. Yes, you can use dried beans. Just soak them overnight before cooking. Use about 1 cup of dried beans for this soup recipe. After soaking, cook them until tender, then follow the recipe as usual. This adds a nice texture and flavor to your soup. You can serve white bean soup with crusty bread or a fresh salad. Grilled cheese sandwiches also pair nicely. For a heartier meal, try a side of roasted vegetables. These sides can bring out the yummy garlic flavor in the soup. Yes, you can make this soup ahead of time. It tastes even better the next day as the flavors blend. Just store it in the fridge after cooking. Reheat it on the stove when ready to serve. Absolutely! This soup is packed with fiber and plant-based protein. White beans are great for your heart. The garlic adds flavor and has health benefits too. It’s a wholesome choice for any meal. Yes, this soup freezes well. Let it cool completely before transferring it to freezer-safe containers. It can last for up to 3 months in the freezer. Just thaw in the fridge overnight and reheat when ready to eat. If you want a kick, add red pepper flakes or hot sauce. Stir in these spicy additions during cooking. This will give your creamy garlic white bean soup a warm, zesty flavor that wakes up your taste buds. For a richer flavor, you can use heavy cream instead of coconut milk. This will give the soup a creamier texture. You can also add more garlic for a stronger taste. Experiment with flavors to find your perfect mix. To make the soup more filling, add diced potatoes or carrots during cooking. You can also stir in cooked grains like quinoa or rice. These options will add bulk and nutrients to your meal. Yes! Fresh parsley adds a nice touch. You can also use croutons or a drizzle of olive oil for extra flavor. Garnishing makes the soup look appealing and adds a bit of crunch. For the full recipe, check out the [Full Recipe]. This blog post covered how to make creamy garlic white bean soup. We went through ingredients, nutritional info, and cooking steps. I shared tips for a creamy texture and flavor must-haves. You learned about serving options and variations too. In summary, this soup is easy and healthy. Feel free to customize it to fit your taste. Enjoy making it for friends, family, or yourself!](https://dailydishlab.com/wp-content/uploads/2025/07/b682e594-aaaa-4098-8015-8011c3b1faa4-768x768.webp)

