Sheet Pan Greek Chicken & Potatoes Flavorful Meal

Looking for a quick, tasty meal? My Sheet Pan Greek Chicken & Potatoes recipe delivers bold flavors and easy cleanup. You’ll love how juicy chicken thighs pair with tender Yukon Gold potatoes and bright cherry tomatoes. In just a few simple steps, you can enjoy a restaurant-quality dish right at home. Ready to impress your taste buds? Let’s dive into this flavorful meal that surely will become a family favorite!
Why I Love This Recipe
- Easy Preparation: This sheet pan meal simplifies dinner by allowing you to cook everything on one pan, saving time on cleanup.
- Flavorful Marinade: The combination of olive oil, lemon juice, and spices infuses the chicken with incredible flavor.
- Versatile Ingredients: With chicken, potatoes, and fresh veggies, this dish is both hearty and healthy, perfect for any occasion.
- Garnish Options: The addition of fresh parsley and feta cheese adds a burst of flavor and freshness that elevates the dish.
Ingredients
Main Ingredients
- 4 boneless, skinless chicken thighs
- 4 medium Yukon Gold potatoes, cubed
- 1 red onion, cut into wedges
- 1 cup cherry tomatoes, halved
Marinade Ingredients
- 1/4 cup olive oil
- 2 tablespoons lemon juice
- 3 cloves garlic, minced
- 2 teaspoons dried oregano
- 1 teaspoon paprika
- Salt and pepper to taste
Optional Garnishes
- Fresh parsley, chopped, for garnish
- Feta cheese, crumbled, for garnish (optional)
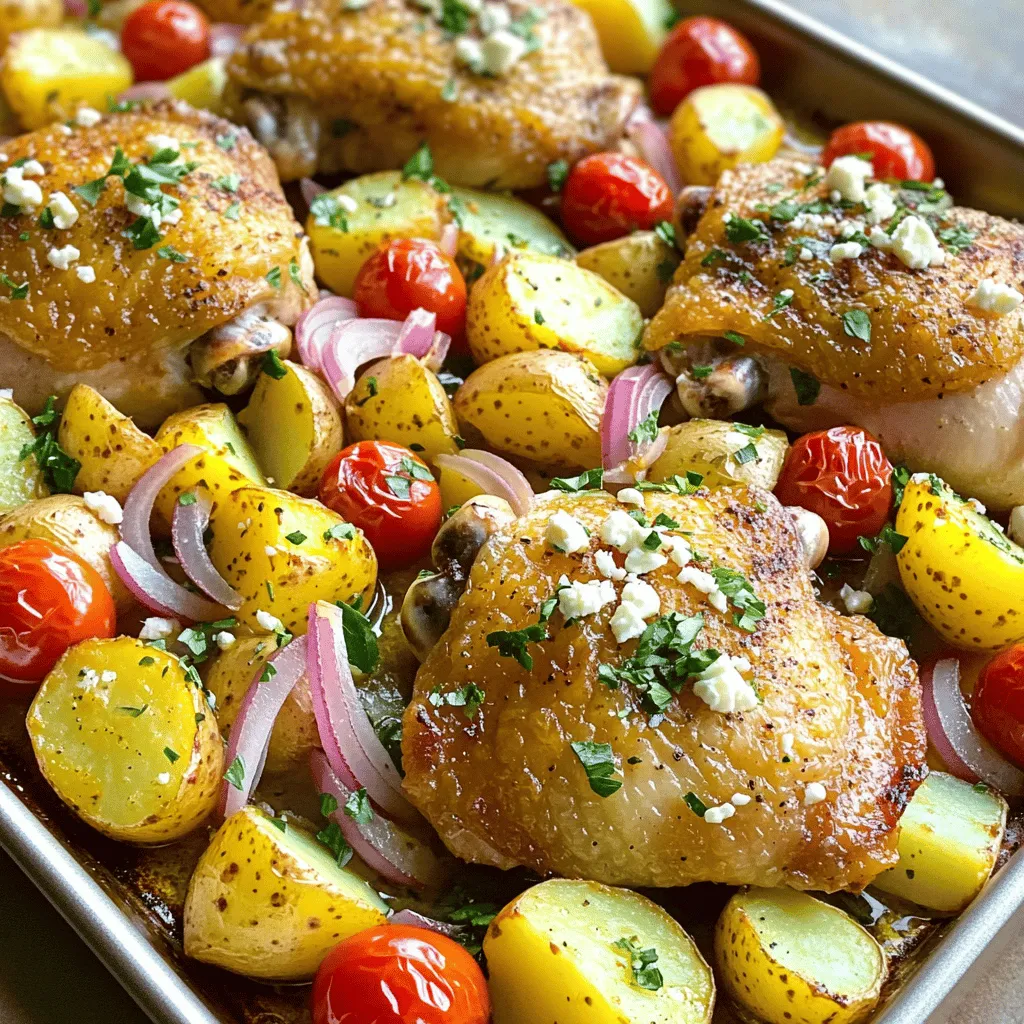
The main ingredients in this dish are simple yet full of flavor. I love using chicken thighs since they stay juicy while cooking. Yukon Gold potatoes add a creamy texture. Red onion brings sweetness, and cherry tomatoes add a burst of freshness.
The marinade is what makes this meal special. Olive oil keeps everything moist. The acid from lemon juice brightens the dish. Garlic adds depth, while oregano and paprika give it that Greek flair. Don’t forget salt and pepper to enhance all the flavors!
For a finishing touch, consider garnishing with fresh parsley and feta cheese. This adds color and a salty kick. These ingredients create a delightful mix that you and your family will enjoy.

Step-by-Step Instructions
Preparation Steps
- Preheat oven to 400°F (200°C).
- In a large bowl, mix olive oil, lemon juice, minced garlic, oregano, paprika, salt, and pepper. Whisk well until combined.
Combining Ingredients
- Add chicken thighs to the bowl. Coat them well with the marinade. Let the chicken sit for at least 15 minutes. For deeper flavor, marinate for up to 2 hours in the fridge.
- On a large sheet pan, arrange cubed Yukon Gold potatoes and red onion wedges. Drizzle some olive oil over them. Season with salt, pepper, and half of the dried oregano. Toss everything to coat evenly.
Baking
- Remove the marinated chicken from the bowl and place it on the sheet pan with the veggies. Pour any leftover marinade over the chicken for extra flavor.
- Scatter the halved cherry tomatoes around the chicken and potatoes on the sheet pan.
- Bake in the preheated oven for 35-40 minutes. Make sure the chicken is fully cooked and the potatoes are tender and golden. You can broil for the last 2-3 minutes for extra crispiness if you like.
- Once done, take it out of the oven and let it rest for a few minutes. Garnish with chopped parsley and crumbled feta cheese if you want.
Pro Tips
- Marinate for Maximum Flavor: Allowing the chicken to marinate for at least 2 hours (or overnight) will enhance the flavor significantly.
- Choose the Right Potatoes: Yukon Gold potatoes are ideal for this recipe due to their creamy texture and ability to hold their shape while roasting.
- Use Fresh Herbs: If possible, substitute dried oregano with fresh oregano for a more vibrant flavor profile.
- Check for Doneness: Always verify that the chicken reaches an internal temperature of 165°F (75°C) for safe consumption.
Tips & Tricks
Marinating Tips
- How long to marinate for maximum flavor
For the best flavor, marinate the chicken for at least 15 minutes. This allows the marinade to soak in. For an even bolder taste, go for 2 hours in the fridge.
- Alternative marinade ideas
Feel free to mix things up! Try using yogurt instead of olive oil for a creamier texture. You can also add lemon zest for extra brightness.
Cooking Tips
- Ensuring chicken is fully cooked
To check if the chicken is done, use a meat thermometer. It should read 165°F (75°C) in the thickest part. If you don’t have a thermometer, cut into the chicken. Ensure it’s no longer pink inside.
- Achieving crispy potatoes
For crispier potatoes, spread them out on the sheet pan. Make sure they are not crowded. A little extra olive oil helps too. Broil in the last few minutes for a golden finish.
Presentation Tips
- Garnishing with parsley and feta
Once your dish is cooked, sprinkle fresh parsley on top. Crumbled feta adds a nice touch and a salty bite. Both make the dish look inviting.
- Serving suggestions
Serve this meal with a simple side salad or warm pita bread. This adds freshness and balances the rich flavors. Enjoy your meal family-style right from the sheet pan for fun!

Variations
Ingredient Substitutions
You can swap out chicken thighs for other meats. Chicken breasts work well, too. For a leaner option, try turkey thighs. If you’re feeling adventurous, use firm fish like salmon or cod. These will cook faster, so adjust your baking time.
When it comes to veggies, the sky’s the limit. You can add bell peppers, zucchini, or even asparagus. Just remember to cut them into similar sizes for even cooking. Broccoli or cauliflower also make great choices. They’ll soak up all the tasty flavors.
Flavor Enhancements
Want to kick up the taste? Adding more spices can transform this dish. Try cumin for a warm note or sumac for a tangy twist. Fresh herbs like thyme or rosemary can boost the aroma too. Just chop them finely and sprinkle on top before serving.
Experimenting with oils can also change the flavor profile. Use avocado oil for a rich taste or sesame oil for a nutty finish. For acidity, swap lemon juice for balsamic vinegar or red wine vinegar. These options can add a new dimension to your dish.
Meal Prep Variations
You can make this meal ahead of time. Simply marinate the chicken and chop the veggies the night before. Store them in the fridge until you’re ready to cook. This cuts down on prep time during busy weeknights.
If you want to freeze it, prepare the chicken and veggies in a freezer-safe bag. Just remember to label it with the date. When it’s time to eat, thaw in the fridge overnight. Then bake as usual.
Leftovers can be magic. Transform them into a tasty salad by mixing with greens and a light dressing. You can also wrap them in tortillas for a quick lunch. These simple swaps keep the meal exciting!
Storage Info
Storing Leftovers
To keep your leftovers fresh, store them in airtight containers. This helps lock in flavor. Place the chicken and potatoes in one container and the veggies in another. Refrigerate them within two hours after cooking. For best taste, consume leftovers within three days.
If you want to freeze the meal, it is easy! Place the cooled chicken and potatoes in freezer-safe bags. Remove as much air as possible. They can stay fresh for up to three months in the freezer. Just remember to label the bags with the date.
Reheating Instructions
When it’s time to enjoy your leftovers, the best way to reheat them is in the oven. Preheat your oven to 350°F (175°C). Place the chicken and potatoes in an oven-safe dish, cover with foil, and heat for about 20-25 minutes. This method keeps the texture nice.
If you’re short on time, you can use the microwave. Heat in 30-second intervals, checking often. However, this may make the potatoes a bit soft. To keep the flavor strong, add a splash of olive oil before reheating.
Shelf Life
Leftover chicken and potatoes can last up to three days in the fridge. If stored well, frozen leftovers can last for three months.
Look out for signs of spoilage. If you see any strange smells, colors, or spots, it’s best to throw them away. Always trust your senses! Keeping an eye on these signs helps ensure your meal stays safe and tasty.
FAQs
Common Questions
Can I use boneless chicken breast instead?
Yes, you can use boneless chicken breast. It will cook faster, so check it sooner. Chicken thighs add more flavor and stay juicy, which is why I prefer them.
How do I know when the chicken is done?
Check the chicken’s internal temperature. It should reach 165°F (75°C). Cut into the thickest part. The meat should be white and juices should run clear.
Dietary Considerations
Is this recipe gluten-free?
Yes, this recipe is gluten-free. None of the ingredients contain gluten. Always check for cross-contamination if you have a severe allergy.
Can this dish be made dairy-free?
Yes, you can skip the feta cheese. The dish will still taste great without it. You can also use a dairy-free cheese if you want.
Serving Suggestions
What to serve with Sheet Pan Greek Chicken & Potatoes?
Serve it with a fresh salad or pita bread. Tzatziki sauce pairs well too. You could also add a side of steamed vegetables for more color.
Can I make it ahead of time?
Yes, you can prep this dish ahead. Marinate the chicken and chop the veggies. Store them in the fridge. Just bake it when you’re ready to eat!
This blog post covered a tasty and easy recipe for Sheet Pan Greek Chicken & Potatoes. I shared key ingredients, marinade tips, and steps to bake a perfect dish. I also discussed variations and storage tips to help you enjoy leftovers. Remember, cooking can be fun and simple. You can make this dish customize it to fit your tastes. Try it out and share your thoughts! Enjoy your meal!

Sheet Pan Greek Chicken & Potatoes
Ingredients
4 boneless, skinless chicken thighs
4 medium Yukon Gold potatoes, cubed
1 red onion, cut into wedges
3 cloves garlic, minced
1 cup cherry tomatoes, halved
1/4 cup olive oil
2 tablespoons lemon juice
2 teaspoons dried oregano
1 teaspoon paprika
Salt and pepper to taste
Fresh parsley, chopped, for garnish
Feta cheese, crumbled, for garnish (optional)
Instructions
Preheat your oven to 400°F (200°C).
In a large bowl, combine the olive oil, lemon juice, minced garlic, oregano, paprika, salt, and pepper. Whisk until well mixed.
Add the chicken thighs to the bowl and coat them thoroughly with the marinade. Allow to marinate for at least 15 minutes (or up to 2 hours in the refrigerator for more flavor).
On a large sheet pan, arrange the cubed potatoes and red onion wedges. Drizzle a bit of olive oil over them and season with salt, pepper, and half of the dried oregano. Toss to coat evenly.
Remove the marinated chicken from the bowl and place it on the sheet pan with the veggies. Pour any remaining marinade over the chicken.
Scatter the halved cherry tomatoes around the chicken and potatoes on the sheet pan.
Bake in the preheated oven for 35-40 minutes or until the chicken is cooked through and the potatoes are tender and golden. You can broil for the last 2-3 minutes for extra crispiness if desired.
Once done, remove from the oven and let it rest for a few minutes. Garnish with chopped parsley and crumbled feta cheese if using.
Prep Time: 15 minutes | Total Time: 55 minutes | Servings: 4

Sheet Pan Greek Chicken & Potatoes
Ingredients
- 4 pieces boneless, skinless chicken thighs
- 4 medium Yukon Gold potatoes, cubed
- 1 piece red onion, cut into wedges
- 3 cloves garlic, minced
- 1 cup cherry tomatoes, halved
- 1 4 cup olive oil
- 2 tablespoons lemon juice
- 2 teaspoons dried oregano
- 1 teaspoon paprika
- to taste salt and pepper
- for garnish fresh parsley, chopped
- optional feta cheese, crumbled
Instructions
- Preheat your oven to 400°F (200°C).
- In a large bowl, combine the olive oil, lemon juice, minced garlic, oregano, paprika, salt, and pepper. Whisk until well mixed.
- Add the chicken thighs to the bowl and coat them thoroughly with the marinade. Allow to marinate for at least 15 minutes (or up to 2 hours in the refrigerator for more flavor).
- On a large sheet pan, arrange the cubed potatoes and red onion wedges. Drizzle a bit of olive oil over them and season with salt, pepper, and half of the dried oregano. Toss to coat evenly.
- Remove the marinated chicken from the bowl and place it on the sheet pan with the veggies. Pour any remaining marinade over the chicken.
- Scatter the halved cherry tomatoes around the chicken and potatoes on the sheet pan.
- Bake in the preheated oven for 35-40 minutes or until the chicken is cooked through and the potatoes are tender and golden. You can broil for the last 2-3 minutes for extra crispiness if desired.
- Once done, remove from the oven and let it rest for a few minutes. Garnish with chopped parsley and crumbled feta cheese if using.

![To make the best honey soy sauce chicken marinade, you'll need some simple ingredients. Each one adds its own special touch. Here’s what you’ll need: - 4 bone-in, skin-on chicken thighs - 1/4 cup low sodium soy sauce - 1/4 cup honey - 2 tablespoons sesame oil - 2 cloves garlic, finely minced - 1 tablespoon fresh ginger, grated - 1 tablespoon rice vinegar - 1/2 teaspoon black pepper - 1/2 teaspoon red pepper flakes (optional for heat) - 2 green onions, finely chopped - A sprinkle of sesame seeds This mix of flavors comes together to create a sweet and savory marinade. The honey gives a nice glaze, while the soy sauce adds depth. Garlic and ginger bring in warmth. You can adjust the red pepper flakes based on how spicy you like it. I enjoy this recipe for its simplicity and taste. You can find the full recipe in the Honey Soy Glaze Chicken Delight section. To start, gather your ingredients. In a medium bowl, combine the low sodium soy sauce, honey, sesame oil, minced garlic, grated ginger, rice vinegar, black pepper, and red pepper flakes. Use a whisk to mix everything well. This step is key as it brings out all the flavors. You want a smooth blend that coats the chicken nicely. Next, take your chicken thighs. Place them in a large Ziploc bag or a shallow dish. Pour the marinade over the chicken, making sure it covers each piece. Seal the bag tightly or cover the dish with plastic wrap. Let the chicken marinate in the fridge for at least 2 hours. For the best flavor, let it sit overnight. This allows the chicken to soak up all those tasty flavors. Now it's time to bake. Preheat your oven to 375°F (190°C). While it heats up, prepare your baking sheet by lining it with parchment paper or aluminum foil. This makes for easy clean-up later. After marinating, take the chicken out of the bag or dish. Place the thighs skin-side up on the baking sheet. Bake the chicken for 35-40 minutes. Every 15 minutes, baste it with the reserved marinade. This keeps the chicken juicy and adds even more flavor. You know it’s done when the internal temperature hits 165°F (74°C). Once ready, let the chicken rest for 5 minutes before serving. This keeps it tender and full of flavor. For a final touch, sprinkle chopped green onions and sesame seeds on top. This adds a nice crunch and makes your dish look great. If you want more details, check out the Full Recipe. Marinating is key to great flavor. I recommend marinating your chicken for at least two hours. But if you can wait, do it overnight. This time lets the flavors soak in well. You can adjust the taste too. If you like it sweeter, add more honey. For saltiness, use a bit more soy sauce. Just remember, balance is the goal. You want a marinade that excites your taste buds without being overpowering. Baking your chicken at 375°F (190°C) works best. This temperature ensures even cooking. Bake for 35 to 40 minutes. Use a meat thermometer to check for doneness. Chicken should reach 165°F (74°C) inside. To keep it juicy, baste the chicken with the marinade every 15 minutes. This step adds flavor and keeps the meat moist. After baking, let it rest for about five minutes. This helps the juices redistribute, giving you a tender bite. Garnishing makes a big difference. I love using chopped green onions and sesame seeds for a nice touch. They add color and crunch. When it comes to sides, think rice or steamed vegetables. They complement the honey soy sauce chicken well. You could also serve it with a light salad for some freshness. For more ideas, check out the [Full Recipe]. {{image_4}} You can change the protein in the recipe. Try using pork, beef, or tofu. Each option brings its own taste. Pork absorbs the sauce well, while tofu soaks up flavors beautifully. You can also switch the vinegar. Rice vinegar is mild, but apple cider vinegar adds a fruity touch. If you want a strong flavor, use balsamic vinegar. Each vinegar creates a different taste profile. To amp up the flavor, think about adding spices or herbs. Garlic and ginger are great, but you can try adding five-spice powder for a warm kick. Fresh herbs like cilantro or basil can freshen the dish. You can also mix in fruit juices. Pineapple juice gives sweetness and a tropical twist. Orange juice is another sweet option that works well. This adds a nice layer to the marinade. Grilling the chicken gives it a smoky taste. It creates a char that is hard to beat. Just make sure to monitor the heat to avoid burning. Slow-cooking is another excellent method. It makes the chicken very tender and juicy. The longer it cooks, the more the flavors blend. You can set it in the morning and enjoy it by dinner. For the full recipe, check out the Honey Soy Glaze Chicken Delight. You can keep leftover marinade in the fridge for up to five days. Store it in an airtight container. Make sure to label the container with the date. If you want to keep it longer, freeze it! Use a freezer-safe bag or container. Just remember to leave some room for expansion as it freezes. Frozen marinade can last for about three months. Once your chicken is cooked, let it cool down. After cooling, place it in a sealed container. Store it in the fridge for up to four days. For longer storage, you can freeze the chicken. Wrap it tightly in plastic wrap or foil, then place it in a freezer bag. Cooked chicken can last up to three months in the freezer. To reheat, you can use the microwave or oven. For the microwave, place the chicken on a plate and cover it with a damp paper towel. Heat it in short bursts, checking often. If using the oven, preheat to 350°F (175°C) and bake for about 15-20 minutes. The marinade can last in the fridge for five days. If frozen, it is good for three months. Cooked chicken can stay fresh in the fridge for four days. If you freeze it, it can last up to three months. Always check for any signs of spoilage before using. To add heat, try adding red pepper flakes. Start with a half teaspoon. If you want more spice, use a full teaspoon. You can also add fresh chopped chili peppers. Sriracha sauce is another great option. Mix any of these into your marinade for a nice kick. Yes, you can use boneless chicken. Boneless thighs or breasts work well. Just remember, they will cook faster. Check for doneness at about 25-30 minutes. Use a meat thermometer to ensure the chicken reaches 165°F (74°C) for safety. The flavor will still be great with boneless cuts. This dish pairs well with steamed rice or quinoa. You can also serve it with stir-fried vegetables. A fresh salad or roasted sweet potatoes make nice sides too. For a fun twist, try serving it with Asian-style slaw. Each option adds a different texture and flavor. Absolutely! If you want more, just double all the ingredients. Use the same marinating time. Cooking time may vary a bit. If using more chicken, check it at the same time. You may need an extra 5-10 minutes to ensure it’s cooked through. The prep time is about 15 minutes. You will need at least 2 hours for marinating. Cooking the chicken takes about 40 minutes. So, in total, you are looking at around 2 hours and 55 minutes. For best flavor, marinate overnight if you can. Check out the Full Recipe for all the details! You now have a complete guide for making honey soy sauce chicken. We covered the ingredients to create a tasty marinade, along with each step to bake the chicken perfectly. Tips for adjusting flavors, serving ideas, and variations make this dish even better. Remember, marinating is key for flavor. Enjoy experimenting with new ingredients and cooking methods. This recipe is simple, fun, and delicious. You’ll impress everyone at your next meal. Let your creativity shine as you cook!](https://dailydishlab.com/wp-content/uploads/2025/06/bd272301-b7e3-46d4-98e1-9d012cb49af4-768x768.webp)


![To make a tasty Easy Broccoli Cheese Casserole, you need a few simple ingredients. Each one plays a key role in creating a rich flavor and creamy texture. Here’s what you will need: - 4 cups fresh broccoli florets - 1 cup cooked quinoa - 2 cups shredded cheddar cheese - 1 cup cream of mushroom soup - 1/2 cup milk - 1/4 cup sour cream - 1 teaspoon garlic powder - 1/2 teaspoon onion powder - Salt and pepper to taste - 1/2 cup breadcrumbs - 2 tablespoons olive oil Fresh broccoli florets give this dish its bright color and crunch. I like using cooked quinoa for a boost of protein. It makes the casserole more filling. The shredded cheddar cheese melts beautifully, adding a rich, creamy layer. Cream of mushroom soup is the secret to a dreamy texture. Milk and sour cream make everything extra smooth. Don’t forget the spices! Garlic powder and onion powder add depth to the flavor. You can adjust the salt and pepper to match your taste. The breadcrumbs on top add a nice crispiness, thanks to the olive oil. For the Full Recipe, check the detailed instructions. Enjoy making this dish with your family! First, preheat your oven to 350°F (175°C). This helps the casserole cook evenly. Next, grab a 9x13 inch baking dish and lightly grease it. This prevents sticking. Now, let’s steam the broccoli florets. Place them in a steamer for about 4-5 minutes. You want them tender but not mushy. Once done, set them aside to cool. In a large mixing bowl, combine the cooked quinoa, 1 1/2 cups of shredded cheddar cheese, cream of mushroom soup, milk, sour cream, garlic powder, onion powder, salt, and pepper. Mix everything well. You want a smooth, cheesy blend. This mix is the heart of your casserole, so make sure it's well combined. Now it’s time to fold in the steamed broccoli. Gently stir it into the cheesy mixture until coated. This adds a nice green color and texture. Pour this mixture into your prepared baking dish, spreading it out evenly. For the topping, mix breadcrumbs with olive oil in a small bowl. Sprinkle this mixture over the casserole. Finally, add the remaining 1/2 cup of shredded cheddar cheese on top. Place the casserole in the preheated oven. Bake it for 25-30 minutes. You will know it’s done when the top is golden brown and the cheese is bubbly. This creates a nice crust. After baking, let it cool for a few minutes before serving. This helps the flavors settle and makes it easier to serve. Enjoy your Easy Broccoli Cheese Casserole! For the full recipe, check the earlier section. To cook broccoli for the best texture, steam it lightly. This method keeps it bright green and crisp. Steam the florets for about 4-5 minutes. They should be tender but not mushy. This step helps them hold their shape and adds a nice bite to your casserole. Choosing the right cheese is key for flavor. I recommend using sharp cheddar. It melts well and gives a rich taste. If you want a creamier texture, try adding mozzarella. Mixing different cheeses can also add depth to your dish. You can easily make ingredient substitutions. If you don’t have quinoa, use rice or even pasta. For a lighter option, swap cream of mushroom soup with plain yogurt. This change keeps the dish creamy while cutting calories. Add-ins can boost flavor and nutrition. Consider mixing in cooked chicken or turkey for protein. Diced bell peppers or carrots can add color and crunch. You can also throw in some nuts for a nice crunch. These options make it fun and unique every time you make it. For the full recipe, check out the [Full Recipe]. {{image_2}} For a lighter version of this casserole, swap out some ingredients. Use low-fat cheese to cut calories. You can also replace cream of mushroom soup with a homemade version or low-sodium broth. This gives you control over the fat and salt levels. If you want a gluten-free option, use gluten-free breadcrumbs. You can also make your own with gluten-free bread if you prefer. These small changes keep the dish tasty while making it healthier. To add more flavor, you can include other vegetables. Bell peppers, carrots, or even spinach work well. These not only boost nutrition but also add great color. Mixing in proteins like cooked chicken or turkey makes the dish heartier. It turns a side dish into a full meal. For the best flavor, try adding fresh herbs like thyme or rosemary. These herbs brighten up the taste and add a nice aroma. You can also use a mix of cheeses for a more complex flavor profile. Just remember to keep it balanced so the broccoli shines through. For the complete recipe, check out the Full Recipe section. To keep your Easy Broccoli Cheese Casserole fresh, let it cool first. Once cool, cover it tightly with plastic wrap or aluminum foil. Store it in the fridge for up to three days. Use a clean spoon when serving, so you avoid cross-contamination. This way, you can enjoy your leftovers without worry. If you want to freeze your casserole, here’s what to do. First, let it cool completely. Then, cut it into portions. Wrap each piece in plastic wrap, then place them in a freezer bag. This helps keep the flavor and texture intact. When you are ready to eat, thaw it overnight in the fridge. Reheat in the oven at 350°F (175°C) until hot. This method works well to enjoy your Easy Broccoli Cheese Casserole later. For the complete recipe, check out the Full Recipe. How can I make this broccoli cheese casserole in advance? You can prepare this casserole a day ahead. Simply follow the recipe until you layer the casserole in the dish. Cover it tightly with plastic wrap and store it in the fridge. When ready to bake, remove the wrap and add a few extra minutes to the baking time. This method saves time and lets the flavors mix well. Can I use frozen broccoli instead of fresh? Yes, frozen broccoli works well in this casserole. Just thaw and drain it before mixing. This saves prep time and still gives you that great broccoli flavor. Make sure to squeeze out extra water to avoid a soggy casserole. What is the calorie count per serving? Each serving of this broccoli cheese casserole has about 300 calories. This count can vary based on your specific ingredients. If you use low-fat cheese or a lighter soup, the calories may drop. Does this casserole freeze well? Yes, this casserole freezes nicely. After baking, let it cool completely. Then, cover it tightly with foil or plastic wrap. Store it in the freezer for up to three months. When you want to eat it, thaw it overnight in the fridge and reheat in the oven. This helps keep the flavors fresh and delicious. For the full recipe, check out the Cheesy Broccoli Bliss Casserole! This blog covered a simple and tasty broccoli cheese casserole. You learned about the key ingredients, from fresh broccoli to spices. I shared step-by-step instructions for mixing and baking. Also, you discovered tips for perfecting the dish and ways to customize it. Finally, we discussed storage methods for leftovers. I hope you feel ready to make this dish! Enjoy your cooking and create a meal that everyone will love.](https://dailydishlab.com/wp-content/uploads/2025/07/a9a80e4c-75b2-4ae9-8984-ae1ea083217d-768x768.webp)
![- 1 lb ground beef or turkey - 1 packet taco seasoning - 1 can black beans, rinsed and drained - 1 cup corn, frozen or canned - 1 large head of romaine lettuce, chopped For a tasty loaded taco salad, you need a few key items. The star is ground beef or turkey. This meat gives the salad its savory flavor. Next, you will need taco seasoning. This mix adds spice and zest. Black beans bring in protein and fiber. They also add a nice texture. Corn sweetens the dish and adds a pop of color. Lastly, chopped romaine lettuce makes a great base. It stays crisp and fresh. - 1 cup cherry tomatoes, halved - 1 avocado, diced - 1 cup shredded cheddar cheese - 1/2 cup sour cream - 1/4 cup fresh cilantro, chopped Now, let’s talk toppings! Cherry tomatoes add a juicy bite and bright color. Diced avocado brings creaminess and healthy fats. Shredded cheddar cheese gives a rich flavor and melty touch. Sour cream adds a cool contrast to the spices. Finally, fresh cilantro brings a burst of herbal taste. You can mix these toppings in or add them on top for a fun look. - Salsa, for drizzling - Tortilla chips, for garnish - Lime wedges, for serving - Salt and pepper to taste If you want to jazz up your salad, consider add-ins. Salsa adds more flavor and a bit of heat. Crushed tortilla chips give a crunchy texture. Lime wedges offer a zesty kick when squeezed over the top. Don’t forget to season with salt and pepper to taste. These optional items can turn a good salad into a great one. For the full recipe, check out the complete guide! 1. Brown the ground beef or turkey: Heat a large skillet over medium heat. Add the ground meat and cook until it turns brown. This usually takes about 5 to 7 minutes. Stir often to ensure it cooks evenly. 2. Drain excess fat: Once the meat is browned, carefully drain any extra fat. This step keeps your salad lighter and healthier. 3. Add taco seasoning and simmer: Open the taco seasoning packet and sprinkle it over the meat. Follow the instructions on the packet. Typically, you will add some water and let it simmer for about 5 minutes. This allows the flavors to blend perfectly. 1. Create a base with lettuce: Take a large serving bowl and layer the chopped romaine lettuce at the bottom. This will be your fresh and crunchy base. 2. Layer with cooked meat and other ingredients: Evenly distribute the cooked meat over the lettuce. Next, add a layer of black beans, followed by corn, cherry tomatoes, and diced avocado. Each layer adds texture and flavor. 3. Add toppings and garnishes: Sprinkle shredded cheddar cheese on top. Then, add dollops of sour cream and drizzle salsa over everything. Finally, garnish with fresh cilantro and crushed tortilla chips for that extra crunch. 1. Present in a large bowl or individual bowls: You can serve this salad in one large bowl for sharing or in individual bowls for each guest. 2. Arrange in sections for visual appeal: To make your salad eye-catching, arrange the ingredients in sections. This way, each component shines and looks delicious. Consider adding a sprinkle of cheese and a few extra tortilla chips on top for even more visual appeal. For more detailed steps and tips, check out the Full Recipe for Loaded Taco Salad. To make your loaded taco salad shine, adjust the seasoning to your taste. You might want more spice or salt. Taste as you go to get it just right. Fresh ingredients boost flavor. Try to use ripe tomatoes and crisp lettuce. Fresh cilantro adds a bright touch, too. You can save time by preparing ingredients in advance. Chop your veggies the night before. This way, you can mix the salad fast. Canned or frozen items work well. Black beans from a can save time and taste great. Frozen corn can also cut down on prep time. The way you present your salad matters. Create colorful layers to catch the eye. Start with green lettuce and add bright tomatoes. Layering makes it look fun and tasty. Garnish with extra tortilla chips and cheese for crunch. This adds flair and makes your dish pop. {{image_2}} You can easily switch the meat in your loaded taco salad. If you prefer, use shredded chicken or tofu. Shredded chicken adds a tender texture. Tofu gives a nice bite and works well for vegetarians. You can even try black bean burgers for a fun twist. These options keep the dish tasty while meeting different dietary needs. Feel free to get creative with ingredients. You can use different beans, like pinto or kidney beans. Each type brings its own flavor and texture. Cheese is another area to explore—try pepper jack for a spicy kick or queso fresco for a milder taste. For the greens, mix it up with spinach or arugula. These changes can give your salad a fresh spin. Don't forget about the dressing! A creamy ranch pairs well with the flavors in your salad. If you want a zing, try a vinaigrette for brightness. For those who love heat, add a spicy chipotle dressing. It amps up the flavor and makes the salad even more exciting. Each dressing can change your taco salad experience, so have fun experimenting! For the full recipe, check [Full Recipe]. To keep your loaded taco salad fresh, store it in an airtight container. This step keeps moisture out and preserves flavors. It’s best to keep the meat and toppings separate. This way, your salad stays crisp and tasty. You can refrigerate the salad for up to 3 days. Make sure to eat it within this time for the best taste. I recommend avoiding freezing. Freezing can change the texture of the ingredients, especially the lettuce and tomatoes. When you are ready to enjoy leftovers, reheat the meat separately. This method helps maintain the meat's flavor and warmth. After reheating, add fresh toppings like avocado and cilantro. This keeps your salad looking and tasting great. For a full recipe, check out the loaded taco salad instructions above. You can make your loaded taco salad even better with fun toppings. Consider adding: - Jalapeños for heat - Olives for saltiness - Bell peppers for crunch - Radishes for a fresh bite - Greek yogurt as a sour cream swap - Fresh corn for sweetness Feel free to mix and match toppings. The more colors, the better it looks! Yes, you can prepare parts of your taco salad ahead of time! Here are some tips: - Cook the meat and store it in the fridge for up to three days. - Chop your veggies and keep them in airtight containers. - Wait to add toppings like avocado and sour cream until right before serving. This keeps them fresh. Layering is key for both taste and looks. Here’s how I do it: 1. Start with a base of romaine lettuce. 2. Add the cooked meat evenly over the lettuce. 3. Next, layer black beans, corn, tomatoes, and avocado. 4. Sprinkle cheese on top for a nice finish. 5. Finally, dollop sour cream and drizzle salsa for flavor. This way, each bite is packed with flavor! Making a lighter taco salad is simple. Try these swaps: - Use lean ground turkey or chicken instead of beef. - Swap sour cream for Greek yogurt to cut calories. - Add more veggies like spinach or kale instead of lettuce. - Use low-fat cheese or skip it altogether for fewer calories. These changes keep your salad tasty and nutritious! For the full recipe, check out the Loaded Taco Salad section. This blog post showed you how to make a delicious loaded taco salad. You learned about essential ingredients, cooking steps, and tasty toppings. I shared tips for flavor and presentation, plus fun variations and storage info. Now you can create your own loaded taco salad that fits your taste. Enjoy experimenting with the ingredients. Make it colorful and flavorful, and share it with friends!](https://dailydishlab.com/wp-content/uploads/2025/06/0bf67b06-348e-48f5-b73f-4698b039c9e8-768x768.webp)
