Sheet-Pan Parmesan Crusted Cod and Veggies Delight

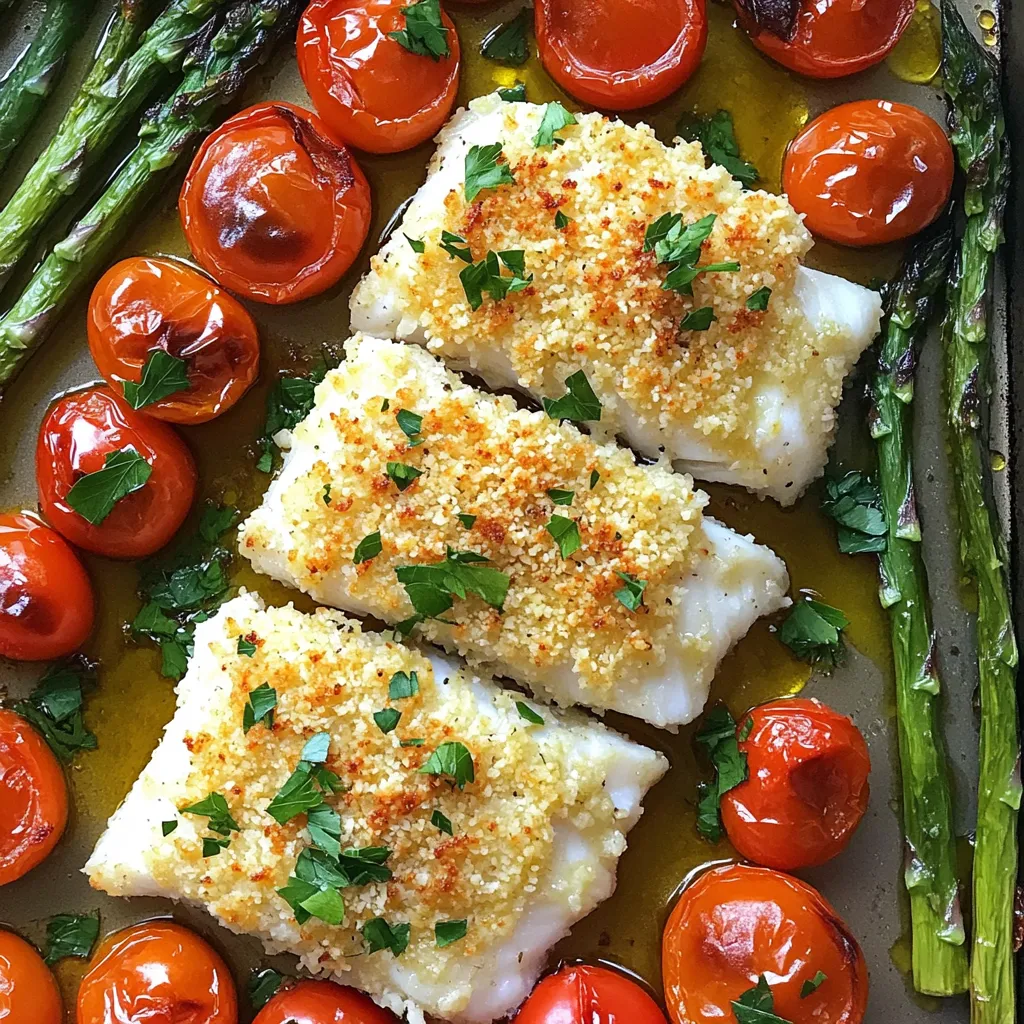
Cooking doesn’t have to be hard to be delicious! In this article, I’ll show you how to make a simple and tasty Sheet-Pan Parmesan Crusted Cod with fresh veggies. You’ll use just a few easy ingredients and end up with a meal that looks and tastes amazing. Perfect for busy nights, this dish is quick to prepare and clean up. Let’s get started on making your new favorite dinner!
Why I Love This Recipe
- Quick and Easy: This recipe takes just 25 minutes total, making it perfect for those busy weeknights when you want a delicious meal without spending hours in the kitchen.
- Healthy and Nutritious: With cod as a lean protein source and plenty of veggies, this dish is packed with nutrients and low in calories, making it a healthy choice for everyone.
- Flavorful Crunch: The Parmesan breadcrumb topping adds a delightful crunch and rich flavor, elevating the mild taste of cod and making the dish satisfying.
- One-Pan Wonder: Cooking everything on a single sheet pan means less cleanup and more time to enjoy your meal, which is always a win in my book!
Ingredients
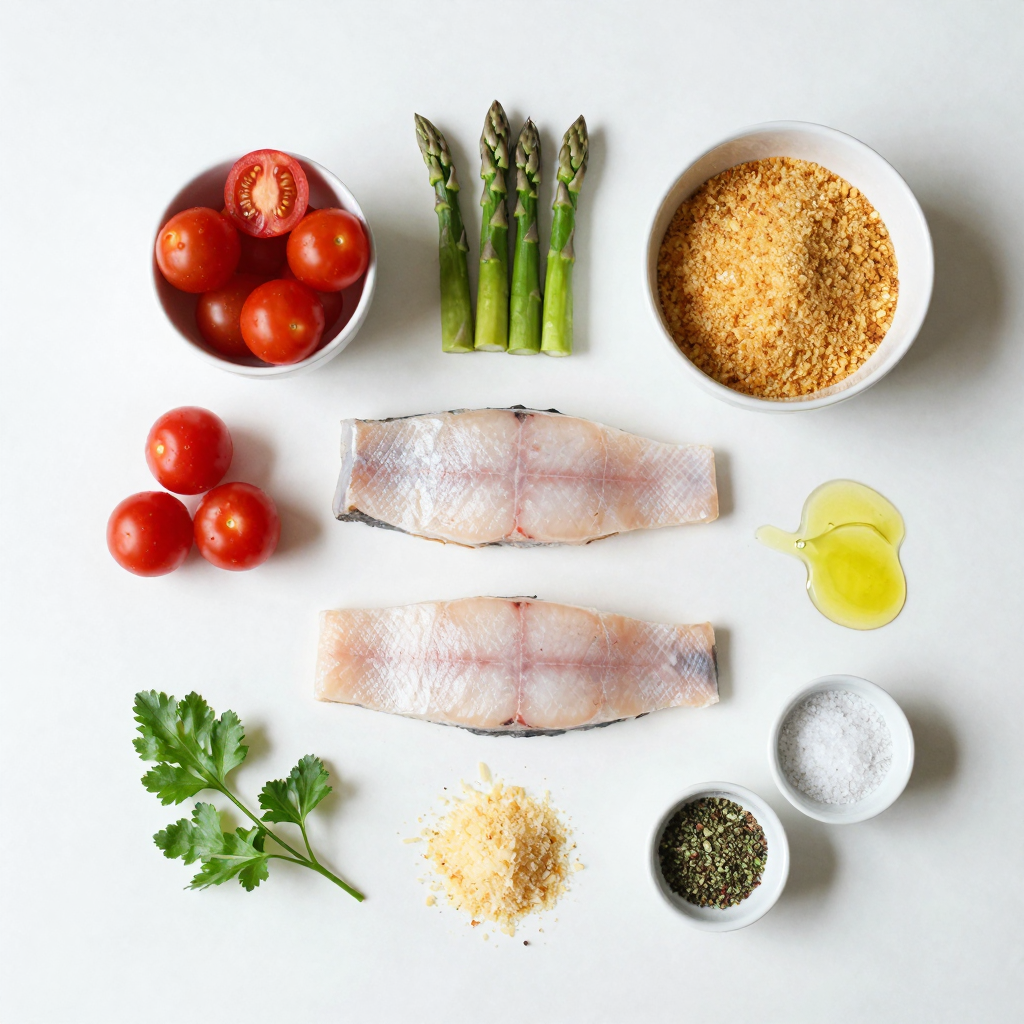
Essential Ingredients for Sheet-Pan Parmesan Crusted Cod
- 2 cod fillets
- 1 cup cherry tomatoes, halved
- 1 cup asparagus, trimmed and cut into 2-inch pieces
- 1/2 cup breadcrumbs (preferably panko)
- 1/2 cup grated Parmesan cheese
The main star of this dish is the cod fillets. Cod is light and flaky, making it perfect for baking. The cherry tomatoes add a burst of sweetness, while the asparagus brings a nice crunch. Together, they create a colorful plate.
Seasoning and Oils
- 2 tablespoons olive oil
- 1 teaspoon garlic powder
- 1 teaspoon dried Italian herbs
- Salt and pepper for taste
Olive oil helps to enhance the flavors and keeps everything moist. Garlic powder gives the dish a lovely aroma. The dried herbs add a touch of Italy, while salt and pepper bring all the flavors together.
Optional Garnishes
- Fresh parsley
- Drizzle of balsamic glaze for serving
Fresh parsley adds a pop of color and freshness. A drizzle of balsamic glaze can elevate your dish, giving it a sweet and tangy finish. This extra touch makes your meal look gourmet and inviting.

Step-by-Step Instructions
Preparation Steps
1. Preheat the oven and prepare the baking sheet
Set your oven to 400°F (200°C). Line a large baking sheet with parchment paper. This keeps the fish and veggies from sticking. It makes cleanup easy too.
2. Combine breadcrumb mixture in a bowl
In a mixing bowl, mix together 1/2 cup breadcrumbs, 1/2 cup grated Parmesan cheese, 1 teaspoon garlic powder, 1 teaspoon dried Italian herbs, salt, and pepper. Stir until everything is well mixed. This will give a great crust to your cod.
Cooking Steps
1. Season and place cod fillets on the baking sheet
Take your two cod fillets. Drizzle 1 tablespoon of olive oil on them. Season with salt and pepper. Place the fillets on one side of the baking sheet.
2. Add vegetables and drizzle with olive oil
On the other side of the baking sheet, spread 1 cup of halved cherry tomatoes and 1 cup of cut asparagus. Drizzle with the remaining olive oil. Add a pinch of salt and pepper for flavor.
Baking and Finishing Touches
1. Coat cod with breadcrumb mixture
Generously cover the top of each cod fillet with your breadcrumb mixture. Press down gently so it sticks well. This crust will get nice and crispy in the oven.
2. Set baking time and optional broiling for crispiness
Bake in the preheated oven for 15-18 minutes. The cod should flake easily with a fork, and the veggies should be tender. For a crispy topping, broil for the last 2-3 minutes. Watch it closely to avoid burning.
Pro Tips
- Use Fresh Ingredients: Always opt for fresh cod and seasonal vegetables for the best flavor and texture.
- Customize the Topping: Feel free to add your favorite herbs or spices to the breadcrumb mixture for a personal touch.
- Check for Doneness: Use a fork to test if the cod flakes easily; this indicates it is properly cooked.
- Rest Before Serving: Let the dish sit for a couple of minutes after baking to allow the flavors to settle before serving.
Tips & Tricks
Ensuring Perfectly Cooked Cod
To check if your cod is done, look for a flaky texture. When you poke the fish with a fork, it should fall apart easily. This means it is cooked just right. Even seasoning is key. Make sure to sprinkle salt and pepper evenly on the cod. This way, every bite tastes great.
Vegetable Tips for Ideal Texture
Choose seasonal vegetables for the best flavor. Fresh cherry tomatoes and asparagus work well here. For thicker veggies, like carrots or zucchini, adjust the cooking time. Cut them smaller or add them to the pan a few minutes early. This helps them cook through and become tender.
Serving Suggestions
To make your meal shine, serve the cod with a side of rice or quinoa. These complement the fish and veggies nicely. For a pretty plate, arrange the cod and vegetables on a large platter. Drizzle a touch of balsamic glaze for a beautiful finish. Fresh parsley adds a pop of color and flavor.

Variations
Protein Alternatives
You can switch the cod for other fish like salmon. Salmon has a richer flavor. It also holds up well to baking. Shrimp is another great choice. Just peel and devein them. Toss them in the breadcrumb mix. You could also use chicken breasts. Simply adjust the cooking time. Chicken should be fully cooked through to 165°F.
Vegetable Swaps
If you do not have cherry tomatoes, try using diced bell peppers. They add a nice crunch and sweetness. Zucchini is another good swap. Cut it into thick rounds to keep it hearty. Broccoli or green beans can also work well. Just make sure to adjust the cooking time for thicker veggies.
Flavor Profile Adjustments
Spice it up with your favorite herbs. Try adding paprika or a pinch of cayenne for heat. Fresh herbs like basil or dill can add a bright note. A splash of lemon juice can bring freshness to the dish. It also balances the richness of the cheese. You can also experiment with different cheeses, like feta or cheddar. Each will give a unique twist to your meal.
Storage Info
How to Store Leftovers
To keep your Sheet-Pan Parmesan Crusted Cod and Veggies fresh, refrigerate them. Place leftovers in airtight containers. This way, they will stay tasty for up to three days. For best results, let the meal cool before sealing. This helps avoid extra moisture that can spoil the food.
The best containers for sheet-pan meals are glass or BPA-free plastic. They help keep flavors locked in and are easy to clean. If you have multiple servings, consider using smaller containers. This makes it easier to grab a quick meal later.
Reheating Instructions
When reheating, the oven works best. Preheat it to 350°F (175°C) and place the cod and veggies on a baking sheet. Cover with foil to keep them moist. Heat for about 10-15 minutes until warmed through.
If you’re in a hurry, the microwave is an option too. Place the leftovers in a microwave-safe dish. Heat in short bursts, about 30 seconds. Stir in between to ensure even heating. However, the microwave may make the cod a bit soggy.
Freezing Options
You can freeze this meal for future use. Portion it into individual servings before freezing. Use freezer-safe containers or heavy-duty freezer bags to prevent freezer burn. Label them with the date so you know when to use them.
To thaw, place the container in the fridge overnight. If you’re short on time, you can use the microwave’s defrost setting. After thawing, reheat as mentioned above. This way, you can enjoy your delicious cod and veggies later without much fuss.
FAQs
Can I make this recipe gluten-free?
Yes, you can easily make this dish gluten-free. Instead of regular breadcrumbs, use gluten-free breadcrumbs. You can also crush gluten-free crackers or use ground oats. Both options work great and keep the taste delicious.
How long can leftovers be stored?
You can store leftovers in the fridge for up to three days. Make sure to place them in an airtight container. This helps keep the cod and veggies fresh. If you notice any changes in smell or color, it’s best to toss them.
Can I prepare the meal in advance?
Yes, you can prep many ingredients ahead of time. Chop the veggies and mix the breadcrumb topping a day before. Store them in the fridge. When you are ready to cook, just coat the cod and bake. This saves time and makes dinner easy.
This recipe for Sheet-Pan Parmesan Crusted Cod is simple and tasty. You learned about key ingredients like cod, fresh veggies, and seasonings. I provided easy steps for cooking, tips for perfect results, and ideas for variations. You can even make this dish gluten-free or prep it in advance.
Overall, this meal is healthy, quick, and fun to make. You can enjoy it any night of the week. Happy cooking!

Sheet-Pan Parmesan Crusted Cod and Veggies
Ingredients
2 cod fillets
1 cup cherry tomatoes, halved
1 cup asparagus, trimmed and cut into 2-inch pieces
1/2 cup breadcrumbs (preferably panko)
1/2 cup grated Parmesan cheese
2 tablespoons olive oil
1 teaspoon garlic powder
1 teaspoon dried Italian herbs
Salt and pepper to taste
Fresh parsley for garnish (optional)
Instructions
Preheat your oven to 400°F (200°C) and line a large baking sheet with parchment paper.
In a mixing bowl, combine the breadcrumbs, grated Parmesan, garlic powder, dried Italian herbs, salt, and pepper. Mix until well combined.
Drizzle 1 tablespoon of olive oil over the cod fillets and season with salt and pepper. Place the cod on one side of the prepared baking sheet.
On the other side of the baking sheet, spread out the halved cherry tomatoes and asparagus pieces. Drizzle them with the remaining olive oil, and sprinkle with a pinch of salt and pepper.
Generously coat the top of each cod fillet with the Parmesan breadcrumb mixture, pressing gently to adhere.
Bake in the preheated oven for 15-18 minutes, or until the cod is cooked through and flakes easily with a fork, and the veggies are tender and slightly caramelized.
For an extra crispy topping, broil for the last 2-3 minutes, keeping a close eye to prevent burning.
Remove from oven and garnish with fresh parsley if desired.
Prep Time, Total Time, Servings: 10 mins | 25 mins | 2 servings
– Presentation Tips: Serve the cod fillets on a large platter accompanied by the roasted veggies. Drizzle with a touch of balsamic glaze for a beautiful finish.

Sheet-Pan Parmesan Crusted Cod and Veggies
Ingredients
- 2 fillets cod
- 1 cup cherry tomatoes, halved
- 1 cup asparagus, trimmed and cut into 2-inch pieces
- 1 cup breadcrumbs (preferably panko)
- 1 cup grated Parmesan cheese
- 2 tablespoons olive oil
- 1 teaspoon garlic powder
- 1 teaspoon dried Italian herbs
- to taste salt and pepper
- optional fresh parsley for garnish
Instructions
- Preheat your oven to 400°F (200°C) and line a large baking sheet with parchment paper.
- In a mixing bowl, combine the breadcrumbs, grated Parmesan, garlic powder, dried Italian herbs, salt, and pepper. Mix until well combined.
- Drizzle 1 tablespoon of olive oil over the cod fillets and season with salt and pepper. Place the cod on one side of the prepared baking sheet.
- On the other side of the baking sheet, spread out the halved cherry tomatoes and asparagus pieces. Drizzle them with the remaining olive oil, and sprinkle with a pinch of salt and pepper.
- Generously coat the top of each cod fillet with the Parmesan breadcrumb mixture, pressing gently to adhere.
- Bake in the preheated oven for 15-18 minutes, or until the cod is cooked through and flakes easily with a fork, and the veggies are tender and slightly caramelized.
- For an extra crispy topping, broil for the last 2-3 minutes, keeping a close eye to prevent burning.
- Remove from oven and garnish with fresh parsley if desired.
- Serve the cod fillets on a large platter accompanied by the roasted veggies. Drizzle with a touch of balsamic glaze for a beautiful finish.

![- 1 pound ziti pasta - 2 tablespoons olive oil - 1 onion, finely chopped - 3 cloves garlic, minced - 1 pound ground beef (or plant-based ground meat) - 1 jar (24 ounces) marinara sauce - 1 can (15 ounces) ricotta cheese - 1 egg - 2 cups shredded mozzarella cheese - 1 cup grated Parmesan cheese - 1 teaspoon Italian seasoning - Salt and pepper to taste - Fresh basil leaves for garnish (optional) For baked ziti, the ingredients are simple but full of flavor. First, you need ziti pasta as your base. I prefer the traditional ziti shape, but penne can work too. Olive oil adds richness and helps in cooking the onion and garlic. Next, the onion and garlic create a savory base for the meat sauce. You can choose ground beef for a classic taste, or use a plant-based option for a lighter meal. Marinara sauce brings the dish together, adding moisture and flavor. Ricotta cheese is a must. It adds creaminess. Mixing it with an egg binds everything together and gives a smooth texture. Mozzarella and Parmesan are essential for that cheesy top that makes baked ziti so appealing. Finally, season with Italian herbs, salt, and pepper. Fresh basil as a garnish adds a pop of color and flavor. If you want the full recipe, just check the section titled Full Recipe. 1. Preheat your oven to 375°F (190°C). This makes sure your dish cooks evenly. 2. Cook the ziti pasta according to package instructions until al dente. Drain the pasta and set it aside. Al dente means it should be firm but not hard. This helps keep the pasta from getting mushy later. 1. In a large skillet, heat the olive oil over medium heat. 2. Add the chopped onion and minced garlic. Sauté them until the onion turns translucent. This step builds flavor and aroma. 3. Next, add the ground beef to the skillet. Cook it until it is browned, breaking it apart with a spatula as it cooks. If there’s extra fat, drain it out. 4. Stir in the marinara sauce and Italian seasoning. Let the sauce simmer for about 5 minutes. This allows the flavors to mingle. Remove it from heat when done. 1. In a large mixing bowl, combine the cooked ziti with the meat sauce. Stir well to coat all the pasta with the sauce. 2. To assemble, spread half of the ziti mixture into a greased 9x13 inch baking dish. 3. Dollop half of the ricotta mixture over the pasta, spreading it gently. 4. Sprinkle half of the shredded mozzarella cheese on top. 5. Add the remaining ziti mixture on top, then dollop with the remaining ricotta. 6. Finally, sprinkle the rest of the mozzarella and Parmesan cheese over everything. 7. Cover the baking dish with aluminum foil and bake for 25 minutes. 8. Remove the foil and bake for an additional 15-20 minutes. Look for bubbly and golden brown cheese. 9. Let the baked ziti cool for about 10 minutes before serving. If you like, garnish with fresh basil leaves for a nice touch. For the full recipe, check out the detailed ingredient list above. Enjoy your delicious, comforting meal! How to avoid overcooked pasta To keep your pasta just right, cook the ziti for 2 minutes less than the package says. This way, the pasta stays firm after baking. Remember, it will cook more in the oven, so don't overdo it! Browning the cheese for extra flavor For a rich taste, broil the dish for the last few minutes. This gives the cheese a nice brown color and a crunchy bite. Just watch it closely so it doesn’t burn. Recommended herbs and spices Add freshness with basil or oregano. A pinch of red pepper flakes can give it a nice kick! Mix these in your meat sauce for a burst of flavor. Suggested cheese alternatives If you want to change things up, try goat cheese or feta instead of ricotta. They add a tangy twist. For mozzarella, fresh mozzarella balls can create a creamy texture and taste. Best sides to accompany baked ziti Serve your baked ziti with a simple green salad. A side of garlic bread goes great too! The crunch and flavors balance the creamy pasta. Pairing with wines and salads A light red wine, like Chianti, pairs well with baked ziti. If you prefer white, a crisp Pinot Grigio is also nice. For salads, a Caesar or caprese salad adds freshness to your meal. For the complete process, check the [Full Recipe]. {{image_2}} If you want a meatless option, try plant-based ground meat. This makes the dish lighter but still tasty. You can use lentils or mushrooms for a hearty feel. If you prefer, you can simply omit the meat. This gives you a delicious vegetarian baked ziti. You still get great flavor from the sauce and cheese. Cheese makes baked ziti special. Using fresh mozzarella gives a creamy and stretchy texture. Shredded mozzarella melts well, too. You can mix both types for extra flavor. Ricotta adds a nice creaminess. Try different ricotta brands or even mix in some herbs for added taste. You can make it your own with these cheese choices. Adding vegetables can boost flavor and nutrition. Spinach, zucchini, or bell peppers are great choices. Just chop them small so they blend well. Sauté them with the onion and garlic to enhance their taste. When adding veggies, balance is key. Use them with the right amount of sauce and cheese. This way, every bite stays flavorful. For more details, check the Full Recipe. To keep baked ziti fresh, cool it first. Then, place it in an airtight container. Glass or plastic containers work well for refrigeration. Make sure to seal the lid tightly to lock in moisture. When you reheat baked ziti, avoid the microwave if you can. Instead, use an oven set to 350°F (175°C). Cover it with foil to keep moisture in. Heat for about 20 minutes. If you want to freeze leftovers, let the ziti cool completely. Place it in freezer-safe containers, leaving space for expansion. Baked ziti lasts about 3 to 5 days in the fridge. If you freeze it, it can last up to 3 months. To ensure best flavor and texture, wrap it well before freezing. How long do I bake baked ziti? I bake baked ziti for about 40 to 45 minutes. First, cover it with foil and bake for 25 minutes. Then, remove the foil and bake for another 15 to 20 minutes. This method helps the cheese get nice and bubbly. Can I prepare baked ziti ahead of time? Yes, you can prepare baked ziti ahead of time. Assemble it the day before and keep it in the fridge. Just make sure to cover it well. Bake it the next day, adding a few extra minutes if it’s cold from the fridge. Gluten-free options for ziti To make a gluten-free baked ziti, use gluten-free ziti pasta. There are many brands available that taste great. Just check the package for cooking directions, as they may vary from regular pasta. Low-carb alternatives For a low-carb version, swap the ziti for spiralized zucchini or cauliflower rice. Both options are tasty and keep the dish light. Just be sure to adjust cooking times as needed. Can I replace ricotta cheese? Yes, you can replace ricotta cheese with cottage cheese or cream cheese. Both give a nice creamy texture. If you want to keep it dairy-free, use tofu blended with a little lemon juice. What to use instead of marinara sauce? If you don’t have marinara sauce, try using a homemade tomato sauce or even pesto. Both options add unique flavors to the dish. Just make sure to season them well for the best taste. [Full Recipe] Baked ziti is a classic dish that brings warmth and joy. It combines pasta, meat, and cheese into one tasty meal. Let me share how to make this comforting dish. - 1 pound ziti pasta - 2 tablespoons olive oil - 1 onion, finely chopped - 3 cloves garlic, minced - 1 pound ground beef (or plant-based ground meat) - 1 jar (24 ounces) marinara sauce - 1 can (15 ounces) ricotta cheese - 1 egg - 2 cups shredded mozzarella cheese - 1 cup grated Parmesan cheese - 1 teaspoon Italian seasoning - Salt and pepper to taste - Fresh basil leaves for garnish (optional) 1. Preheat your oven to 375°F (190°C). This ensures even cooking. 2. Cook the ziti pasta until it is al dente. Drain and set it aside. You want it firm so it holds up in the oven. 3. Heat olive oil in a large skillet over medium heat. Add the chopped onion and garlic. Cook until the onion is soft. 4. Add the ground beef to the skillet. Cook until it turns brown. Break it into small pieces as it cooks. Drain any extra fat if needed. 5. Stir in the marinara sauce and Italian seasoning. Let it simmer for about 5 minutes. This helps blend the flavors. 6. In a bowl, mix the ricotta cheese, egg, salt, and pepper. Stir until smooth. This will give creamy layers. 7. In another large bowl, combine the cooked ziti with the meat sauce. Mix well. Make sure every piece of pasta is coated. 8. Spread half of the ziti mixture into a greased baking dish. Add half of the ricotta mixture on top and sprinkle half of the mozzarella cheese. 9. Layer the rest of the ziti mixture on top. Add the remaining ricotta and sprinkle the rest of the mozzarella and Parmesan cheese. 10. Cover the dish with foil and bake for 25 minutes. This keeps it moist while cooking. 11. Remove the foil and bake for another 15-20 minutes. Look for bubbly and golden cheese on top. 12. Let it cool for about 10 minutes before serving. Garnish with fresh basil leaves if you like. With this recipe, you will create a dish that comforts and delights. Enjoy every cheesy bite! Baked ziti is a hearty dish made with simple ingredients. We covered the essential components, from pasta and sauce to cheese. I shared easy steps for cooking and assembling, plus tips for perfecting your meal. Remember, you can customize baked ziti with proteins and veggies to fit your taste. Don't forget about storage and reheating guidelines for leftovers. Enjoy this dish with friends and family, making each bite memorable!](https://dailydishlab.com/wp-content/uploads/2025/06/2fce1db0-3740-4cc6-8e4e-0aee4d2c952d-768x768.webp)


. In this post, we explored how to make spicy garlic shrimp tacos. We covered key ingredients like shrimp, garlic, and spices. I shared step-by-step instructions for marinating, cooking, and assembling the tacos. We also discussed tips for perfect shrimp and different tortilla options. You can customize these tacos to your taste or use other proteins too. Don’t forget to check out the full recipe for quick reference. Enjoy creating and sharing this tasty meal with friends and family!](https://dailydishlab.com/wp-content/uploads/2025/06/f3f63153-6df6-4664-b699-490f731c66b6-768x768.webp)
