Sheet Pan Teriyaki Meatball Bowls Flavorful Dinner

Are you ready to serve up a quick and tasty dinner? My Sheet Pan Teriyaki Meatball Bowls will delight your taste buds and save you time in the kitchen. This one-pan meal combines juicy meatballs, fresh veggies, and a sweet teriyaki sauce, all baked to perfection. In this post, I’ll guide you step by step, sharing tips and tricks to make dinner a breeze. Let’s get cooking!
Why I Love This Recipe
- Healthy Ingredients: This recipe features lean ground chicken or turkey, packed with protein and essential nutrients, making it a wholesome meal option.
- Quick and Easy: With a total cooking time of just 30 minutes, this sheet pan meal is perfect for busy weeknights or last-minute dinners.
- One-Pan Wonder: Cooking everything on a single sheet pan means minimal cleanup, allowing you to enjoy your meal without the hassle of washing a ton of dishes.
- Flavorful and Versatile: The teriyaki sauce adds a deliciously sweet and savory flavor, while the variety of vegetables can be easily swapped based on your preferences.
Ingredients
Main Ingredients for Meatballs
To make the meatballs, gather these items:
- 1 pound ground chicken or turkey
- 1/2 cup panko breadcrumbs
- 1/4 cup green onions, finely chopped
- 2 cloves garlic, minced
- 1 teaspoon ginger, grated
- 1 tablespoon soy sauce
- 1 egg, beaten
- Salt and pepper to taste
These ingredients blend well to create moist, tasty meatballs. The panko breadcrumbs add a nice texture. The green onions, garlic, and ginger give a fresh flavor, making the meatballs stand out.
Fresh Vegetables to Include
For the vegetables, use:
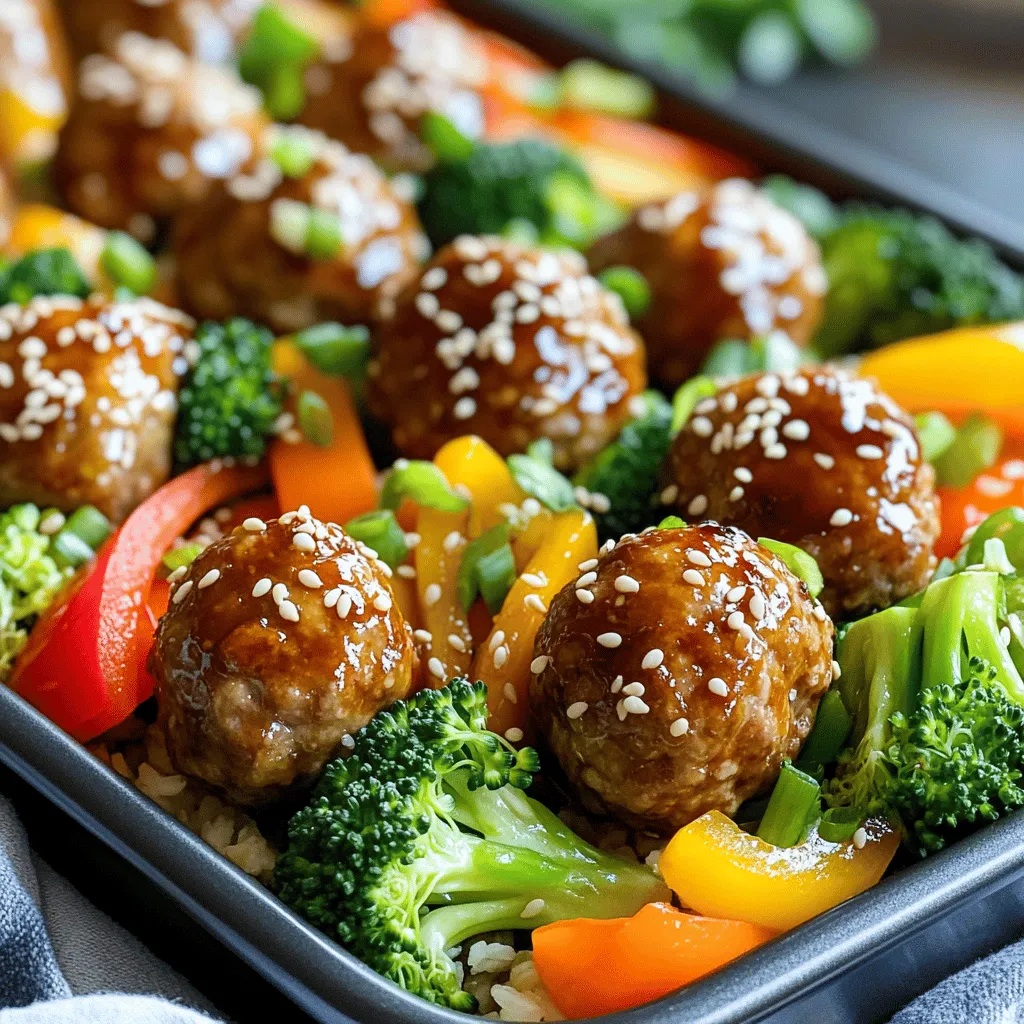
- 2 cups broccoli florets
- 1 cup bell peppers, sliced (any color)
- 1 cup carrots, thinly sliced
These veggies add color and crunch. Broccoli brings a nice bite, while bell peppers offer sweetness. Carrots add a hint of earthiness. Together, they make the dish balanced and bright.
Optional Garnishes
To finish the bowls, consider these garnishes:
- Sesame seeds for garnish
- Additional green onions for garnish
These garnishes enhance the look and taste of the dish. Sesame seeds add a nutty crunch, while extra green onions bring freshness. They make every bite more enjoyable and appealing.

Step-by-Step Instructions
Preparing the Oven and Baking Sheet
Start by preheating your oven to 400°F (200°C). This step ensures that your meatballs cook evenly and get nice and brown. Next, grab a large baking sheet and line it with parchment paper. This makes cleanup easy and helps the meatballs and veggies not stick.
Making the Meatball Mixture
In a large bowl, combine 1 pound of ground chicken or turkey with 1/2 cup of panko breadcrumbs. Add 1/4 cup of finely chopped green onions, 2 minced garlic cloves, and 1 teaspoon of grated ginger. Pour in 1 tablespoon of soy sauce and crack in 1 beaten egg. Season with salt and pepper to your taste. Mix everything well until it’s nice and smooth. This mixture creates moist and flavorful meatballs.
Shaping and Arranging the Meatballs and Vegetables
Now it’s time to shape the meatballs. With clean hands, form the meat mixture into balls about 1 inch wide. Place them on one side of the baking sheet. On the other side, arrange 2 cups of broccoli florets, 1 cup of sliced bell peppers, and 1 cup of thinly sliced carrots. Spread these in a single layer. Drizzle a little olive oil over the veggies and sprinkle them with salt and pepper.
Baking and Adding Teriyaki Sauce
Carefully place the baking sheet in the preheated oven. Bake for around 20 minutes. Your meatballs should reach an internal temperature of 165°F, and the veggies should be tender. After 20 minutes, remove the sheet from the oven. Brush 1/4 cup of teriyaki sauce over the meatballs. Drizzle some over the vegetables too. This adds extra flavor. Return the sheet to the oven for another 5 minutes to caramelize the sauce.
Assembling and Garnishing the Bowls
Take the baking sheet out of the oven. Using a spatula, transfer the meatballs and vegetables into individual bowls. To finish, sprinkle sesame seeds and some extra chopped green onions on top. This gives your meal a nice look and a bit more taste. Enjoy your vibrant and flavorful Sheet Pan Teriyaki Meatball Bowls!
Pro Tips
- Use Fresh Ingredients: Fresh vegetables will enhance the flavor and nutritional value of your dish. Look for vibrant colors and firm textures.
- Don’t Overcrowd the Pan: Give your meatballs and vegetables enough space on the baking sheet to ensure they roast properly and develop a nice caramelization.
- Customize Your Sauce: Feel free to add more spices or a splash of lime juice to your teriyaki sauce for a unique twist that suits your taste.
- Meal Prep Friendly: These bowls are perfect for meal prep. You can double the recipe and store leftovers in the fridge for quick lunches or dinners throughout the week.
Tips & Tricks
Best Practices for Moist Meatballs
To make moist meatballs, use ground chicken or turkey. These meats are lean, helping keep them juicy. Add panko breadcrumbs to the mix. They soak up moisture and add a nice texture. Also, don’t skip the egg. It binds the meatballs and adds moisture. Mix the ingredients gently. Overmixing can lead to tough meatballs. Shape them into balls about 1 inch wide. This size cooks evenly and stays juicy.
Vegetable Cooking Tips
For the best veggies, cut them into similar sizes. This helps them cook at the same rate. Use fresh broccoli, bell peppers, and carrots for vibrant color and taste. Drizzle olive oil lightly over the vegetables. This helps them roast well. Season with salt and pepper to enhance their flavor. Pull them out of the oven when they are tender but still crisp. They should not be mushy.
How to Customize Your Teriyaki Sauce
You can make teriyaki sauce your own. If you want it sweeter, add honey or brown sugar. For a tangy kick, mix in a splash of rice vinegar. You can also add sesame oil for depth. If you like heat, chop up some chili peppers or add a dash of sriracha. Brush the sauce on meatballs and veggies before the last bake. This caramelizes the sauce and adds flavor.

Variations
Using Different Proteins
You can switch the ground chicken or turkey for other meats. Try ground beef or pork for a richer taste. If you prefer lean meats, use ground chicken breast. You can also use ground lamb for a unique twist. Adjust the cooking time if using a different protein. Just ensure the meatballs reach 165°F internal temperature.
Vegetarian and Vegan Alternatives
For a meat-free option, use lentils or chickpeas. Mash cooked lentils and mix with panko and seasonings. You can also make veggie meatballs using black beans, oats, and spices. Tofu is another great choice. Crumble firm tofu and mix it with breadcrumbs and seasonings. These alternatives are tasty and healthy!
Alternative Vegetable Combinations
Feel free to swap the vegetables for others you enjoy. Zucchini, snap peas, or even cauliflower work well. You can add sweet potatoes for a nice sweetness. Roasted asparagus or green beans are also great options. The key is to keep the veggies colorful and fresh for a vibrant meal.
Storage Info
How to Store Leftovers
To store leftovers, let the meatball bowls cool completely. Place the meatballs and veggies in an airtight container. This keeps them fresh. You can store them in the fridge for up to three days. If you want them to last longer, consider freezing them.
Reheating Instructions
When you are ready to eat, you can reheat the leftovers. The microwave is quick and easy. Heat for about 1-2 minutes, stirring halfway through. If you prefer, you can reheat them in the oven. Preheat the oven to 350°F (175°C). Place the bowls on a baking sheet and heat for 10-15 minutes. This method keeps them crispy!
Freezing Tips for Meal Prep
If you want to prep ahead, freezing is a great option. Place the meatballs and vegetables in separate freezer bags. Squeeze out the air before sealing. This helps prevent freezer burn. You can freeze them for up to three months. When you want to enjoy them, just thaw in the fridge overnight before reheating. This keeps the flavors fresh and tasty!
FAQs
Can I use store-bought teriyaki sauce?
Yes, you can use store-bought teriyaki sauce. It saves time and adds great flavor. Look for a sauce with clean ingredients. Some sauces are sweeter, while others are more savory. Choose one you enjoy. If you want to make it at home, mix soy sauce, honey, garlic, and ginger. This option lets you adjust the flavors.
What can I serve with Sheet Pan Teriyaki Meatball Bowls?
Sheet Pan Teriyaki Meatball Bowls are great on their own. You can add rice or quinoa for extra carbs. A side salad with fresh greens also works well. Try adding sesame cucumbers for crunch. If you like spice, serve with sriracha or chili flakes. You can also pair it with steamed edamame for more protein.
How do I know when the meatballs are fully cooked?
Check the internal temperature of the meatballs. They should reach 165°F (74°C). You can use a meat thermometer for accuracy. If you cut one open, it should be no longer pink inside. The juices should run clear. This ensures they are safe and tasty to eat.
This post showed you how to make tasty sheet pan teriyaki meatball bowls. We covered key ingredients, easy steps, and helpful tips. You learned to customize flavors and explore different proteins or vegetables. Storing leftovers and reheating was also discussed to save time.
Now, you can create this meal with ease and enjoy a healthy dish. Get creative and make it your own!

Sheet Pan Teriyaki Meatball Bowls
Ingredients
1 pound ground chicken or turkey
1/2 cup panko breadcrumbs
1/4 cup green onions, finely chopped
2 cloves garlic, minced
1 teaspoon ginger, grated
1 tablespoon soy sauce
1 egg, beaten
Salt and pepper to taste
2 cups broccoli florets
1 cup bell peppers, sliced (any color)
1 cup carrots, thinly sliced
1/4 cup teriyaki sauce (store-bought or homemade)
Sesame seeds for garnish
Additional green onions for garnish
Instructions
Preheat the Oven: Preheat your oven to 400°F (200°C) and line a large baking sheet with parchment paper for easy cleanup.
Make the Meatballs: In a large bowl, combine ground chicken or turkey, panko breadcrumbs, chopped green onions, minced garlic, grated ginger, soy sauce, beaten egg, salt, and pepper. Mix well until fully combined.
Shape the Meatballs: With your hands, form the mixture into meatballs about 1 inch in diameter and place them on one side of the prepared baking sheet.
Prepare the Vegetables: On the other side of the baking sheet, arrange the broccoli florets, sliced bell peppers, and carrots in a single layer. Drizzle a little olive oil over the vegetables and season with salt and pepper.
Bake: Place the sheet pan in the preheated oven. Bake for about 20 minutes, or until the meatballs are cooked through (internal temperature of 165°F) and the vegetables are tender.
Add Teriyaki Sauce: Remove the sheet pan from the oven. Brush the teriyaki sauce over the meatballs and sprinkle some teriyaki sauce over the vegetables. Return to the oven for an additional 5 minutes to caramelize the sauce.
Assemble the Bowls: Remove the sheet pan from the oven. Using a spatula, carefully transfer the meatballs and vegetables into individual bowls.
Garnish: Sprinkle sesame seeds and additional chopped green onions over the top for a finishing touch.
– Prep Time: 15 minutes | Total Time: 30 minutes | Servings: 4
Enjoy your vibrant and flavorful Sheet Pan Teriyaki Meatball Bowls! Perfect for meal prep or a quick family dinner.

Sheet Pan Teriyaki Meatball Bowls
Ingredients
- 1 pound ground chicken or turkey
- 0.5 cup panko breadcrumbs
- 0.25 cup green onions, finely chopped
- 2 cloves garlic, minced
- 1 teaspoon ginger, grated
- 1 tablespoon soy sauce
- 1 egg beaten
- to taste salt and pepper
- 2 cups broccoli florets
- 1 cup bell peppers, sliced
- 1 cup carrots, thinly sliced
- 0.25 cup teriyaki sauce
- for garnish sesame seeds
- for garnish additional green onions
Instructions
- Preheat your oven to 400°F (200°C) and line a large baking sheet with parchment paper for easy cleanup.
- In a large bowl, combine ground chicken or turkey, panko breadcrumbs, chopped green onions, minced garlic, grated ginger, soy sauce, beaten egg, salt, and pepper. Mix well until fully combined.
- With your hands, form the mixture into meatballs about 1 inch in diameter and place them on one side of the prepared baking sheet.
- On the other side of the baking sheet, arrange the broccoli florets, sliced bell peppers, and carrots in a single layer. Drizzle a little olive oil over the vegetables and season with salt and pepper.
- Place the sheet pan in the preheated oven. Bake for about 20 minutes, or until the meatballs are cooked through (internal temperature of 165°F) and the vegetables are tender.
- Remove the sheet pan from the oven. Brush the teriyaki sauce over the meatballs and sprinkle some teriyaki sauce over the vegetables. Return to the oven for an additional 5 minutes to caramelize the sauce.
- Remove the sheet pan from the oven. Using a spatula, carefully transfer the meatballs and vegetables into individual bowls.
- Sprinkle sesame seeds and additional chopped green onions over the top for a finishing touch.
- Enjoy your vibrant and flavorful Sheet Pan Teriyaki Meatball Bowls!


![Let’s dive into the simple ingredients that make this dish shine. Each element plays a role in creating a tasty and healthy meal. Here’s what you need: - 4 cod fillets (about 6 oz each) - 2 tablespoons olive oil - 2 lemons (one for zest and juice, one for slices) - 3 cloves garlic, minced - 1 teaspoon dried oregano - 1 teaspoon dried thyme - 1 teaspoon paprika - Salt and pepper to taste - Fresh parsley, chopped (for garnish) Cod fillets are the star here. They have a mild taste that works well with the bright lemon and herbs. Olive oil adds richness and helps the fish stay moist. Garlic brings a punch of flavor, and the herbs add freshness. Using fresh lemons is key. You’ll use one for zest and juice, which brightens up the dish. The other lemon gets sliced and placed on top of the cod for extra flavor and a nice look. Dried oregano and thyme give depth to the dish. Paprika adds a hint of warmth. Finally, a sprinkle of salt and pepper rounds it all out. These ingredients come together to create a dish that is both light and satisfying. If you want to see how these ingredients blend, check out the Full Recipe for step-by-step instructions. 1. Preheat the oven: Start by setting your oven to 400°F (200°C). This ensures even cooking for our cod. 2. Prepare the marinade: In a small bowl, mix 2 tablespoons of olive oil, 3 minced garlic cloves, the zest of one lemon, and the juice from that same lemon. Add 1 teaspoon each of dried oregano, thyme, and paprika. Finally, season with salt and pepper to taste. Stir it well. 3. Coat the cod fillets: Place your 4 cod fillets in a baking dish. Pour the lemon herb marinade over each fillet. Make sure they are all well coated in that tasty mix. 1. Arrange lemon slices: Take the other lemon and slice it. Place the lemon slices on top of each cod fillet. This adds a fresh, zesty kick while baking. 2. Baking time and temperatures: Slide the baking dish into your preheated oven. Bake for 15-20 minutes. The cod is ready when it turns opaque and flakes easily with a fork. 1. Rest and garnish before serving: Once the cod is done, take it out and let it rest for a couple of minutes. This helps the juices settle. Before serving, sprinkle freshly chopped parsley on top. It adds color and a fresh taste. Feel free to check the [Full Recipe] for more details! Choosing the best cod is key to a tasty dish. Look for cod fillets that are firm and moist. They should have a clean, ocean-like smell. Freshness matters. If you can, buy wild-caught cod for the best flavor. Fresh herbs and citrus add bright notes. Use fresh parsley, thyme, and oregano when possible. They bring out the lemon's zest. Always choose lemons that feel heavy for their size. Juicy lemons will boost your dish. To ensure moist fillets, don’t overcook the cod. Bake just until it is opaque and flakes easily. Set a timer for 15 minutes, then check. If it needs more time, add a few minutes. Adjusting seasoning levels is easy. Taste the marinade before adding it to the cod. If it feels bland, add a pinch more salt or pepper. You can always adjust to match your palate. Pair this dish with sides that complement its light flavors. Roasted vegetables work nicely. Try asparagus or green beans for a fresh touch. A light sauce can elevate the meal. Consider a yogurt dill sauce for creaminess. It adds a nice contrast to the cod. For a bit of crunch, add a side salad. For the full recipe, see the details above. {{image_2}} You can try other white fish instead of cod. Fish like tilapia or haddock work well. They will soak up the lemon and herb flavors nicely. If you want a richer taste, you can substitute cod with salmon. Salmon has more fat, so it stays moist when cooked. The lemon still brightens the dish, making it fresh and tasty. Adding spices can take your baked lemon herb cod to the next level. You might want to try adding cumin or dill to the mix. These spices pair well with lemon, enhancing the dish's flavor. If you love heat, consider making a spicy version. Add chili flakes or fresh jalapeños to the marinade. This twist creates a fun kick that many will enjoy. While baking is easy, you can also grill or pan-sear your cod. Grilling adds a smoky flavor that many people love. Just be sure to keep an eye on it so it doesn't dry out. Air-frying is another great option. It cooks the fish quickly and gives it a nice crust. Each method offers a unique taste and texture, so feel free to experiment. To store leftover cod, let it cool first. Place the cod in an airtight container. Cover it tightly to keep it fresh. You can store it in the fridge for up to three days. Make sure to check for any off smells or changes in texture before eating. If you want to keep cod longer, freezing is a great option. Wrap the cod tightly in plastic wrap or foil. You can also use a freezer-safe bag. This helps prevent freezer burn. Cod can last up to three months in the freezer. When you are ready to use it, remember to thaw it slowly. Place it in the fridge overnight for the best results. To reheat your baked cod, use the oven or a skillet. If you use the oven, preheat it to 350°F (175°C). Place the cod on a baking sheet for about 10 minutes. This keeps it moist and tasty. If you choose a skillet, heat it over medium heat. Add a splash of olive oil and gently warm the cod for about 5 minutes. Avoid high heat to keep the texture nice. Enjoy your flavorful meal again! What can I substitute for cod in this recipe? You can use halibut, haddock, or tilapia as substitutes for cod. Each fish has a mild flavor and similar texture. This ensures your dish remains light and flaky. How do I know when cod is fully cooked? Cod is fully cooked when it turns opaque and flakes easily with a fork. This usually takes 15 to 20 minutes at 400°F. A food thermometer can help; the internal temperature should reach 145°F. Can I prepare the marinade in advance? Yes, you can prepare the marinade a day ahead. Store it in the fridge until you are ready to use it. This allows the flavors to blend nicely. Caloric values per serving Each serving of Baked Lemon Herb Cod contains about 250 calories. This is a healthy option for a balanced meal. Key vitamins and minerals in the dish This dish is rich in protein, vitamin C, and omega-3 fatty acids. Cod provides important nutrients for heart health and overall well-being. Making it gluten-free This recipe is naturally gluten-free. Use gluten-free seasoning blends if you want to add extra flavors without worry. Adjusting for low-sodium diets For a low-sodium version, skip the added salt. Use fresh herbs and lemon juice for flavor without extra salt. This keeps your meal healthy and tasty. This article covered how to make delicious baked cod. You learned about the right ingredients, like fresh cod and herbs. I shared step-by-step instructions for preparing, baking, and serving. We also explored tips for ingredient selection and cooking methods. Remember, cooking should be fun and simple. Experiment with flavors and cooking styles. Whether you stick to cod or try other fish, enjoy the process. Keep these tips in mind for tasty meals every time. Happy cooking!](https://dailydishlab.com/wp-content/uploads/2025/07/2716cd61-27b0-42e4-83ae-f5907d1cee06-768x768.webp)
![For these tasty bowls, you need: - 2 boneless, skinless chicken breasts - 1 cup jasmine rice - 1 cucumber, thinly sliced - 1 carrot, julienned - Fresh cilantro leaves for garnishing - Lime wedges for serving - Sliced red chili (optional, for heat) These ingredients create a base full of flavor and texture. The chicken offers protein, while the jasmine rice adds a nice touch of sweetness. The veggies give crunch and freshness. The marinade brings all the flavors together. Here’s what you need: - 3 tablespoons fish sauce - 2 tablespoons honey - 1 tablespoon soy sauce (low-sodium is fine) - 2 cloves garlic, minced - 1 tablespoon fresh ginger, grated - 1/2 teaspoon black pepper This mix makes the chicken tender and packed with taste. Fish sauce adds a salty depth, while honey balances it with sweetness. Garlic and ginger provide warmth and depth. Feel free to add more veggies to your bowls. Some great options include: - Bell peppers, sliced - Snap peas, trimmed - Radishes, thinly sliced You can also switch up the garnishes. Consider adding: - Chopped green onions - Sesame seeds - Fresh mint leaves These additions enhance the meal's look and flavor. They also add extra nutrients, making your meal even better. For the full recipe, check out the Vietnamese Chicken Meal Prep Bowls section. To start, you need to make the marinade. In a mixing bowl, whisk together: - 3 tablespoons fish sauce - 2 tablespoons honey - 1 tablespoon soy sauce - 2 cloves garlic, minced - 1 tablespoon fresh ginger, grated - 1/2 teaspoon black pepper Mix well until everything blends together. This marinade gives the chicken a great flavor. Next, add the chicken breasts to the bowl. Make sure each breast is coated with the marinade. Cover the bowl and let it sit in the fridge for at least 30 minutes. If you have time, let it marinate for up to 2 hours for more flavor. While the chicken marinates, it’s time to cook the jasmine rice. In a medium pot, combine: - 1 cup jasmine rice - 1 3/4 cups water or low-sodium chicken broth - A pinch of salt Bring the mixture to a boil over medium-high heat. Once it boils, lower the heat and cover with a lid. Let it simmer for about 15 minutes until the rice is fluffy. After cooking, keep it covered for an extra 5 minutes. This helps the rice steam and become perfect. Now, heat a non-stick skillet on medium-high heat. Add a little cooking oil once it’s hot. Carefully place the marinated chicken in the skillet. Cook each side for 6-7 minutes. You want the chicken to be golden-brown and fully cooked. Use a meat thermometer to ensure it reaches 165°F (75°C). Once cooked, take the chicken out of the skillet. Let it rest for a few minutes on a cutting board. After it rests, slice the chicken into thin strips. This makes it tender and easy to eat. Now for the fun part: assembling the bowls! Start by dividing the cooked jasmine rice into 4 airtight containers. Top each serving of rice with sliced chicken. Then, add: - Thinly sliced cucumber - Julienned carrots Garnish each bowl with fresh cilantro leaves. Place lime wedges on the side for a burst of flavor when you eat. If you like some heat, add sliced red chili on top. Allow the bowls to cool before sealing them with lids. You can store them in the fridge for up to 4 days. These meal prep bowls are perfect for quick lunches or dinners. For the complete recipe, check out the [Full Recipe]. To make meal prep easy, I like to set up a workspace. First, gather all your tools. This includes cutting boards, knives, and bowls. Having everything close by cuts down on time. I also recommend cooking in batches. Make extra rice or chicken. This way, you can use them in other meals too. To ensure juicy chicken, marinate it well. A good marinade adds flavor and moisture. I suggest marinating for at least 30 minutes. For best results, go for 2 hours. When cooking, use medium-high heat. This helps create a nice golden color. Always check the chicken's temperature. It should reach 165°F (75°C). Letting it rest after cooking is key. This keeps the juices in the meat. There are many ways to boost flavor in your meal prep bowls. Try adding fresh herbs like mint or basil. You can also squeeze lime juice over each bowl. For extra crunch, add chopped peanuts or cashews. If you like spice, toss in some sliced chili. These small touches make a big difference. For the full recipe, check out the complete guide on Vietnamese Chicken Meal Prep Bowls. {{image_4}} You can easily swap chicken for other proteins. Shrimp is a great choice. Cook the shrimp for just 2-3 minutes until they turn pink. Tofu works well too. Use firm tofu and press it first to remove extra moisture. This helps it absorb flavors. Another option is beef. Use thinly sliced flank steak instead of chicken. Cook it quickly over high heat for a tender bite. If you want a vegetarian or vegan meal prep bowl, try using tempeh or seitan. Both have a great texture and soak up flavors well. Marinate them just like the chicken. Cook tempeh for about 5-7 minutes in a skillet. For a vegan option, skip the fish sauce and use soy sauce instead. You can also add more veggies like bell peppers or mushrooms for added taste and nutrition. Make your bowls unique with different toppings. Try adding sliced radishes for crunch. You can also add avocado for creaminess. Fresh herbs like mint or basil work wonders too. For extra flavor, drizzle some sriracha or hoisin sauce on top. You can even add nuts for a tasty crunch. These simple tweaks let you enjoy a new meal every time. To see the full recipe, check out the [Full Recipe]. To keep your Vietnamese Chicken Meal Prep Bowls fresh, use airtight containers. Divide the bowls into four portions. Store rice, chicken, and veggies separately if you can. This will help maintain texture and flavor. Let the meal prep bowls cool before sealing them. This step helps prevent steam from making everything soggy. When you're ready to enjoy your meal prep bowls, use the microwave. Place a bowl in the microwave for 1-2 minutes. Stir halfway through to heat evenly. Check that the chicken reaches 165°F (75°C) before eating. If you prefer, you can reheat on the stove. Just add a splash of water to prevent sticking. These bowls last for up to four days in the fridge. After that, the flavors may fade. Always check for any off smells or changes in color before eating. If you want to store them longer, consider freezing. Just make sure to label them, so you know what's inside. Enjoy your delicious meal prep with confidence! To make Vietnamese Chicken Meal Prep Bowls, start with chicken breasts. First, mix fish sauce, honey, soy sauce, garlic, ginger, and black pepper in a bowl. This creates a tasty marinade. Coat the chicken in this marinade and let it sit for 30 minutes in the fridge. While it marinates, cook jasmine rice in water or broth for about 15 minutes. Heat a skillet, add oil, and cook the chicken for 6-7 minutes on each side until it’s golden and reaches 165°F. Slice the chicken and assemble the bowls with rice, chicken, cucumber, and carrots. Don’t forget the cilantro and lime! For more details, check the Full Recipe. Vietnamese Chicken Meal Prep Bowls pair well with light sides. Here are some great choices: - Steamed broccoli - Pickled vegetables - Fresh spring rolls - Asian-style slaw - Edamame These sides add color and different textures to your meal. They also keep the meal fresh and exciting. Yes, you can freeze Vietnamese Chicken Meal Prep Bowls. Just make sure to cool them completely before sealing them in airtight containers. They can last in the freezer for up to three months. When you want to eat them, thaw them in the fridge overnight and reheat in the microwave. This keeps your meal fresh and tasty. Vietnamese Chicken Meal Prep Bowls are healthy and balanced. Here is a rough idea of the nutrition per serving: - Calories: 400 - Protein: 30g - Carbohydrates: 45g - Fat: 10g - Fiber: 3g - Sugar: 6g This dish provides protein, carbs, and healthy fats. You can adjust ingredients for your dietary needs. In this blog post, we covered the key ingredients and step-by-step instructions for making Vietnamese Chicken Meal Prep Bowls. We discussed marinades and cooking tips to ensure great flavor. You can also explore various protein options and learn how to store and reheat these bowls effectively. These meal prep bowls are easy to customize and perfect for busy days. With simple steps and tasty ingredients, you can enjoy delicious, healthy meals throughout the week. Happy cooking!](https://dailydishlab.com/wp-content/uploads/2025/06/450469d4-7878-479c-828a-ae6f4f51905d-768x768.webp)
. Enjoy using these ingredients to create a flavorful and juicy dish! Start by taking the ribeye steaks out of the fridge. Let them sit at room temperature for about 30 minutes. This helps the meat cook evenly. While they rest, you should preheat your grill or a cast-iron skillet on medium-high heat. A hot cooking surface will give your steaks a nice crust. Now, pat the steaks dry with paper towels. This step is key for a good sear. Next, rub salt, pepper, and Cajun seasoning on both sides of the steaks. Make sure they are well-coated for the best flavor. Add 2 tablespoons of butter to your skillet or grill. Let it melt and get slightly browned for extra taste. Place the seasoned steaks on the hot surface. Cook them for about 4-5 minutes on one side. This will create a nice crust. Flip the steaks over and add the remaining 2 tablespoons of butter. Also, sprinkle the minced garlic and smoked paprika on top. Continue cooking for another 4-5 minutes. Spoon the melted garlic butter over the steaks often. Aim for a temperature of 130°F for medium-rare. Once the steaks are done, take them off the grill or skillet. Let them rest for about 5 minutes on a cutting board. This resting time helps keep the juices inside the meat. Slice the steaks against the grain. Drizzle the garlicky Cajun butter from the skillet over the slices. Finally, sprinkle chopped parsley on top for color and flavor. Serve with lemon wedges for a zesty kick. For the complete recipe, refer to the Full Recipe section. To check steak temperature, use a meat thermometer. Insert it into the thickest part of the steak. This gives the most accurate reading. Here are the recommended doneness levels: - Rare: 120°F - 125°F - Medium Rare: 130°F - 135°F - Medium: 140°F - 145°F - Medium Well: 150°F - 155°F - Well Done: 160°F and above Aim for medium-rare for the best flavor and juiciness. Cajun seasoning can vary. You can find blends with more heat or herbs. Feel free to mix your own. Add paprika, onion powder, or cayenne for extra kick. When browning the butter, heat it slowly. Watch for the golden color and a nutty aroma. This adds depth to your dish. For serving, place the steak on a warm plate. This keeps it hot longer. You can slice the steak for easier eating. Garnish with fresh parsley for a pop of color. Add lemon wedges on the side for a zesty touch. These simple moves make your meal look and taste gourmet. For the complete experience, check the Full Recipe. {{image_2}} You can use different cuts of meat for your Cajun butter steak. Ribeye is great, but you can try sirloin, filet mignon, or T-bone. Each cut has its unique taste and texture. - Sirloin: This cut is leaner but still juicy. Cook for 3-4 minutes per side. - Filet Mignon: Very tender, it cooks quickly. Aim for 2-3 minutes per side. - T-bone: A mix of tenderloin and strip steak. Cook for about 4-5 minutes per side. Cooking times vary based on thickness and how you like your steak. Always check the internal temperature to ensure it’s safe and delicious. You can adjust the spice level of your Cajun butter steak to fit your taste. If you want more heat, add extra Cajun seasoning. If you prefer less spice, cut back on it. You can also mix in other spices. Try adding: - Cayenne pepper for extra heat. - Paprika for a smoky flavor. - Thyme or oregano for herbal notes. Experiment with these spices to create a unique flavor profile. Adding vegetables can enhance your dish. Grilled vegetables like bell peppers, zucchini, or asparagus pair well with the steak. You can also add sauces and sides. Think about these options: - Creamy mashed potatoes for a comforting side. - Garlic bread for a crunchy texture. - A fresh salad to add a light touch. These additions make your meal more balanced and exciting. For the full recipe, check out the Cajun butter steak steps above. To store leftover Cajun Butter Steak, let it cool first. Then, place it in an airtight container. This helps keep the steak fresh for up to three days. If you want to enjoy its full flavor, reheat it gently. Use a skillet or the microwave on low power. If you want to freeze cooked steak, wrap each piece in plastic wrap. Then, put it in a freezer-safe bag. This way, it can last up to three months. When you're ready to eat, thaw the steak in the fridge overnight. For best texture and flavor, reheat it in a skillet. This keeps it juicy and tasty. Enjoy your Cajun Butter Steak anytime with these storage tips! To get a great sear, start with a hot grill or skillet. Here are some key tips: - Use a cast-iron skillet or a grill for best results. - Pat your steaks dry to remove moisture. - Season the steaks right before cooking. - Avoid overcrowding the pan or grill. - Cook without moving the steak for a few minutes. This helps form a nice crust. Flip the steak only once. You want to hear that sizzle! Yes, you can adapt the Cajun butter for chicken or seafood. - For chicken, use the same Cajun butter mix. Cook until the chicken reaches 165°F. - For seafood like shrimp or fish, reduce cooking time. Seafood cooks fast! Just remember to adjust the cooking time based on the protein you choose. Cajun Butter Steak goes well with many sides. Here are my favorites: - Garlic mashed potatoes - Grilled corn on the cob - Sautéed green beans - Coleslaw for a crunchy contrast - A fresh garden salad for balance These sides enhance the steak's bold flavors and make a complete meal. Cooking time for a ribeye varies by preference: - Rare: 3-4 minutes per side (120°F) - Medium-rare: 4-5 minutes per side (130°F) - Medium: 5-6 minutes per side (140°F) - Medium-well: 6-7 minutes per side (150°F) - Well-done: 8-9 minutes per side (160°F) Always let the steak rest after cooking. This keeps it juicy and flavorful. For the full recipe, check out the detailed cooking steps above. You now have a flavorful Cajun Butter Steak recipe. We explored key ingredients, cooking steps, and tips for perfect doneness. Remember to adjust the spice level to suit your taste. Try adding different cuts, vegetables, or sauces for variety. Proper storage keeps leftovers fresh for later. This dish is simple to prepare and sure to impress. Enjoy your cooking adventure with this tasty recipe!](https://dailydishlab.com/wp-content/uploads/2025/07/cefc687f-9021-4868-bb93-419ddf0ee92f-768x768.webp)