Simple Greek Salad Fresh and Flavorful Delight

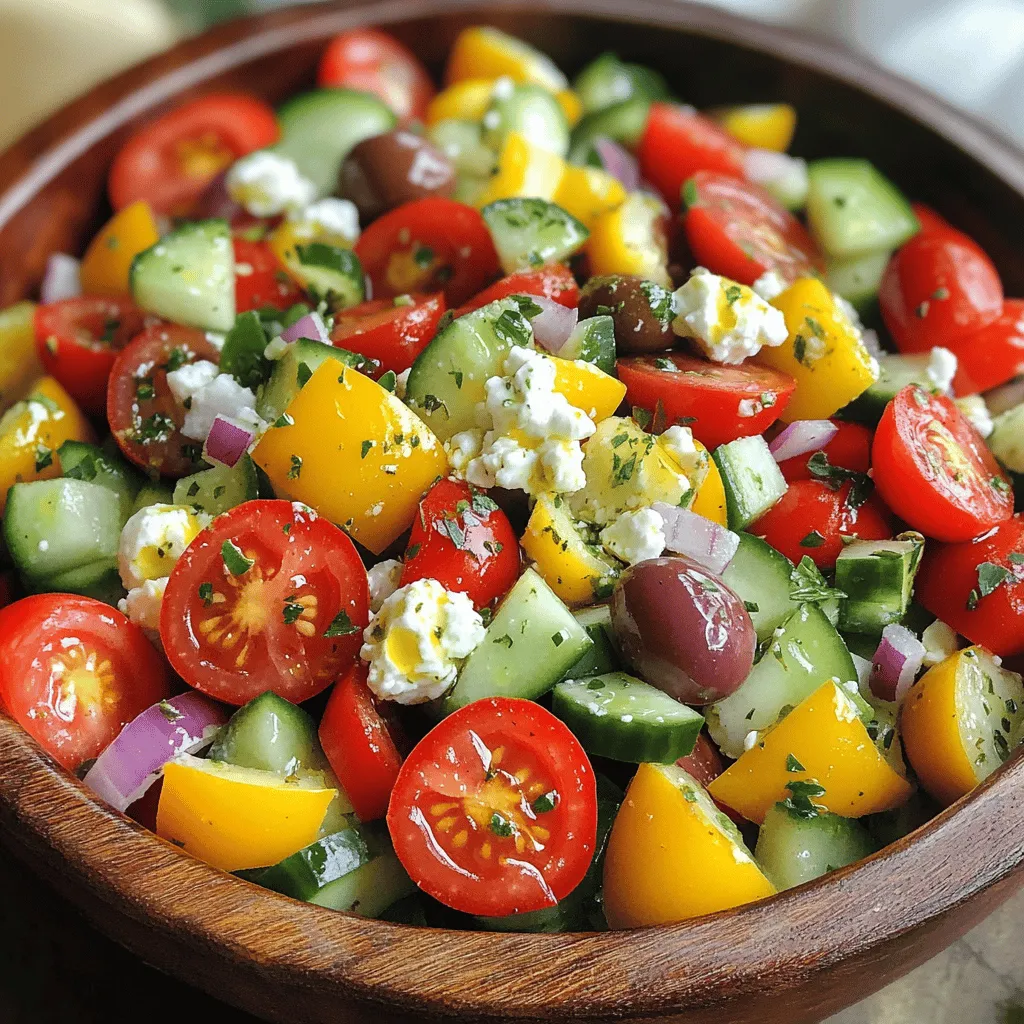
Looking for a quick, refreshing meal? My Simple Greek Salad is packed with fresh produce and bold flavors. You’ll love the crunch of crisp vegetables and the zing from tangy dressing. I’ll guide you through easy steps to create a delightful salad that works as a main or side dish. Let’s dive in and make this vibrant, tasty dish together! Your taste buds will thank you!
Why I Love This Recipe
- Fresh and Vibrant Ingredients: This salad features a colorful mix of fresh vegetables that not only look appealing but also provide a burst of flavor in every bite.
- Quick and Easy to Prepare: With just 15 minutes of prep time, this salad is perfect for a quick lunch or a side dish at dinner.
- Healthy and Nutritious: Packed with vitamins and minerals, this Greek salad is a great way to incorporate more nutrients into your diet without sacrificing taste.
- Customizable: You can easily modify this recipe by adding your favorite ingredients, such as avocado or grilled chicken, to make it your own.
Ingredients
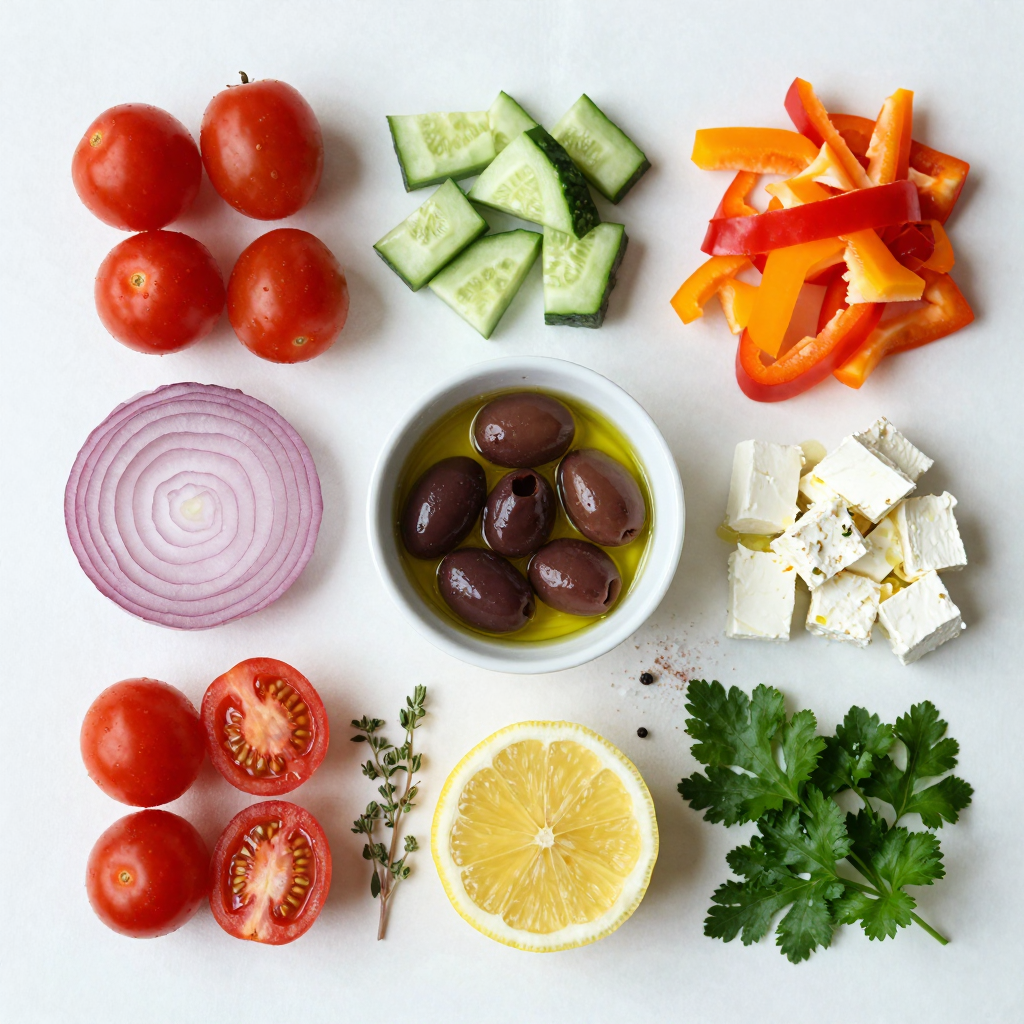
Fresh produce makes this salad bright and colorful. Here’s what you need:
- 2 cups cherry tomatoes, halved
- 1 cucumber, diced
- 1 bell pepper (any color), diced
- 1/2 red onion, finely sliced
Next, we add cheese and olives for flavor and texture:
- 1 cup Kalamata olives, pitted
- 1 cup feta cheese, crumbled
Finally, the dressing components bring it all together:
- 3 tablespoons extra virgin olive oil
- 2 tablespoons fresh lemon juice
- 1 teaspoon dried oregano
- Salt and pepper to taste
This Simple Greek Salad bursts with flavor and freshness.Enjoy making this delicious dish!

Step-by-Step Instructions
Preparing the Vegetables
To start, you need to prepare the vegetables. This step makes your salad fresh and colorful. First, halve the cherry tomatoes. This brings out their sweet flavor. Next, dice the cucumber and bell pepper. Aim for small pieces to mix well. Finally, finely slice the red onion. This adds a nice crunch and bite.
Mixing the Salad
Now it’s time to mix the salad. In a large bowl, combine all the chopped vegetables. This includes the cherry tomatoes, cucumber, bell pepper, and red onion. Next, add the Kalamata olives. These salty olives give a great taste. Then, sprinkle in the crumbled feta cheese. This creamy cheese makes the salad rich and tasty.
Making the Dressing
Making the dressing is simple and quick. In a small bowl, whisk together the dressing ingredients. Use extra virgin olive oil, fresh lemon juice, and dried oregano. Add salt and pepper to taste. Once well combined, pour the dressing over the salad. Gently toss everything together until it coats evenly. You want each bite to be flavorful.
Pro Tips
- Tip Title: Use Fresh Ingredients: Always opt for the freshest vegetables and herbs available to enhance the flavor of your salad.
- Tip Title: Marinate Ahead: Letting the salad sit for 10-15 minutes after tossing with the dressing allows the flavors to meld together beautifully.
- Tip Title: Customize Your Salad: Feel free to add other ingredients like avocado, artichokes, or even chickpeas for added texture and nutrition.
- Tip Title: Dressing Variations: Experiment with different vinegars, such as red wine or balsamic, for a unique twist on the classic dressing.
Tips & Tricks
Serving Suggestions
To make your Greek salad shine, pair it with grilled chicken or fish. You can also enjoy it with warm pita bread or hummus. As a side dish, it complements many meals. If you want, serve it as a light main dish. For that, add some chickpeas or quinoa for extra protein.
Flavor Enhancements
To adjust the flavors, taste as you go. If you like it tangy, add more lemon juice. For a milder taste, use less salt or olives. You can also try adding fresh herbs like basil or mint. They can give your salad a new twist.
Presentation Ideas
Make your salad pop with color! Use a large bowl to show off the layers. Arrange the feta cheese on top for a nice look. You can sprinkle some chopped parsley for freshness. If you’re feeling fancy, add a few slices of lemon on the side. This adds a nice touch and extra flavor.

Variations
Additional Ingredients
You can make your Greek salad even better by adding protein. Chicken or shrimp works great. Both add flavor and make the salad more filling. You can grill or roast the chicken for extra taste. Shrimp can be sautéed with garlic for a special touch.
You can also mix in other vegetables. Radishes add a nice crunch, and spinach brings color and nutrients. Feel free to get creative with what you have. More veggies mean more flavor and texture.
Dietary Modifications
If you want a vegan or dairy-free salad, skip the feta cheese. You can use avocado for creaminess instead. It adds healthy fats and a smooth texture.
For gluten-free options, this salad is already safe. Just ensure that any added ingredients, like dressings, are gluten-free too. Always check labels to be sure.
Storage Info
Best Practices for Keeping Fresh
To keep your Greek salad fresh, store it in an airtight container. This helps avoid moisture loss. If you have leftovers, separate the dressing from the salad. Add the dressing only when you’re ready to eat. This will keep the salad crisp and tasty.
Shelf Life
In the refrigerator, your Greek salad lasts about 3 to 4 days. If you freeze it, the texture may change. I do not recommend freezing Greek salad. It’s best enjoyed fresh.
Reheating Guidelines
You do not need to reheat this salad. It tastes best cold. Just take it out of the fridge and serve it. If the salad seems dry, add a splash of olive oil or lemon juice. Enjoy the fresh flavors!
FAQs
What is a traditional Greek salad made of?
A traditional Greek salad has simple, fresh ingredients. You need:
- Cherry tomatoes
- Cucumber
- Bell pepper
- Red onion
- Kalamata olives
- Feta cheese
- Extra virgin olive oil
- Fresh lemon juice
- Dried oregano
- Salt and pepper
These ingredients create a colorful and tasty dish. Each item brings its own flavor and texture. The tomatoes add sweetness, while the cucumber adds crunch. Kalamata olives give a briny taste, and feta adds creaminess. This balance makes the salad a delight.
How can I make my Greek salad last longer?
To keep your Greek salad fresh, store it properly. Here are some tips:
- Use an airtight container: This helps keep moisture out.
- Keep the dressing separate: Add the dressing just before serving. This keeps the veggies crisp.
- Refrigerate promptly: Store leftovers in the fridge within two hours.
When stored this way, your salad can last up to three days. Always check for freshness before eating.
Can I customize the dressing for my Greek salad?
Absolutely! You can change the dressing to suit your taste. Here are some ideas:
- Add garlic: Mix in minced garlic for an extra kick.
- Use vinegar: Swap lemon juice for red wine or balsamic vinegar.
- Try yogurt: Mix Greek yogurt with olive oil for a creamy dressing.
Feel free to play with the flavors. This salad is about making it your own.
This blog post shared how to create a fresh Greek salad. We talked about the tasty ingredients, from veggies to olives and cheese. I broke down the steps to prepare, mix, and dress your salad. Plus, I offered tips for serving and storing. You can even change the recipe to fit your needs. Enjoy making this bright dish, and feel free to get creative. Healthy food can be fun and easy!

Simple Greek Salad
Ingredients
2 cups cherry tomatoes, halved
1 cucumber, diced
1 bell pepper (any color), diced
1/2 red onion, finely sliced
1 cup Kalamata olives, pitted
1 cup feta cheese, crumbled
3 tablespoons extra virgin olive oil
2 tablespoons fresh lemon juice
1 teaspoon dried oregano
Salt and pepper to taste
Fresh parsley for garnish
Instructions
In a large mixing bowl, combine the halved cherry tomatoes, diced cucumber, diced bell pepper, and finely sliced red onion.
Add the pitted Kalamata olives and crumbled feta cheese to the bowl.
In a small bowl, whisk together the extra virgin olive oil, fresh lemon juice, dried oregano, salt, and pepper until well combined.
Pour the dressing over the salad and gently toss everything together until the ingredients are evenly coated.
Taste and adjust seasoning if necessary, adding more salt, pepper, or lemon juice to suit your taste.
Garnish with freshly chopped parsley before serving.
Prep Time: 15 mins | Total Time: 15 mins | Servings: 4

Simple Greek Salad
Ingredients
- 2 cups cherry tomatoes, halved
- 1 whole cucumber, diced
- 1 whole bell pepper, diced
- 0.5 whole red onion, finely sliced
- 1 cup Kalamata olives, pitted
- 1 cup feta cheese, crumbled
- 3 tablespoons extra virgin olive oil
- 2 tablespoons fresh lemon juice
- 1 teaspoon dried oregano
- to taste salt and pepper
- for garnish fresh parsley
Instructions
- In a large mixing bowl, combine the halved cherry tomatoes, diced cucumber, diced bell pepper, and finely sliced red onion.
- Add the pitted Kalamata olives and crumbled feta cheese to the bowl.
- In a small bowl, whisk together the extra virgin olive oil, fresh lemon juice, dried oregano, salt, and pepper until well combined.
- Pour the dressing over the salad and gently toss everything together until the ingredients are evenly coated.
- Taste and adjust seasoning if necessary, adding more salt, pepper, or lemon juice to suit your taste.
- Garnish with freshly chopped parsley before serving.


![To make delicious Deep-Dish Pizza Muffins, gather these simple ingredients: - 2 cups all-purpose flour - 1 tablespoon baking powder - 1 teaspoon garlic powder - ½ teaspoon salt - 1 cup shredded mozzarella cheese - ½ cup pepperoni, diced - ½ cup green bell pepper, finely chopped - ½ cup marinara sauce (plus extra for serving) - 1 cup milk - ⅓ cup olive oil - 1 large egg - Italian seasoning, for garnish These ingredients create a tasty muffin that bursts with pizza flavor. Each one is packed with cheese, pepperoni, and veggies. You can mix and match these items to fit your taste. For example, you can swap pepperoni for veggies or try different cheeses. The options are endless! When you gather your ingredients, make sure they are fresh. Fresh ingredients make the muffins taste better. You can find all these items at your local grocery store. If you want, you can even get organic or local options for a healthier choice. Don't forget to check out the Full Recipe for more details on making these muffins, including cooking times and tips! 1. Preheat your oven to 375°F (190°C). This step is key for even baking. 2. Prepare a standard muffin tin by greasing each cup with cooking spray or olive oil. This keeps the muffins from sticking. 3. In a large bowl, mix together the all-purpose flour, baking powder, garlic powder, and salt. Make sure to whisk them well. 4. Now, gently fold in the shredded mozzarella cheese, diced pepperoni, and finely chopped green bell pepper. Mix until they are evenly spread in the flour blend. 1. In another bowl, whisk together the milk, olive oil, and egg. This helps create a smooth mixture for the batter. 1. Slowly pour the wet mix into the dry ingredients. Stir gently until just combined. The batter should be slightly lumpy. 2. Spoon the batter into the prepared muffin tin. Fill each cup about three-quarters full. 3. For a fun twist, add a small dollop of marinara sauce on top of each muffin. 4. Sprinkle some Italian seasoning over the muffins to enhance the flavor. 5. Bake in the preheated oven for 20-25 minutes. The muffins will rise and turn golden brown. 6. To check if they are done, insert a toothpick in the center of a muffin. If it comes out clean, they are ready. 7. Let the muffins cool in the tin for a few minutes, then transfer them to a wire rack to cool completely. This quick process will lead you to delicious Deep-Dish Pizza Muffins! For the complete recipe, refer to the [Full Recipe]. To make the best deep-dish pizza muffins, avoid overmixing the batter. Overmixing can make the muffins tough. Mix just enough until the ingredients come together. To check for doneness, insert a toothpick into the center of a muffin. If the toothpick comes out clean, the muffins are ready. If it has wet batter, bake a few more minutes. For a great presentation, serve the muffins warm on a rustic wooden board. This adds a cozy touch. Include a small bowl of extra marinara sauce for dipping. This makes every bite even better! Garnish with fresh basil leaves for color and taste. Pair these muffins with a simple salad or garlic bread. They make a great meal or snack. You can swap ingredients for different flavors. Try using cheddar or pepper jack cheese for a twist. For a meatless option, add mushrooms or diced zucchini. Adjust the spice level by adding red pepper flakes or using spicy pepperoni. You can customize each batch to suit your taste! {{image_4}} You can change the cheese in these muffins for new tastes. Try using cheddar cheese for a sharp bite. Pepper jack cheese adds a spicy kick. Mixing mozzarella with these cheeses gives a creamy texture. Experimenting with cheese can make your muffins unique. If you want a vegetarian version, skip the pepperoni. You can use mushrooms for a hearty feel. Chopped spinach or zucchini also works well. These veggies add flavor and moisture. Using different toppings keeps the muffins fresh and fun. The dough you choose can change the whole muffin. You can use pizza dough for a chewy texture. Or, try biscuit dough for a fluffy muffin. Each option brings a new twist to the dish. Experiment with dough types to find your favorite. Don't forget to check the Full Recipe for more ideas! To keep your deep-dish pizza muffins fresh at room temperature, place them in an airtight container. This helps prevent them from drying out. If you plan to eat them within two days, they will stay tasty and soft. If you have more, consider freezing them. For best results, freeze the muffins after they cool completely. Wrap each muffin in plastic wrap. Then, place them in a freezer bag. This keeps them fresh for up to three months. To thaw, leave them in the fridge overnight or set them on the counter for a few hours. To reheat the muffins without drying them out, use the oven. Preheat it to 350°F (175°C). Place the muffins on a baking sheet and cover them with foil. Heat for about 10-15 minutes. This method keeps them moist and warm, ready for you to enjoy. For a quick option, you can microwave them for about 20-30 seconds, but they may dry out more this way. Deep-Dish Pizza Muffins come from Chicago's famous deep-dish pizza. This style of pizza started in the 1940s. It became popular for its thick crust and plenty of toppings. These muffins take that rich flavor and make it bite-sized. They are fun, easy to share, and perfect for parties. You get all the classic tastes in a new form. Yes, you can make these muffins ahead of time. After baking, let them cool completely. Store them in an airtight container at room temperature. They stay fresh for about two days. You can also freeze them. Wrap each muffin tightly and place them in a freezer bag. They can last up to three months. When ready to eat, thaw them in the fridge overnight. Warm them in the oven for the best taste. Absolutely! You can use gluten-free flour for these muffins. Just make sure to choose a good blend. A cup-for-cup gluten-free flour works well. This makes it easy to substitute without changing the recipe. The muffins may be slightly different in texture but still taste great. Enjoy your tasty treat without worry! This blog post guides you through making delicious deep-dish pizza muffins. We covered the key ingredients needed, each step, and helpful tips for the best results. Remember to avoid overmixing the batter and check for doneness to achieve perfect muffins. You can customize the recipe with different toppings and adjust flavors to suit your tastes. These muffins freeze well and reheat easily. Enjoy your baking, and watch these tasty treats impress your family and friends!](https://dailydishlab.com/wp-content/uploads/2025/06/d9a1d58c-7d1e-421a-bb26-4a1991aecf18-768x768.webp)


![- 1 cup canned chickpeas, rinsed and drained - 1 large red bell pepper - 2 tablespoons tahini - 3 tablespoons olive oil - 2 tablespoons fresh lemon juice - 2 cloves garlic, minced - 1 teaspoon ground cumin - Salt and black pepper to taste - 2 tablespoons water (adjust for consistency) - Fresh parsley, chopped (for garnish) - Pita chips or fresh vegetables (for serving) To make the best roasted red pepper hummus, you need a few simple ingredients. The chickpeas form the base. They are creamy and full of protein. A large red bell pepper adds a sweet taste and vibrant color. Tahini, made from sesame seeds, gives a rich, nutty flavor. You will also need olive oil to make it smooth. Fresh lemon juice adds a tart kick. Garlic brings a strong taste that pairs well. Ground cumin adds warmth. Don't forget salt and black pepper to enhance all the flavors. You can adjust the hummus's texture with water. This helps it become creamy or thick, depending on your liking. For a lovely finish, use chopped parsley to garnish. Serve with pita chips or fresh vegetables for dipping. You can find the full recipe in the earlier section. 1. Preheat your oven to 450°F (230°C). 2. Cut the large red bell pepper in half. Remove the seeds and stems. 3. Place the pepper halves skin-side up on a baking sheet. 4. Roast them in the oven for about 20-25 minutes. The skin should blister and blacken. 5. Once done, remove the peppers and let them cool for about 10 minutes. 6. Peel off the skin and chop the flesh. This adds a sweet and smoky taste to your hummus. 1. In a food processor, combine: - 1 cup canned chickpeas, rinsed and drained - Chopped roasted red pepper - 2 tablespoons tahini - 3 tablespoons olive oil - 2 tablespoons fresh lemon juice - 2 cloves garlic, minced - 1 teaspoon ground cumin 2. Blend the mixture until smooth. 3. If the hummus is too thick, add water a tablespoon at a time. Adjust until you reach your desired consistency. 4. Season with salt and black pepper. Taste and adjust as needed. 1. Transfer the smooth hummus to a serving bowl. 2. Drizzle with additional olive oil for richness. 3. Garnish with chopped fresh parsley for a pop of color. This recipe is easy and a delight for your taste buds. You’ll find it perfect for parties or a healthy snack. Enjoy with pita chips or fresh veggies. For the full recipe, check out [Full Recipe]. To get the right hummus texture, adjust the water. Start with two tablespoons, then add more if needed. Blend well. The longer you blend, the smoother your hummus will be. This step is key to a creamy result. Boost the taste by adding spices or herbs. Try smoked paprika for warmth or fresh basil for a twist. Fresh lemon juice adds zing. It brightens the flavors and makes the hummus pop. Serve your hummus in a shallow bowl. Create a swirl on top with a spoon. Drizzle olive oil in the center for shine. Arrange pita chips and fresh veggies around the bowl. This makes your dish look colorful and inviting. For the full recipe, check the link above. {{image_2}} You can make this hummus even more fun. Try adding some heat with spicy roasted red pepper hummus. Just toss in a pinch of cayenne or some chopped jalapeños for that extra kick. If you love herbs, mix in fresh basil or cilantro. These add a bright flavor that makes your hummus pop. Want to keep it vegan? This recipe is already vegan-friendly! If you like, you can swap the tahini for sunflower seed butter. This change keeps the taste yummy. For those who need gluten-free options, pair your hummus with veggie sticks or gluten-free crackers. They will make a great snack! Sometimes, you just need hummus fast! When you're in a rush, grab a store-bought option. Look for brands that use real ingredients and no added preservatives. Some of the best brands are Sabra and Cedarlane. They have great roasted red pepper hummus that can save you time while still tasting good. To keep your hummus fresh, use an airtight container. Glass jars work great. Make sure the lid seals tightly. It helps to keep air out. For added freshness, drizzle a little olive oil on top. This layer forms a barrier against air. Homemade hummus lasts about a week in the fridge. Store it at a temperature below 40°F (4°C). If you want to keep it longer, you can freeze it. Hummus can stay good in the freezer for up to three months. To thaw frozen hummus, move it to the fridge overnight. If you're in a hurry, you can use the microwave. Heat it in small bursts, stirring in between. Don't overheat, as it can change the texture. Enjoy your hummus with pita chips or fresh veggies just like in the Full Recipe! If you don’t have tahini, use peanut butter or sunflower seed butter. You can also blend soaked cashews or almonds for a nutty taste. These options give your hummus a creamy texture. Each will add a unique flavor twist to the dish. Homemade hummus lasts about 5 to 7 days in the fridge. Store it in an airtight container. Check for signs of spoilage, like a sour smell or mold on top. If it smells fresh, it’s still good to eat. Yes, you can make roasted red pepper hummus a day in advance. Just store it in the fridge. Let it sit at room temperature for about 30 minutes before serving. This helps the flavors blend better. This blog post covered how to make delicious hummus with roasted red pepper. You learned about the main ingredients, step-by-step instructions, and helpful tips. We also explored fun variations and storage tips. Remember, perfecting your hummus takes practice, so don’t hesitate to experiment. Enjoy your tasty snack with pita or fresh veggies. With these methods, you can create hummus that shines at any gathering!](https://dailydishlab.com/wp-content/uploads/2025/07/83ccc056-5a58-4bcc-806c-3c7123215f8b-768x768.webp)
