Simple Grilled Veggie Skewers Flavorful Summer Dish

Looking for a fresh, flavorful dish for summer? Simple grilled veggie skewers are your answer! These vibrant and easy-to-make skewers are perfect for grilling up with friends and family. In this post, I’ll guide you through choosing veggies, marinating them with the right seasonings, and grilling them to perfection. Get ready to impress everyone at your next summer cookout with this tasty recipe! Let’s get started!
Why I Love This Recipe
- Fresh and Colorful: The vibrant colors of the vegetables make these skewers visually appealing and a feast for the eyes.
- Easy to Prepare: This recipe requires minimal prep work, making it perfect for busy weeknights or casual gatherings.
- Healthy and Flavorful: Grilling enhances the natural flavors of the vegetables while keeping them healthy and packed with nutrients.
- Versatile and Customizable: You can easily swap in your favorite vegetables or adjust the seasonings to suit your taste.
Ingredients
List of Required Ingredients
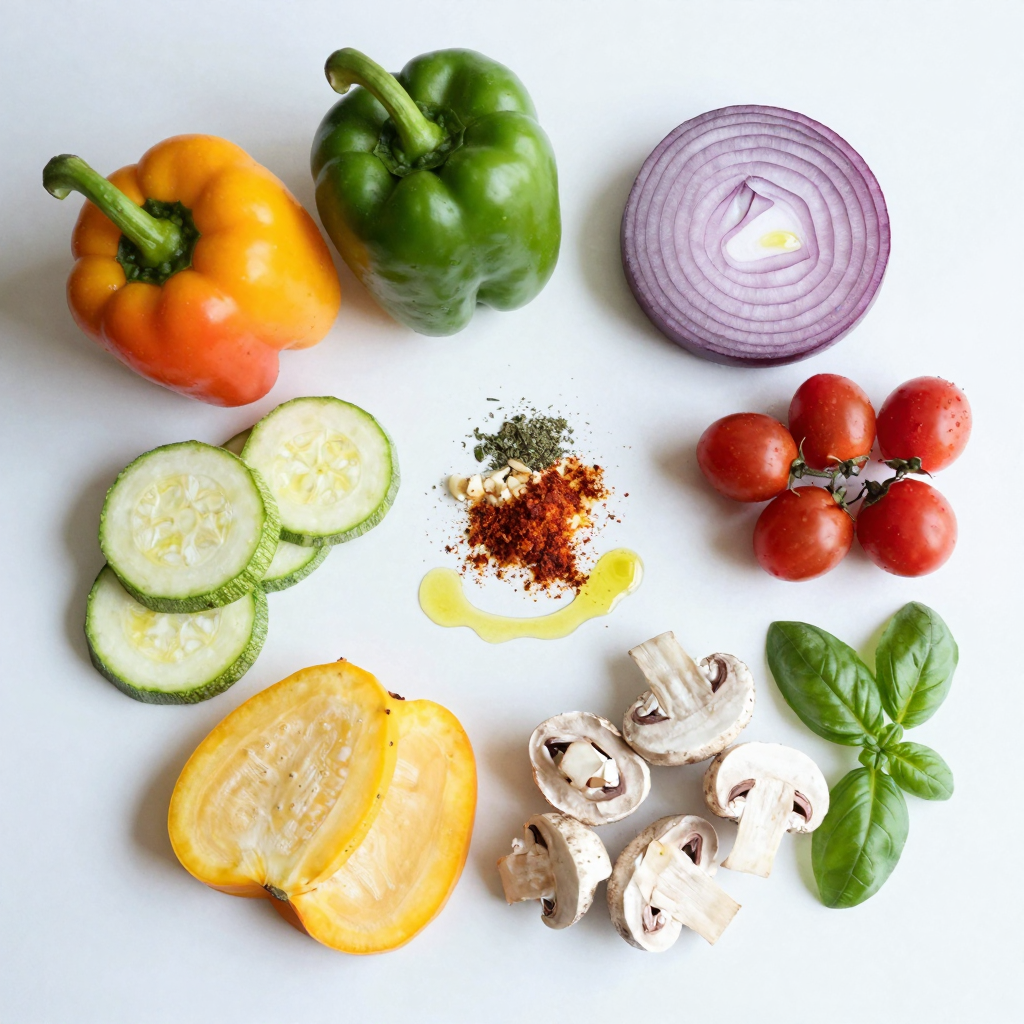
For your simple grilled veggie skewers, gather these fresh vegetables:
- 1 bell pepper (red, yellow, or green), cut into 1-inch pieces
- 1 zucchini, sliced into thick rounds
- 1 yellow squash, sliced into thick rounds
- 1 red onion, cut into wedges
- 8 cherry tomatoes
- 1 cup mushrooms, whole or halved if large
Next, you’ll need some seasonings and marinades to make them burst with flavor:
- 3 tablespoons olive oil
- 1 teaspoon garlic powder
- 1 teaspoon dried oregano
- 1 teaspoon smoked paprika
- Salt and pepper to taste
Finally, for a beautiful finish, consider these suggested garnishes:
- Fresh basil leaves for garnish
These ingredients make up the core of your skewers. They are colorful, tasty, and perfect for summer grilling.

Step-by-Step Instructions
Preparation Overview
Prepping the Vegetables
Start by washing all your veggies. Cut the bell pepper into 1-inch pieces. Slice the zucchini and yellow squash into thick rounds. For the red onion, cut it into wedges. Make sure to keep the cherry tomatoes whole. If your mushrooms are big, you can cut them in half.
Marinating for Flavor
Place all the chopped vegetables in a large bowl. Drizzle 3 tablespoons of olive oil over them. Add 1 teaspoon each of garlic powder, dried oregano, and smoked paprika. Season with salt and pepper to taste. Toss the veggies well to coat them in the oil and spices. This step adds a lot of flavor to your skewers.
Assembling the Skewers
Grab your skewers and start threading the marinated veggies. Alternate colors and types for a fun look. This makes the skewers not only tasty but also pretty. Pack them close together, but leave a little space for even cooking.
Grilling Process
Preheating the Grill
Before placing your skewers on the grill, preheat it to medium-high heat. If you’re using wooden skewers, soak them in water for about 30 minutes. This helps prevent them from burning on the grill.
Cooking Instructions
Place the assembled skewers on the hot grill. Cook them for about 10 to 15 minutes. Turn them occasionally to ensure they cook evenly. You want to see nice grill marks on the veggies.
Checking for Doneness
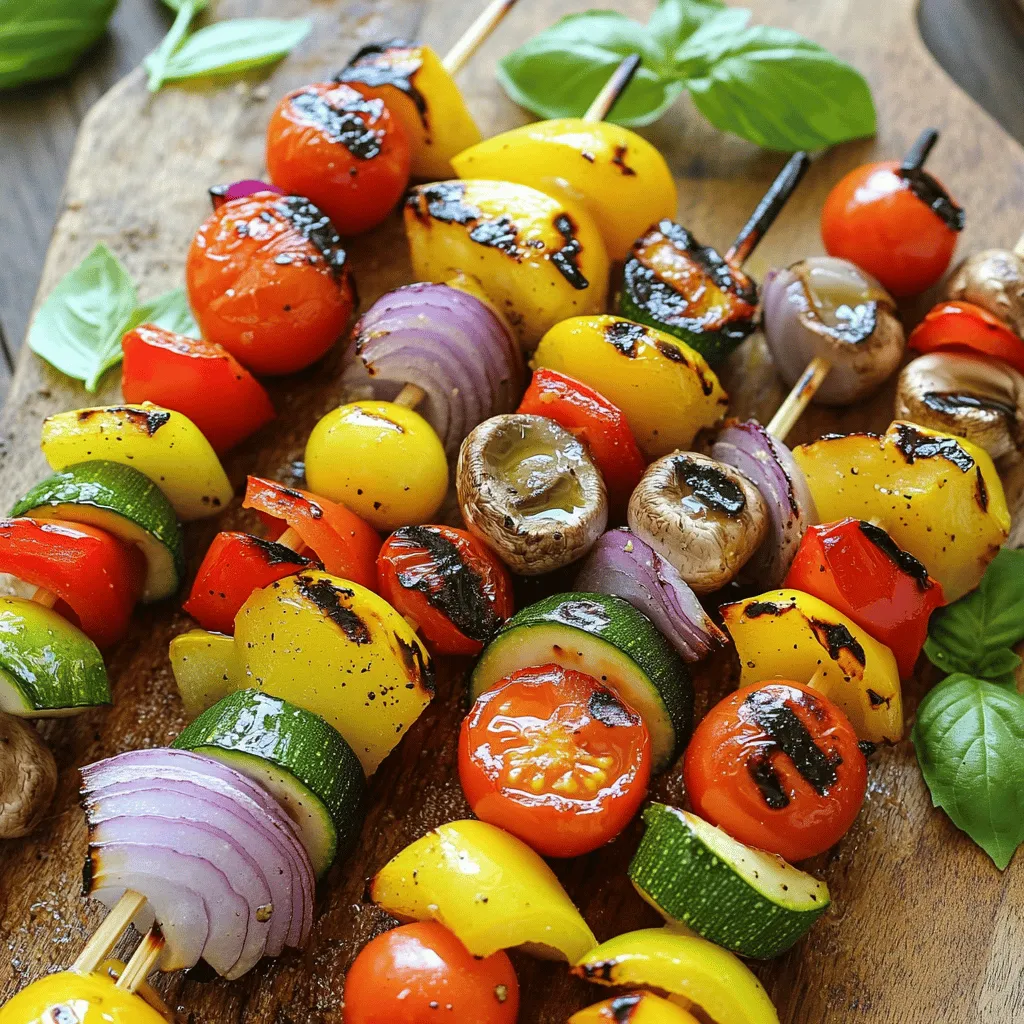
To check if your skewers are done, look for tender veggies. They should be soft but not mushy. If they are tender and have those beautiful grill marks, they are ready to come off the grill. Let them rest for a couple of minutes before serving. For a nice touch, add some fresh basil leaves on top. Enjoy your colorful, tasty Simple Grilled Veggie Skewers!
Pro Tips
- Choose Colorful Veggies: Using a variety of colorful vegetables not only makes your skewers visually appealing but also enhances the overall flavor and nutritional value.
- Marinate Ahead: For even more flavor, consider marinating the vegetables in the olive oil and spices for at least 30 minutes before skewering and grilling.
- Don’t Overcrowd the Skewers: Leave some space between the veggies on the skewers. This ensures they cook evenly and get those beautiful grill marks.
- Experiment with Seasonings: Feel free to mix and match different herbs and spices to customize the flavor profile according to your preferences.
Tips & Tricks
Grilling Techniques
Best Practices for Even Cooking
To cook veggies evenly, cut them into similar sizes. This helps them cook at the same pace. Use medium-high heat for grilling. It gives the best results for grilled veggie skewers.
Avoiding Common Mistakes
Don’t overcrowd the skewers. If you pack them too tightly, they won’t cook well. Make sure to turn them often while grilling. This helps prevent burning and ensures even cooking.
Achieving Grill Marks
To get those nice grill marks, place the skewers on the grill and leave them alone for a few minutes. Don’t move them too soon. After a few minutes, turn them a quarter turn for perfect marks.
Serving Suggestions
Pairing with Dips or Sauces
These skewers taste great with dips. Try pairing them with hummus or tzatziki. A drizzle of balsamic glaze adds a lovely touch too. It enhances the flavor and makes the dish look fancy.
Creative Plating Ideas
For a fun presentation, arrange the skewers on a colorful platter. You can add fresh herbs or lemon slices for extra color. Consider using a wooden board for a rustic look.
Add-ons to Enhance Flavor
You can add more flavor by including cheese on the skewers. Feta or mozzarella works well. For a spicy kick, sprinkle chili flakes over the veggies before grilling. These small changes can really boost the taste.

Variations
Vegetable Swaps
Adding More Veggies
You can get creative with your skewers. Try adding eggplant, asparagus, or bell peppers. Each veggie brings its own taste. Mix and match for fun flavors.
Utilizing Seasonal Produce
Use what’s fresh in your area. In summer, zucchini and tomatoes shine. In fall, try butternut squash or mushrooms. Seasonal veggies taste best. They also help the planet by reducing food miles.
Using Different Types of Skewers
You can use wooden, metal, or even rosemary skewers. Wooden skewers need soaking to prevent burning. Metal skewers are great for reuse. Rosemary skewers add a nice aroma to your veggies.
Flavor Variations
Marinade Alternatives
Switch up your marinade for new flavors. Try soy sauce, lemon juice, or balsamic vinegar. Each adds a unique twist. Marinating for at least 30 minutes helps flavors soak in.
Adding Proteins like Tofu or Chicken
Want to make it a meal? Add tofu, shrimp, or chicken to your skewers. Cut them into bite-sized pieces for easy grilling. This boosts protein and makes your dish more filling.
Spice Up with Heat
If you love spice, add chili flakes or hot sauce. You can also use jalapeños for a kick. Adjust the heat to your taste. This will give your skewers an exciting flavor boost.
Storage Info
Making Ahead
You can prep skewers in advance. Cut all your veggies and marinate them. Store them in a bowl covered with plastic wrap. This keeps them fresh for up to 24 hours. If you want to store uncooked skewers, thread the veggies onto the skewers. Place them in a zip-top bag or an airtight container. Keep them in the fridge. They stay good for about a day.
Leftover Storage
For leftover skewers, refrigerate them right away. Place them in a container with a lid. They will last 3 to 4 days in the fridge. You can also freeze them. Wrap the skewers tightly in plastic wrap and place them in a freezer bag. They can last up to 3 months frozen.
To reheat, take them out of the fridge or freezer. If frozen, let them thaw in the fridge overnight. Heat the grill to medium. Place the skewers on the grill for about 5 minutes. Turn them to heat evenly. You can also reheat in the oven at 350°F for 10 minutes. Enjoy your tasty leftovers!
FAQs
Common Questions
How long should skewers be soaked?
Soak wooden skewers for 30 minutes. This keeps them from burning on the grill.
Can I use wooden skewers without soaking?
Yes, but it’s better to soak them. Soaking helps avoid flare-ups while grilling.
What are the best vegetables to grill?
Great choices include bell peppers, zucchini, mushrooms, onions, and cherry tomatoes. Each adds unique flavor and color to your skewers.
Can I make these skewers in the oven?
Absolutely! Preheat your oven to 400°F. Place the skewers on a baking sheet. Cook for about 20 minutes, turning halfway through.
How can I ensure even cooking on the grill?
Cut your veggies into similar sizes. Also, turn the skewers often while grilling to cook all sides evenly.
Nutritional Information
Calorie count per serving
Each serving has about 130 calories. This makes them a light and healthy dish.
Health benefits of grilled vegetables
Grilled veggies are full of vitamins and minerals. They boost your immune system and help with digestion.
Options for low-carb diets
These skewers fit well in low-carb diets. They are low in carbs and high in fiber. You can enjoy them guilt-free!
You now have all you need to make great vegetable skewers. We covered ingredients, easy steps, and helpful tips. Plus, I shared tasty variations and how to store leftovers.
With these ideas, grilling will be fun and simple. Enjoy delicious, healthy skewers with your family and friends. Remember, the best part is to experiment and find your favorite flavors! Happy grilling!

Simple Grilled Veggie Skewers
Ingredients
1 bell pepper (red, yellow, or green), cut into 1-inch pieces
1 zucchini, sliced into thick rounds
1 yellow squash, sliced into thick rounds
1 red onion, cut into wedges
8 cherry tomatoes
1 cup mushrooms, whole or halved if large
3 tablespoons olive oil
1 teaspoon garlic powder
1 teaspoon dried oregano
1 teaspoon smoked paprika
Salt and pepper to taste
Fresh basil leaves for garnish
Instructions
Preheat your grill to medium-high heat. If using wooden skewers, soak them in water for 30 minutes to prevent burning.
In a large bowl, combine the bell pepper, zucchini, yellow squash, red onion, cherry tomatoes, and mushrooms.
Drizzle the olive oil over the vegetables, then sprinkle with garlic powder, dried oregano, smoked paprika, salt, and pepper. Toss everything until the veggies are well coated.
Thread the marinated vegetables onto the skewers, alternating them for a colorful presentation.
Place the skewers on the grill and cook for 10-15 minutes, turning occasionally, until the vegetables are tender and have nice grill marks.
Once they are done, remove from the grill and let them rest for a couple of minutes. Garnish with fresh basil leaves before serving.
Prep Time: 15 minutes | Total Time: 30 minutes | Servings: 4
– Presentation Tips: Arrange the skewers on a wooden board or a vibrant platter. You can also drizzle a bit of balsamic glaze over the top for an extra touch of flavor and elegance.

Simple Grilled Veggie Skewers
Ingredients
- 1 piece bell pepper (red, yellow, or green), cut into 1-inch pieces
- 1 piece zucchini, sliced into thick rounds
- 1 piece yellow squash, sliced into thick rounds
- 1 piece red onion, cut into wedges
- 8 pieces cherry tomatoes
- 1 cup mushrooms, whole or halved if large
- 3 tablespoons olive oil
- 1 teaspoon garlic powder
- 1 teaspoon dried oregano
- 1 teaspoon smoked paprika
- to taste Salt and pepper
- for garnish Fresh basil leaves
Instructions
- Preheat your grill to medium-high heat. If using wooden skewers, soak them in water for 30 minutes to prevent burning.
- In a large bowl, combine the bell pepper, zucchini, yellow squash, red onion, cherry tomatoes, and mushrooms.
- Drizzle the olive oil over the vegetables, then sprinkle with garlic powder, dried oregano, smoked paprika, salt, and pepper. Toss everything until the veggies are well coated.
- Thread the marinated vegetables onto the skewers, alternating them for a colorful presentation.
- Place the skewers on the grill and cook for 10-15 minutes, turning occasionally, until the vegetables are tender and have nice grill marks.
- Once they are done, remove from the grill and let them rest for a couple of minutes. Garnish with fresh basil leaves before serving.


![- 2 medium zucchinis, cut into fries - 1 cup breadcrumbs (preferably whole wheat or panko for extra crunch) - 1/2 cup grated Parmesan cheese - 1 teaspoon garlic powder - 1 teaspoon paprika - 1/2 teaspoon salt - 1/2 teaspoon black pepper - 2 large eggs, beaten - Cooking spray or olive oil for drizzling When choosing zucchinis, look for medium-sized ones that feel firm. Avoid any that are soft or have blemishes. Fresh zucchinis taste better and give the best results. For breadcrumbs, I suggest using either whole wheat or panko. Whole wheat adds a nutty flavor, while panko gives extra crunch. Both options work well, but I lean toward panko for that delightful crisp. Using fresh ingredients is key. Fresh herbs, spices, and cheese enhance the taste of your baked zucchini fries. They make your snack not just tasty but also healthy. Always choose high-quality ingredients for the best results. For the full recipe, check the detailed instructions above. Enjoy your cooking! Start by preheating your oven to 425°F (220°C). This high heat helps achieve that crispy texture we love. While the oven heats, line a baking sheet with parchment paper. This step makes cleanup easy and prevents sticking. Make sure the parchment paper is flat against the pan. Any wrinkles can cause uneven cooking. Next, let's coat those zucchini fries. First, beat your eggs in a shallow bowl. This will help the breadcrumbs stick. Now, prepare the breadcrumb mixture. In another bowl, mix the breadcrumbs, grated Parmesan, garlic powder, paprika, salt, and pepper. The mix should be evenly combined. For coating, take each zucchini fry and dip it into the eggs. Let the extra drip off for a cleaner look. Then, roll it in the breadcrumb mix. Press gently to ensure the crumbs stick well. This step is key for a crispy bite. Now, it's time to bake. Place the coated zucchini fries on the baking sheet. Make sure they are in a single layer and not touching. This spacing helps them crisp up. Lightly spray or drizzle with olive oil for an extra crispy finish. Bake the fries for 20 to 25 minutes. Flip them halfway through to ensure even cooking. You know they are done when they turn golden brown and crisp. Let them cool for a few minutes before serving. Enjoy your crispy and flavorful baked zucchini fries! For the full recipe, check out the [Full Recipe]. To get your zucchini fries extra crispy, focus on the coating. I recommend using panko breadcrumbs. They add more crunch than regular breadcrumbs. Mix them with grated Parmesan, garlic powder, paprika, salt, and pepper for a tasty coating. Even spacing on the baking sheet is key. Place the zucchini fries in a single layer. Make sure they don’t touch each other. This allows hot air to circulate around each fry, making them crispier. You can customize the spice levels to fit your taste. If you like heat, add cayenne pepper or chili powder. For a milder flavor, stick to garlic and herbs. Fresh herbs can enhance the flavor. Try adding chopped parsley or basil to the breadcrumb mix. This adds a fresh taste that pairs well with zucchini. If you want to try air frying, it’s a great option. Air fryers cook food quickly and make it crispy. Set the temperature to 400°F (200°C) and cook for about 15 minutes, shaking the basket halfway through. Grilling zucchini fries is another fun method. Brush them with olive oil and grill them over medium heat. This gives them a smoky flavor while still keeping them crispy. For the full recipe, check out the detailed steps provided earlier. {{image_2}} You can switch up the cheese for your baked zucchini fries. For a vegan option, use nutritional yeast. It adds a cheesy flavor without dairy. You can also use vegan cheese shreds. They melt well and give a nice texture. If you prefer traditional cheese, try mozzarella or cheddar. Both add a creamy taste. Parmesan is great for a salty kick. Mixing different cheeses can create even more flavor. Want a gluten-free option? Use almond flour or crushed rice cereal instead of breadcrumbs. These options still give that crunchy texture. For more crunch, add nuts or seeds to your coating mix. Chopped almonds or sunflower seeds work well. They boost nutrition and flavor. You can even try crushed cornflakes for a unique twist. Experiment with spices to give your fries a new taste. Try adding cayenne pepper for heat or Italian herbs for a fresh flavor. You can mix garlic powder with onion powder for depth. Incorporating other vegetables can add variety, too. Try mixing in carrot or sweet potato sticks. They can add color and taste. Just keep the size similar so they cook evenly. To keep your zucchini fries fresh, use airtight containers. Glass containers work great. You can also use plastic ones that seal well. Store them in the fridge. They stay good for about 3 days. When reheating, use the oven for the best results. Preheat it to 350°F (175°C). Place the fries on a baking sheet. Heat for about 10 minutes. This keeps them crispy. The microwave works too, but it may make them soft. If you use the microwave, heat for 1-2 minutes on a plate. You can freeze your leftover fries for later. Lay them flat on a baking sheet and freeze until solid. Then, move them to a freezer bag. They stay good for about 2 months. When you're ready to eat them, thaw overnight in the fridge. Reheat in the oven for a crispy finish. Always avoid refreezing once they are thawed. To make baked zucchini fries crispy, you need to focus on a few key steps. First, choose the right breadcrumbs. Whole wheat or panko breadcrumbs add great crunch. Dip the fries in beaten eggs to help the coating stick. Make sure to press the breadcrumbs onto the zucchini well. Common mistakes include overcrowding the baking sheet. Ensure the fries are in a single layer. This allows hot air to circulate and crisp them up. Also, lightly spray the fries with cooking spray or drizzle with olive oil before baking. This step enhances the crispiness. Using frozen zucchini is not ideal for baked zucchini fries. Frozen zucchini contains more water, which affects texture. When you bake it, the fries may turn out soggy instead of crispy. Fresh zucchini gives you the best flavor and crunch. If you only have frozen zucchini, thaw it first. Pat it dry with paper towels to remove excess moisture. This may improve the final result, but fresh is always better for this recipe. Zucchini fries taste great with many dips. Here are some popular options: - Marinara sauce - Ranch dressing - Garlic aioli - Spicy ketchup - Yogurt dip You can also make your own dips to match your taste. Mixing Greek yogurt with herbs makes a refreshing dip, while a spicy aioli adds a kick. Try different combinations to find your favorite! In this post, I shared how to make delicious zucchini fries. We covered selecting the best ingredients, baking techniques, and tips for a perfect crunch. Fresh ingredients matter for great taste. Remember to space your fries evenly for crispiness. Experiment with flavors and cooking methods for variety. Finally, store your leftovers correctly to keep them tasty. Enjoy making these versatile fries, and don’t hesitate to try new combinations!](https://dailydishlab.com/wp-content/uploads/2025/06/7c2e4ba5-05a6-4328-aa36-1f6df44662bb-768x768.webp)