Smoky Chipotle Chicken Quesadillas Flavorful Treat

Craving a bold flavor boost? You’re in the right place! These Smoky Chipotle Chicken Quesadillas are packed with layered tastes and a crispy bite. Imagine juicy, seasoned chicken wrapped in melty cheese and smoky spices. Plus, I’ll walk you through easy steps to make these quesadillas just right. Let’s dive in and transform your meal time with this flavorful treat that’s sure to impress!
Why I Love This Recipe
- Convenience: Using rotisserie chicken makes this recipe quick and easy, perfect for busy weeknights.
- Flavor Explosion: The combination of chipotle peppers and smoked paprika adds a rich, smoky flavor that elevates the dish.
- Customizable: You can easily adjust the spice level and add your favorite vegetables or beans for extra nutrition.
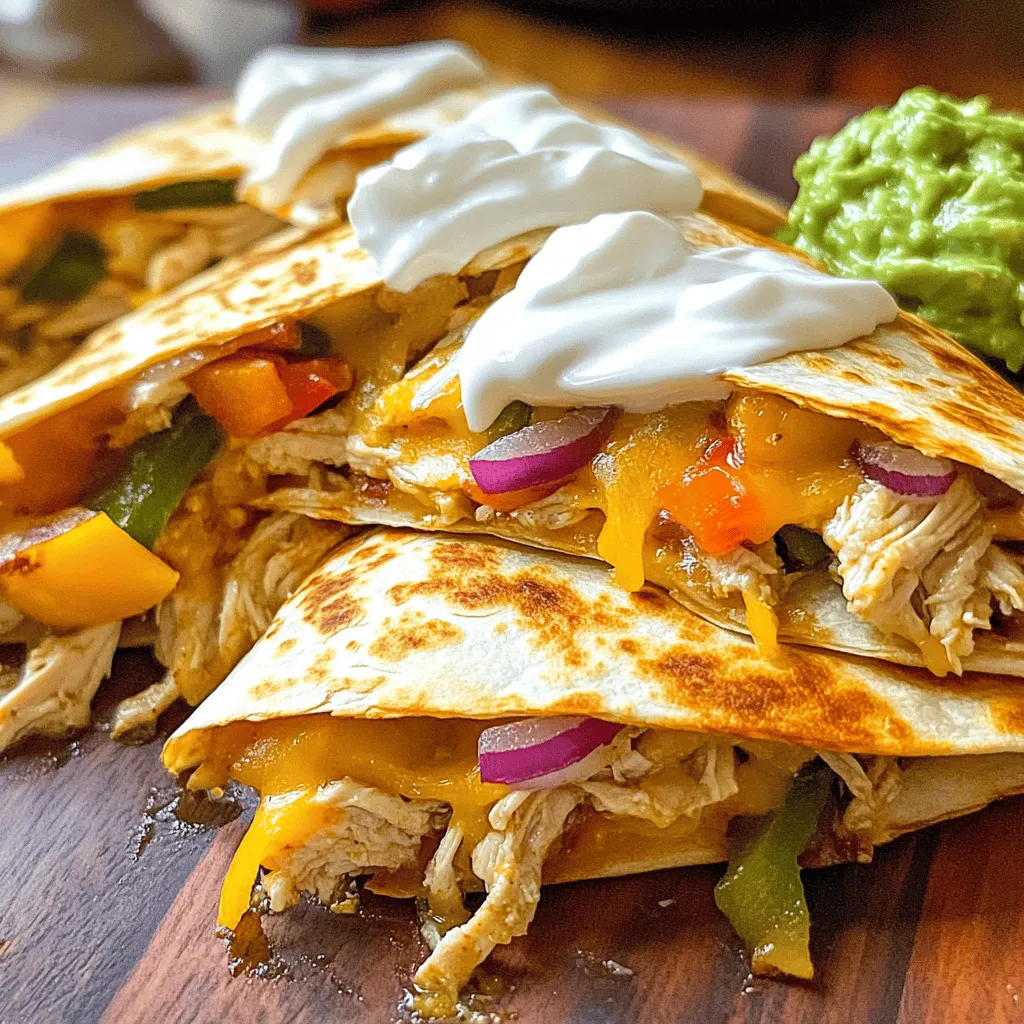
- Perfect for Sharing: These quesadillas are great for gatherings and can be served with a variety of dips like sour cream and guacamole.
Ingredients
Main Ingredients
- 2 cups cooked shredded chicken
- 1 cup shredded Monterey Jack cheese
- 1 cup shredded cheddar cheese
Optional Ingredients
- 1-2 tablespoons chipotle peppers in adobo sauce
- Sour cream for dipping
- Guacamole for dipping
Spices and Seasonings
- 1 teaspoon garlic powder
- 1 teaspoon smoked paprika
- Salt to taste
- Pepper to taste
The main ingredients form the base of your quesadillas. Cooked shredded chicken gives it a hearty texture. I prefer rotisserie chicken for ease. The melted Monterey Jack and cheddar cheeses create that gooey goodness we crave.
You can add chipotle peppers in adobo sauce for a smoky kick. Adjust the amount based on your spice tolerance. Sour cream and guacamole are great for dipping. They add creaminess that balances the heat.
Spices like garlic powder and smoked paprika enhance the flavors. Salt and pepper round out the dish. A pinch of each makes a big difference.
When you gather these ingredients, you set yourself up for success. Each element plays a role in making smoky chipotle chicken quesadillas a flavorful treat.

Step-by-Step Instructions
Prepare the Filling
In a large bowl, I mix the cooked shredded chicken with spices. I add minced chipotle peppers, garlic powder, smoked paprika, salt, and pepper. I stir well to coat the chicken evenly. The chipotle adds a smoky flavor that makes this dish exciting.
Sauté Vegetables
Next, I heat olive oil in a skillet over medium heat. I toss in chopped red onion and sliced bell pepper. I sauté these for about five minutes. The goal is to soften the veggies and get a nice caramel color. This step adds sweetness and depth to the quesadillas.
Assemble and Cook Quesadillas
I heat a clean skillet over medium heat again. I place one tortilla in the skillet and spread a generous portion of the chicken and veggie filling on one half. I fold the tortilla to create a half-moon shape. I cook it for three to four minutes on each side. I want the tortilla crispy and golden, and the cheese melted. I repeat this for the remaining tortillas. Once done, I slice them into wedges and serve them hot.
Pro Tips
- Use Rotisserie Chicken: For convenience and flavor, using rotisserie chicken saves time and adds depth to the quesadilla filling.
- Customize Spice Level: Adjust the amount of chipotle peppers according to your spice tolerance. Start with a small amount and add more if desired.
- Don’t Overfill: When assembling quesadillas, be careful not to overfill them. This ensures they cook evenly and makes flipping easier.
- Rest Before Slicing: Allow the quesadillas to rest for a minute after cooking. This helps the cheese set slightly and makes for cleaner slices.
Tips & Tricks
Selecting the Right Chicken
You can use rotisserie chicken for ease. It’s cooked and tender. Just shred it and mix it with spices. If you prefer homemade, poach chicken breasts. Shred them once they cool. Both options work well and taste great.
Ensuring Perfectly Crispy Tortillas
Crispy tortillas make a big difference. Use medium heat when cooking. Don’t rush it. Cook each side for about 3-4 minutes. Press down gently with a spatula to ensure even crisping. Use a bit of olive oil in the pan for flavor.
Flavor Enhancements
To make your quesadillas even better, add fresh herbs. Cilantro adds a nice touch. You can also try cumin for an extra kick. Experiment with spices to find your favorite blend. Every tweak brings new flavors to your plate.

Variations
Alternative Proteins
You can change the chicken for beef or turkey. Ground beef works well when cooked and seasoned. Shredded beef, like brisket, adds rich flavor. For a vegetarian option, use black beans or mushrooms. They give a nice texture and taste.
Cheese Substitutions
If you want to switch up the cheese, try pepper jack for added spice. Mozzarella gives a nice stretch, while feta can add a tangy twist. Experimenting with different cheeses can create unique quesadillas.
Spice Level Adjustments
To control the heat, add fewer chipotle peppers. For a milder taste, use just one pepper. You can also mix in diced jalapeños for fresh heat. If you love spice, increase the peppers or add hot sauce. This lets you customize the quesadilla to your liking.
Storage Info
Refrigeration Guidelines
To store leftover quesadillas, let them cool first. Wrap them in plastic wrap or foil. Place them in an airtight container. They stay fresh for up to three days in the fridge.
Reheating Instructions
The best way to reheat quesadillas is in a skillet. Heat the skillet on medium. Add a little oil to prevent sticking. Place the quesadilla in the skillet and heat for about three minutes on each side. You can also use a microwave. However, this may make the tortilla a bit soggy.
Freezing Options
You can freeze quesadillas for later. Wrap them tightly in plastic wrap. Then, place them in a freezer bag or container. They last up to three months in the freezer. To thaw, move them to the fridge overnight. Reheat them in a skillet or microwave as mentioned above. This keeps their flavor and texture intact.
FAQs
Can I use corn tortillas instead of flour?
Yes, you can use corn tortillas instead of flour. Corn tortillas add a nice texture. They can provide a slightly different flavor, which many enjoy. Just make sure to warm them up first. Heating helps them become more pliable. This makes it easier to fold your quesadilla without breaking.
What can I substitute for chipotle peppers?
If you don’t have chipotle peppers, try smoked paprika. It gives a nice smoky flavor too. You can also use regular chili powder for some heat. Add a dash of liquid smoke for an extra smoky taste. If you prefer milder flavors, use sweet paprika or roasted red peppers. Adjust according to your taste.
How do I know when the quesadillas are done?
Check for a golden brown color on each side. The cheese should be melted and gooey. You’ll also hear a slight crunch when you cut into them. Let them rest for a minute before slicing. This helps the cheese set a bit, making them easier to eat.
In this blog post, we covered how to make delicious quesadillas with simple steps. We started with selecting key ingredients like cooked chicken, Monterey Jack cheese, and spices. Then, I shared tips for cooking, assembling, and storing your quesadillas. If you want to switch it up, I discussed options for proteins and spices. Enjoying these cheesy delights at home is easy. Keep experimenting with flavors and don’t hesitate to adjust to your taste. You’ll soon become the quesadilla expert in your kitchen.

Smoky Chipotle Chicken Quesadillas
Ingredients
2 cups cooked shredded chicken (preferably rotisserie for convenience)
1 cup shredded Monterey Jack cheese
1 cup shredded cheddar cheese
1-2 tablespoons chipotle peppers in adobo sauce, minced (adjust for spice preference)
1 small red onion, finely chopped
1 bell pepper (red or green), sliced
2 tablespoons olive oil
1 teaspoon garlic powder
1 teaspoon smoked paprika
Salt and pepper to taste
4 large flour tortillas
Optional: sour cream and guacamole for serving
Instructions
Prepare the Filling: In a large mixing bowl, combine the shredded chicken, minced chipotle peppers in adobo sauce, garlic powder, smoked paprika, salt, and pepper. Mix well to ensure the chicken is evenly coated in spices.
Sauté Vegetables: In a skillet over medium heat, add olive oil. Once hot, add the chopped red onion and sliced bell pepper. Sauté for about 5 minutes until the vegetables are softened and slightly caramelized.
Combine Ingredients: Add the sautéed vegetables to the chicken mixture. Fold in the Monterey Jack and cheddar cheeses until well combined.
Assemble Quesadillas: Heat a clean skillet over medium heat. Place one tortilla in the skillet and spread a generous portion of the filling onto half of the tortilla. Fold the tortilla over to create a half-moon shape.
Cook the Quesadilla: Cook for about 3-4 minutes on each side or until the tortilla is crispy and golden brown and the cheese has melted. Repeat with remaining tortillas and filling.
Slice and Serve: Remove the quesadillas from the skillet and let them rest for a minute before slicing them into wedges.
Garnish: Serve hot with sour cream and guacamole on the side for dipping.
Prep Time: 15 minutes | Total Time: 25 minutes | Servings: 4

Smoky Chipotle Chicken Quesadillas
Ingredients
- 2 cups cooked shredded chicken
- 1 cup shredded Monterey Jack cheese
- 1 cup shredded cheddar cheese
- 1 tablespoon chipotle peppers in adobo sauce, minced
- 1 small red onion, finely chopped
- 1 piece bell pepper, sliced
- 2 tablespoons olive oil
- 1 teaspoon garlic powder
- 1 teaspoon smoked paprika
- to taste salt and pepper
- 4 large flour tortillas
- optional sour cream and guacamole for serving
Instructions
- In a large mixing bowl, combine the shredded chicken, minced chipotle peppers in adobo sauce, garlic powder, smoked paprika, salt, and pepper. Mix well to ensure the chicken is evenly coated in spices.
- In a skillet over medium heat, add olive oil. Once hot, add the chopped red onion and sliced bell pepper. Sauté for about 5 minutes until the vegetables are softened and slightly caramelized.
- Add the sautéed vegetables to the chicken mixture. Fold in the Monterey Jack and cheddar cheeses until well combined.
- Heat a clean skillet over medium heat. Place one tortilla in the skillet and spread a generous portion of the filling onto half of the tortilla. Fold the tortilla over to create a half-moon shape.
- Cook for about 3-4 minutes on each side or until the tortilla is crispy and golden brown and the cheese has melted. Repeat with remaining tortillas and filling.
- Remove the quesadillas from the skillet and let them rest for a minute before slicing them into wedges.
- Serve hot with sour cream and guacamole on the side for dipping.


![To make a delicious classic macaroni salad, you need simple, fresh ingredients. Here’s what you will need: - 2 cups elbow macaroni - 1 cup creamy mayonnaise - 2 tablespoons apple cider vinegar - 1 tablespoon Dijon mustard - 1 teaspoon granulated sugar - 1 cup celery, finely diced - 1 cup red bell pepper, diced - 1/2 cup red onion, finely chopped - 1 cup frozen peas, thawed - Salt and freshly cracked black pepper, to taste - Fresh parsley or chives, chopped, for garnish These ingredients create a salad that is both creamy and crunchy. The elbow macaroni serves as the base, while the veggies add color and texture. The dressing blends everything together, making each bite flavorful. When preparing the salad, always use fresh ingredients for the best taste. You can find the full recipe in the article. To cook the elbow macaroni, start with a large pot. Fill it with enough water to cover the pasta. Add a big pinch of salt to the water. Bring it to a rolling boil. Once boiling, pour in the macaroni. Cook it for about 8 to 10 minutes. You want it to be al dente, which means it should still have a little bite. When it's ready, drain it in a colander. Rinse it under cold water to stop the cooking. Let it cool completely. For the dressing, you need a few simple ingredients. Gather 1 cup of creamy mayonnaise, 2 tablespoons of apple cider vinegar, 1 tablespoon of Dijon mustard, and 1 teaspoon of granulated sugar. In a large bowl, whisk these together. Mix until it is smooth and creamy. Make sure there are no lumps left. This dressing adds the perfect flavor to your salad. Now it's time to combine everything. First, add the cooled macaroni to the bowl with the dressing. Then, fold in the veggies gently. Use 1 cup of finely diced celery, 1 cup of diced red bell pepper, ½ cup of finely chopped red onion, and 1 cup of thawed peas. Be careful not to mash the pasta. You want all the ingredients to be evenly coated with the dressing. Taste the salad to check the seasoning. Add salt and freshly cracked black pepper as needed. Mix it again to make sure every bite is tasty. Next, cover the bowl with plastic wrap or a lid. Put it in the refrigerator for at least 1 hour. This chilling time helps the flavors blend together. When it's ready, give it a gentle stir and adjust any seasoning if needed. Serve it in a big bowl or in individual portions. A sprinkle of fresh parsley or chives on top makes it look great. For the full recipe, check out the details above! Overcooking the macaroni is a mistake many people make. It turns mushy and loses its bite. Aim for al dente, which means firm but cooked. Follow the package time closely, usually about 8-10 minutes. Rinse it under cold water right after cooking to stop the heat. Not seasoning enough is another common error. A dash of salt makes a big difference. Taste your salad while mixing. Add salt and pepper slowly until you find the right level. To boost flavor, consider adding fresh herbs. Chopped dill, parsley, or chives add a nice touch. You could also try a sprinkle of paprika or garlic powder for extra zest. Chilling your salad is key. It allows the flavors to blend together. Let it sit in the fridge for at least one hour. The longer you chill, the better it tastes. Macaroni salad pairs well with grilled meats. It complements burgers, hot dogs, or barbecued chicken perfectly. You can also serve it with fresh veggies, chips, or fruit. For presentation, use a large, colorful bowl. You can garnish with extra herbs or slices of bell pepper on top. This makes the salad look as good as it tastes. Enjoy your beautiful dish! {{image_4}} You can easily change the classic macaroni salad by using different ingredients. One great swap is to replace mayonnaise with Greek yogurt. This makes the salad lighter and adds a nice tang. Greek yogurt also packs in protein, making your salad more filling. You can also add protein like chicken or tuna. This simple change makes it a full meal. Just shred cooked chicken or mix in canned tuna. You’ll have a hearty dish that everyone will love. To give your salad a new twist, try different flavors. For a Mediterranean twist, add olives and feta cheese. This adds a briny flavor that pairs well with the creamy dressing. The feta also gives a nice texture contrast. If you like spice, try adding jalapeños. This will give your salad a kick that may surprise your guests. You can adjust the amount based on how spicy you want it. If you need gluten-free options, use gluten-free macaroni. Many brands offer pasta made from rice or quinoa. These work great and taste delicious in the salad. For a vegan option, replace the mayo with a vegan dressing. You can find many great recipes online or in stores. This way, everyone can enjoy your macaroni salad without worry. For the full recipe, check out the [Full Recipe]. To keep your macaroni salad fresh, use an airtight container. Glass or plastic containers with tight lids work best. Avoid leaving it uncovered in the fridge. Covering it keeps out odors and maintains flavor. Store the salad in the fridge right after serving. The cool temperature slows spoilage. It's best to eat it within a few days for optimal taste. Classic macaroni salad usually lasts for about 3 to 5 days in the fridge. Make sure to check for signs of spoilage. If you see mold or an off smell, it’s best to discard it. Also, if the salad looks dry or the texture changes, it may not be safe to eat. Always trust your senses when assessing food safety. Reheating macaroni salad is usually not necessary. This dish is best served cold. If you have leftovers, you can enjoy them straight from the fridge. If you want to refresh the salad, add a bit more dressing. Stir it well to mix in the new dressing. This will help bring back some of the creaminess. Enjoy your classic macaroni salad with a burst of flavor! Yes, you can make macaroni salad ahead of time. It tastes better when chilled. I recommend chilling it for at least one hour. If you have more time, chilling overnight will enhance the flavors even more. If you want a creamy texture without mayonnaise, try Greek yogurt. It adds creaminess and a bit of tang. You can also use avocado or a mix of sour cream and mustard. These options are tasty and healthy. To make your macaroni salad creamier, add more mayonnaise or yogurt. Mixing in a little pasta water can also help. If you prefer a richer taste, consider adding a splash of heavy cream. Each of these tips can really boost the creaminess. Yes, it is safe to eat leftover macaroni salad if stored properly. Keep it in an airtight container in the fridge. It should be eaten within three to five days. Always check for any signs of spoilage before eating. This article explored making a classic macaroni salad, from ingredients to storage. Remember, cooking the macaroni al dente and chilling the salad enhance flavors. Avoid common mistakes like overcooking and under-seasoning. Variations, like using yogurt or adding protein, can create new tastes. Proper storage ensures your salad stays fresh. With these tips, you can enjoy a delicious macaroni salad any time. Now, it’s your turn to make it and impress your friends and family!](https://dailydishlab.com/wp-content/uploads/2025/06/3a7d09ad-1a72-4428-9717-30c1895d693b-768x768.webp)
