Spicy Garlic Shrimp Noodles Flavorful and Easy Recipe

Get ready to dive into a delicious world of flavors with my Spicy Garlic Shrimp Noodles! This easy recipe packs a punch with perfectly cooked shrimp, fresh veggies, and a bold garlic-chili sauce. Whether you’re a novice cook or a kitchen pro, I’ll guide you through each step. With just a few ingredients, you’ll create a dish that impresses family and friends alike. Let’s get cooking!
Why I Love This Recipe
- Flavorful Combination: This recipe combines the heat of chili with the savory notes of garlic and shrimp, creating a deliciously balanced dish.
- Quick to Prepare: With a total time of just 30 minutes, this meal is perfect for busy weeknights while still being impressive.
- Nutritious Ingredients: Packed with vegetables like bell peppers and spinach, this dish is not only tasty but also healthy.
- Customizable Heat: You can easily adjust the spiciness by modifying the amount of chili used, making it suitable for all palates.
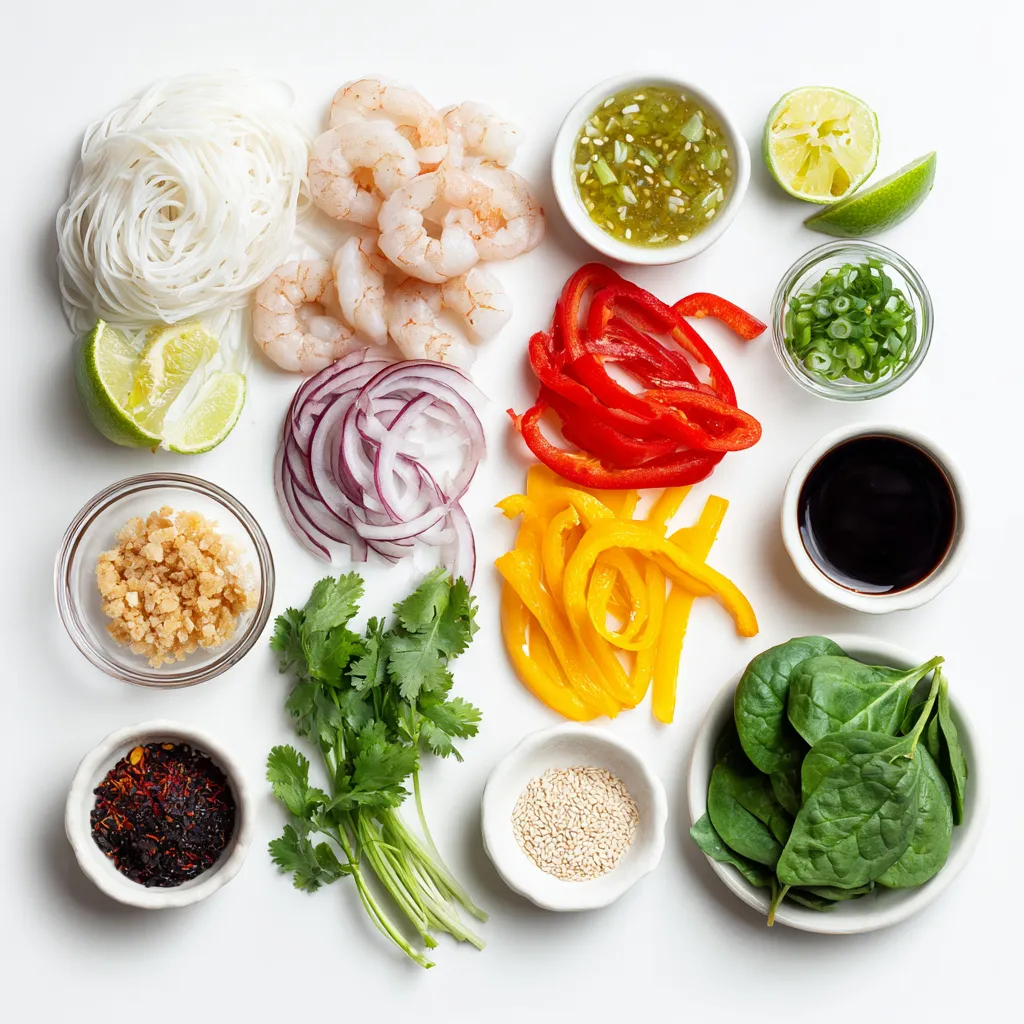
Ingredients
Main Ingredients for Spicy Garlic Shrimp Noodles
- 8 oz rice noodles
- 1 lb shrimp, peeled and deveined
- 2 tablespoons vegetable oil
- 4 cloves garlic, minced
- 1 red chili, thinly sliced (adjust for heat preference)
The rice noodles serve as the base. They soak up the tasty sauce. Fresh shrimp adds protein and a sweet flavor. Vegetable oil helps to cook the garlic and shrimp. Garlic gives a strong aroma and taste. The red chili adds spice and color.
Additional Ingredients
- 1 bell pepper, thinly sliced (any color)
- 2 cups baby spinach
- 3 tablespoons soy sauce
- 1 tablespoon fish sauce
- 1 tablespoon lime juice
- 1 tablespoon brown sugar
- 2 green onions, chopped
- Fresh cilantro, for garnish
- Sesame seeds, for garnish
The bell pepper brings crunch and sweetness. Baby spinach adds nutrients and a pop of green. Soy sauce and fish sauce give umami richness. Lime juice adds brightness, while brown sugar balances the heat. The green onions and cilantro enhance the dish’s freshness. Finally, sesame seeds add a nice crunch.

Step-by-Step Instructions
Cooking the Rice Noodles
To cook rice noodles, start by bringing a pot of water to boil. Add the noodles and cook them for about 4-6 minutes, or until they are tender but firm. Check the package for exact timing. Once done, drain them well in a colander. Rinse the noodles under cold water to stop the cooking. Set them aside so they stay moist.
Sautéing Garlic and Chili
In a large pan or wok, heat 2 tablespoons of vegetable oil over medium heat. Add 4 cloves of minced garlic and 1 sliced red chili. Sauté them for about 1 minute until the garlic smells nice. Be careful not to burn it. This step boosts the flavor of the dish.
Cooking the Shrimp
Now it’s time for the shrimp! Increase the heat to medium-high. Add 1 pound of peeled and deveined shrimp to the pan. Cook them for about 2-3 minutes. Watch for the shrimp to turn pink and opaque. This means they are ready. Once cooked, remove the shrimp from the pan and set them aside.
Stir-Frying the Vegetables
In the same pan, add 1 thinly sliced bell pepper. Stir-fry it for about 2 minutes until it starts to soften. Next, toss in 2 cups of baby spinach. Cook until the spinach wilts down. This keeps your veggies crisp and colorful.
Combining Everything
Return the cooked shrimp to the pan. Now, add the drained rice noodles. Pour in 3 tablespoons of soy sauce, 1 tablespoon of fish sauce, 1 tablespoon of lime juice, and 1 tablespoon of brown sugar. Toss everything together so all the noodles and shrimp are well coated. Heat it all through for a minute.
Garnishing and Serving
To make your dish look great, garnish with 2 chopped green onions, some fresh cilantro, and a sprinkle of sesame seeds. Serve the noodles hot for the best taste. Enjoy the bright flavors and colors of your meal!
Tips & Tricks
Ingredient Swaps
If you don’t have shrimp, you can use chicken or tofu. Both options taste great. For noodles, try whole wheat or egg noodles as a swap. Adjust the spice level by adding more or less chili. You can also use hot sauce for extra kick.
Cooking Techniques
Grilling shrimp adds a nice smoky flavor. Simply marinate them in soy sauce and lime juice before grilling. If you don’t have a grill, using a wok is ideal. A wok heats evenly and allows for quick cooking. A regular pan works too, but the results may vary.
Meal Prep Ideas
You can prepare the noodles and shrimp in advance. Cook the noodles and store them in an airtight container. Shrimp can also be cooked ahead and kept in the fridge. When ready to eat, just combine everything and heat it up. This makes dinner quick and easy!
Pro Tips
- Use Fresh Shrimp: For the best flavor and texture, opt for fresh shrimp rather than frozen. If using frozen, ensure they are fully thawed and patted dry before cooking.
- Adjust the Spice: The heat level of the dish can be customized by adding more or fewer chili slices. For a milder dish, remove the seeds from the chili.
- Perfectly Cooked Noodles: Be careful not to overcook the rice noodles; they should be al dente, as they will continue to cook when combined with the hot ingredients.
- Garnish for Flavor: Don’t skip the garnishes! Fresh cilantro and sesame seeds add not only visual appeal but also enhance the flavor profile of the dish.

Variations
Adding Protein
You can switch up the shrimp for chicken, beef, or tofu. Each protein brings a new taste.
- Chicken: Use boneless, skinless chicken breast. Cut it into small pieces. Cook it for about 5-7 minutes until it’s no longer pink.
- Beef: Thinly slice flank steak or sirloin. Stir-fry it for 3-4 minutes until it’s browned.
- Tofu: Use firm or extra-firm tofu. Cut it into cubes and fry until golden brown. This takes about 6-8 minutes.
Adjust your cooking time based on the protein you choose. Chicken and beef take a bit longer than shrimp and tofu.
Making it Vegetarian or Vegan
To make this dish vegetarian or vegan, you can replace a few ingredients.
- Shrimp: Swap it for tofu, tempeh, or even chickpeas.
- Fish Sauce: Use soy sauce or a vegan fish sauce made from seaweed.
- Other ingredients: Use coconut sugar instead of brown sugar if you want to keep it vegan.
Keep the flavors strong by using fresh herbs and spices. A squeeze of lime juice adds brightness too.
Flavor Combinations
You can add new flavors with sauces and spices. Try these options:
- Sauces: Add teriyaki, hoisin, or sriracha for extra flavor. Adjust the amount based on your taste.
- Spices: Consider adding crushed red pepper, ginger, or lemongrass for depth.
- Vegetables: Add seasonal veggies like snap peas, carrots, or broccoli. These add crunch and color.
Mixing flavors keeps this dish exciting. Experiment to find your favorite combos!
Storage Info
Refrigeration Guidelines
To store leftovers, let the dish cool first. Place it in an airtight container. This keeps the shrimp and noodles fresh. I recommend using glass or plastic containers with tight lids. They help prevent any odors from the fridge. Leftovers can last for up to three days in the fridge.
Freezing Tips
If you want to freeze the dish, divide it into small portions. This makes it easier to reheat later. Use freezer-safe bags or containers. Squeeze out air to avoid freezer burn. For best quality, eat within one to two months. When ready to eat, thaw in the fridge overnight before reheating.
Reheating Best Practices
When reheating, use low heat on the stove. This keeps the shrimp from overcooking. You can add a splash of water or broth to keep it moist. Stir often to heat evenly. You can also microwave it, but use short bursts. This way, you can check the temperature and avoid drying it out. Enjoy your meal just as tasty as when it was fresh!
FAQs
What can I substitute for shrimp in Spicy Garlic Shrimp Noodles?
You can use chicken, tofu, or scallops instead of shrimp. Chicken gives a hearty feel and cooks quickly. Tofu adds a great texture and soaks up the flavor well. Scallops are sweet and tender, but they cook fast, so watch them closely.
Can I prepare Spicy Garlic Shrimp Noodles in advance?
Yes, you can prep the noodles and shrimp ahead of time. Cook the noodles and store them in the fridge for up to three days. Cooked shrimp can also be stored, but eat them within two days for best taste. When ready, just reheat and stir-fry with the veggies and sauce.
How can I make Spicy Garlic Shrimp Noodles less spicy?
To tone down the heat, use less chili or choose a milder pepper. You can also skip the chili and add more bell pepper for sweetness. Adding a dollop of sour cream or yogurt on top can help balance the heat too.
What do I serve with Spicy Garlic Shrimp Noodles?
These noodles pair well with a light salad or steamed broccoli. For drinks, try iced tea or a light beer. A crisp white wine, like Sauvignon Blanc, also complements the dish nicely.
In this blog post, I shared a delicious recipe for Spicy Garlic Shrimp Noodles. We discussed key ingredients like rice noodles and fresh shrimp, and I provided step-by-step cooking methods. You learned tips for ingredient swaps and meal prep ideas. I also covered variations to suit different diets and shared important storage tips for leftovers. Remember, this dish is versatile and can be customized to your taste. Enjoy experimenting and make this recipe your ow

Spicy Garlic Shrimp Noodles
Ingredients
- 8 oz rice noodles
- 1 lb shrimp, peeled and deveined
- 2 tablespoons vegetable oil
- 4 cloves garlic, minced
- 1 red chili thinly sliced
- 1 bell pepper thinly sliced
- 2 cups baby spinach
- 3 tablespoons soy sauce
- 1 tablespoon fish sauce
- 1 tablespoon lime juice
- 1 tablespoon brown sugar
- 2 green onions chopped
- none fresh cilantro, for garnish
- none sesame seeds, for garnish
Instructions
- Cook the rice noodles according to package instructions. Drain and set aside.
- In a large pan or wok, heat the vegetable oil over medium heat. Add the minced garlic and sliced red chili, sautéing for 1 minute until fragrant.
- Increase the heat to medium-high and add the shrimp to the pan. Cook until they turn pink and opaque, about 2-3 minutes. Remove shrimp from the pan and set aside.
- In the same pan, add the thinly sliced bell pepper and sauté for another 2 minutes until they begin to soften. Then, add the baby spinach and cook until wilted.
- Return the cooked shrimp to the pan and add the cooked noodles. Pour in the soy sauce, fish sauce, lime juice, and brown sugar. Toss everything together to coat evenly and heat through.
- Remove from heat, garnish with chopped green onions, fresh cilantro, and sesame seeds. Serve hot.


![To make a tasty one-pot vegetable soup, gather these fresh ingredients: - 1 tablespoon olive oil - 1 medium onion, diced - 3 cloves garlic, minced - 2 medium carrots, sliced - 2 celery stalks, chopped - 1 bell pepper, diced (any color) - 1 medium zucchini, diced - 1 cup green beans, trimmed and cut into 1-inch pieces - 1 cup diced tomatoes (canned or fresh) - 4 cups vegetable broth - 1 teaspoon dried thyme - 1 teaspoon dried basil - Salt and pepper to taste - 1 cup kale or spinach, chopped - Juice of 1 lemon Using fresh ingredients makes a big difference in flavor and nutrition. Fresh vegetables add crunch and bright taste. They also keep the soup light and vibrant. However, canned ingredients can save time and still taste good. For instance, canned tomatoes are great in this soup. They are sweet and ready to use. If you choose canned, look for low-sodium options to keep it healthy. Seasonings bring the soup to life. I recommend using dried thyme and basil for a warm, earthy flavor. They blend well with the vegetables. You can also try adding a bay leaf while it cooks. It gives the soup a lovely aroma. For a kick, add a pinch of red pepper flakes. Fresh herbs like parsley or cilantro at the end will add a pop of color and freshness. Adjust the salt and pepper to make it suit your taste. For the full recipe, follow the instructions provided to create this delightful dish. You start by gathering your ingredients. This makes the cooking process easier. Here’s what you need: - 1 tablespoon olive oil - 1 medium onion, diced - 3 cloves garlic, minced - 2 medium carrots, sliced - 2 celery stalks, chopped - 1 bell pepper, diced (any color) - 1 medium zucchini, diced - 1 cup green beans, trimmed and cut into 1-inch pieces - 1 cup diced tomatoes (canned or fresh) - 4 cups vegetable broth - 1 teaspoon dried thyme - 1 teaspoon dried basil - Salt and pepper to taste - 1 cup kale or spinach, chopped - Juice of 1 lemon Once you have everything, chop the veggies into bite-sized pieces. This helps them cook evenly. Heat the olive oil in a large pot over medium heat. Add the diced onion and sauté it for about 5 minutes. You want it soft and clear. Then, add the minced garlic and cook for another minute. This gives the soup a nice aroma. Next, toss in the sliced carrots, chopped celery, and diced bell pepper. Cook these for about 5 minutes. Stir occasionally so they don’t stick. Now, add in the diced zucchini and green beans. Mix well, followed by the diced tomatoes. Pour in the vegetable broth. Then, add the dried thyme, dried basil, salt, and pepper. Bring the mixture to a boil. Once it's boiling, lower the heat to let it simmer. Cook for about 20 minutes, or until all the veggies are soft. Finally, stir in the chopped kale or spinach and the lemon juice. Let them wilt for 2-3 minutes, then taste. Adjust the seasoning if needed. Make sure to keep the heat at medium while cooking the onions. This helps them soften without burning. When you add the broth, watch for the boil. Reducing heat after boiling is key. For the best taste, let the soup simmer. This gives the flavors time to blend. If you want a thicker soup, you can mash some of the veggies with a fork. Enjoy your hearty garden vegetable bliss soup! Check the [Full Recipe] for more details. To make a great one-pot vegetable soup, always use fresh veggies. They boost flavor and nutrition. Start with a good base. Sauté your onion and garlic in olive oil first. This step builds a rich flavor. Be sure to chop your vegetables evenly. This helps them cook at the same rate. Add herbs like thyme and basil early. They release their best flavors when heated. For a bright finish, squeeze fresh lemon juice at the end. One common mistake is not cutting vegetables the same size. This can lead to uneven cooking. Another mistake is adding too much salt at once. Start with a little and taste as you go. Don’t rush the simmering step. Let the soup cook low and slow. This brings out the best flavors. Lastly, avoid overcooking the greens. Add them last, so they stay bright and vibrant. If your soup is too bland, add more herbs or a splash of vinegar. This can brighten the flavors. If it’s too thick, stir in more vegetable broth or water. For a richer taste, add a dash of soy sauce or Worcestershire sauce. If you accidentally add too much salt, toss in a few potato chunks. They absorb excess salt while cooking. Finally, if the soup is too watery, let it simmer uncovered for a bit longer. This helps thicken it up nicely. {{image_2}} You can easily change this soup to suit your taste. Start by picking your favorite veggies. If you love spinach, add more of it. If you want a bit of heat, toss in some chili flakes. You can also try different herbs. Instead of thyme and basil, use parsley or oregano. Each choice adds a unique flavor. Do you have veggies at home that you need to use? Feel free to swap them! For example, if you have sweet potatoes, they work great instead of carrots. If you don't have green beans, try peas or corn. You can even use frozen veggies if fresh ones aren’t available. Just use the same amount for best results. This recipe is already vegan and gluten-free, making it easy for many diets. If you want to add protein, beans or lentils are great choices. Just make sure to cook them until soft. For a heartier soup, you can add gluten-free pasta. Just cook it separately and stir it in at the end. It’s all about making this soup fit your needs. For the full recipe, check out the Hearty Garden Vegetable Bliss Soup. After making this soup, let it cool before storing. Use an airtight container. This keeps the soup fresh. You can store it in the fridge for up to four days. If you want to enjoy it later, freezing is the way to go. To reheat, pour the soup into a pot. Heat it over medium heat. Stir it often for even warming. You can also use the microwave. Just place it in a microwave-safe bowl and heat for 2 to 3 minutes. Stir halfway through to make sure it heats evenly. For long-term storage, freeze the soup in portions. Use freezer-safe bags or containers. Leave some space at the top, as liquids expand when frozen. The soup can last up to three months in the freezer. When you’re ready to eat, thaw it in the fridge overnight before reheating. This keeps the flavors fresh and tasty. If you follow these tips, your soup will stay delicious! Check out the Full Recipe for more details. The cooking time for this soup is about 40 minutes. You spend 15 minutes prepping the ingredients. Then, the soup simmers for 20 minutes after boiling. This makes a tasty meal fast! Yes, you can add protein to your soup. Try adding cooked beans or lentils. You can also mix in cooked chicken or tofu. These options make the soup more filling and nutritious. To thicken your vegetable soup, blend some of it. Use an immersion blender or a regular blender. You can also add a few more diced potatoes. They cook down and help thicken the soup. Definitely! Frozen vegetables are a great choice. They are just as healthy and save time. Add them straight to the pot with the broth. You won’t need to thaw them first. Store leftovers in an airtight container. Refrigerate them for up to three days. For longer storage, freeze the soup. It can last up to three months in the freezer. You can add fresh herbs like parsley or cilantro. Dried herbs like oregano and rosemary work well too. Just remember to adjust the amount based on what you like. Yes, this soup is kid-friendly! It has tasty veggies and a mild flavor. You can even let kids pick their favorite vegetables to add. Yes, you can make the soup ahead of time. It tastes even better after a day in the fridge. Just reheat it before serving, and you’re good to go! For the full recipe, check out the Hearty Garden Vegetable Bliss Soup. This blog post covered how to make a great one-pot vegetable soup. We discussed ingredients, cooking steps, and tips to ensure success. I shared ways to customize the recipe, store leftovers, and answer common questions. Now, you have all the tools to make your perfect soup. Enjoy each warm bowl and feel free to experiment with flavors. Keep these tips handy, and soon, you'll create a dish everyone will love.](https://dailydishlab.com/wp-content/uploads/2025/06/881b00bc-e7c1-4e5c-8041-f5936b3db67e-768x768.webp)

![- 500g chicken breast, cubed - 1 large onion, finely chopped - 3 cloves garlic, minced - 1 inch ginger, grated - 2 tablespoons curry powder - 1 teaspoon turmeric powder - 1 teaspoon cumin powder - 400ml coconut milk - 1 tablespoon vegetable oil - Salt and pepper to taste To make my easy chicken curry, I focus on fresh and simple ingredients. Chicken breast is my main protein. The onions, garlic, and ginger create a rich base. The spices, like curry powder, turmeric, and cumin, bring warmth and depth. Coconut milk adds creaminess and a hint of sweetness, balancing the spices. - Fresh herbs like cilantro - Lime wedges for serving If you want to elevate your dish, add fresh herbs like cilantro. It gives a bright flavor and nice color. Lime wedges on the side add a zesty kick when served. They contrast well with the creamy curry. - Large skillet or pan - Measuring cups and spoons Having the right tools makes cooking easier. A large skillet or pan helps with even cooking. Use measuring cups and spoons for accuracy. Proper tools ensure your easy chicken curry turns out perfect every time. For the full recipe, check the section above. To start, I heat vegetable oil in a large skillet over medium heat. I add the finely chopped onion and sauté it for about five minutes. The onion should turn translucent. Next, I stir in the minced garlic and grated ginger. I cook this mixture for another one to two minutes until it smells great. Now comes the fun part: toasting the spices! I sprinkle curry powder, turmeric, and cumin into the pan. I stir well to coat the onions and toast the spices for about one minute. This step brings out their rich flavors. After preparing the base, I add the cubed chicken breast to the pan. I season it with salt and pepper for a balanced taste. It’s important to brown the chicken pieces thoroughly. I cook them for about five to seven minutes, ensuring they turn golden on all sides. Once the chicken is browned, I pour in the coconut milk. I bring the mixture to a gentle simmer and then reduce the heat to low. Covering the pan, I let it cook for 15 to 20 minutes. This allows the chicken to cook through and the sauce to thicken. Before serving, I taste the curry and adjust the seasoning if needed. A fresh garnish of chopped coriander adds a lovely touch. For the full recipe, check the details above. To make your chicken curry perfect, focus on the spice blend. Use fresh spices whenever you can. They add much more flavor than old ones. Toast the spices in the pan before adding other ingredients. This step releases their oils and boosts their taste. You can also adjust the spice levels to match your taste. If you prefer a milder curry, reduce the curry powder. For extra warmth, add a bit more cumin. Using fresh ingredients is key for a tasty curry. Fresh chicken, onions, garlic, and ginger make a big difference. Chop the onion finely to help it cook faster. Mince the garlic and grate the ginger for the best flavor. The coconut milk should be full-fat for a creamy texture. When you cook with quality items, your dish shines. Chicken curry pairs well with simple sides. Serve it over fluffy rice for a filling meal. You can also try naan or roti for a fun twist. These breads soak up the sauce nicely. Garnishing your dish can elevate its look. Sprinkle fresh coriander on top before serving. This adds color and a fresh taste. You might also squeeze some lime juice over the curry. The zest brightens the flavors and adds a nice touch. To manage your cooking time, prep before you cook. Chop all your ingredients first. This makes cooking smoother and faster. While the chicken simmers, clean up your workspace. This keeps your kitchen organized and less stressful. You can also start cooking rice or bread while the curry simmers. This multitasking saves time and lets you serve everything hot. For a quick meal, the full recipe of quick and creamy chicken curry takes just 35 minutes. With these tips, you’ll not only save time but also enjoy a delicious dinner! {{image_2}} You can easily make this chicken curry vegetarian or vegan. Simply replace the chicken with tofu or your favorite vegetables. Some great choices are bell peppers, carrots, and peas. For a delicious twist, use firm tofu. Cut it into cubes and sauté it until golden. This adds a nice texture. When using coconut milk, be sure to pick a full-fat version. It gives a rich flavor. If you want a lighter option, use light coconut milk but add a bit of vegetable broth for depth. You can also add extra spices to boost flavor. Try adding a dash of soy sauce for umami. You can create exciting versions of chicken curry by adding spices from different regions. For an Indian-inspired dish, add garam masala or fenugreek. These spices bring warmth and depth to the curry. If you prefer a Thai-style curry, add lemongrass and kaffir lime leaves. These ingredients bring a fresh and zesty flavor. Use fresh or dried lemongrass, and slice it finely. This will enhance the overall taste and give a unique twist. Adjusting the spice level is easy. To make the curry mild, use less curry powder and skip the hot peppers. For a medium heat, use a bit of chili powder or cayenne. If you like it hot, add fresh chili peppers, like jalapeños or serranos. You can also use hot sauce to kick it up a notch. Just start with a small amount and taste as you go. This way, you can control the heat to your liking. To keep your chicken curry fresh, first let it cool. Then, transfer the leftovers to airtight containers. This helps prevent moisture loss and keeps flavors intact. You can store it in the fridge for up to three days. For longer preservation, consider freezing. Divide the curry into portions, and freeze each in a separate container. It will last up to three months in the freezer. When you're ready to enjoy your chicken curry again, I recommend reheating it on the stove. This method warms the curry evenly. You can also use the microwave; just cover the bowl and heat it in short bursts. Stir in between to avoid hot spots. To maintain flavor and texture, add a splash of coconut milk or water if it seems thick. You can safely eat the leftovers within three days if stored in the fridge. If you freeze the curry, it should remain good for about three months. Always check for changes in smell or color. If you see any signs of spoilage, like a sour smell or odd texture, it’s best to toss it. To make easy chicken curry, follow these key steps: 1. Prepare your ingredients: Chop the onion, garlic, and ginger. 2. Heat oil: In a large pan, heat vegetable oil over medium heat. 3. Sauté onion: Add the chopped onion and cook until soft. 4. Add garlic and ginger: Stir in minced garlic and grated ginger for flavor. 5. Toast spices: Add curry powder, turmeric, and cumin. Stir to mix. 6. Cook chicken: Add cubed chicken, season, and brown on all sides. 7. Simmer with coconut milk: Pour in coconut milk, stir, and simmer until done. 8. Finish and serve: Taste, adjust seasoning, and garnish with coriander. These steps make it easy to create a rich and tasty chicken curry from scratch. Yes, you can use different meats. Here are some options: - Beef: Cut into small cubes, similar to chicken. - Lamb: Use tender pieces for a rich flavor. - Pork: Pork tenderloin works well in this curry. Each meat brings its unique taste. Adjust cooking times based on the meat you choose. The best side dishes for chicken curry include: - Cooked rice: Fluffy rice soaks up the sauce well. - Naan bread: Soft naan is perfect for dipping. - Raita: A yogurt sauce cools the spices. These sides complement the curry's rich flavors. Try mixing and matching to find your favorite! For the full recipe, check out the [Full Recipe]. In this article, we covered the key ingredients for chicken curry, including spices and optional items that boost flavor. You learned step-by-step instructions to cook, simmer, and serve your dish perfectly. We provided tips for enhancements, variations, and storage methods to keep your curry fresh. Cooking chicken curry is easy and fun. Experiment with flavors and share your creations. Enjoy your delicious meal!](https://dailydishlab.com/wp-content/uploads/2025/06/c5f0adf9-706c-4d08-bf07-c5d16fe1346d-768x768.webp)


![To make this tasty dish, you need some key items. Here is what you will need: - 2 cups cooked pasta (penne or rotini works best) - 1 lb chicken breast, diced - 8 oz mushrooms, sliced - 2 cups broccoli florets (fresh or frozen) - 3 cups Alfredo sauce (store-bought or homemade) - 1 cup shredded mozzarella cheese - ½ cup grated Parmesan cheese - 2 tablespoons olive oil - 2 cloves garlic, minced - Salt and pepper to taste - 1 teaspoon Italian seasoning These ingredients create a rich and creamy flavor that everyone will love. The right seasonings make your casserole pop. Salt and pepper add basic flavor. Italian seasoning gives it a nice herbal touch. I often use fresh garlic to add depth. The garlic will make your kitchen smell amazing as it cooks. Don’t skip these steps; they make a big difference! Garnishes can make your dish look more inviting. I like to use fresh parsley for a burst of color. You can also add extra cheese on top if you want a cheesier finish. These little touches make your casserole feel special and more appealing. Use what you enjoy most! If you want the full details, check the Full Recipe. Start by gathering your ingredients. You need cooked pasta, chicken, mushrooms, broccoli, and sauce. Also, have mozzarella and Parmesan cheese ready. Dice the chicken and slice the mushrooms. This helps the cooking go fast. Mince the garlic too. Don’t forget to measure out the olive oil and seasonings. In a large skillet, heat olive oil over medium heat. Once hot, add the diced chicken. Season it with salt, pepper, and Italian seasoning. Cook for 5-7 minutes until the chicken turns white. It should not be pink inside. Next, add minced garlic and sliced mushrooms. Sauté these for 3-4 minutes. The mushrooms will become soft and tasty. Finally, stir in the broccoli florets. Cook for an extra 2 minutes until they turn bright green. In a big bowl, mix the cooked pasta with the chicken and vegetables. Pour in the Alfredo sauce and stir well. Make sure everything is coated evenly. Transfer this mixture to a greased baking dish. Spread it out evenly. Now, top it with mozzarella and Parmesan cheese. Bake it in a preheated oven at 375°F for 25-30 minutes. Look for bubbly, golden cheese on top. When it’s ready, let it cool for 5 minutes before serving. You can find the Full Recipe for more details and serving tips. To cook chicken well, use a skillet over medium heat. First, add olive oil and let it warm. Then, add diced chicken to the hot oil. Season with salt, pepper, and Italian seasoning. Cook for 5-7 minutes until the chicken turns white and is no longer pink. This step ensures juicy chicken for your casserole. The key to creamy Alfredo sauce is gentle heating. If you use store-bought sauce, warm it on low heat. If you make it from scratch, stir constantly to avoid lumps. You want it smooth and silky. Mix the sauce well with pasta before adding other ingredients. This helps coat everything evenly and keeps it creamy. Ovens can vary, so check your casserole while it bakes. I suggest baking for 25-30 minutes. If the top isn’t golden, leave it for a few more minutes. To avoid overcooking, always look for bubbling cheese. When the cheese is melted and golden, it’s ready to serve. Adjust your time based on your oven’s heat. {{image_2}} You can switch out the chicken for other meats. Try diced turkey or cooked ham. Shrimp works well too. Each option adds a different taste to the dish. You can also use ground beef for a heartier flavor. Just make sure it's fully cooked. If you want a meatless meal, skip the chicken. Replace it with tofu or tempeh. Both will soak up the sauce and add protein. You can also use chickpeas for a fun twist. This way, you keep it filling and tasty. Boost the health of your casserole by adding more vegetables. Spinach, bell peppers, or zucchini are great choices. You can mix in frozen peas or corn too. Just remember to keep the cooking time in mind. You want all the veggies to be tender but not mushy. They add color and flavor to your dish! To keep your Chicken and Mushroom Alfredo Casserole fresh, store it in an airtight container. Place it in the fridge right after it cools down. It will stay good for up to three days. Make sure to label the container with the date. This helps you track how long it has been stored. When you’re ready to enjoy your leftovers, preheat your oven to 350°F (175°C). Place the casserole in an oven-safe dish. Cover it with foil to keep it moist. Heat for about 20 minutes or until it's warm all the way through. You can also use the microwave. Just heat in short bursts and stir in between until hot. If you want to save the casserole for later, freezing is a great option. Allow the dish to cool completely before freezing. Use a freezer-safe container or wrap it tightly in plastic wrap and foil. It can last for up to three months in the freezer. To reheat, thaw it overnight in the fridge and then bake as mentioned above. Enjoy your creamy, cheesy meal anytime! Yes, you can make this dish ahead of time. Prepare the casserole, but do not bake it. Cover it tightly with plastic wrap or foil. Store it in the fridge for up to two days. When you are ready to eat, bake it straight from the fridge. Just add a few extra minutes to the cooking time. This keeps the flavors fresh and tasty. If you need a substitute, try cream cheese mixed with milk. This gives a creamy texture. You can also use a white sauce made from butter, flour, and milk. For a lighter option, consider using Greek yogurt mixed with a bit of cheese. These options will still keep your casserole rich and delicious. Yes, frozen chicken and vegetables work well in this recipe. If using frozen chicken, thaw it first. Cut it into small pieces before cooking. For frozen vegetables, you can add them straight to the skillet. Just cook them a little longer to ensure they heat through. This makes the prep easy and quick, while still tasting great. You can find the full recipe for Chicken and Mushroom Alfredo Casserole [Full Recipe]. This blog covered everything you need for Chicken and Mushroom Alfredo Casserole. We discussed the ingredients, from required items to tasty garnishes. I shared easy steps for preparing, cooking, and assembling the dish. Plus, I gave tips for perfect chicken and sauce. We explored variations, storage, and answered common questions. Creating this dish can be simple and fun. You can enjoy different flavors and textures. Don't hesitate to try your own spin on it. Enjoy your cooking adventure!](https://dailydishlab.com/wp-content/uploads/2025/06/668e601b-10d5-4ca8-81a3-3ea93e17acf1-768x768.webp)