Spicy Korean Beef Lettuce Wraps Flavorful and Easy Dish

If you’re craving a fun, easy meal, try my Spicy Korean Beef Lettuce Wraps. This dish packs bold flavors into crisp lettuce leaves. It’s perfect for a quick weeknight dinner or a lively party snack. I’ll guide you step-by-step to create this delicious and versatile meal. Ready to spice up your dinner? Let’s get cooking!
Why I Love This Recipe
- Bold Flavor Profile: The combination of gochujang, soy sauce, and brown sugar creates a perfect balance of spicy, savory, and sweet flavors that tantalize the taste buds.
- Quick and Easy: This recipe comes together in just 20 minutes, making it a fantastic option for busy weeknights or last-minute gatherings.
- Healthy and Fresh: Using lettuce wraps instead of tortillas adds a refreshing crunch and reduces calories, making this dish a healthier alternative to traditional wraps.
- Customizable: Feel free to add your favorite toppings like cucumber slices or kimchi, allowing everyone to personalize their wraps to their liking.
Ingredients
Main Ingredients List
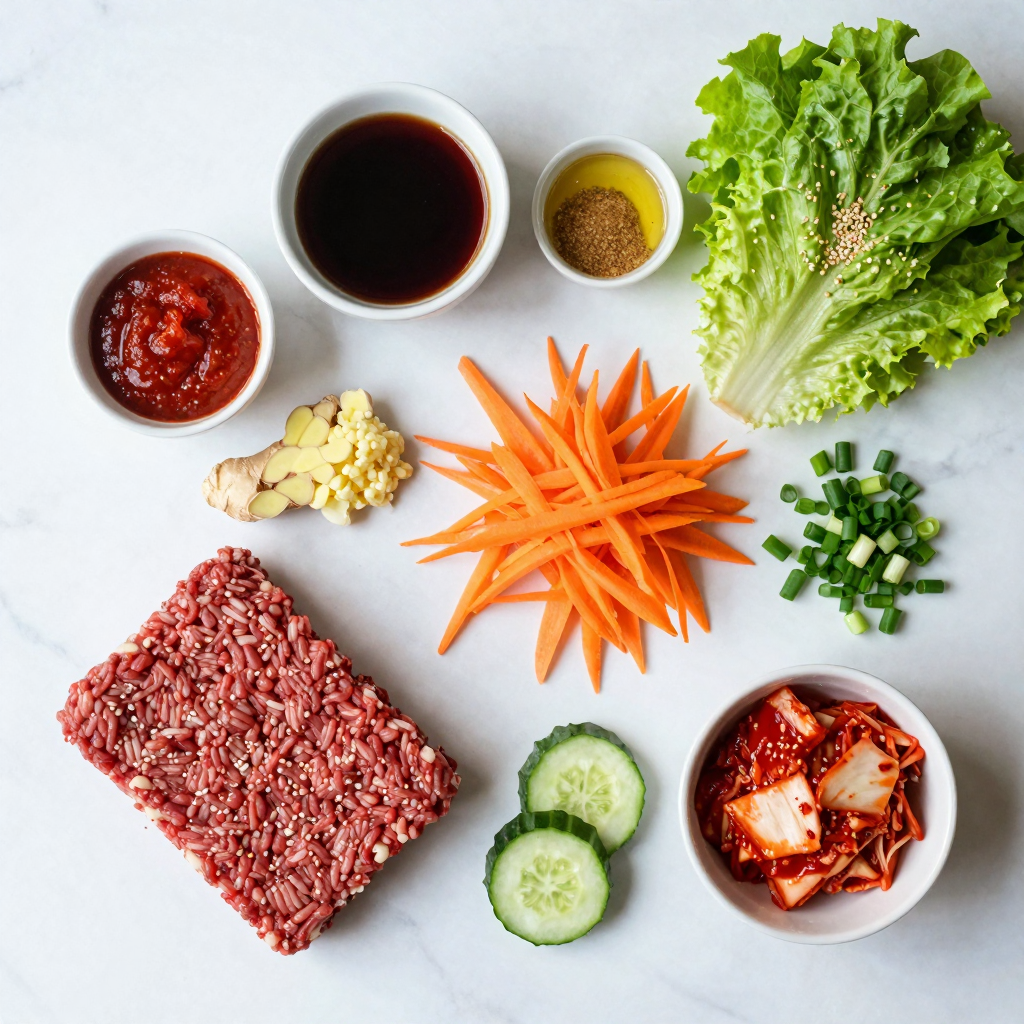
- 1 lb ground beef
- 2 tablespoons gochujang (Korean red chili paste)
- 2 tablespoons soy sauce
- 1 tablespoon sesame oil
- 1 tablespoon brown sugar
- 2 cloves garlic, minced
- 1 teaspoon fresh ginger, grated
- 1 cup shredded carrots
- 1 cup chopped green onions (scallions)
- 1 head of butter or romaine lettuce, leaves separated
- 1 tablespoon sesame seeds (for garnish)
To make these wraps pop, you need fresh flavors and rich ingredients. Ground beef gives a hearty base. Gochujang adds spice and depth. Soy sauce brings in saltiness. Sesame oil gives a nutty taste. Brown sugar balances the heat. Garlic and ginger provide aromatic notes. Carrots and green onions add crunch and freshness.
Optional Ingredients for Serving
- Slices of cucumber
- Kimchi
For extra crunch and zest, serve with cucumber slices. Kimchi adds a tangy bite that complements the beef. Both options enhance the meal, making it more exciting.
Suggested Substitutions
- Ground turkey or chicken for a leaner option
- Tamari or coconut aminos for a gluten-free version
- Honey or maple syrup instead of brown sugar
If you want a healthier twist, try ground turkey or chicken. For a gluten-free dish, tamari or coconut aminos work well. Swap brown sugar for honey or maple syrup if you prefer natural sweeteners. These swaps keep the dish delicious while fitting your needs.

Step-by-Step Instructions
Preparation of the Beef Mixture
To start, heat sesame oil in a large skillet over medium heat. This oil adds a rich flavor. Once the oil is hot, add minced garlic and grated ginger. Sauté this for about 30 seconds. You want to smell the aroma fill the kitchen. Next, increase the heat to medium-high. Add 1 pound of ground beef to the skillet. Cook this for 5 to 7 minutes. Break it up with a spatula as it cooks. You want it browned all over. If there’s excess fat, drain it carefully.
Now it’s time to add flavor. Stir in 2 tablespoons of gochujang, 2 tablespoons of soy sauce, and 1 tablespoon of brown sugar. Mix well so the beef gets coated. Cook for another 2 to 3 minutes. This helps the flavors blend nicely. Finally, remove the skillet from heat. Mix in 1 cup of shredded carrots and 1 cup of chopped green onions. Let them warm through in the hot mixture.
Assembling the Lettuce Wraps
Now, grab a head of butter or romaine lettuce. Carefully separate the leaves. You can use them whole or fold them. Spoon a portion of the beef mixture into the center of each lettuce leaf. Don’t be shy; fill it well! Sprinkle a tablespoon of sesame seeds on top for extra crunch.
Serving Suggestions and Presentation Tips
To make your dish even more appetizing, add some cucumber slices on the side. This adds a nice crunch. You can also serve kimchi for a spicy kick. Arrange the wraps on a colorful platter. This makes it look inviting. Enjoy these wraps fresh for the best taste!
Pro Tips
- Use Fresh Ingredients: Fresh garlic and ginger will enhance the flavor of the beef, giving your wraps a vibrant taste.
- Adjust Spice Level: Modify the amount of gochujang to suit your spice preference; start with less if you’re unsure.
- Serve Immediately: For the best texture, serve the wraps right after assembling them to maintain the crispness of the lettuce.
- Experiment with Fillings: Feel free to add other vegetables like bell peppers or bean sprouts for added crunch and flavor.
Tips & Tricks
Perfecting the Flavor Profile
To bring out the best flavors, balance the spice and sweetness. Gochujang adds heat, while brown sugar adds a touch of sweetness. I like to taste as I cook. If you want more heat, add extra gochujang. For a sweeter taste, add more brown sugar. This balance makes the dish stand out.
Cooking Tips for Ground Beef
When cooking ground beef, use a hot skillet. Heat the skillet before adding the oil. This helps the beef brown nicely. Break the beef apart as it cooks. This ensures even cooking and browning. If there’s too much fat, drain some off. Keeping the beef moist is key!
Enhancing Texture and Freshness
To add crunch, mix in carrots and green onions at the end. This keeps them fresh and bright. You can also add cucumber slices for extra crunch. Serve with kimchi for a tangy kick. Using crisp lettuce adds a great texture to each bite. Enjoy the mix of flavors and textures in every wrap!

Variations
Make It Spicy: Adjusting Heat Levels
To make your Spicy Korean Beef Lettuce Wraps even hotter, add more gochujang. Start with one extra tablespoon for a kick. You can also add sliced fresh chili peppers. If you want less heat, use less gochujang. You can replace it with sweet chili sauce for a milder taste. This way, you can enjoy the flavor without too much spice.
Vegetarian or Vegan Alternatives
If you prefer a vegetarian or vegan option, swap the ground beef for ground mushrooms or lentils. Mushrooms give a nice texture and absorb flavors well. Use the same spices and sauces to keep the taste. For a nutty flavor, add crushed tofu or tempeh. These choices will make your wraps just as tasty and satisfying.
Creative Add-Ins for Extra Flavor
Add extra ingredients to enhance your wraps. Try adding sliced cucumbers for crunch. You can mix in diced bell peppers for sweetness. Fresh herbs like cilantro or mint can add a bright touch. For a twist, drizzle some sriracha or hoisin sauce over the beef. These changes will make your wraps even more exciting and flavorful.
Storage Info
How to Store Leftovers
After enjoying your spicy Korean beef lettuce wraps, store any leftovers in an airtight container. Keep them in the fridge for up to three days. The beef mixture stays tasty, while the lettuce can wilt. To keep it fresh, store the beef and lettuce separately.
Reheating Instructions
To reheat the beef, place it in a skillet over medium heat. Stir it often until it warms through, about five minutes. You can also microwave it in short bursts, stirring in between. Avoid reheating the lettuce; it’s best fresh.
Freezing Tips for Meal Prep
You can freeze the beef mixture for easy meals later. Let it cool completely before putting it in a freezer-safe bag. It lasts well for up to three months. When ready to eat, thaw in the fridge overnight and reheat as needed. Enjoy your tasty wraps again!
FAQs
What type of lettuce is best for wraps?
The best lettuce for wraps is butter or romaine lettuce. Both types have strong leaves. They hold the filling well and add crunch. Butter lettuce is soft and sweet, while romaine is crispy. You can use either based on your taste.
Can I use a different protein instead of beef?
Yes, you can use other proteins. Ground chicken, turkey, or pork work well. For a vegetarian option, try mushrooms or tofu. Just adjust the cooking time if using chicken or turkey. Make sure to season them well for flavor.
How do I make this dish ahead of time?
To make this dish ahead, prepare the beef mixture first. Store it in the fridge for up to three days. When ready to eat, warm it in a pan. Assemble the wraps just before serving. This keeps the lettuce fresh and crisp.
This blog post covered all key points for tasty lettuce wraps. We discussed ingredients, step-by-step instructions, and tips to boost flavor. You learned about variations, storage, and answered common questions.
Now, you can make these wraps your own. Feel free to try new flavors or ingredients. Enjoy healthy meals that are easy and fun to prepare!

Spicy Korean Beef Lettuce Wraps
Ingredients
1 lb ground beef
2 tablespoons gochujang (Korean red chili paste)
2 tablespoons soy sauce
1 tablespoon sesame oil
1 tablespoon brown sugar
2 cloves garlic, minced
1 teaspoon fresh ginger, grated
1 cup shredded carrots
1 cup chopped green onions (scallions)
1 head of butter or romaine lettuce, leaves separated
1 tablespoon sesame seeds (for garnish)
Optional: Slices of cucumber and kimchi for serving
Instructions
In a large skillet, heat the sesame oil over medium heat.
Add minced garlic and ginger, sauté for about 30 seconds until fragrant.
Increase the heat to medium-high, then add the ground beef. Cook until browned, breaking it up with a spatula, about 5-7 minutes.
Once the beef is cooked through, drain excess fat, if necessary.
Stir in gochujang, soy sauce, and brown sugar, mixing well to fully coat the beef. Cook for another 2-3 minutes, allowing the flavors to meld.
Remove from heat and mix in shredded carrots and chopped green onions, letting them warm through.
To serve, spoon a portion of the beef mixture into the center of a lettuce leaf, either whole or folded, and top with sesame seeds.
Optional: Add cucumber slices and a side of kimchi for added crunch and flavor.
Prep Time: 10 mins | Total Time: 20 mins | Servings: 4

Spicy Korean Beef Lettuce Wraps
Ingredients
- 1 lb ground beef
- 2 tablespoons gochujang (Korean red chili paste)
- 2 tablespoons soy sauce
- 1 tablespoon sesame oil
- 1 tablespoon brown sugar
- 2 cloves garlic, minced
- 1 teaspoon fresh ginger, grated
- 1 cup shredded carrots
- 1 cup chopped green onions (scallions)
- 1 head butter or romaine lettuce, leaves separated
- 1 tablespoon sesame seeds (for garnish)
- optional slices of cucumber and kimchi for serving
Instructions
- In a large skillet, heat the sesame oil over medium heat.
- Add minced garlic and ginger, sauté for about 30 seconds until fragrant.
- Increase the heat to medium-high, then add the ground beef. Cook until browned, breaking it up with a spatula, about 5-7 minutes.
- Once the beef is cooked through, drain excess fat, if necessary.
- Stir in gochujang, soy sauce, and brown sugar, mixing well to fully coat the beef. Cook for another 2-3 minutes, allowing the flavors to meld.
- Remove from heat and mix in shredded carrots and chopped green onions, letting them warm through.
- To serve, spoon a portion of the beef mixture into the center of a lettuce leaf, either whole or folded, and top with sesame seeds.
- Optional: Add cucumber slices and a side of kimchi for added crunch and flavor.

![- 8 oz spaghetti or linguine - 1 lb large shrimp, peeled and deveined - 4 cloves garlic, minced - 1/4 cup olive oil - 1 lemon (zested and juiced) - 1/4 cup fresh parsley, chopped - 1/2 teaspoon red pepper flakes (optional) - Salt and pepper to taste - Grated Parmesan cheese for serving When I make Lemon Garlic Shrimp Pasta, I start with the main ingredients. The pasta is key. I choose either spaghetti or linguine. Both have the right texture. The shrimp adds protein and flavor. Large shrimp work best. Their size means they cook well and absorb the taste. Next, I grab garlic. Fresh, minced garlic gives the dish a punch of flavor. It's one of my favorite parts. With these main ingredients, we're well on our way to a great meal. Now, I gather the additional ingredients. First, I pour in some olive oil. It helps cook the garlic and shrimp. Then, I zest and juice a lemon. The citrus brightens up the dish and adds freshness. I also chop fresh parsley. It adds color and flavor. If you like heat, add red pepper flakes. They bring a nice kick. Don't forget salt and pepper. They are essential for seasoning. Finally, I always keep grated Parmesan cheese on hand. It makes a great topping that melts into the warm pasta. These ingredients come together for a dish that is simple yet packed with flavor. For the full recipe, you can follow the steps to create this delightful meal. To start, bring a large pot of salted water to a boil. Add 8 ounces of spaghetti or linguine. Cook the pasta until it is al dente, following the package instructions. This usually takes about 8 to 10 minutes. Once done, reserve about 1/2 cup of the pasta water before draining the rest. Set the pasta aside in a large bowl. Next, grab a large skillet and heat 1/4 cup of olive oil over medium heat. Add 4 cloves of minced garlic to the skillet. Sauté the garlic for about 1 minute. Keep an eye on it, so it doesn't burn. After the garlic becomes fragrant, add 1 pound of large shrimp, peeled and deveined. Cook the shrimp for 2 to 3 minutes on each side. They will turn pink when done. Season the shrimp with salt, pepper, and optional red pepper flakes for some heat. Once the shrimp are cooked, it’s time to mix everything. Add the cooked pasta to the skillet with the shrimp. Pour in the juice and zest from 1 lemon. Toss everything well to combine. If the pasta looks dry, add a little of the reserved pasta water. This will help achieve the right consistency. Finally, stir in 1/4 cup of chopped fresh parsley. Adjust the seasoning if needed and serve immediately. For a finishing touch, sprinkle some grated Parmesan cheese on top. Enjoy your delicious meal! To cook your pasta just right, aim for al dente. This means the pasta should be firm yet tender. Cook it according to the package, but check a minute early. This helps keep a good bite. Don’t forget to reserve some pasta water before draining. This water is starchy and helps bind the sauce. If your dish seems dry, just add a splash of this water to get the right texture. Season your dish well. Use salt and pepper to bring out the flavors. For extra zing, add red pepper flakes. They add warmth without overpowering the dish. To really boost the garlic flavor, sauté it gently. Cook it until it's fragrant but not burnt. This way, the garlic infuses the oil with a rich taste, enhancing the shrimp and pasta. Make your dish look great when serving. Sprinkle fresh parsley on top for a pop of color. You can also add a generous amount of grated Parmesan cheese. It adds a nice finish and rich flavor. Pair Lemon Garlic Shrimp Pasta with a crisp salad or some garlic bread. These sides bring balance and make your meal feel complete. For more tasty ideas, check out the Full Recipe. {{image_2}} You can change the pasta type to fit your taste. Use whole wheat or gluten-free pasta. Both options work well with the dish. If you want a unique twist, try using fettuccine or penne. They all absorb the flavors nicely. If shrimp isn't your favorite, swap in other proteins. Chicken or scallops are great alternatives. You can even use tofu for a plant-based meal. Just adjust cooking times to ensure everything cooks evenly. Adding vegetables boosts both flavor and nutrition. Spinach wilts down nicely and adds color. Cherry tomatoes burst with juice and sweetness. You can add these veggies when cooking the shrimp. Herbs and spices can transform this dish. Basil or oregano pair well with lemon. For heat, consider using crushed red pepper flakes. Fresh herbs like basil or cilantro add a pop of freshness. Experiment with what you love! Gluten-free eaters can enjoy this dish too. Use gluten-free pasta instead of traditional options. Make sure to check the label for safe ingredients. For a vegan version, skip the shrimp and Parmesan. Use chickpeas or mushrooms for texture. Nutritional yeast can give a cheesy flavor without the dairy. This way, everyone can enjoy a delicious meal! For the full recipe, check out the [Full Recipe]. To store your Lemon Garlic Shrimp Pasta, place it in an airtight container. This helps keep it fresh. You can store it in the fridge for up to three days. If you want to enjoy it later, make sure it cools down first before sealing the container. When you’re ready to eat the pasta again, there are a few easy ways to reheat it. You can use the microwave or heat it on the stove. If you microwave it, add a splash of water to keep it moist. If you use the stove, warm it over low heat and stir gently. This helps keep the shrimp tender and the pasta tasty. If you want to keep the Lemon Garlic Shrimp Pasta longer, freezing works great. First, let it cool completely. Then, pack it in a freezer-safe container or bag. It can last up to three months in the freezer. To reheat, thaw it overnight in the fridge. Then, warm it on the stove or microwave as mentioned above. Enjoy your delicious meal later with ease! For the complete recipe, check out the Full Recipe. Preparing Lemon Garlic Shrimp Pasta takes about 10 minutes for prep and 10 minutes for cooking. You can have this dish ready in just 20 minutes. This quick time makes it perfect for busy weeknights or a cozy dinner. Yes, you can use frozen shrimp. Just thaw the shrimp before cooking. Place frozen shrimp in a bowl of cold water for about 15-20 minutes. This method works well and keeps shrimp firm. Once thawed, peel and devein them if needed. Then, you can follow the steps in the full recipe. Lemon Garlic Shrimp Pasta goes well with many sides. Here are some great options: - A simple green salad with lemon vinaigrette. - Garlic bread for a crunchy bite. - Steamed asparagus or broccoli for some veggies. - A light tomato salad to balance the dish's flavors. These sides add freshness and texture to your meal, making it even more enjoyable. Lemon Garlic Shrimp Pasta combines fresh flavors and simple steps. We covered ingredients, cooking methods, and helpful tips. Remember to reserve pasta water for the best texture. You can also customize with veggies or different proteins. This dish is quick and enjoyable for any meal. Try it next time you cook. It’s easy, tasty, and sure to impress! Enjoy sharing or savoring this meal with loved ones.](https://dailydishlab.com/wp-content/uploads/2025/06/cb109eed-2e61-4a9b-85d4-6391f29df5eb-768x768.webp)


