Spicy Mango Habanero Wings Flavorful and Zesty Treat

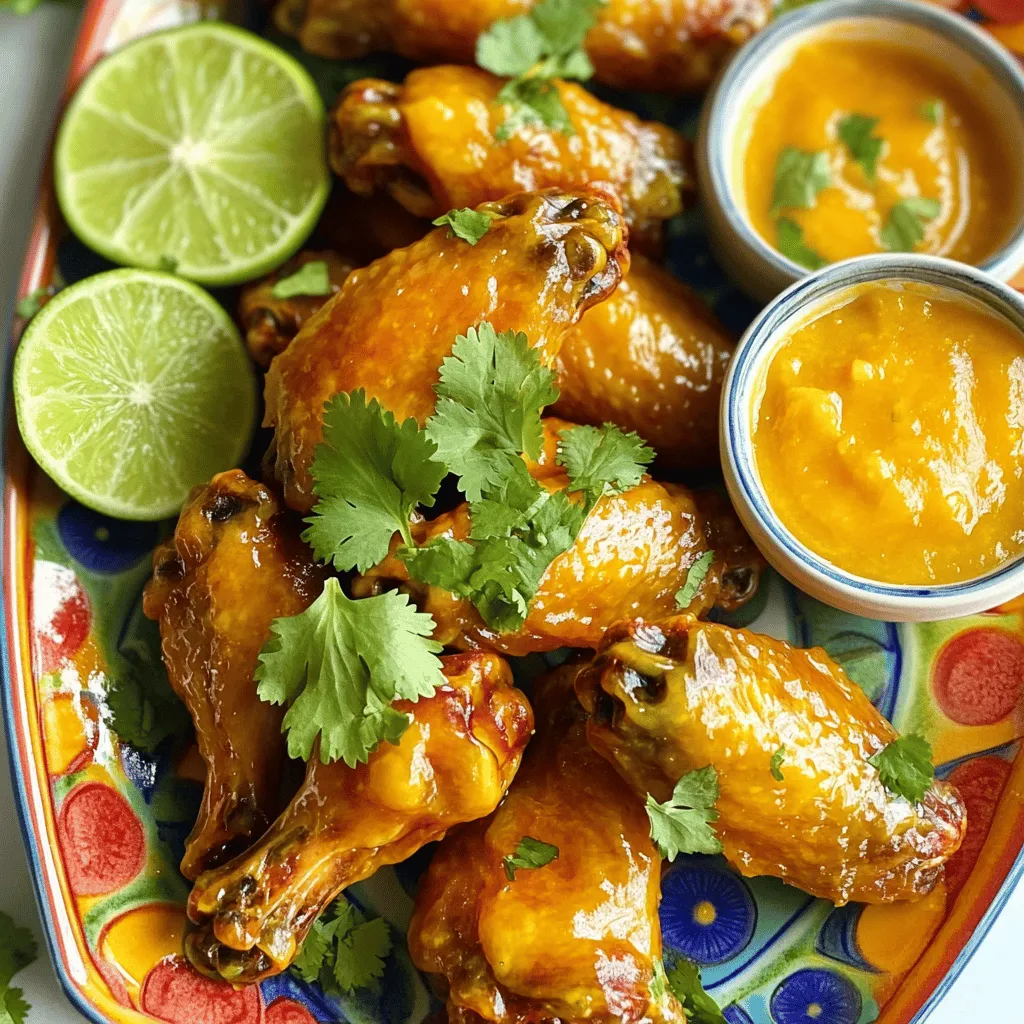
Are you ready to spice up your dinner plans? These Spicy Mango Habanero Wings are a bold and tasty treat! With juicy chicken wings smothered in a sweet and fiery mango-habanero sauce, your taste buds will dance. In this post, I’ll guide you through the simple steps to achieve crispy perfection. Get ready to impress your friends and family with this zesty dish that’s sure to be a hit!
Why I Love This Recipe
- Bold Flavors: The combination of sweet mango and fiery habanero creates a unique flavor profile that tantalizes the taste buds.
- Easy Preparation: This recipe requires minimal prep time and uses simple ingredients, making it perfect for any occasion.
- Healthier Alternative: Baking the wings instead of frying them results in a healthier dish that doesn’t compromise on taste.
- Perfect for Sharing: These spicy wings make for an excellent appetizer or party snack, sure to impress your guests.
Ingredients
Main Ingredients for Spicy Mango Habanero Wings
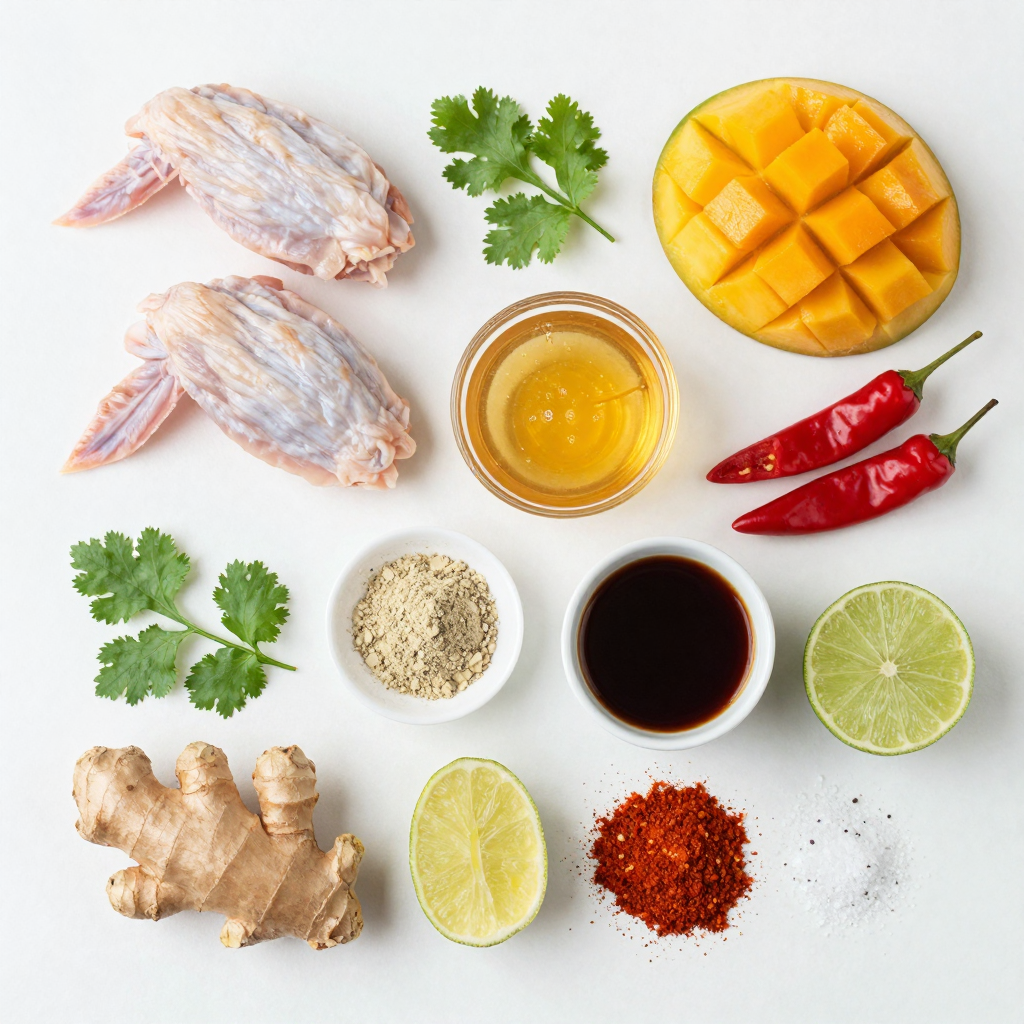
- 2 pounds chicken wings
- 1 ripe mango, peeled and diced
- 2-3 habanero peppers, seeded and finely chopped
Sauce Ingredients
- 1/4 cup honey
- 1/4 cup soy sauce
- 2 tablespoons lime juice
- 1 tablespoon garlic powder
- 1 tablespoon ginger, minced
- 1 teaspoon smoked paprika
Garnishes and Seasoning
- Salt and pepper to taste
- Fresh cilantro for garnish
For these spicy mango habanero wings, the main ingredients are simple yet bold. The chicken wings provide the perfect canvas. They soak up all the delicious flavors. A ripe mango adds a sweet touch, balancing the heat. Habanero peppers give these wings their signature kick. You can adjust the amount to fit your spice level.
The sauce ingredients blend together to create a bright and zesty flavor. Honey adds sweetness, while soy sauce gives depth. Lime juice adds a fresh, tangy note. Garlic powder and minced ginger enhance the flavor with warmth. Smoked paprika gives a hint of smokiness that rounds out the sauce.
To finish off your wings, season with salt and pepper. Fresh cilantro brings color and freshness. It also adds a lovely herbal note. These ingredients come together to create a flavorful dish that is sure to impress. Each bite is a tasty experience that combines sweet, spicy, and savory notes.

Step-by-Step Instructions
Preparing the Oven and Sauce
- Preheat your oven to 400°F (200°C) and line a baking tray with parchment paper.
- In a blender, combine the diced mango, chopped habaneros, honey, soy sauce, lime juice, garlic powder, minced ginger, smoked paprika, salt, and pepper. Blend until smooth for a delicious mango habanero sauce.
Marinating the Wings
- Place the chicken wings in a large bowl. Toss the wings with half of the sauce until well coated.
- Set aside the remaining sauce for later use. This will add an extra kick later.
Baking the Wings
- Arrange the marinated wings on the baking tray in a single layer. Bake for 40-45 minutes until they are golden and crispy.
- Flip the wings halfway through cooking for even browning. This helps them get nice and crunchy.
This step-by-step guide makes it easy to create your spicy mango habanero wings. Enjoy the process and the tasty results!
Pro Tips
- Choose the Right Habaneros: Select firm, bright habanero peppers to ensure maximum flavor and heat.
- Marinate for Extra Flavor: For a deeper flavor, marinate the wings in half of the sauce for a couple of hours before baking.
- Check for Crispiness: If you want extra crispy wings, broil them for the last 5 minutes of cooking, keeping a close eye on them.
- Serving Suggestions: Pair these wings with cooling sides like ranch or blue cheese dressing to balance the heat.
Tips & Tricks
Achieving the Perfect Texture
To get crispy chicken wings, start with a hot oven. Preheat your oven to 400°F (200°C). Line your tray with parchment paper. This helps with easy cleanup. Arrange the wings in a single layer. This allows hot air to reach all sides. For wing size, cook smaller wings for 40 minutes. Larger wings may need up to 45 minutes. Flip the wings halfway to crisp both sides.
Balancing Spiciness and Sweetness
Habaneros bring heat, but you can adjust it. For less heat, remove all seeds. You can also use fewer peppers. If you want more sweetness, add extra honey. This helps balance the spicy flavor. Fresh lime juice brightens the dish too. You could mix in some mango pieces for more texture.
Serving Suggestions
Presentation matters! Serve the wings on a bright platter. Add slices of lime for color. A small bowl of extra sauce makes it fun for dipping. Pair these wings with crunchy veggies or a fresh salad. Cold drinks like lemonade or beer work well too.

Variations
Ingredient Substitutions
You can swap ingredients for fun twists. Instead of honey, use maple syrup or agave. For a different fruit flavor, try using ripe peaches or pineapple instead of mango. If you want more heat, use jalapeños or serranos. They add spice but are milder than habaneros.
Cooking Methods
Grilling wings gives them a smoky flavor. Bake them for a crunchy texture. If you prefer a faster method, use an air fryer. Cook wings at 375°F for about 25-30 minutes. This method keeps them crispy and juicy.
Making it a Full Meal
Turn your wings into a full meal. Pair them with a fresh salad or coleslaw. A citrus salad adds a nice contrast to the heat. For dips, try a cooling ranch or blue cheese. These sides balance the wings’ spice and make your meal satisfying.
Storage Info
Storing Leftovers
To keep your wings fresh, place them in a shallow container. Cover the container tightly. This keeps air out and moisture in. Store the wings in the fridge for up to three days. If you have leftover sauce, store it in a separate airtight container. This helps maintain its flavor and thickness.
Reheating Tips
To reheat your wings, use the oven for the best texture. Preheat the oven to 350°F (175°C). Place the wings on a baking sheet and heat for 10-15 minutes. This method keeps them crispy. Avoid using the microwave. It can make the wings soggy. If you must use a microwave, heat in short bursts and check often.
Freezing Instructions
To freeze the wings, let them cool completely first. Place them in a freezer-safe bag. Remove as much air as possible to prevent freezer burn. You can freeze the wings for up to three months. For the sauce, use a separate container and freeze it as well. This keeps the flavor fresh. When you’re ready to eat, thaw in the fridge overnight. Then, reheat as noted above.
FAQs
How spicy are Spicy Mango Habanero Wings?
Spicy Mango Habanero Wings can pack a punch. The heat comes from the habanero peppers. Habaneros are among the hottest peppers. If you use 2-3 of them, expect a good kick. You can control the heat by adjusting the number of habaneros. Removing the seeds also helps lower the spice. If you want less heat, consider using one pepper or even a milder chili.
Can I make these wings ahead of time?
Yes, you can prepare these wings in advance. Marinate the wings in the sauce a few hours before cooking. This allows the flavors to soak in. You can also bake them ahead of time. Just reheat them in the oven before serving. To keep them crispy, bake at 375°F for about 10-15 minutes. This helps maintain that crunchy texture.You will find detailed steps and ingredient amounts there.
Can I use frozen wings for this recipe?
Yes, you can use frozen chicken wings. Just be sure to thaw them first. You can do this overnight in the fridge. If you’re short on time, use the microwave’s defrost setting. Once thawed, follow the recipe as usual. Just keep an eye on the cooking time, as frozen wings may take a bit longer to cook.
To make your Spicy Mango Habanero Wings, gather chicken wings, ripe mango, and habanero peppers. Combine them with honey, soy sauce, and spices for a vibrant sauce. Bake the wings for that crispy texture, and enjoy them with fun side dishes or garnishes.
In conclusion, this recipe balances heat and sweetness perfectly. Experiment with variations and serving styles. Enjoy this tasty dish at your next gathering!

Spicy Mango Habanero Wings
Ingredients
2 pounds chicken wings
1 ripe mango, peeled and diced
2-3 habanero peppers, seeded and finely chopped
1/4 cup honey
1/4 cup soy sauce
2 tablespoons lime juice
1 tablespoon garlic powder
1 tablespoon ginger, minced
1 teaspoon smoked paprika
Salt and pepper to taste
Fresh cilantro for garnish
Instructions
Preheat your oven to 400°F (200°C) and line a baking tray with parchment paper.
In a blender or food processor, combine the diced mango, chopped habaneros, honey, soy sauce, lime juice, garlic powder, minced ginger, smoked paprika, salt, and pepper. Blend until smooth to create the mango habanero sauce.
Place the chicken wings in a large bowl. Pour half of the mango habanero sauce over the wings and toss until the wings are evenly coated. Reserve the remaining sauce for later.
Arrange the chicken wings on the prepared baking tray in a single layer. Bake in the preheated oven for 40-45 minutes, flipping them halfway through, until the wings are golden brown and crispy.
Once the wings are done, remove them from the oven and toss them in the reserved mango habanero sauce for an extra kick.
Transfer the spicy wings to a serving platter and garnish with chopped fresh cilantro.
Prep Time, Total Time, Servings: 15 minutes | 1 hour | Serves 4-6
– Presentation Tips: Serve the wings on a vibrant platter with sliced limes and a small bowl of extra mango habanero sauce on the side for dipping.

Spicy Mango Habanero Wings
Ingredients
- 2 pounds chicken wings
- 1 ripe mango, peeled and diced
- 2 to 3 habanero peppers, seeded and finely chopped
- 1 cup honey
- 1 cup soy sauce
- 2 tablespoons lime juice
- 1 tablespoon garlic powder
- 1 tablespoon ginger, minced
- 1 teaspoon smoked paprika
- to taste salt and pepper
- for garnish fresh cilantro
Instructions
- Preheat your oven to 400°F (200°C) and line a baking tray with parchment paper.
- In a blender or food processor, combine the diced mango, chopped habaneros, honey, soy sauce, lime juice, garlic powder, minced ginger, smoked paprika, salt, and pepper. Blend until smooth to create the mango habanero sauce.
- Place the chicken wings in a large bowl. Pour half of the mango habanero sauce over the wings and toss until the wings are evenly coated. Reserve the remaining sauce for later.
- Arrange the chicken wings on the prepared baking tray in a single layer. Bake in the preheated oven for 40-45 minutes, flipping them halfway through, until the wings are golden brown and crispy.
- Once the wings are done, remove them from the oven and toss them in the reserved mango habanero sauce for an extra kick.
- Transfer the spicy wings to a serving platter and garnish with chopped fresh cilantro.
- Serve the wings on a vibrant platter with sliced limes and a small bowl of extra mango habanero sauce on the side for dipping.

![- 6 cups fresh baby spinach, washed and dried - 2 cups strawberries, hulled and sliced - 1/2 red onion, thinly sliced Fresh produce is key in this salad. Spinach gives a nice green base. Strawberries add sweetness and color. Red onion brings a bit of sharpness that balances the flavors. Together, they create a fresh and vibrant mix. - 1 cup pecans, chopped and toasted - 1/2 cup feta cheese, crumbled Nuts and cheese add texture and flavor. Pecans, when toasted, become crunchy and rich. Feta cheese adds a creamy, salty element. This mix makes every bite exciting and satisfying. - 1/4 cup balsamic vinegar - 2 tablespoons honey - 1/4 cup extra virgin olive oil - Salt and pepper to taste Dressings tie the salad together. Balsamic vinegar gives a tangy bite. Honey adds a touch of sweetness. Olive oil brings smoothness. Salt and pepper enhance all the flavors. You can find the Full Recipe for more details. Whisking the Dressing To start, you need to make the dressing. In a small bowl, mix the balsamic vinegar, honey, and olive oil. I like to use a whisk for this. Keep whisking until the mixture is smooth. This dressing adds a sweet and tangy flavor to the salad. After mixing, season it with salt and pepper to your taste. Set the dressing aside for later. Toasting the Pecans Next, let’s toast the pecans. Take a dry skillet and heat it over medium heat. Add the chopped pecans to the skillet. Stir them often. Toast for about 4 to 5 minutes, or until they smell fragrant and look golden brown. This step makes the pecans crunchy and brings out their rich flavor. Once done, remove them from the heat and let them cool. Combining Vegetables and Nuts Now, it’s time to assemble your salad. Grab a large mixing bowl. In the bowl, add the fresh baby spinach, sliced strawberries, and the toasted pecans. Gently mix everything together. This combination gives you a mix of textures and flavors. The spinach is crisp, while the strawberries add sweetness. Adding the Cheese After mixing the veggies and nuts, it’s time for cheese. Take the crumbled feta cheese and gently fold it into the salad. The feta adds a salty flavor that balances the sweetness of the strawberries. Be careful not to break the cheese too much; you want those nice, creamy chunks. Dressing the Salad With everything mixed, it’s time to dress the salad. Drizzle your prepared dressing over the salad. Toss everything gently to coat all the ingredients. Make sure every bite will have that delicious flavor. Serving Suggestions For serving, you can transfer the salad to a large platter or individual bowls. I like to garnish it with extra strawberry slices and a few whole pecans on top. This adds a lovely look. You can also drizzle a little extra balsamic glaze for a special touch. Enjoy your fresh and tasty Strawberry Spinach Pecan Salad! For the complete recipe, check out the [Full Recipe]. Toasting pecans brings out their rich flavor. The heat makes them crunchy and tasty. It only takes about 4-5 minutes. Keep stirring to avoid burning. If you don't have pecans, try walnuts or almonds. These nuts add good taste and texture too. You can change the dressing for new flavors. Try lemon juice or yogurt for a lighter taste. Both add a nice zing. If you want a sweet touch, use maple syrup instead of honey. Balancing the flavors is key. Mix sweet, tangy, and salty for a perfect bite. This salad pairs well with grilled chicken or fish. The fresh flavors work great together. For a nice look, serve it in a big bowl. Garnish with extra strawberries and whole pecans. A drizzle of balsamic glaze adds flair. Make it pretty for your guests! {{image_2}} You can change this salad with different fruits. Try adding blueberries for a sweet twist. Apples also work well, adding crunch and flavor. Seasonal fruits keep the salad fresh and exciting. You can also use different greens. If you want a stronger flavor, try arugula. Kale can add a hearty touch, too. Mixing greens gives your salad more color and texture. Need it gluten-free? This salad is naturally gluten-free, so no worries there. Just check any added dressings for gluten. If you're vegan, swap feta cheese for avocado. It adds creaminess and healthy fats. Use agave syrup instead of honey for the dressing. These simple swaps keep the salad tasty for everyone. For the full recipe, visit the [Full Recipe]. You can store your strawberry spinach pecan salad easily. - Refrigerator Storage: Place any leftover salad in an airtight container. This helps keep it fresh. The salad will stay good for about 1-2 days in the fridge. The strawberries may lose some crunch but will still taste great. - Freezing Considerations: Freezing this salad is not recommended. The spinach and strawberries do not freeze well. They become mushy once thawed. Enjoy this salad soon after making it for the best taste. - Freshness Tips: To keep your salad fresh, add the dressing just before serving. This prevents the greens from wilting. - Shelf Life of Ingredients: Spinach stays fresh for about 5-7 days in the fridge. Strawberries last about 3-7 days, depending on ripeness. Keep pecans in a cool, dry place for up to a month. For a full recipe, check out the complete details. You can prep this salad easily. Start by washing and drying the spinach. Slice the strawberries and red onion. Toast the pecans in advance and store them in an airtight container. For the dressing, mix balsamic vinegar, honey, and olive oil in a jar. Store it in the fridge. When you are ready to serve, combine all the ingredients in a bowl. Add the dressing right before serving to keep everything fresh. This way, you save time and enjoy a quick meal. If you don't like feta cheese, you have options. Try using goat cheese. It has a creamy texture and tangy flavor. Another great option is ricotta cheese, which is milder. You can also use shredded mozzarella for a different taste. For a dairy-free choice, try crumbled tofu. It soaks up the dressing well and adds protein. These swaps keep the salad tasty while fitting your dietary needs. To keep your salad fresh, store it properly. First, keep the spinach and dressing separate until serving. This prevents sogginess. Use a salad spinner to dry the greens well after washing. If you have leftovers, place them in an airtight container. Add a paper towel inside to absorb moisture. This helps maintain crispness. Eat the salad within a day or two for the best taste and texture. In this blog, I shared the key ingredients for a tasty salad, including fresh produce, nuts, and dressings. You learned how to prepare and assemble the salad step-by-step. I also provided tips for toasting pecans and modifying dressings. Variations allow for seasonal ingredients and dietary needs, while storage info helps keep leftovers fresh. Overall, this salad is easy to make and customize. Enjoy experimenting with flavors to create a dish you love!](https://dailydishlab.com/wp-content/uploads/2025/07/c2f62471-05ae-4dd0-b343-fd1b51ab9361-768x768.webp)

![For spicy roasted sweet potatoes, you need simple and fresh ingredients. Here’s what you’ll need: - 3 medium sweet potatoes, peeled and cut into 1-inch cubes - 2 tablespoons olive oil - Spices: smoked paprika, cayenne pepper, garlic powder, onion powder - Additional seasonings: salt and black pepper - Sweetener options: honey or maple syrup - Garnish: fresh cilantro, chopped These ingredients come together to create a dish that is both tasty and easy to make. Sweet potatoes provide a natural sweetness, while the spices add a punch of flavor. Using honey or maple syrup gives the dish a delightful glaze. You can adjust the heat by changing the amount of cayenne pepper. Fresh cilantro brings a bright finish to your plate. If you want to see the full recipe, check out the section below. - Step 1: Preheat the oven and prepare baking sheet Start by preheating your oven to 425°F (220°C). This high heat helps the sweet potatoes become crispy. While the oven heats, line a baking sheet with parchment paper. This makes for easy cleanup later. - Step 2: Mix sweet potatoes with seasoning and oil In a large bowl, gather your cubed sweet potatoes. Pour in 2 tablespoons of olive oil. Add 1 teaspoon each of smoked paprika, cayenne pepper, garlic powder, and onion powder. Season with salt and black pepper to taste. Toss everything well until the sweet potatoes are fully coated in the mix. - Step 3: Spread sweet potatoes and roast in the oven Next, spread your seasoned sweet potatoes on the lined baking sheet. Make sure they are in a single layer. This spacing allows them to roast evenly. Place the baking sheet in the preheated oven and roast for 25 to 30 minutes. Stir the sweet potatoes halfway through to ensure all sides get crispy. - Step 4: Drizzle with honey/maple syrup and garnish Once the sweet potatoes are tender and crispy, take them out of the oven. Drizzle 2 tablespoons of honey or maple syrup over them. Toss again to coat. Finally, transfer the sweet potatoes to a serving dish and sprinkle with fresh cilantro for a tasty finish. For the complete recipe, check out the [Full Recipe]. To make the best spicy roasted sweet potatoes, pick firm and smooth sweet potatoes. Look for ones with no soft spots or blemishes. Choose medium-sized sweet potatoes for even cooking. When peeling, use a sharp peeler to remove the skin easily. Cut the sweet potatoes into 1-inch cubes. This size helps them cook at the same rate. Crispiness comes from roasting sweet potatoes at a high temperature. Preheat your oven to 425°F (220°C). Spread the sweet potatoes on the baking sheet in a single layer. Avoid crowding them. This gives them room to brown and crisp up. Stir halfway through cooking to ensure even roasting. You want them tender inside and crispy outside. For an extra kick, try adding cumin or chili powder. Fresh herbs also add flavor. Consider topping your sweet potatoes with avocado or a squeeze of lime. These toppings bring freshness to the dish. For a sweet finish, drizzle on honey or maple syrup after roasting. This contrast makes the flavors pop. You can find the full recipe in the earlier section. {{image_2}} For a vegan option, use maple syrup instead of honey. This sweetener adds depth and keeps the dish plant-based. It blends well with the spices and enhances the natural sweetness of the sweet potatoes. If you need gluten-free modifications, rest assured that this recipe is already gluten-free. All the spices and oils used are safe. Feel free to add your favorite gluten-free ingredients for extra flavor! To kick up the heat, try different hot spices. You can use chipotle powder or even a pinch of red pepper flakes. This gives a smoky flavor and makes the dish even more exciting. For a sweet and savory twist, add caramelized onions. Cook the onions slowly until they are golden brown. Toss them with the sweet potatoes before serving. This adds a lovely depth to the dish. Pair these spicy roasted sweet potatoes with proteins like grilled chicken or fish. They also taste great with a fresh salad. The sweetness balances the savory flavors of the proteins. For a creative presentation, serve the sweet potatoes in a colorful bowl. Add fresh cilantro on top for a nice touch. You could also add a wedge of lime on the side for a zesty kick. This makes the dish look more inviting and adds extra flavor. For the full recipe, check out the link above! To keep your spicy roasted sweet potatoes fresh, store them in an airtight container. This helps lock in moisture and flavor. You can use glass or plastic containers with tight lids. Avoid using bags, as they may not keep them as fresh. Make sure to let the sweet potatoes cool down before sealing them up. This prevents condensation, which can make them soggy. When reheating, the oven is my favorite method. Preheat it to 375°F (190°C). Spread the sweet potatoes on a baking sheet. Heat for about 10-15 minutes until warm. This helps them stay crispy. If you're in a hurry, you can use the microwave. Place sweet potatoes in a microwave-safe dish. Heat in short bursts of 30 seconds, stirring in between. This helps heat them evenly without making them mushy. For the best taste, go for the oven when you can! How long do spicy roasted sweet potatoes last in the fridge? Spicy roasted sweet potatoes can last 3 to 5 days in the fridge. Store them in an airtight container. This helps keep them fresh and tasty. Can I prepare the sweet potatoes in advance? Yes, you can prep the sweet potatoes ahead of time. Cut and season them, then store in the fridge for up to 24 hours. Just roast them when you're ready to eat. What can I serve with spicy roasted sweet potatoes? These sweet potatoes pair well with many dishes. Try serving them with grilled chicken, fish, or a fresh salad. You can add them to tacos for a fun twist too. How do I prevent the sweet potatoes from burning? To avoid burning, make sure to cut the sweet potatoes evenly. Spread them out on the baking sheet. Stir them halfway through cooking for even roasting. Can I substitute other vegetables for sweet potatoes? Yes, you can use other veggies like carrots or butternut squash. Just adjust the cooking time based on the vegetable you choose. Each will add its own tasty twist! You learned how to make tasty roasted sweet potatoes. We covered ingredients, step-by-step cooking, and tips. Remember to choose quality sweet potatoes for the best flavor. Use spices you enjoy to make it your own. Don't forget about storage and reheating so your leftovers stay great. With these ideas, you'll impress at any meal. Enjoy your cooking adventure!](https://dailydishlab.com/wp-content/uploads/2025/07/c2c85d03-5716-4218-8e65-d8fbee897dfc-768x768.webp)
![For my Zucchini Quiche Muffins, I use these key ingredients: - 2 medium zucchinis, grated - 4 large eggs - 1 cup milk (dairy or plant-based) - 1 cup all-purpose flour (or whole wheat) - 1 cup shredded cheese (cheddar or feta) - 1/2 teaspoon baking powder - 1/2 teaspoon salt - 1/4 teaspoon black pepper - 1/2 teaspoon garlic powder - 1/4 cup green onions, finely chopped - 1/4 cup bell pepper, finely diced (any color) - Olive oil for greasing muffin tin You can swap out some ingredients for variety. Here are my favorites: - Instead of all-purpose flour, try almond flour for a nutty taste. - Use turkey bacon or cooked sausage for added protein. - If you want a dairy-free option, use nutritional yeast instead of cheese. - For extra greens, add chopped spinach or kale. - You can replace green onions with chives for a milder flavor. These muffins are not just tasty; they are also good for you. Here are some details: - Each muffin has about 120 calories. - They provide a good source of protein from eggs and cheese. - Zucchini adds fiber and vitamins A and C. - These muffins are low in carbs if you choose whole wheat flour. - They make a great snack or meal option for all ages. For the full recipe, check out the detailed instructions and tips! 1. Preheat your oven to 375°F (190°C). Grease a muffin tin with olive oil or use muffin liners. 2. In a large bowl, whisk together four large eggs and one cup of milk. Mix until they are well blended. 3. Grate two medium zucchinis and add them to the egg mixture. If needed, use a sieve to drain excess liquid. This step keeps your muffins from being soggy. 4. Add one cup of all-purpose flour, half a teaspoon of baking powder, and half a teaspoon of salt. Also, include a quarter teaspoon of black pepper and half a teaspoon of garlic powder. Stir gently until just mixed. Don’t overmix; the batter should be a bit lumpy. 5. Fold in one cup of shredded cheese, a quarter cup of chopped green onions, and a quarter cup of diced bell pepper. Mix until everything is evenly distributed. 6. Use a spoon to fill each muffin cup about three-quarters full with the batter. 7. Place the muffin tin in the preheated oven. Bake for 20 to 25 minutes. You want them golden brown on top. 8. About halfway through baking, check on them. This way, you can ensure they rise evenly. 9. To check if the muffins are done, insert a toothpick into the center. If it comes out clean, they are ready. If not, give them a few more minutes. 10. Once baked, let the muffins cool for a few minutes in the tin. Then, transfer them to a wire rack to cool completely. For the full recipe and further details, check the [Full Recipe]. Enjoy these tasty muffins as a snack or a side! To get the best texture in your zucchini quiche muffins, use fresh zucchinis. Grate them finely, and squeeze out any extra water. This keeps the muffins from being soggy. Mix the batter gently. A few lumps are okay; overmixing can make them tough. Use a blend of cheese for more flavor. Cheddar and feta work great together. Store any leftovers in an airtight container. They stay fresh in the fridge for up to three days. For longer storage, freeze them. Place muffins in a freezer bag, and they will last up to three months. Thaw in the fridge overnight before enjoying again. Serve these muffins warm or at room temperature. They pair well with a fresh salad or soup. Top with herbs like parsley for a burst of flavor. You can also sprinkle extra cheese on top before serving. For a fun twist, serve with a dollop of sour cream or yogurt. Enjoy them as a snack, breakfast, or side dish! For the full recipe, check out the detailed instructions above. {{image_2}} You can easily make these muffins vegetarian. Just skip the cheese, or use a plant-based one. Add more veggies like spinach, mushrooms, or kale for a tasty twist. You can even mix in some sun-dried tomatoes for extra color and flavor. This way, you keep the muffins light and fresh! To make these muffins gluten-free, swap the all-purpose flour for a gluten-free blend. Many blends work well in baking. Just make sure to check the labels to avoid any hidden gluten. You can also use almond flour or oat flour for a nutty taste. Both will give you a nice texture. Herbs and spices can make these muffins pop. Try adding thyme, rosemary, or dill for a fragrant touch. You can also mix in a pinch of chili flakes if you like heat. Another idea is to add a sprinkle of smoked paprika for a unique flavor. Don't be afraid to get creative! To keep your zucchini quiche muffins fresh, place them in an airtight container. This helps to keep moisture out. You can store them at room temperature for up to two days. If you want them to last longer, consider the fridge. In the fridge, they can stay fresh for up to a week. Freezing is a great option if you want to save muffins for later. To freeze, first let them cool completely. Then, wrap each muffin tightly in plastic wrap. After that, place them in a freezer bag. Label the bag with the date. You can freeze them for up to three months. When you’re ready to eat, just take out what you need. Reheating zucchini quiche muffins is easy. For the best results, use an oven. Preheat your oven to 350°F (175°C). Place the muffins on a baking sheet. Heat them for about 10-15 minutes. You can also use a microwave. Just heat them for 20-30 seconds. This warms them but may not keep them crisp. Enjoy your muffins warm! For the full recipe, check out the earlier section. Yes, you can use other vegetables! Carrots, spinach, or mushrooms work well. Just remember to chop them small. If you want a burst of flavor, add some sun-dried tomatoes. The key is to keep the total vegetable amount similar to the zucchini. This keeps the muffins tasty and moist. Feel free to mix and match according to what you have at home. It makes cooking fun and creative! Zucchini quiche muffins last about four days in the fridge. To store them, place them in an airtight container. This keeps them fresh and tasty. If you notice any change in smell or texture, it’s best to toss them. You can enjoy them cold or warm them up in the microwave. They make a quick snack or breakfast option! Absolutely! Mini zucchini quiche muffins are a great idea. Use a mini muffin tin instead of a regular one. Just reduce the baking time to about 12-15 minutes. Keep an eye on them, as they cook faster. These bite-sized treats are perfect for parties or snacks. Plus, they are easy to grab and eat on the go. Try making them for your next gathering! For the full recipe, check out the complete instructions above. In this post, we covered how to make delicious zucchini quiche muffins. We explored key ingredients and their substitutions. I shared easy preparation steps and baking tips to ensure perfect results. You learned how to store and reheat your muffins and enjoyed ideas for tasty variations. Embrace these tips to make your own muffin masterpiece. Enjoy experimenting and savor every bite!](https://dailydishlab.com/wp-content/uploads/2025/06/fed823f9-c559-4a2e-ba47-9f1169717efa-768x768.webp)

