

Looking for a crunchy snack that bursts with flavor? Spicy roasted chickpeas are your answer! With just a few simple ingredients, you can make a delicious and healthy treat. These crispy bites are packed with spices that will tickle your taste buds. Whether you munch on them alone, toss them in a salad, or add them to wraps, they’re sure to satisfy. Let’s dive into this easy recipe and transform your snacking game!
Why I Love This Recipe
- Healthy Snack: These roasted chickpeas are a nutritious and satisfying alternative to traditional chips or snacks.
- Customizable Spice: You can easily adjust the spices to suit your taste preferences, making them as spicy or mild as you like.
- Quick and Easy: This recipe comes together in just 40 minutes, making it perfect for a last-minute snack or appetizer.
- Versatile Use: Enjoy them on their own, or use as a crunchy topping for salads and soups for added texture and flavor.
Ingredients
Main Ingredients
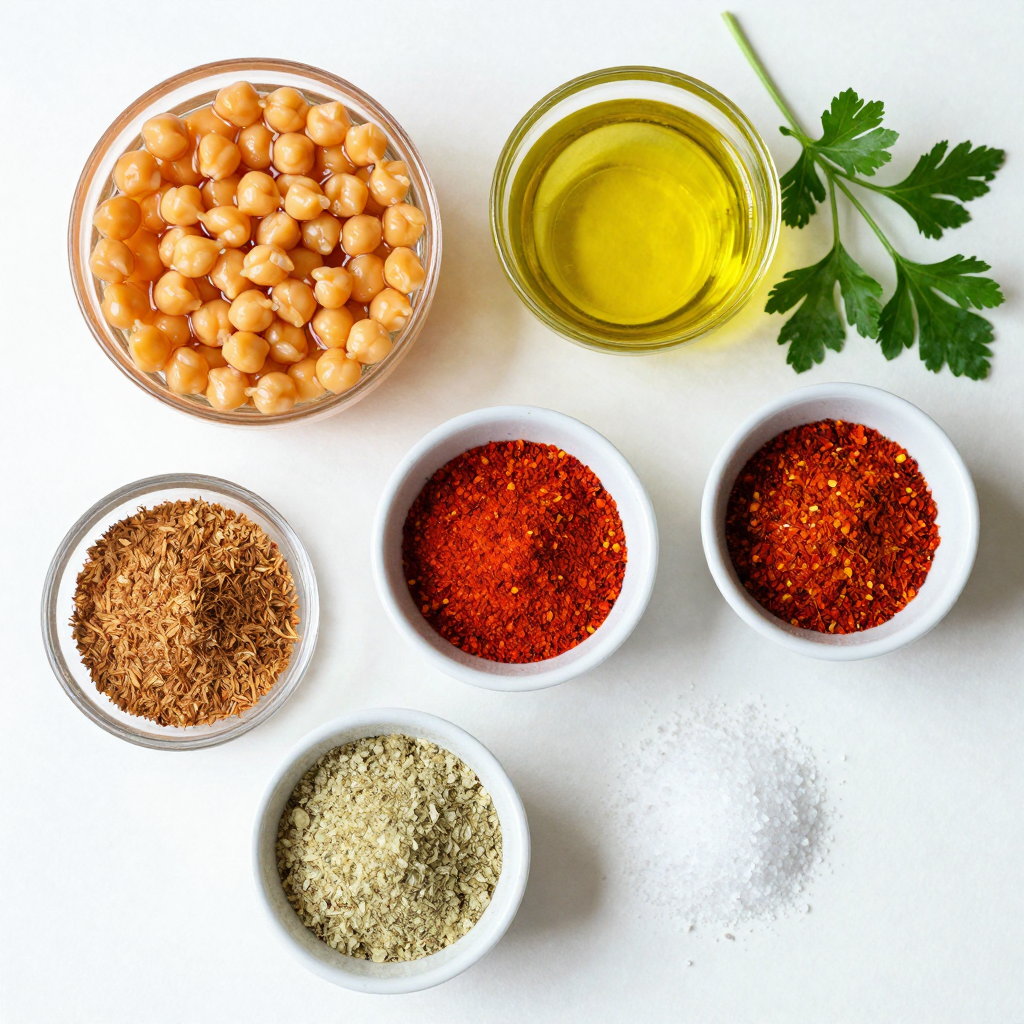
– 1 can (15 oz) chickpeas, rinsed and drained
– 2 tablespoons olive oil
– Spices: smoked paprika, cayenne pepper, garlic powder, ground cumin
– Garnish: Salt and fresh parsley, chopped
Optional Ingredients
– Substitute olive oil with avocado oil
– Alternative spices and blends for different flavors
Using the right ingredients is key to making these spicy roasted chickpeas. First, start with a can of chickpeas. Rinse them well and drain them. This step removes excess sodium and gets rid of any canning liquid.
Next, grab some olive oil. You can also use avocado oil if you prefer a different taste. The oil helps the spices stick and makes the chickpeas crispy.
Now let’s talk spices! I love using smoked paprika for that deep, smoky flavor. Adjust the cayenne pepper to match your spice level. Garlic powder adds a nice kick, while ground cumin brings warmth.
Finally, don’t forget the salt! It enhances all the flavors. For a fresh touch, chop some parsley to sprinkle on top. This makes your dish look and taste great.
If you want to mix it up, try different spices or blends. You could add curry powder for an Indian twist or taco seasoning for a Mexican flair. There are so many options!
Step-by-Step Instructions
Preparation Steps
– Preheat your oven to 400°F (200°C).
– Rinse and dry the chickpeas thoroughly.
Start by preheating your oven. This step helps the chickpeas roast evenly. While the oven heats, grab a can of chickpeas. Rinse them well under cold water. Use a colander to drain the chickpeas. It’s key to dry them with a clean kitchen towel. Removing moisture will make the chickpeas crisp.
Seasoning the Chickpeas
– Toss the chickpeas with olive oil.
– Mix in spices for optimal flavor coating.
Next, place the dried chickpeas in a mixing bowl. Pour in two tablespoons of olive oil. This oil helps the spices stick and adds flavor. Now, it’s time to add the spices. Use smoked paprika, cayenne pepper, garlic powder, ground cumin, and salt. Mix everything well, so each chickpea gets coated. This step really boosts the taste.
Roasting the Chickpeas
– Spread seasoned chickpeas on a baking sheet.
– Roast and shake pan halfway through for even cooking.
Now, line a baking sheet with parchment paper. Spread the coated chickpeas in a single layer. This spacing helps them roast evenly. Place the baking sheet in your preheated oven. Roast them for 25-30 minutes. Halfway through, shake the pan to move the chickpeas around. This action ensures they cook well and get crispy. When they are golden brown, they are ready. Let them cool a bit before tasting. You can adjust the seasoning at this point. If you want to make them even better, garnish with fresh parsley before serving.
Pro Tips
- Dry Chickpeas Thoroughly: Ensure the chickpeas are completely dried after rinsing. This prevents steaming during roasting and helps achieve maximum crispiness.
- Adjust Spice Levels: Customize the heat by adjusting the amount of cayenne pepper. Start with less if you’re unsure, and add more to taste after roasting.
- Even Layering: Spread the chickpeas in a single layer on the baking sheet to ensure they roast evenly. Avoid overcrowding, as this can lead to sogginess.
- Cool Before Serving: Allow the roasted chickpeas to cool for a few minutes after baking. This helps them crisp up even more before serving.
Tips & Tricks
Achieving Perfect Crunch
To get that perfect crunch, start by drying the chickpeas thoroughly. After rinsing, drain them well. Then, pat them with a clean towel. The less moisture, the crispier they get. Also, do not overcrowd the baking sheet. Give them space to roast evenly. If they touch, they will steam instead of crisp.
Flavor Enhancement
You can adjust the spice levels to your taste. If you like it hot, add more cayenne pepper. For a milder flavor, reduce it. You can also add extra herbs or citrus zest before serving. Fresh herbs like rosemary or thyme add a great twist. A touch of lemon zest brightens the flavors.
Timing and Observation
Keep an eye on the roasting time. You want them golden brown, not burnt. Check for doneness by looking at the color. They should be crispy and firm to the touch. If they feel soft, give them a few more minutes. The right timing ensures a delightful crunch.
Variations
Spice Blend Alternatives
You can switch up the flavors of your spicy roasted chickpeas easily. Try using curry powder for a warm and earthy taste. Taco seasoning gives a fun, zesty kick. If you’re in the mood for something sweet, mix cinnamon and sugar. This creates a tasty dessert version that is hard to resist.
Healthy Additions
For a cheesy flavor, sprinkle in some nutritional yeast. This adds a delightful twist and boosts nutrients. You can also mix in seeds or nuts. This adds extra crunch and makes your snack even more satisfying.
Creative Serving Suggestions
These roasted chickpeas are not just a snack. Use them as a topping for salads to add texture and taste. They also work great in wraps, giving a crunchy surprise. Pair them with dips like hummus or tzatziki for a fun flavor combo. Enjoy your crunchy treat in many ways!
Storage Info
Storing Roasted Chickpeas
To keep your spicy roasted chickpeas crunchy, store them in an airtight container. This helps prevent moisture from making them soggy. They stay good for about 3 to 5 days at room temperature. Make sure to place them in a cool, dry spot away from sunlight. If you store them in the fridge, they may lose their crunch faster.
Recrisping Guidelines
If your chickpeas lose their crunch, you can easily fix them. Preheat your oven to 400°F (200°C). Spread the chickpeas on a baking sheet. Bake for about 10 minutes or until they are crispy again. Keep an eye on them so they don’t burn. If your chickpeas smell off or feel too soft, it’s best to discard them. Enjoy them fresh for the best taste!
FAQs
How long do Spicy Roasted Chickpeas last?
Spicy roasted chickpeas can last about four to five days when stored properly. Keep them in an airtight container at room temperature. Avoid storing them in the fridge, as moisture can make them soggy. If you want them to stay crunchy, check the container daily.
Can I use dried chickpeas instead of canned?
Yes, you can use dried chickpeas. First, soak them in water overnight. This helps them soften. After soaking, cook them in boiling water for about 1 to 1.5 hours until tender.
What are the health benefits of chickpeas?
Chickpeas are packed with nutrients. They are rich in protein and fiber. This makes them great for your diet. They also help keep you full longer. Chickpeas are low in fat and have no cholesterol. They support heart health and help with digestion. Enjoying chickpeas can be a tasty way to boost your health.
Spicy roasted chickpeas are easy and fun to make. We covered main and optional ingredients, step-by-step roasting instructions, and storage tips. You can also tailor flavors with various spices and add ingredients for crunch. These chickpeas make a tasty snack or a top-notch salad addition. When you try this recipe, I hope you enjoy every bite and explore your favorite flavors. Keep experimenting for the best version that suits you!


