Spinach Ricotta Stuffed Shells Flavorful Family Meal

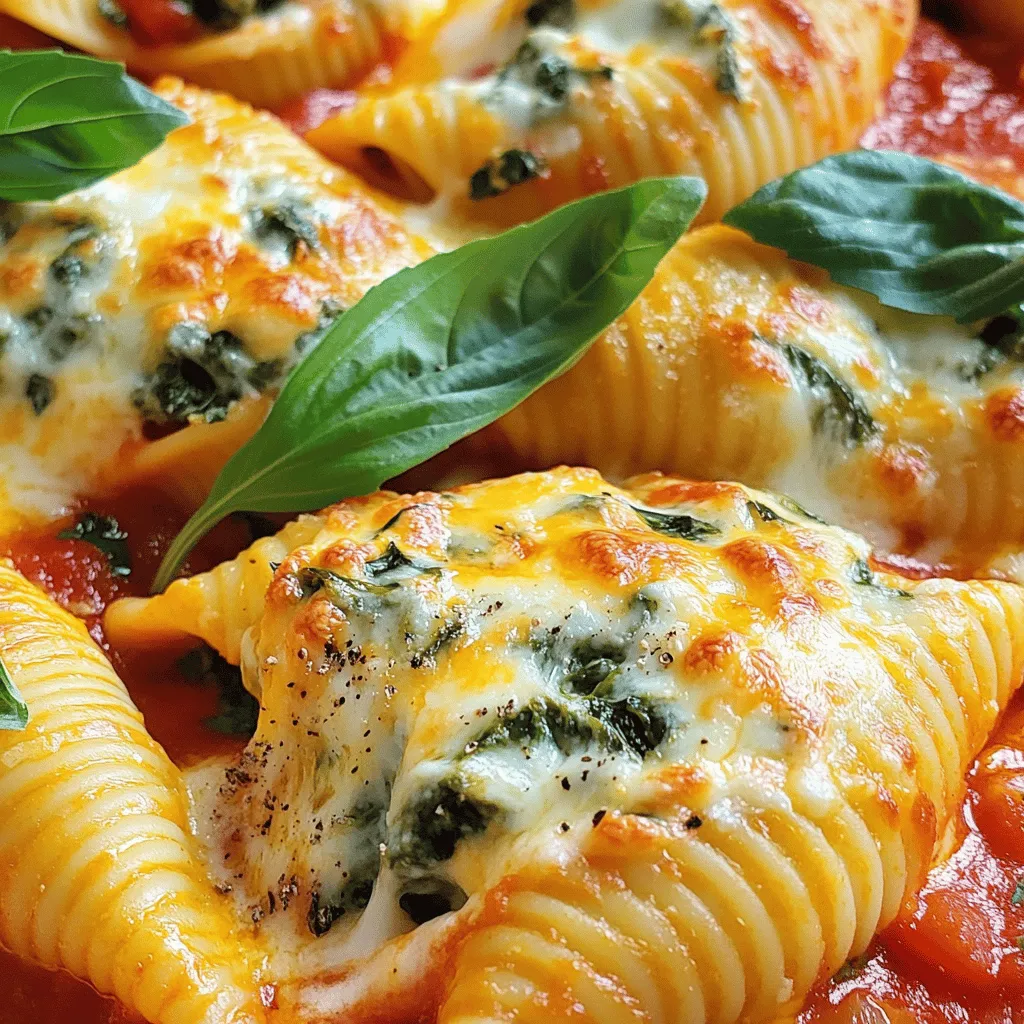
Are you looking for a fun, tasty meal the whole family will love? Spinach ricotta stuffed shells mix creamy cheese, hearty pasta, and fresh spinach into one delicious dish. In this article, I will guide you through easy steps, tasty tips, and fun variations. Whether you’re a seasoned cook or a beginner, let’s dive into making this flavorful family meal that will impress everyone at your table!
Why I Love This Recipe
- Delicious Flavor: The combination of ricotta, spinach, and herbs creates a rich and savory filling that tantalizes the taste buds.
- Comfort Food: Stuffed shells are the epitome of comfort food, making this dish perfect for cozy family dinners.
- Easy to Prepare: This recipe comes together quickly, making it ideal for weeknight meals or entertaining guests.
- Customizable: You can easily modify the filling with different cheeses or vegetables to suit your taste preferences.
Ingredients
List of Ingredients
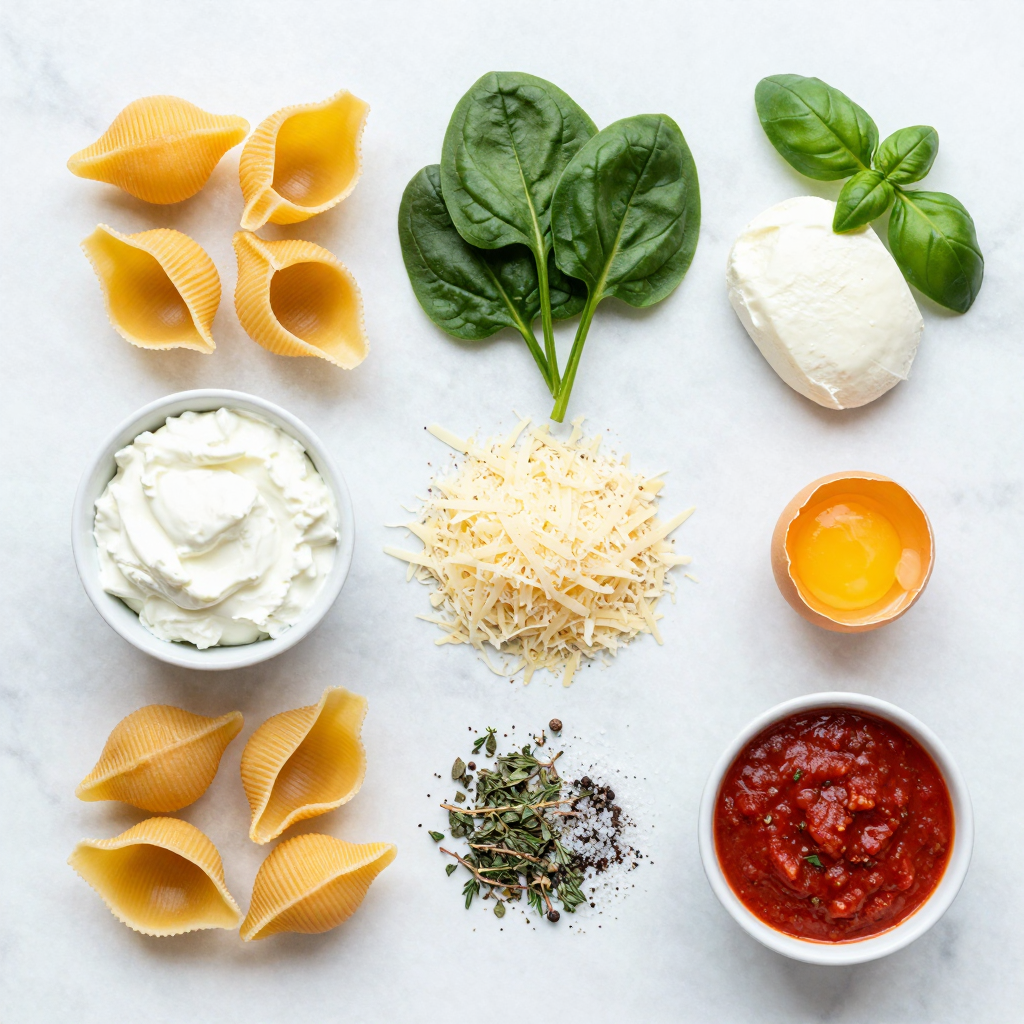
To make delicious spinach ricotta stuffed shells, you will need:
- 20 large conchiglie (stuffed pasta shells)
- 1 cup ricotta cheese
- 2 cups fresh spinach, chopped
- 1 cup mozzarella cheese, shredded (plus more for topping)
- 1/2 cup grated Parmesan cheese
- 1 egg, beaten
- 2 teaspoons garlic powder
- 1 teaspoon dried Italian herbs (oregano, basil, thyme)
- 2 cups marinara sauce
- Salt and pepper to taste
- Fresh basil leaves for garnish
Optional Ingredients for Added Flavor
You can enhance the flavor with these options:
- A pinch of red pepper flakes for heat
- A splash of lemon juice for brightness
- Chopped sun-dried tomatoes for a tangy twist
- Fresh herbs like parsley or thyme for freshness
Substitutions for Dietary Restrictions
If you have dietary needs, try these substitutions:
- For gluten-free, use gluten-free pasta shells.
- For a vegetarian option, ensure all cheeses are vegetarian.
- For dairy-free, swap ricotta and mozzarella with plant-based cheese.
- For egg-free, use a flaxseed mixture instead of egg for binding.
These options keep the dish tasty while meeting your needs.

Step-by-Step Instructions
Prepping the Oven and Pasta
First, set your oven to 375°F (190°C). This helps the shells cook evenly. While the oven heats, get a pot of water boiling. Add a pinch of salt to the water. Cook 20 large conchiglie (stuffed pasta shells) according to the package until they are al dente. This means they should be firm but not hard. Once done, drain the shells and set them aside. Make sure they don’t stick together.
Making the Spinach Ricotta Filling
Next, grab a large mixing bowl. Add 1 cup of ricotta cheese and 2 cups of chopped fresh spinach. Stir in 1 cup of shredded mozzarella cheese and 1/2 cup of grated Parmesan cheese. Then, beat 1 egg and add it to the mixture. This helps bind everything together. Season with 2 teaspoons of garlic powder, 1 teaspoon of dried Italian herbs, salt, and pepper. Mix until the filling looks smooth and creamy.
Assembling the Stuffed Shells
Now it’s time to fill the shells. Take a baking dish and spread 1 cup of marinara sauce on the bottom. This keeps the shells moist while baking. Use a spoon or your fingers to gently fill each cooked shell with the spinach and ricotta mixture. Place the filled shells in the baking dish, one by one. Once all shells are filled, pour the remaining marinara sauce over them. Sprinkle extra mozzarella cheese on top for added flavor.
Baking Instructions
Cover the baking dish with aluminum foil. Bake in the preheated oven for 25 minutes. After 25 minutes, remove the foil. Bake for another 10 to 15 minutes. You want the cheese to be bubbly and golden. Once done, take the dish out of the oven. Let it cool for a few minutes. Garnish with fresh basil leaves. Now your spinach ricotta stuffed shells are ready to enjoy!
Pro Tips
- Use Fresh Spinach: Fresh spinach enhances the flavor and nutrition of the dish compared to frozen spinach. Make sure to wash and chop it just before using.
- Cheese Variations: Feel free to experiment with different cheeses like feta or goat cheese for a unique twist on the classic flavor profile.
- Make Ahead: You can prepare the stuffed shells a day in advance. Just assemble them, cover, and refrigerate until you’re ready to bake.
- Garnish Smartly: Fresh basil not only adds a pop of color but also a burst of flavor. Add it just before serving for the best taste and presentation.
Tips & Tricks
Best Practices for Cooking Pasta
To make the best stuffed shells, cook the pasta just right. Follow the package instructions. Aim for al dente. This means the pasta should be firm to the bite. Overcooked pasta can break easily when you stuff it. Use a large pot with plenty of boiling water. Add a pinch of salt for flavor. After cooking, drain the shells gently and toss them with a bit of olive oil. This keeps them from sticking together.
How to Achieve Perfect Cheese Melting
For the best cheese melt, choose high-quality mozzarella. Fresh mozzarella can melt beautifully. Mix it with shredded mozzarella for a great blend. When baking, cover the dish with aluminum foil for the first part. This helps the cheese melt evenly. Remove the foil near the end to brown the cheese. The cheese should bubble and turn golden. This adds a crispy layer on top, making the dish even more appealing.
Tips for Making Ahead and Freezing
You can prepare stuffed shells ahead of time. Make the filling and stuff the shells a day in advance. Store them in the fridge until you are ready to bake. If you want to freeze them, do so before baking. Place the filled shells in a baking dish, cover with sauce, and wrap tightly. When you are ready to cook, thaw them in the fridge overnight. Bake as directed, adding a few extra minutes to ensure they heat through. This makes busy nights easier while still serving a delicious meal.

Variations
Meat Lovers Version
For those who crave meat, add cooked sausage or ground beef to the filling.
Use about one cup of cooked meat per batch. Mix it with the ricotta, spinach, and cheeses. This gives the dish a hearty boost. You can also use shredded chicken or diced ham for variety. The meaty flavor pairs well with the creamy ricotta.
Vegan Adaptation
To make this dish vegan, swap out the cheeses for plant-based options. Use vegan ricotta made from nuts or tofu. Substitute the egg with flaxseed meal mixed with water. It binds the filling well. For the sauce, choose a marinara without added dairy. This ensures a creamy yet dairy-free experience.
Gluten-Free Options
For a gluten-free meal, select gluten-free pasta shells. Many brands offer this choice now. Ensure that your marinara sauce is also gluten-free. You can enjoy the same great flavors without the gluten. Always check labels to be sure. This way, everyone can join the family feast.
Storage Info
How to Store Leftovers
After you enjoy your spinach ricotta stuffed shells, store leftovers in an airtight container. Place the dish in the fridge. They will stay fresh for about three to four days. Make sure to let them cool down first. This keeps the shells from getting soggy.
Reheating Instructions
To reheat, preheat your oven to 350°F (175°C). Place the stuffed shells in a baking dish. Add a splash of marinara sauce to keep them moist. Cover with foil to prevent drying out. Heat for about 20 minutes or until warm. You can also microwave individual servings for about two to three minutes.
Freezing and Thawing Guidelines
For long-term storage, freeze the stuffed shells. Place them in a freezer-safe dish, separating layers with parchment paper. They can last for up to three months. To thaw, move them from the freezer to the fridge for a few hours or overnight. Then, reheat as mentioned above. This method keeps the flavors fresh and delicious.
FAQs
What can I serve with Spinach Ricotta Stuffed Shells?
You can pair stuffed shells with a fresh salad. A simple green salad works well. Garlic bread is another great side. Try a warm, crunchy loaf for dipping. You can also serve it with roasted veggies. They add color and flavor to your meal.
How long does it take to cook stuffed shells?
Cooking stuffed shells takes about 35 to 40 minutes in total. This includes 25 minutes covered with foil and an extra 10 to 15 minutes uncovered. You want the cheese to bubble and brown nicely. Remember to check the shells to ensure they are hot all the way through.
Can I make stuffed shells in advance?
Yes, you can prepare stuffed shells ahead of time. Just assemble them in the baking dish without baking. Cover and store them in the fridge for up to two days. When you’re ready, bake them straight from the fridge. You may need to add a few extra minutes to the cooking time.
Can I use different types of cheese?
Absolutely! You can switch up the cheeses based on your taste. Try using feta for a tangy flavor. Cheddar can add a sharp taste. You can even mix in some cream cheese for creaminess. Feel free to experiment and find your favorite cheese combo.
What is the best way to reheat stuffed shells?
The best way to reheat stuffed shells is in the oven. Preheat the oven to 350°F (175°C). Place the shells in a baking dish and cover with foil. Heat for about 20-25 minutes until warmed throughout. This method keeps the shells from drying out and maintains their cheesy goodness.
In this blog post, we covered all you need to make delicious Spinach Ricotta Stuffed Shells. We shared key ingredients and options for taste, along with easy steps for preparation and baking. You learned tips for perfect pasta and how to store leftovers. Finally, we explored tasty variations for dietary needs.
With these insights, you can create a delightful meal that suits everyone. Happy cooking and enjoy your stuffed shells!

Spinach Ricotta Stuffed Shells
Ingredients
20 large conchiglie (stuffed pasta shells)
1 cup ricotta cheese
2 cups fresh spinach, chopped
1 cup mozzarella cheese, shredded (plus more for topping)
1/2 cup grated Parmesan cheese
1 egg, beaten
2 teaspoons garlic powder
1 teaspoon dried Italian herbs (oregano, basil, thyme)
2 cups marinara sauce
Salt and pepper to taste
Fresh basil leaves for garnish
Instructions
Preheat your oven to 375°F (190°C).
Cook the conchiglie according to package instructions until al dente. Drain and set aside.
In a large mixing bowl, combine the ricotta cheese, chopped spinach, mozzarella cheese, Parmesan cheese, beaten egg, garlic powder, dried Italian herbs, salt, and pepper. Mix until all ingredients are well incorporated.
Spread 1 cup of marinara sauce evenly on the bottom of a large baking dish.
Gently fill each cooked conchiglie with the spinach and ricotta mixture, using a spoon or your fingers. Arrange the filled shells in the baking dish on top of the sauce.
Pour the remaining marinara sauce over the stuffed shells to cover them. Sprinkle additional mozzarella cheese on top for an extra cheesy finish.
Cover the baking dish with aluminum foil and bake in the preheated oven for 25 minutes.
After 25 minutes, remove the foil and bake for an additional 10-15 minutes, or until the cheese is bubbly and golden.
Remove from the oven and let it cool for a few minutes before serving. Garnish with fresh basil leaves for an added touch.
Prep Time: 20 minutes | Total Time: 55 minutes | Servings: 4

Spinach Ricotta Stuffed Shells
Ingredients
- 20 large conchiglie (stuffed pasta shells)
- 1 cup ricotta cheese
- 2 cups fresh spinach, chopped
- 1 cup mozzarella cheese, shredded
- 1/2 cup grated Parmesan cheese
- 1 large egg, beaten
- 2 teaspoons garlic powder
- 1 teaspoon dried Italian herbs
- 2 cups marinara sauce
- to taste Salt and pepper
- for garnish Fresh basil leaves
Instructions
- Preheat your oven to 375°F (190°C).
- Cook the conchiglie according to package instructions until al dente. Drain and set aside.
- In a large mixing bowl, combine the ricotta cheese, chopped spinach, mozzarella cheese, Parmesan cheese, beaten egg, garlic powder, dried Italian herbs, salt, and pepper. Mix until all ingredients are well incorporated.
- Spread 1 cup of marinara sauce evenly on the bottom of a large baking dish.
- Gently fill each cooked conchiglie with the spinach and ricotta mixture, using a spoon or your fingers. Arrange the filled shells in the baking dish on top of the sauce.
- Pour the remaining marinara sauce over the stuffed shells to cover them. Sprinkle additional mozzarella cheese on top for an extra cheesy finish.
- Cover the baking dish with aluminum foil and bake in the preheated oven for 25 minutes.
- After 25 minutes, remove the foil and bake for an additional 10-15 minutes, or until the cheese is bubbly and golden.
- Remove from the oven and let it cool for a few minutes before serving. Garnish with fresh basil leaves for an added touch.


![For the base of this dish, you need: - 8 oz. rice noodles - 2 tablespoons vegetable oil - 1 tablespoon fresh ginger, minced - 4 cloves garlic, minced - 1 bell pepper, julienned (any color) - 1 cup broccoli florets - 1 cup snap peas - 2 green onions, chopped - 3 tablespoons soy sauce - 1 tablespoon sesame oil - 1 tablespoon honey (or maple syrup for a vegan option) - Sesame seeds for garnish - Fresh cilantro for garnish - Salt and pepper to taste These ingredients create a vibrant and tasty dish. The ginger and garlic add warmth and depth. The bright veggies make every bite a treat. To boost the flavor, consider adding: - Red pepper flakes for heat - Mushrooms for a savory touch - Carrots for added sweetness and color - Cashews for crunch and richness These options can enhance the dish and make it your own. You can swap ingredients based on your needs: - Use gluten-free noodles if you need a gluten-free option. - Replace soy sauce with tamari for a gluten-free sauce. - For a vegan dish, make sure to use maple syrup instead of honey. These swaps let everyone enjoy a delicious Ginger Garlic Noodle Stir Fry. Check out the Full Recipe for more details on how to put it all together! First, you need to make your rice noodles. Boil water in a pot. Add 8 oz. of rice noodles and cook them according to the package instructions. This usually takes about 5-7 minutes. Once they are soft, drain them in a colander. Rinse them with cold water to stop the cooking. Toss the noodles with a bit of oil. This will help keep them from sticking together. Now, let’s get cooking! Heat 2 tablespoons of vegetable oil in a skillet or wok over medium-high heat. Wait until the oil shimmers. Add 1 tablespoon of minced ginger and 4 cloves of minced garlic. Stir them quickly for about 30 seconds. You want them fragrant, not burnt. Next, toss in your julienned bell pepper. Stir-fry this for 2-3 minutes until it's slightly soft. Now, add 1 cup of broccoli florets and 1 cup of snap peas. Keep stirring for another 3-4 minutes. Your veggies should be bright and tender-crisp. If they look dull or mushy, you’ve cooked them too long! In a small bowl, mix together 3 tablespoons of soy sauce, 1 tablespoon of sesame oil, and 1 tablespoon of honey or maple syrup. Pour this sauce over the cooked veggies. Add your prepared rice noodles to the skillet. Toss everything together gently. Make sure the noodles and veggies are well combined and heated through. Finally, season your dish with salt and pepper to taste. Fold in 2 chopped green onions for a fresh touch. Serve your Ginger Garlic Noodle Stir Fry hot. Garnish with sesame seeds and fresh cilantro for that perfect finish. This dish is not only easy but also packed with flavor. Enjoy your meal! For the full recipe, check out the details above. To get the best texture, keep your heat high. Hot oil helps cook food fast. Cut your veggies thin for quick cooking. Stir them often to avoid burning. Don't crowd the pan; it can make your veggies soggy. Work in batches if needed. You want that crisp bite! Start with fresh ginger and garlic. They create a strong base for flavor. Sauté them quickly to release their oils. Use a mix of sauces for depth. Soy sauce adds saltiness, while sesame oil gives richness. Honey or maple syrup offers a sweet touch. Taste as you go to balance flavors. One big mistake is overcooking the veggies. They should stay bright and crunchy. Avoid using old oil; it can ruin the taste. Don't skip the seasoning; it elevates the dish. Lastly, remember to toss everything together well. This ensures each bite is packed with flavor. Make sure to check out the [Full Recipe] for all the steps! {{image_2}} You can easily make this dish vegetarian or vegan. Just skip the meat and use more veggies. Try adding mushrooms, zucchini, or carrots for extra taste. Use maple syrup instead of honey to keep it vegan. This keeps the dish sweet and delicious. Adding protein can make your meal heartier. Chicken works well and cooks quickly. Simply cut it into bite-sized pieces and stir-fry it before adding veggies. Tofu is another great choice. Use firm tofu and cube it. Fry until golden for a tasty crunch. Shrimp also adds flavor. Cook them until they turn pink, then mix them in. You can change the taste by swapping some ingredients. Instead of rice noodles, try whole wheat or soba noodles for a different texture. Use dark soy sauce for a richer flavor. Add chili flakes or sriracha if you like heat. You can also try different vegetables like bok choy or asparagus for variety. For the full recipe and more tips, check out the Full Recipe section! After you enjoy your Ginger Garlic Noodle Stir Fry, store any leftovers. Use an airtight container. This helps keep it fresh. Let the stir fry cool to room temperature first. Avoid putting hot food in the fridge. This can raise the temperature inside, which is not safe. Place the container in the fridge. It will last up to three days. When you’re ready to eat leftovers, reheat carefully. Use a skillet for best results. Heat it on medium heat. Add a splash of water or oil to keep it moist. Stir it gently until heated through. This keeps the noodles from getting too dry or sticky. You can also use the microwave. Just cover the bowl with a damp paper towel. Heat for one minute at a time, stirring in between. You can freeze Ginger Garlic Noodle Stir Fry for later. Use a freezer-safe container or bag. Make sure to remove as much air as possible. This helps prevent freezer burn. It will stay good for up to two months. When you’re ready to eat it, thaw it overnight in the fridge. Reheat it in a skillet for best taste and texture. You can follow the steps for reheating leftovers. Using this method keeps the flavors fresh. For the full recipe, check out the previous sections. Making Ginger Garlic Noodle Stir Fry takes about 20 minutes total. You need 10 minutes to prep and another 10 to cook. This quick time makes it perfect for busy days when you want a tasty meal fast. Yes, you can use different noodles for this recipe. Options like egg noodles or udon work well. You can also try whole wheat or gluten-free noodles if you prefer. Just remember to adjust the cooking time based on the noodles you choose. Ginger and garlic offer many health benefits. Ginger can help with digestion and reduce nausea. It also has anti-inflammatory properties. Garlic can boost your immune system. It may help lower blood pressure and improve heart health. Both add flavor and nutrition to your meals, making them great choices in cooking. You've learned to make a delicious Ginger Garlic Noodle Stir Fry. We covered key ingredients, techniques, and helpful tips to ensure your dish shines. Dietary variations allow everyone to enjoy this meal. Proper storage keeps leftovers fresh, while reheating maintains great flavor. Follow these steps and you'll impress at the dinner table. Remember, with practice, you'll master this stir fry and tweak it to fit your taste. Enjoy cooking and sharing this simple, tasty dish!](https://dailydishlab.com/wp-content/uploads/2025/07/2e7dc7f2-8fff-4ba0-8595-d5dc5059986b-768x768.webp)

