Sweet Chili Quinoa Stir-Fry Savory and Simple Dish

Looking for a fresh, tasty meal that’s ready in no time? Try this Sweet Chili Quinoa Stir-Fry! It’s packed with flavor, bright vegetables, and healthy quinoa. Whether you’re a busy parent or just want something quick after work, this dish is simple to make. Let’s dive into the easy steps and tips to perfect your stir-fry. You’ll learn how to impress your taste buds with just a few ingredients!
Why I Love This Recipe
- Flavorful and Versatile: This stir-fry combines sweet and savory elements that can easily be adjusted to your taste preferences.
- Quick and Easy: With a total time of just 30 minutes, this recipe is perfect for busy weeknights.
- Nutritious Ingredients: Packed with vegetables and protein-rich quinoa, this dish is a wholesome meal option.
- Customizable: You can swap in your favorite vegetables or proteins to make this dish truly your own.
Ingredients
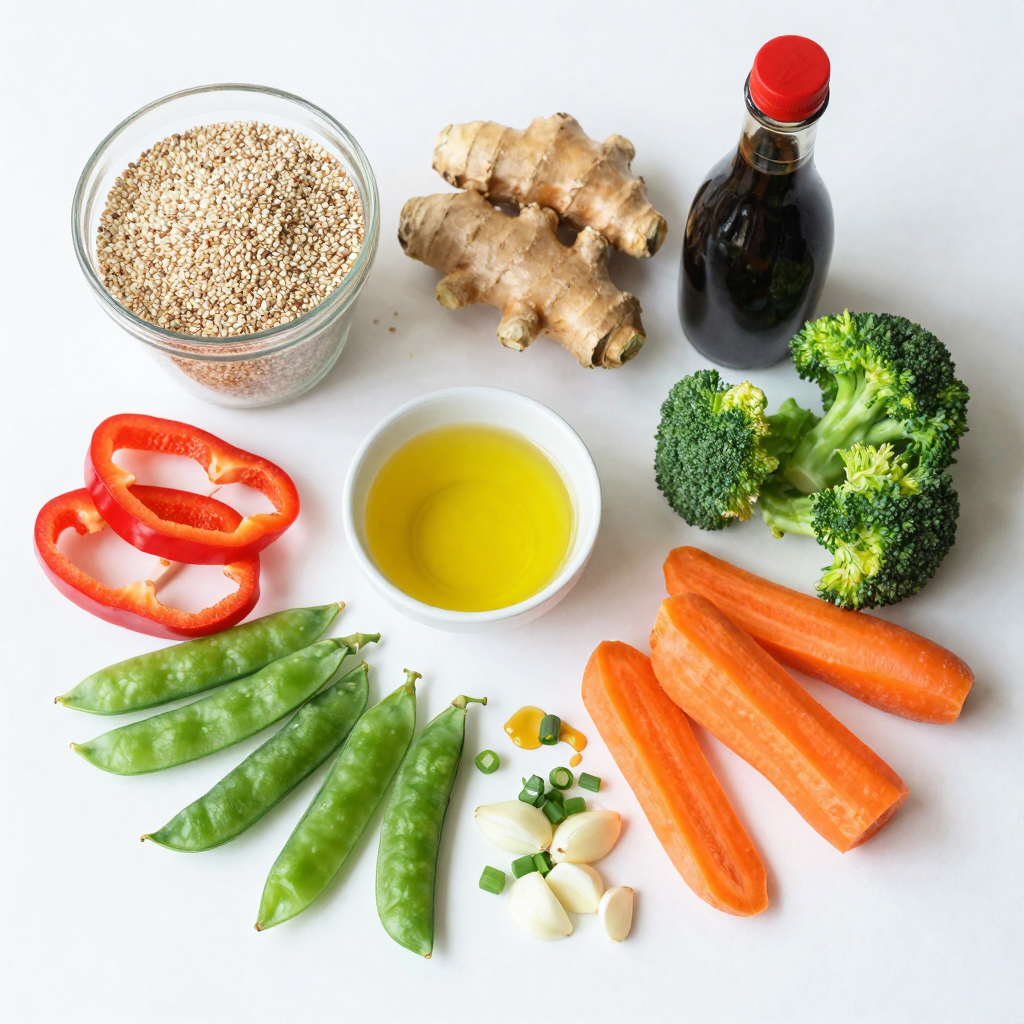
Main Ingredients List
- Quinoa and Broth
- 1 cup quinoa, rinsed
- 2 cups vegetable broth or water
- Vegetables
- 1 red bell pepper, sliced
- 1 cup snap peas, trimmed
- 1 cup carrots, julienned
- 1 cup broccoli florets
- 3 green onions, chopped
- 3 cloves garlic, minced
- 1 tablespoon fresh ginger, grated
- Sauces and Seasonings
- 1/4 cup sweet chili sauce
- 2 tablespoons soy sauce (or tamari for gluten-free)
- 1 tablespoon sesame oil
- Sesame seeds for garnish
- Fresh cilantro for garnish (optional)
The main star of this dish is quinoa. It gives a great nutty flavor and texture. The vegetable broth or water cooks it perfectly. You want your quinoa to be light and fluffy, not mushy.
Next, we have the colorful veggies, which add crunch and nutrients. The red bell pepper brings sweetness, while the snap peas add a nice snap. Carrots and broccoli bring freshness and color to your plate.
For flavor, we use garlic and ginger. They add depth and warmth to the dish. The sweet chili sauce gives it a lovely sweetness and kick. Soy sauce adds umami, and sesame oil gives a rich, nutty finish.
Finally, we garnish with green onions, sesame seeds, and cilantro. These little touches make the dish pop visually and flavor-wise. Each ingredient plays a role in making your Sweet Chili Quinoa Stir-Fry easy and tasty.

Step-by-Step Instructions
Preparing the Quinoa
Cooking Method
Start by boiling 2 cups of vegetable broth or water in a medium saucepan. Rinse 1 cup of quinoa under cold water. Once the broth boils, add the quinoa. Lower the heat, cover, and let it simmer for 15-20 minutes. This cooks the quinoa perfectly, making it fluffy and light.
Fluffing the Quinoa
After cooking, remove the pot from heat. Let it sit for a few minutes, then fluff the quinoa with a fork. This helps separate the grains and gives it a nice texture. Set it aside while you prepare the rest of the dish.
Sautéing the Aromatics
Heat and Timing
In a large wok or frying pan, heat 1 tablespoon of olive oil over medium-high heat. Add 3 cloves of minced garlic and 1 tablespoon of grated fresh ginger. Sauté these for about 30 seconds until they smell great. Be careful not to burn them.
Importance of Fresh Ingredients
Using fresh garlic and ginger makes a big difference. They add a bright flavor that makes your stir-fry come alive. Fresh ingredients bring out the best in any dish.
Stir-Frying the Vegetables
Adding Vegetables in Stages
Toss in 1 sliced red bell pepper, 1 cup of julienned carrots, and 1 cup of broccoli florets. Stir-fry these for 4-5 minutes until they soften a bit. Then, add 1 cup of snap peas and stir-fry for another 2-3 minutes. This method keeps the veggies crisp and colorful.
Achieving Crispness
To keep the vegetables crunchy, don’t overcook them. You want them to be tender but still have a nice bite. This makes the dish more enjoyable and nutritious.
Combining Ingredients
Mixing Techniques
Once the veggies are cooked, lower the heat to medium. Stir in the cooked quinoa, pouring over 1/4 cup of sweet chili sauce and 2 tablespoons of soy sauce. Drizzle 1 tablespoon of sesame oil over the top. Mix everything well, making sure every grain of quinoa gets coated in the sauce.
Ensuring Even Coating
To ensure even flavor, stir gently but thoroughly. This allows all the ingredients to blend nicely. Cook for an additional 2-3 minutes to heat everything through. The dish should smell amazing!
Pro Tips
- Perfectly Cooked Quinoa: To ensure your quinoa is fluffy and not mushy, rinse it thoroughly under cold water before cooking and use the correct water-to-quinoa ratio (2:1).
- Veggie Variations: Feel free to substitute or add your favorite vegetables like bell peppers, zucchini, or mushrooms to customize the stir-fry to your taste.
- Make it Spicy: If you enjoy heat, add some red pepper flakes or Sriracha to the stir-fry for an extra kick.
- Meal Prep Friendly: This stir-fry is perfect for meal prep! Store leftovers in an airtight container in the fridge for up to 4 days.
Tips & Tricks
Perfecting Quinoa Cook Time
- Avoiding Overcooking: Quinoa cooks fast. Keep an eye on it. If you cook it too long, it can turn mushy. Aim for 15-20 minutes. When the water is gone, it’s done.
- Optimal Quinoa Texture: The best quinoa is fluffy. To get that, rinse it well. This removes the bitter coating. Fluff it with a fork after cooking. This keeps the grains separate and nice.
Enhancing Flavor
- Suggestions for Additional Seasonings: You can mix in more spices. Try a pinch of red pepper flakes for heat. A squeeze of lime adds brightness. Fresh herbs like basil or mint work great too.
- Alternative Sauces: If sweet chili sauce isn’t your thing, use teriyaki or hoisin. These sauces add a rich flavor. You can also skip the sauce and use broth for a lighter dish.
Cooking Method Alternatives
- Skillet vs. Wok: A wok gives you more space to stir. This helps cook the veggies evenly. A skillet works too, especially if you don’t have a wok. Just make sure it’s large enough.
- Using a Rice Cooker: If you have a rice cooker, use it for quinoa. It cooks perfectly without fuss. Just add the quinoa and broth, set it, and walk away. It will beep when done!

Variations
Protein Add-Ins
You can easily boost the protein in your Sweet Chili Quinoa Stir-Fry. Adding protein makes it more filling and nutritious. Here are some options for adding protein:
- Tofu: Cube firm tofu and sauté until golden.
- Chicken: Cut chicken breast into pieces and cook until done.
- Shrimp: Toss in shrimp for a fast and tasty option.
- Beans: Use black beans or chickpeas for plant-based protein.
For vegetarian and vegan choices, tofu and beans are great. They soak up flavors well. This keeps your dish tasty while being meat-free.
Vegetable Swaps
You can change up the veggies based on what you have. Seasonal vegetables are fresh and full of flavor. Here are some ideas:
- Zucchini: Slice and add for a soft texture.
- Bell Peppers: Use different colors for a beautiful dish.
- Asparagus: Cut into pieces for a crisp bite.
If fresh veggies aren’t available, frozen options work well. They save time and are often picked at peak freshness. Just add them later in the cooking process for the best results.
Gluten-Free and Dietary Adjustments
If you need a gluten-free option, use gluten-free soy sauce or tamari. This keeps the sweet and savory taste while avoiding gluten.
For low-carb variations, you can swap quinoa for cauliflower rice. This keeps the dish light and healthy while still being satisfying. Feel free to mix and match these ideas to fit your needs.
Storage Info
Refrigeration Guidelines
To store your Sweet Chili Quinoa Stir-Fry, let it cool first. Put it in an airtight container. This keeps it fresh for up to 3 days. When you are ready to eat, take it out of the fridge.
Reheating Instructions:
You can reheat it in a microwave or on the stove. If using a microwave, heat it for about 1-2 minutes. Stir halfway through to warm it evenly. On the stove, use low heat and add a splash of water. This helps it steam and stay moist.
Freezing Options
You can freeze the Sweet Chili Quinoa Stir-Fry to enjoy later. After cooling, place it in a freezer-safe container. Make sure to leave some space at the top, as it will expand. Label the container with the date. It can last for up to 2 months in the freezer.
Thawing and Reheating Tips:
To thaw, move it to the fridge overnight. If you need it fast, use the microwave on defrost. Once thawed, reheat it on the stove or in the microwave. Add a little water if it seems dry. Enjoy your tasty meal again!
FAQs
How do I make quinoa less bitter?
Rinsing quinoa before cooking helps remove its natural coating, called saponins. This coating can taste bitter. To rinse, place the quinoa in a fine-mesh strainer and run it under cold water for a few minutes. Cook it in vegetable broth instead of water for extra flavor. This simple step makes a big difference in taste.
Can I use brown rice instead of quinoa?
Yes, you can use brown rice instead of quinoa. However, the texture and flavor will change. Brown rice is chewier and takes longer to cook. Quinoa has a nutty taste and fluffy texture. If you choose brown rice, adjust the cooking time to about 40-45 minutes. This way, you can still enjoy a tasty stir-fry.
What can I substitute for sweet chili sauce?
If you don’t have sweet chili sauce, try using hoisin sauce or a mix of honey and hot sauce. Hoisin gives a sweet and savory flavor. The honey and hot sauce mix adds sweetness and heat. You can also use BBQ sauce for a different twist. Each option will change the taste but still work well in the dish.
How can I make this dish spicier?
To add more heat, consider adding red pepper flakes or diced fresh chili peppers. You can also drizzle in some hot sauce when mixing the sauce. For a smoky flavor, try adding smoked paprika. Start with a small amount and adjust to your taste. This way, you can enjoy a flavorful kick without overwhelming the dish.
Can this recipe be made in advance?
Yes, this recipe is great for meal prep. You can cook the quinoa and vegetables ahead of time. Store them separately in airtight containers. When ready to eat, mix the quinoa and veggies with the sauce and heat them on the stove or microwave. This makes it easy to enjoy a quick and healthy meal during busy days.
This blog post covered key ingredients, step-by-step instructions, and helpful tips for your quinoa stir-fry. You learned how to cook quinoa, sauté fresh veggies, and combine them for great flavor. You also explored tasty variations and storage tips for leftovers.
As you make this dish, remember to keep things fresh and experiment. Your quinoa stir-fry can be personalized to fit your taste. Enjoy creating a meal that is both healthy and delicious!

Sweet Chili Quinoa Stir-Fry
Ingredients
1 cup quinoa, rinsed
2 cups vegetable broth or water
1 tablespoon olive oil
1 red bell pepper, sliced
1 cup snap peas, trimmed
1 cup carrots, julienned
1 cup broccoli florets
3 green onions, chopped
3 cloves garlic, minced
1 tablespoon fresh ginger, grated
1/4 cup sweet chili sauce
2 tablespoons soy sauce (or tamari for gluten-free)
1 tablespoon sesame oil
Sesame seeds for garnish
Fresh cilantro for garnish (optional)
Instructions
In a medium saucepan, bring the vegetable broth or water to a boil. Add the rinsed quinoa, reduce heat to low, cover, and simmer for 15-20 minutes or until all the liquid is absorbed. Fluff with a fork and set aside.
While the quinoa is cooking, heat olive oil in a large wok or frying pan over medium-high heat.
Add the minced garlic and grated ginger, sauté for about 30 seconds until fragrant.
Toss in the sliced bell pepper, julienned carrots, and broccoli florets. Stir-fry for 4-5 minutes until they begin to soften.
Add in the snap peas and continue to stir-fry for another 2-3 minutes until all vegetables are cooked but still crisp.
Reduce heat to medium, then stir in the cooked quinoa. Pour over the sweet chili sauce and soy sauce. Drizzle with sesame oil and mix well to combine all ingredients.
Cook for an additional 2-3 minutes until everything is heated through.
Remove from heat and sprinkle with chopped green onions and sesame seeds. Add fresh cilantro if desired.
Prep Time: 10 mins | Total Time: 30 mins | Servings: 4

Sweet Chili Quinoa Stir-Fry
Ingredients
- 1 cup quinoa, rinsed
- 2 cups vegetable broth or water
- 1 tablespoon olive oil
- 1 unit red bell pepper, sliced
- 1 cup snap peas, trimmed
- 1 cup carrots, julienned
- 1 cup broccoli florets
- 3 unit green onions, chopped
- 3 cloves garlic, minced
- 1 tablespoon fresh ginger, grated
- 0.25 cup sweet chili sauce
- 2 tablespoons soy sauce (or tamari for gluten-free)
- 1 tablespoon sesame oil
- 1 unit sesame seeds for garnish
- 1 unit fresh cilantro for garnish (optional)
Instructions
- In a medium saucepan, bring the vegetable broth or water to a boil. Add the rinsed quinoa, reduce heat to low, cover, and simmer for 15-20 minutes or until all the liquid is absorbed. Fluff with a fork and set aside.
- While the quinoa is cooking, heat olive oil in a large wok or frying pan over medium-high heat.
- Add the minced garlic and grated ginger, sauté for about 30 seconds until fragrant.
- Toss in the sliced bell pepper, julienned carrots, and broccoli florets. Stir-fry for 4-5 minutes until they begin to soften.
- Add in the snap peas and continue to stir-fry for another 2-3 minutes until all vegetables are cooked but still crisp.
- Reduce heat to medium, then stir in the cooked quinoa. Pour over the sweet chili sauce and soy sauce. Drizzle with sesame oil and mix well to combine all ingredients.
- Cook for an additional 2-3 minutes until everything is heated through.
- Remove from heat and sprinkle with chopped green onions and sesame seeds. Add fresh cilantro if desired.


![- 4 large russet potatoes, peeled and cubed - ½ cup cream cheese, softened - ½ cup sour cream - 1 cup shredded sharp cheddar cheese - ½ cup grated Parmesan cheese - 2 tablespoons butter, melted - 1 teaspoon garlic powder - ½ teaspoon onion powder - Salt and pepper to taste - ¼ cup chopped green onions for garnish When I prepare Cheesy Mashed Potato Casserole, I choose high-quality ingredients. Fresh, firm potatoes make the best base. Look for russet potatoes, known for their creamy texture. Cream cheese and sour cream blend well, adding richness. Sharp cheddar cheese gives a bold flavor. I often select a good quality Parmesan for a nice finish. - 4 large russet potatoes = approximately 1.8 kg - ½ cup cream cheese = about 125 g - ½ cup sour cream = about 125 g - 1 cup shredded sharp cheddar cheese = about 115 g - ½ cup grated Parmesan cheese = about 50 g - 2 tablespoons butter = about 30 g For best results, always measure accurately. Using a kitchen scale can help. If you want to substitute an ingredient, choose similar flavors. For example, Greek yogurt can replace sour cream for a healthier option. To enhance your dish, try to use fresh herbs or spices. They can really bring your casserole to life. And remember, the right choice of cheese can elevate the whole dish. If you want to explore more, check out the Full Recipe. Preheating the oven Start by preheating your oven to 350°F (175°C). This ensures your casserole cooks evenly and gets that perfect golden crust. Preparing the potatoes Next, peel and cube 4 large russet potatoes. The size of the cubes matters. Aim for 1-inch pieces. This helps them cook faster and mash easily. Boiling and draining the potatoes Place the cubed potatoes in a large pot. Cover them with cold water. Add a pinch of salt. Bring the water to a boil. Cook the potatoes for about 15-20 minutes. They should be tender when pierced with a fork. After cooking, drain the potatoes and return them to the pot. Mixing in the ingredients Add in ½ cup of softened cream cheese and ½ cup of sour cream. Then, pour in 2 tablespoons of melted butter. Sprinkle in 1 teaspoon of garlic powder and ½ teaspoon of onion powder. Add half of your shredded sharp cheddar cheese and grated Parmesan cheese. Mash everything together until smooth. Season with salt and pepper to taste. Transferring to the baking dish Now, take a greased 9x13-inch baking dish. Transfer your creamy potato mixture into the dish. Use a spatula to smooth the top evenly. Baking time and techniques Sprinkle the remaining cheeses over the top. Bake in the preheated oven for 25-30 minutes. Look for bubbly and golden cheese on top. When done, let it rest for 5 minutes. Garnish with ¼ cup of chopped green onions before serving. Enjoy your cheesy mashed potato casserole! For a full recipe, check out the [Full Recipe]. - Achieving the best texture: To get smooth mashed potatoes, boil them until tender. Use a potato masher for a creamy texture. Mixing with a hand mixer can make them too fluffy, so stick to mashing. - Tips for flavor enhancement: Add cream cheese and sour cream for richness. Garlic powder and onion powder boost flavor. For an extra kick, stir in some cooked bacon or herbs like chives before baking. - Over-mashing potatoes: If you mash too much, potatoes can turn gummy. Aim for a smooth but slightly chunky texture for the best result. - Incorrect baking times: Baking too long can dry out the casserole. Keep an eye on the cheese; it should be bubbly and golden, not burnt. Follow the timing closely for perfect results. For the complete recipe, check the Full Recipe link provided. {{image_2}} You can easily make this casserole vegetarian. Try adding veggies like spinach, broccoli, or carrots. These add color and flavor. Just steam or sauté them before mixing. This way, they blend well with the creamy potatoes. You can also use mushrooms for a rich, umami taste. While sharp cheddar is classic, feel free to mix it up. Gouda or Monterey Jack adds a smooth touch. For a stronger flavor, blue cheese works great too. You can also add herbs like chives or parsley. These give a fresh taste that brightens the dish. Try mixing in some garlic or onion powder for extra zest. For a gluten-free option, check all labels. The ingredients used in this casserole are naturally gluten-free. You can also make it low-calorie. Use Greek yogurt instead of sour cream. Swap cream cheese for a low-fat version. These changes keep your dish light but still tasty. For the full recipe, check out the details provided earlier. To keep your cheesy mashed potato casserole fresh, follow these steps: - Let the casserole cool to room temperature. - Cover it tightly with plastic wrap or aluminum foil. - Place it in the fridge. It stays good for up to three days. - For best taste, try to eat it within two days. If you want to freeze the casserole, follow these tips: - Cool it completely before freezing. - Use an airtight container or a freezer bag. - Label the bag with the date. - It can last in the freezer for up to three months. - Thaw it in the fridge overnight before reheating. To keep the flavor and texture when reheating, here is what I do: - Preheat your oven to 350°F (175°C). - Place the casserole in an oven-safe dish. - Cover it with foil to prevent drying out. - Heat it for about 20-25 minutes. - For a crisp top, remove the foil for the last 5-10 minutes. - You can also reheat individual portions in the microwave for 1-2 minutes. This way, your cheesy mashed potato casserole stays tasty and comforting! For the full recipe, check out the instructions above. You can prepare this dish a day before serving. Just follow these steps: - Make the mashed potatoes as per the recipe. - Once mixed, transfer the potatoes into a greased baking dish. - Cover the dish with plastic wrap or foil. - Store it in the fridge until you’re ready to bake. - When ready to bake, remove the cover and add the remaining cheese on top. - Bake at 350°F for 25-30 minutes. This method saves time and keeps your dish fresh. Yes, you can use many types of potatoes. Here are some great options: - Yukon Gold potatoes add a buttery flavor. - Red potatoes keep their shape well. - Fingerling potatoes offer a unique texture. - Sweet potatoes can add a hint of sweetness. Each type will change the taste and texture a bit, so choose what you like best. This casserole pairs well with many dishes. Here are some tasty ideas: - Roasted chicken for a classic combo. - Grilled steak adds a hearty touch. - Herb-crusted pork chops bring great flavor. - A simple green salad gives a fresh contrast. Feel free to mix and match to find your perfect meal! For the full recipe, check out the details. This blog post shared a simple recipe for Cheesy Mashed Potato Casserole. You learned about the key ingredients and steps to prepare this dish, along with useful tips to make it better. I highlighted variations for dietary needs and how to store leftovers too. Now, you can easily make this tasty casserole for any meal. Enjoy the creamy texture and rich flavors. Remember, with a few tweaks, you can customize it for anyone!](https://dailydishlab.com/wp-content/uploads/2025/07/cab4f5da-1c73-48e2-8f50-2489a9e1b1cd-768x768.webp)

![- 1 pound rainbow carrots, peeled and cut into even-sized pieces - 3 tablespoons olive oil - 3 cloves garlic, minced - 1 teaspoon fresh rosemary, chopped - 1 teaspoon fresh thyme, chopped - 1 teaspoon fresh parsley, chopped - 1 tablespoon honey or maple syrup - Zest of 1 lemon - Salt and pepper to taste This dish shines with the bright colors of rainbow carrots. Using fresh herbs adds a wonderful touch. The garlic gives it a robust flavor, while honey or maple syrup adds sweetness. Don't forget the lemon zest; it gives a great citrus kick! Each ingredient plays a role in making this dish special. You can find the full recipe for Garlic Herb Roasted Rainbow Carrots to create this vibrant side dish. - Preheat the oven to 425°F (220°C). - Prepare the baking sheet with parchment paper. First, I love to start by preheating the oven. This step ensures that the carrots roast evenly. Parchment paper helps the carrots not stick to the baking sheet. It also makes cleanup easier. - Combine olive oil, garlic, herbs, honey, lemon zest, salt, and pepper in a bowl. - Toss rainbow carrots in the herb mixture until coated. Next, I mix my ingredients. In a bowl, I combine olive oil, minced garlic, fresh herbs, honey, lemon zest, salt, and pepper. The mix adds great flavor to the carrots. After mixing, I add the rainbow carrots to the bowl. I toss them until they're evenly coated. Each carrot gets a nice layer of the herb mix. - Arrange carrots on the baking sheet in a single layer. - Roasting time and temperature: 20-25 minutes at 425°F (220°C). Now, I arrange the carrots on the baking sheet. I place them in a single layer for even roasting. I roast them for 20 to 25 minutes at 425°F (220°C). Halfway through, I turn the carrots to help them caramelize. They will be tender and slightly sweet when done. This simple dish is a true delight! If you want the full recipe, check it out here. To ensure even roasting, cut your rainbow carrots into similar sizes. This way, they cook at the same rate. Spread them out on the baking sheet, leaving space between each piece. This helps warm air circulate, making them cook nicely. Turn the carrots halfway through roasting. This step adds flavor and helps them caramelize. When you flip them, use a spatula to avoid breaking them. You want each piece to stay whole for a great look. Want a tangy kick? Add balsamic vinegar or a touch of mustard to your mix. This gives depth and a nice contrast to the sweetness of the carrots. You can also try different herbs like dill or oregano for a fun twist. The key is to explore flavors you enjoy. Serving your roasted carrots on a nice platter makes a big difference. Arrange them in a circle or a line for an eye-catching display. Drizzle any glaze left on the baking sheet over the top for extra shine. To make your dish pop, garnish with fresh herbs. A sprinkle of parsley or thyme adds color and freshness. You can even add a squeeze of lemon for brightness. This simple touch makes your dish look gourmet. Check out the [Full Recipe] for more details on making these tasty carrots! {{image_2}} You can switch up the recipe using other root veggies. Try adding parsnips or beets for a colorful twist. These vegetables offer unique tastes and textures. You can also use baby carrots. They make for a cute presentation and cook quickly. Want to change the flavor? Add spices like cumin or paprika. These spices give the dish warmth and depth. You can also add citrus. A bit of orange zest brings a bright touch to the carrots. This zest pairs well with the garlic and herbs. If you want a vegan dish, simply skip the honey and use maple syrup. This keeps the sweetness while keeping it plant-based. For gluten-free diets, this recipe is already safe. Just ensure all your ingredients are gluten-free. Enjoy the dish without worry! For the full details on making Garlic Herb Roasted Rainbow Carrots, check the [Full Recipe]. To keep your garlic herb roasted rainbow carrots fresh, store them in the fridge. Place the cooled carrots in an airtight container. This keeps out moisture and air, which can spoil them. Use them within three to five days for the best taste. If you have leftovers, you can freeze them, but note that the texture may change. To freeze, spread the cooled carrots on a baking sheet. Freeze them for about an hour, then transfer them to a freezer bag. This method prevents them from sticking together. When it’s time to enjoy your carrots again, reheating is key. The best way is to use the oven. Preheat it to 350°F (175°C). Spread the carrots on a baking sheet in a single layer. Heat them for about 10 to 15 minutes, or until warm. This method keeps them crisp. Avoid microwaving them if you can. Microwaving can make the carrots soggy and lose their nice texture. If you must use a microwave, place a damp paper towel over the carrots to help retain moisture without making them mushy. Can I use regular carrots instead of rainbow carrots? Yes, you can use regular carrots. However, rainbow carrots add color and fun to your dish. Their taste is sweeter and richer. You can mix and match if you like. Regular carrots work well in this recipe. How can I make the recipe ahead of time? You can prep the carrots and the herb mix a day early. Just cut the carrots and mix them with the herbs. Store them in the fridge. When you're ready to cook, just roast them as directed in the full recipe. What should I do if my carrots aren’t tender after roasting? If your carrots aren't tender, they may need more time. Check them at 5-minute intervals. Add some water to the baking sheet if they look dry. This steam can help soften them. How do I know when the carrots are done? The carrots are done when they are tender and slightly caramelized. You can test them with a fork. They should be easy to pierce. Look for a golden-brown color on the edges for that perfect finish. Are roasted carrots healthy? Yes, roasted carrots are healthy. They are low in calories and high in fiber. This makes them great for digestion. They also contain vitamins like A and C, which help your immune system. What nutritional benefits do rainbow carrots provide? Rainbow carrots have many health benefits. They provide antioxidants that fight free radicals. The different colors show various nutrients. For example, orange carrots are high in beta-carotene, while purple carrots contain anthocyanins. These nutrients help keep you healthy and strong. This blog post covered a simple and tasty roasted rainbow carrots recipe. You learned about key ingredients like olive oil, fresh herbs, and flavor enhancers. I shared step-by-step instructions to achieve perfect roasting. You also got tips for storage and reheating, along with fun variations. The beauty of this dish lies in its versatility and vibrant colors. Enjoy making it your own, and bring joy to your meals with these delicious carrots. Eating well can also be fun and easy!](https://dailydishlab.com/wp-content/uploads/2025/06/d72d9d4c-d28b-4e8c-993a-1734cc17a3d6-768x768.webp)
