Sweet Potato Chickpea Curry Flavorful and Simple Dish

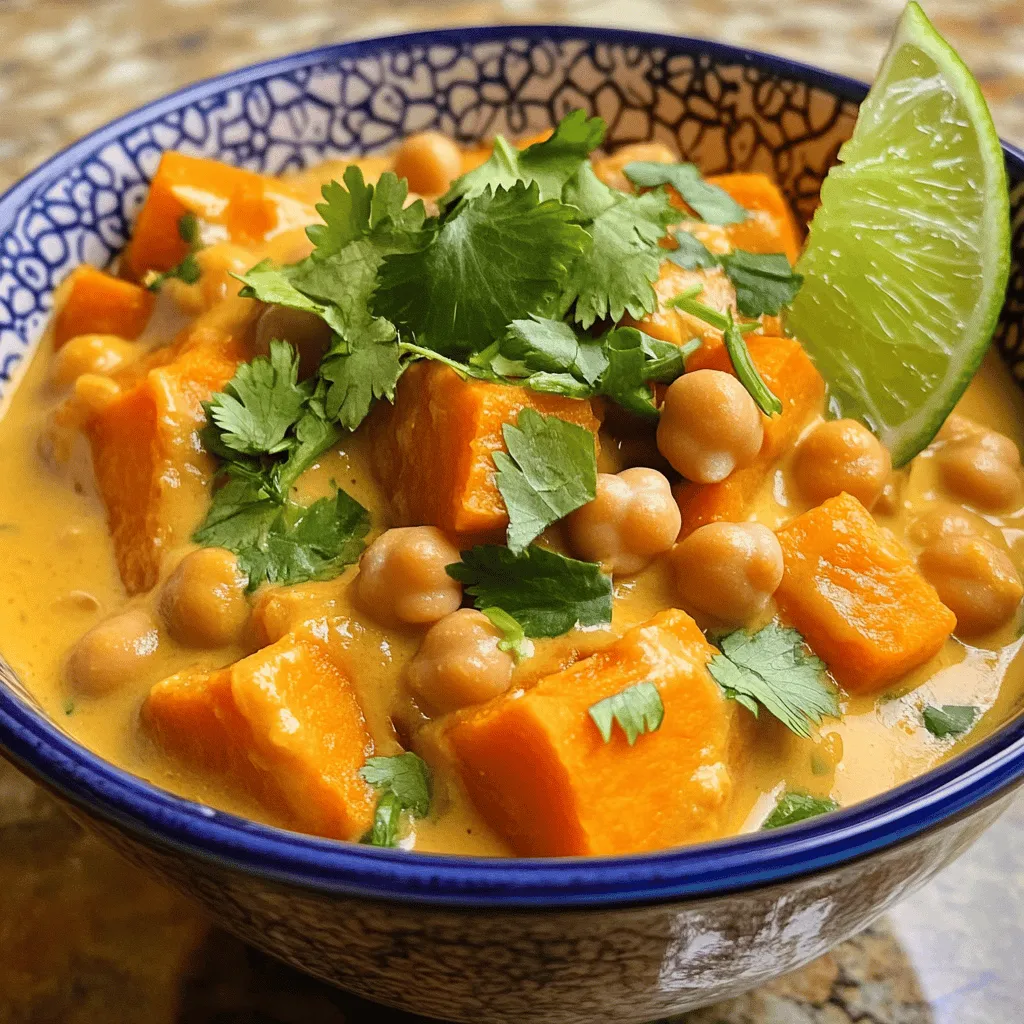
Discover a warm and nourishing bowl of Sweet Potato Chickpea Curry that is both simple and flavorful. Packed with nutrients and easy to make, this dish combines creamy coconut milk with rich spices. Whether you’re a busy parent or a culinary enthusiast, this recipe fits your needs. Let’s dive into the ingredients and steps to create this delightful meal that everyone will love!
Why I Love This Recipe
- Healthy and Nutritious: This curry is packed with vitamins and minerals from sweet potatoes and chickpeas, making it a wholesome meal option.
- Quick and Easy:
- Flavorful and Satisfying: The combination of spices and creamy coconut milk creates a rich, satisfying flavor that warms the soul.
- Versatile and Customizable: This recipe can be easily adjusted with different vegetables or spices to suit your taste preferences.
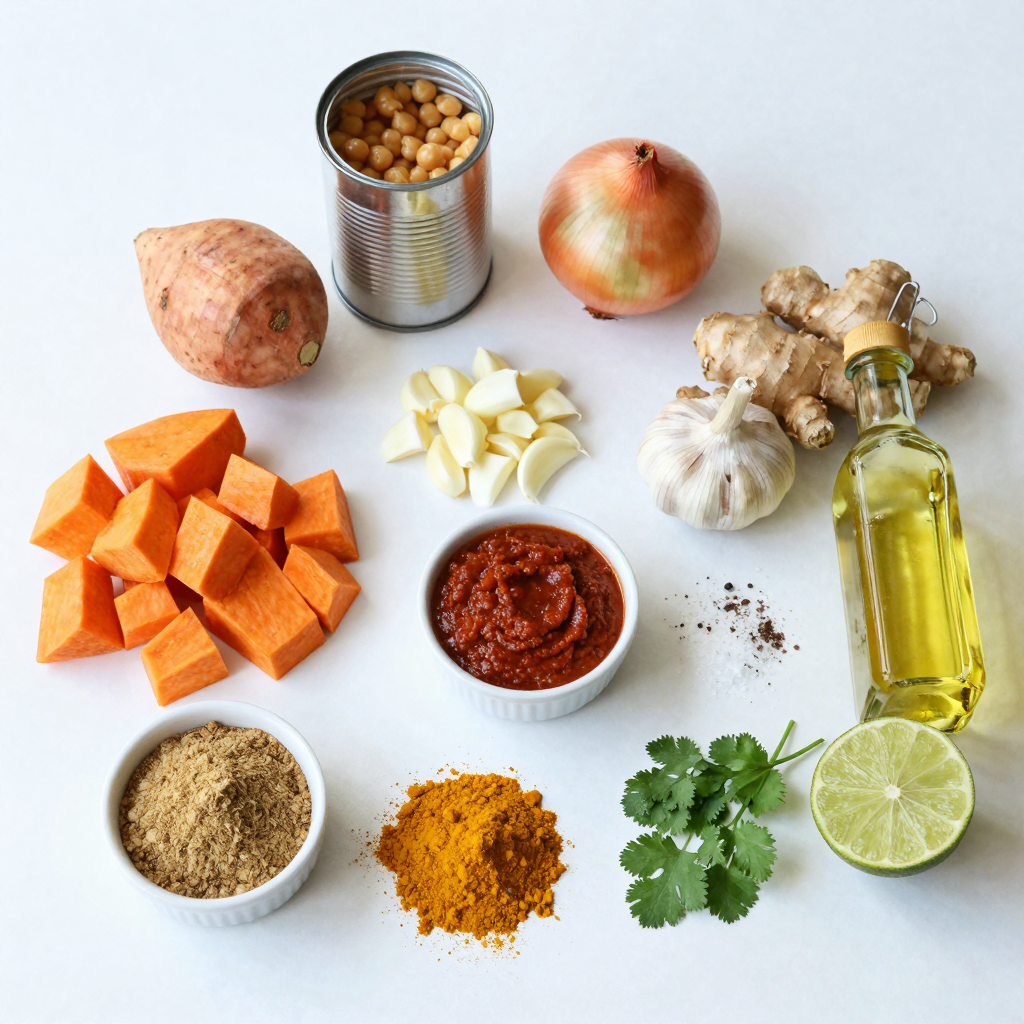
Ingredients
Main Ingredients
- 2 medium sweet potatoes, cubed
- 1 can (15 oz) chickpeas, drained and rinsed
- 1 large onion, diced
- 2 cloves garlic, minced
- 1 tablespoon ginger, grated
- 1 can (14 oz) coconut milk
- 1 tablespoon red curry paste
- 1 tablespoon vegetable oil
- 1 teaspoon cumin
- 1 teaspoon turmeric
- Salt and pepper to taste
Sweet potatoes bring a natural sweetness to the curry. They add texture and nutrients. Chickpeas provide protein and fiber, making the dish hearty. Onions, garlic, and ginger build a flavorful base. Coconut milk adds creaminess and balances the spices. Red curry paste gives it that warm, spicy kick. Cumin and turmeric deepen the flavors and add health benefits.
Optional Ingredients
- Fresh cilantro, chopped (for garnish)
- Juice of 1 lime
- Cooked rice or quinoa (for serving)
Adding fresh cilantro gives a pop of color and freshness. The lime juice brightens the dish, adding tanginess. Serving over rice or quinoa makes for a filling meal.
Nutritional Information
Each serving has about 350 calories. It contains 12 grams of protein, 60 grams of carbs, and 10 grams of fat. This dish is vegan and gluten-free, making it suitable for many diets.

Step-by-Step Instructions
Preparation Steps
- Step 1: Sauté the onion
Start by heating the vegetable oil in a large pot over medium heat. Add the diced onion and sauté it for about five minutes. You want the onion to soften and turn translucent. This step builds a tasty base for your curry.
- Step 2: Add garlic and ginger
Next, stir in the minced garlic and grated ginger. Cook these for one minute until they become fragrant. This adds a wonderful aroma that makes your kitchen smell great.
Cooking Steps
- Step 3: Incorporate sweet potatoes and spices
Now, add the cubed sweet potatoes to the pot. Stir in the cumin and turmeric. Cook this mixture for about five minutes. You want the sweet potatoes to caramelize slightly, enhancing their natural sweetness.
- Step 4: Mix in curry paste
After that, mix in the red curry paste. Make sure the sweet potatoes are well-coated. Cook everything for another two minutes. This step really brings out the flavors and makes the dish vibrant.
Final Steps
- Step 5: Add coconut milk and chickpeas
Pour in the coconut milk and add the rinsed chickpeas. Stir well to combine all the ingredients. This will give your curry a creamy texture and a rich flavor.
- Step 6: Simmer and season with lime juice
Bring the mixture to a gentle simmer. Cover the pot and let it cook for 15-20 minutes, or until the sweet potatoes are tender. Finally, season with salt and pepper to taste. Stir in the lime juice for a zesty kick. This adds brightness to your dish.
Pro Tips
- Use Fresh Spices: Freshly ground spices can enhance the flavor of your curry significantly. Consider grinding whole spices like cumin and turmeric just before using them.
- Adjust Spice Levels: If you prefer a milder curry, start with half the amount of red curry paste and gradually add more to achieve your desired heat level.
- Perfect Sweet Potatoes: To ensure even cooking, cut sweet potatoes into uniform cubes. This helps them cook through at the same rate.
- Garnish for Freshness: Always garnish your curry with fresh cilantro and a squeeze of lime just before serving. It brightens the dish and adds a burst of flavor.
Tips & Tricks
Cooking Tips
To get the right consistency for your sweet potato chickpea curry, make sure to simmer it gently. If it feels too thick, add a splash of water or broth. Stir it well to combine. For spice lovers, you can adjust the heat by adding more red curry paste or a pinch of cayenne pepper. Always taste as you go!
Ingredient Tips
When choosing sweet potatoes, look for firm ones with smooth skin. Avoid any with bruises or soft spots. If you can’t find coconut milk, you can use unsweetened almond milk or cashew cream. These options still give a creamy texture but with a different flavor profile.
Serving Suggestions
This curry pairs best with fluffy rice or nutty quinoa. Both absorb the flavors well. To make it a complete meal, add a side of steamed greens or a fresh salad. These add color and crunch to your plate. Enjoy your dish with a wedge of lime for extra zest!

Variations
Flavor Variations
You can change the flavor of your sweet potato chickpea curry easily. Try adding spices like coriander or paprika for a new twist. Fresh herbs like basil or mint can also brighten up your dish. If you want more veggies, add spinach or bell peppers. They not only add color but also boost nutrition.
Dietary Variations
This recipe is already vegan, but you can make it even better for different diets. For keto, use fewer sweet potatoes and more green veggies. Zucchini or cauliflower can be great swaps. These changes cut carbs while keeping taste.
Serving Variations
You can serve this curry in many ways. Instead of rice, try couscous or bulgur. These grains add a nice texture and flavor. You can also enjoy it as a stew. Just add more liquid to make it soupy. This way, you get a warm and hearty meal.
Storage Info
Storing Leftovers
To store leftovers, let the curry cool first. Then, place it in an airtight container. You can refrigerate the curry for up to four days. If you want to keep it longer, freeze it in a freezer-safe container. It will last up to three months in the freezer. When you are ready to eat, you can thaw it in the fridge overnight.
Reheating Instructions
To reheat the curry, you have a few options. You can use the stove or the microwave. On the stove, heat it on low. Stir often to keep it from sticking. In the microwave, use a microwave-safe bowl. Cover it loosely to allow steam to escape. Heat in short intervals, stirring between each. This method helps keep the flavors fresh and the texture smooth.
Meal Prep Ideas
Preparing this curry in advance is easy and smart. You can make a big batch on the weekend. Then, divide it into portions. Store these in the fridge or freezer for busy nights. Freezing portions means you can enjoy a warm meal anytime. Just remember to thaw and reheat properly for the best taste. For quick meals, serve with rice or quinoa for a complete dish.
FAQs
Common Questions
How do I make Sweet Potato Chickpea Curry more spicy?
You can add more red curry paste for heat. You can also include chopped fresh chili peppers. If you like it spicy, sprinkle in some cayenne pepper too.
Can I use fresh chickpeas instead of canned?
Yes, you can use fresh chickpeas! Just soak them overnight and cook them until tender. This step takes longer, but the flavor is worth it.
Is Sweet Potato Chickpea Curry good for meal prep?
Absolutely! This curry stores well in the fridge. It also freezes nicely, making it perfect for busy days. Just reheat it when you’re ready to eat.
How do I thicken the curry if it’s too watery?
You can simmer the curry longer to reduce the liquid. Another option is to add a cornstarch slurry. Mix cornstarch with water, then stir it in until thickened.
Ingredient Alternatives
What can I use instead of coconut milk?
If you don’t have coconut milk, try almond milk or oat milk. These options will change the flavor but still work well. You can also use vegetable broth for a lighter taste.
Can I substitute sweet potatoes with regular potatoes?
Yes, you can use regular potatoes. They will change the taste and texture, but they will still be delicious. Just cut them into similar-sized pieces for even cooking.
Customization Options
How to make it nut-free?
This dish is already nut-free! Just ensure your curry paste doesn’t contain nuts. Most brands are safe to use, but it’s good to check the label.
Can I add protein, like chicken or tofu?
Yes, you can add chicken or tofu for extra protein. If using chicken, cook it first before adding other ingredients. For tofu, you can cube it and add it along with the chickpeas.
This blog post covered how to make a delicious Sweet Potato Chickpea Curry. You learned about key ingredients like sweet potatoes, chickpeas, and coconut milk. I shared step-by-step instructions to guide you. You now have tips for storage, meal prep, and customizing your dish.
Embrace this recipe and make it your own. Enjoy the tasty flavors and good nutrition in every bite. Happy cooking!

Sweet Potato Chickpea Curry
Ingredients
2 medium sweet potatoes, cubed
1 can (15 oz) chickpeas, drained and rinsed
1 large onion, diced
2 cloves garlic, minced
1 tablespoon ginger, grated
1 can (14 oz) coconut milk
1 tablespoon red curry paste
1 tablespoon vegetable oil
1 teaspoon cumin
1 teaspoon turmeric
Salt and pepper to taste
Fresh cilantro, chopped (for garnish)
Juice of 1 lime
Cooked rice or quinoa (for serving)
Instructions
Heat the vegetable oil in a large pot over medium heat. Add the diced onion and sauté for about 5 minutes until softened and translucent.
Stir in the minced garlic and grated ginger, cooking for another minute until fragrant.
Add the cubed sweet potatoes to the pot and stir in the cumin and turmeric. Cook for about 5 minutes, allowing the sweet potatoes to slightly caramelize.
Mix in the red curry paste, ensuring the sweet potatoes are well coated. Cook for an additional 2 minutes.
Pour in the coconut milk and add the rinsed chickpeas. Stir well to combine.
Bring the mixture to a gentle simmer, cover the pot, and let it cook for 15-20 minutes, or until the sweet potatoes are tender.
Season with salt and pepper to taste. Finish by stirring in the lime juice for a zesty kick.
Serve the curry over cooked rice or quinoa, and garnish with fresh cilantro.
Prep Time: 15 minutes | Total Time: 40 minutes | Servings: 4

Sweet Potato Chickpea Curry
Ingredients
- 2 medium sweet potatoes, cubed
- 1 can (15 oz) chickpeas, drained and rinsed
- 1 large onion, diced
- 2 cloves garlic, minced
- 1 tablespoon ginger, grated
- 1 can (14 oz) coconut milk
- 1 tablespoon red curry paste
- 1 tablespoon vegetable oil
- 1 teaspoon cumin
- 1 teaspoon turmeric
- to taste salt and pepper
- for garnish fresh cilantro, chopped
- 1 juice of lime
- for serving cooked rice or quinoa
Instructions
- Heat the vegetable oil in a large pot over medium heat. Add the diced onion and sauté for about 5 minutes until softened and translucent.
- Stir in the minced garlic and grated ginger, cooking for another minute until fragrant.
- Add the cubed sweet potatoes to the pot and stir in the cumin and turmeric. Cook for about 5 minutes, allowing the sweet potatoes to slightly caramelize.
- Mix in the red curry paste, ensuring the sweet potatoes are well coated. Cook for an additional 2 minutes.
- Pour in the coconut milk and add the rinsed chickpeas. Stir well to combine.
- Bring the mixture to a gentle simmer, cover the pot, and let it cook for 15-20 minutes, or until the sweet potatoes are tender.
- Season with salt and pepper to taste. Finish by stirring in the lime juice for a zesty kick.
- Serve the curry over cooked rice or quinoa, and garnish with fresh cilantro.


![For a tasty beef stir fry, you need some key items. They include: - 1 lb (450g) flank steak, sliced thinly against the grain - 2 tablespoons soy sauce - 1 tablespoon cornstarch - 2 tablespoons vegetable oil These ingredients form the base of your dish. The flank steak gives a rich flavor, while the soy sauce adds a nice salty touch. Seasonings turn a good dish into a great one. For this stir fry, you will use: - 3 cloves garlic, minced - 1 tablespoon ginger, grated - 2 tablespoons oyster sauce - 1 teaspoon sesame oil - Salt and pepper to taste Garlic and ginger bring a warm, aromatic flavor. Oyster sauce adds depth, while sesame oil gives a nutty note. Fresh veggies make your stir fry colorful and healthy. I suggest: - 1 red bell pepper, sliced - 1 yellow bell pepper, sliced - 1 cup broccoli florets - 1 cup snap peas These vegetables stay crisp and bright in the stir fry. They add texture and flavor, making your meal more fun to eat. Follow this [Full Recipe] for a complete guide to making your easy beef stir fry. Start by slicing the flank steak thinly. This helps the beef cook fast and stay tender. Place the sliced beef in a bowl. Add soy sauce and cornstarch. Mix these well to coat the beef. Let it sit for about 15 minutes. This time helps the beef soak up the flavor. While it marinates, you can prepare your veggies. Heat one tablespoon of vegetable oil in a large skillet or wok over high heat. Once hot, add the marinated beef. Stir-fry for about 3 to 4 minutes. You want the beef to brown and cook through. Once it’s done, remove the beef from the skillet. Set it aside while you cook the veggies. This keeps the beef juicy and tasty. In the same skillet, add the last tablespoon of vegetable oil. Add minced garlic and grated ginger. Stir-fry these for about 30 seconds until they smell great. Next, add the sliced red and yellow bell peppers, broccoli, and snap peas. Stir-fry everything for about 5 to 7 minutes. You want the colors bright and the veggies tender-crisp. Return the cooked beef to the skillet. Pour in oyster sauce and sesame oil. Add salt and pepper to taste. Toss everything together for 1 to 2 minutes. Make sure the beef and veggies are coated in the sauce. Now, it’s ready to serve over cooked rice or noodles. For the full recipe, check out the details above. Marinating beef adds great taste. I recommend using soy sauce and cornstarch. Mix these with the beef and let it sit for 15 minutes. This makes the beef tender and juicy. The soy sauce gives it a salty kick. Cornstarch helps create a nice sear when you cook it. To get the best texture, heat your pan well. Start with high heat before adding the beef. Cook it for just 3-4 minutes. If you overcook it, the beef becomes tough. After cooking, remove it from the pan. This keeps it tender. Then, cook your veggies. Stir-fry them until they are bright and crisp. This keeps their nutrients and crunch. One big mistake is overcrowding the pan. If you add too much beef or veggies at once, they steam instead of fry. Fry in batches if needed. Another mistake is not prepping all your ingredients first. Stir fry cooks fast. Have everything ready before you start. Lastly, don’t skip the sauces. They add depth and make your dish pop. For the full recipe, check out the details above! {{image_2}} If you want to switch things up, try chicken or tofu. Both work well in stir fry. Chicken breast, sliced thin, cooks fast and absorbs flavors. Tofu brings a nice texture and is great for vegans. Use firm or extra-firm tofu for the best results. Just press it to remove excess water before cooking. You can change the veggies based on what you have. Carrots add sweetness and color. Zucchini is tender and cooks quickly. You can also use mushrooms for a savory flavor. Snap peas and green beans are great for crunch too. Mix and match to keep it fun and fresh. Want to try something new? Add some pineapple for sweetness. A splash of lime juice gives a zesty kick. You can also sprinkle sesame seeds on top for a nutty taste. If you like heat, add chili flakes or sriracha. These little changes can make your beef stir fry exciting each time you make it. For the full recipe, check out the detailed instructions above. To keep your Easy Beef Stir Fry fresh, let it cool first. Place it in an airtight container. You can store it in the fridge for up to three days. Make sure not to leave it out at room temperature for too long. Bacteria can grow quickly in warm food. Reheating is simple. You can use the microwave or a skillet. If using a microwave, heat in short bursts. Stir the food in between to heat it evenly. If using a skillet, add a splash of water or oil. Heat over medium heat while stirring until warm. You can freeze Easy Beef Stir Fry for up to three months. Use a freezer-safe container or bag. Be sure to squeeze out as much air as you can. When you want to eat it, thaw it in the fridge overnight. Reheat as mentioned before for the best taste. For the full recipe, check the earlier sections. You can make Easy Beef Stir Fry spicier by adding chili sauce or fresh chilies. A dash of sriracha or crushed red pepper can boost the heat. Start with small amounts and taste as you go. This way, you can find the perfect level of spice for your dish. Yes, you can use other cuts of beef for this stir fry. Cuts like sirloin, ribeye, or even ground beef will work. Just remember to slice them thinly. This helps them cook quickly and stay tender. Each cut adds a unique flavor and texture to your meal. Easy Beef Stir Fry pairs well with rice or noodles. You can use white rice, brown rice, or even cauliflower rice. Noodles like soba or rice noodles are also great options. For added crunch, serve with a side of fresh salad or crispy spring rolls. Easy Beef Stir Fry lasts about 3 to 4 days in the fridge. Store it in an airtight container to keep it fresh. When you reheat it, make sure it’s warmed through to avoid any cold spots. Enjoy it again for a quick lunch or dinner! For the full recipe, check out the Quick & Colorful Beef Stir Fry section. In this blog post, I covered the key ingredients and straightforward steps to make an easy beef stir fry. You learned about the best vegetables, seasonings, and cooking tips. Avoid common mistakes to get the right taste and texture. Explore variations for different diets and flavor twists. Remember to store leftovers properly and reheat them correctly for the best taste. Making stir fry is simple, fun, and opens up many options. Enjoy your cooking journey and savor your meals!](https://dailydishlab.com/wp-content/uploads/2025/06/724361ab-9d8c-4328-84bd-9e8ad7b606f6-768x768.webp)
![- 4 large russet potatoes - 2 cups broccoli florets, chopped - 1 cup sharp cheddar cheese, grated - 1/2 cup cream cheese, softened - 1/4 cup sour cream - 2 tablespoons butter - 1 garlic clove, minced - Salt and pepper to taste - 1/4 teaspoon paprika (optional) - Green onions, chopped (for garnish) The main ingredients for broccoli cheddar stuffed potatoes are simple and fresh. Russet potatoes are perfect because they are fluffy and hold up well. Broccoli adds a nice crunch and color. Sharp cheddar cheese gives a bold flavor, while cream cheese and sour cream add creaminess. Butter and garlic bring richness and aroma. - Additional toppings (bacon bits, chives) - Alternative cheese options You can play with the toppings. Bacon bits add a savory touch. Chives lend a fresh, onion-like flavor. You may also swap cheese types if you prefer. Try mozzarella or pepper jack for a twist. This recipe is flexible, so feel free to make it your own! 1. Preheat your oven to 425°F (220°C). This helps the potatoes cook evenly. 2. Scrub the russet potatoes under running water. This removes dirt and makes them clean. 3. Pierce each potato several times with a fork. This lets steam escape as they bake. 4. Place the potatoes on a baking sheet. Bake them for 45-60 minutes. They are done when tender. 1. While the potatoes bake, steam the broccoli florets for 3-4 minutes. They should look bright green and tender. 2. Drain the broccoli and set it aside. This keeps it from getting too soggy. 3. In a mixing bowl, combine the steamed broccoli, sharp cheddar cheese, cream cheese, sour cream, butter, and minced garlic. 4. Stir everything together until it’s well mixed and coated. Add salt and pepper to taste. This mixture is the heart of the dish. 1. When the potatoes are cooked, take them out of the oven. Let them cool for a few minutes. 2. Cut each potato in half lengthwise. Be careful; they will be hot! 3. Scoop out some of the potato flesh with a spoon. Place this in a separate bowl. Don’t scoop out too much; leave some for structure. 4. Mash the scooped-out potato flesh with a fork until it’s smooth. 5. Add this mashed potato back to the broccoli and cheese mixture. Stir until everything is combined. 6. Spoon the broccoli-cheese filling back into the potato skins. Heap it on top for a nice look. 7. Return the filled potatoes to the oven. Bake for an additional 15 minutes. The tops should be golden and the cheese melted. 8. Take them out of the oven and let them cool slightly. Garnish with chopped green onions before serving. For the complete details, check the Full Recipe. Enjoy your delicious Broccoli Cheddar Stuffed Potatoes! To know when your potatoes are done, pierce them with a fork. If it slides in easily, they’re ready. For best results, bake large russet potatoes for 45-60 minutes at 425°F (220°C). When you scoop out the flesh, leave some inside the skins. This helps the potato hold its shape. It also keeps the skins from getting too crispy. A little potato left adds flavor and texture to your filling. To boost flavor, consider adding spices like garlic powder or onion powder. A sprinkle of paprika gives a nice touch. You can also mix in some herbs, like thyme or chives, for a fresh taste. For a creamy filling, use both cream cheese and sour cream. This combo creates a rich texture. Mixing in some melted butter also adds a lovely smoothness to the filling. Serve your stuffed potatoes on a colorful plate. This makes the dish look inviting. You can drizzle a bit of sour cream on the side. It adds extra creaminess and looks nice too. Garnish with chopped green onions for a pop of color. They add a fresh crunch that pairs well with the soft filling. For an extra touch, you can even sprinkle some cheese on top before serving. Enjoy these tips to make your broccoli cheddar stuffed potatoes not just tasty, but a feast for the eyes! Don't forget to check out the Full Recipe for complete instructions. {{image_2}} If you want a vegan version, swap dairy ingredients for plant-based options. Use vegan cheese instead of cheddar. Replace cream cheese and sour cream with cashew cream or tofu. These changes keep the flavor while making it dairy-free. For gluten-free needs, ensure you pick gluten-free cheese. Most cheeses are safe, but always check labels. You can also serve the filling in a bowl without the potato skin. This way, you enjoy all the flavors without gluten. Adding protein can make this dish heartier. Try cooked chicken or crispy bacon for extra flavor. Chop them up and mix them into the filling. This will add a tasty twist and make it more filling. You can also change up the veggies! Spinach and bell peppers work well. Chop them finely and add them to the broccoli mix. This adds color and nutrition to the dish, making it even better. Want to save time? You can use an air fryer. Just set it to 375°F (190°C) and cook the potatoes for about 30 minutes. This method gives you a crispy skin and soft inside. For a hands-off approach, try a slow cooker. Place the potatoes in the cooker, add a bit of water, and cook on low for 6-8 hours. This way, they cook while you do other things. Just be sure to check for doneness before serving. For the full recipe, check out the details above. To store your leftover broccoli cheddar stuffed potatoes, place them in an airtight container. This keeps them fresh and tasty in the fridge. Make sure to cool them down before sealing the container. They can stay in the fridge for about 3 to 5 days. If you want to save some for later, freezing is a great option. Wrap each stuffed potato tightly in plastic wrap, then place them in a freezer bag. This method helps prevent freezer burn. You can freeze them for up to 3 months. When it's time to heat up your stuffed potatoes, the best method is to use the oven. Preheat your oven to 350°F (175°C). Place the potatoes on a baking sheet and cover them with foil. This keeps moisture in and prevents drying out. Heat for about 20-25 minutes or until they are hot all the way through. You can also use a microwave if you're in a hurry. Simply place a potato on a microwave-safe plate and cover it with a damp paper towel. Heat for 2-3 minutes, checking often to avoid overcooking. These stuffed potatoes can last in the fridge for about 3 to 5 days. If you freeze them, they can last for 3 months. Look for signs of spoilage, like a sour smell or mold, before eating. If they don't smell right, it's best to toss them. Enjoying your delicious broccoli cheddar stuffed potatoes fresh is always the best way! For the complete recipe, see the [Full Recipe]. Baking the potatoes takes about 45 to 60 minutes. Start by preheating your oven to 425°F (220°C). Scrub the potatoes well and pierce them several times with a fork. This step helps steam escape while they bake. Place the potatoes on a baking sheet and let them bake until they feel soft when you poke them with a fork. The exact time can depend on the size of your potatoes. Larger ones might take a bit longer. Yes, you can prepare these stuffed potatoes ahead of time. Bake the potatoes and prepare the filling. Store the potato skins and filling separately in the fridge. When you are ready to eat, simply fill the skins and bake them. This method saves you time on busy days. You can even prepare everything a day before. Just reheat the filling if it has cooled down too much. Stuffed potatoes pair well with many side dishes. A simple green salad adds freshness and crunch. You can also serve them with roasted vegetables for extra flavor. If you want protein, grilled chicken or a side of beans works well too. For a heartier meal, consider adding a warm soup. Tomato soup or a creamy broccoli soup complements the stuffed potatoes nicely. Absolutely, you can make these potatoes vegetarian. Use plant-based cream cheese and sour cream for the filling. You can also swap the cheddar cheese for a dairy-free alternative. This way, you keep the creamy texture and rich flavor. Ensure all your ingredients are labeled vegetarian. This dish remains delicious and satisfying without meat. This blog post detailed how to make tasty stuffed potatoes. We covered the key ingredients, preparation steps, and helpful tips. You learned ways to enhance flavor and explore easy variations. Stuffed potatoes are versatile, healthy, and fun to make. You can enjoy them as a side dish or a main meal. With these ideas, you can create your own unique version. Enjoy cooking and sharing this delicious dish!](https://dailydishlab.com/wp-content/uploads/2025/06/cd67da25-e7a2-45e2-aa83-3a832e7f2c3d-768x768.webp)

![To make a tasty Easy Broccoli Cheese Casserole, you need a few simple ingredients. Each one plays a key role in creating a rich flavor and creamy texture. Here’s what you will need: - 4 cups fresh broccoli florets - 1 cup cooked quinoa - 2 cups shredded cheddar cheese - 1 cup cream of mushroom soup - 1/2 cup milk - 1/4 cup sour cream - 1 teaspoon garlic powder - 1/2 teaspoon onion powder - Salt and pepper to taste - 1/2 cup breadcrumbs - 2 tablespoons olive oil Fresh broccoli florets give this dish its bright color and crunch. I like using cooked quinoa for a boost of protein. It makes the casserole more filling. The shredded cheddar cheese melts beautifully, adding a rich, creamy layer. Cream of mushroom soup is the secret to a dreamy texture. Milk and sour cream make everything extra smooth. Don’t forget the spices! Garlic powder and onion powder add depth to the flavor. You can adjust the salt and pepper to match your taste. The breadcrumbs on top add a nice crispiness, thanks to the olive oil. For the Full Recipe, check the detailed instructions. Enjoy making this dish with your family! First, preheat your oven to 350°F (175°C). This helps the casserole cook evenly. Next, grab a 9x13 inch baking dish and lightly grease it. This prevents sticking. Now, let’s steam the broccoli florets. Place them in a steamer for about 4-5 minutes. You want them tender but not mushy. Once done, set them aside to cool. In a large mixing bowl, combine the cooked quinoa, 1 1/2 cups of shredded cheddar cheese, cream of mushroom soup, milk, sour cream, garlic powder, onion powder, salt, and pepper. Mix everything well. You want a smooth, cheesy blend. This mix is the heart of your casserole, so make sure it's well combined. Now it’s time to fold in the steamed broccoli. Gently stir it into the cheesy mixture until coated. This adds a nice green color and texture. Pour this mixture into your prepared baking dish, spreading it out evenly. For the topping, mix breadcrumbs with olive oil in a small bowl. Sprinkle this mixture over the casserole. Finally, add the remaining 1/2 cup of shredded cheddar cheese on top. Place the casserole in the preheated oven. Bake it for 25-30 minutes. You will know it’s done when the top is golden brown and the cheese is bubbly. This creates a nice crust. After baking, let it cool for a few minutes before serving. This helps the flavors settle and makes it easier to serve. Enjoy your Easy Broccoli Cheese Casserole! For the full recipe, check the earlier section. To cook broccoli for the best texture, steam it lightly. This method keeps it bright green and crisp. Steam the florets for about 4-5 minutes. They should be tender but not mushy. This step helps them hold their shape and adds a nice bite to your casserole. Choosing the right cheese is key for flavor. I recommend using sharp cheddar. It melts well and gives a rich taste. If you want a creamier texture, try adding mozzarella. Mixing different cheeses can also add depth to your dish. You can easily make ingredient substitutions. If you don’t have quinoa, use rice or even pasta. For a lighter option, swap cream of mushroom soup with plain yogurt. This change keeps the dish creamy while cutting calories. Add-ins can boost flavor and nutrition. Consider mixing in cooked chicken or turkey for protein. Diced bell peppers or carrots can add color and crunch. You can also throw in some nuts for a nice crunch. These options make it fun and unique every time you make it. For the full recipe, check out the [Full Recipe]. {{image_2}} For a lighter version of this casserole, swap out some ingredients. Use low-fat cheese to cut calories. You can also replace cream of mushroom soup with a homemade version or low-sodium broth. This gives you control over the fat and salt levels. If you want a gluten-free option, use gluten-free breadcrumbs. You can also make your own with gluten-free bread if you prefer. These small changes keep the dish tasty while making it healthier. To add more flavor, you can include other vegetables. Bell peppers, carrots, or even spinach work well. These not only boost nutrition but also add great color. Mixing in proteins like cooked chicken or turkey makes the dish heartier. It turns a side dish into a full meal. For the best flavor, try adding fresh herbs like thyme or rosemary. These herbs brighten up the taste and add a nice aroma. You can also use a mix of cheeses for a more complex flavor profile. Just remember to keep it balanced so the broccoli shines through. For the complete recipe, check out the Full Recipe section. To keep your Easy Broccoli Cheese Casserole fresh, let it cool first. Once cool, cover it tightly with plastic wrap or aluminum foil. Store it in the fridge for up to three days. Use a clean spoon when serving, so you avoid cross-contamination. This way, you can enjoy your leftovers without worry. If you want to freeze your casserole, here’s what to do. First, let it cool completely. Then, cut it into portions. Wrap each piece in plastic wrap, then place them in a freezer bag. This helps keep the flavor and texture intact. When you are ready to eat, thaw it overnight in the fridge. Reheat in the oven at 350°F (175°C) until hot. This method works well to enjoy your Easy Broccoli Cheese Casserole later. For the complete recipe, check out the Full Recipe. How can I make this broccoli cheese casserole in advance? You can prepare this casserole a day ahead. Simply follow the recipe until you layer the casserole in the dish. Cover it tightly with plastic wrap and store it in the fridge. When ready to bake, remove the wrap and add a few extra minutes to the baking time. This method saves time and lets the flavors mix well. Can I use frozen broccoli instead of fresh? Yes, frozen broccoli works well in this casserole. Just thaw and drain it before mixing. This saves prep time and still gives you that great broccoli flavor. Make sure to squeeze out extra water to avoid a soggy casserole. What is the calorie count per serving? Each serving of this broccoli cheese casserole has about 300 calories. This count can vary based on your specific ingredients. If you use low-fat cheese or a lighter soup, the calories may drop. Does this casserole freeze well? Yes, this casserole freezes nicely. After baking, let it cool completely. Then, cover it tightly with foil or plastic wrap. Store it in the freezer for up to three months. When you want to eat it, thaw it overnight in the fridge and reheat in the oven. This helps keep the flavors fresh and delicious. For the full recipe, check out the Cheesy Broccoli Bliss Casserole! This blog covered a simple and tasty broccoli cheese casserole. You learned about the key ingredients, from fresh broccoli to spices. I shared step-by-step instructions for mixing and baking. Also, you discovered tips for perfecting the dish and ways to customize it. Finally, we discussed storage methods for leftovers. I hope you feel ready to make this dish! Enjoy your cooking and create a meal that everyone will love.](https://dailydishlab.com/wp-content/uploads/2025/07/a9a80e4c-75b2-4ae9-8984-ae1ea083217d-768x768.webp)
