Teriyaki Tofu & Veggies Sheet Pan Quick and Easy Dish

Looking for a quick and easy dinner? This Teriyaki Tofu & Veggies Sheet Pan is your answer! Packed with flavor and healthy ingredients, it’s perfect for busy weeknights. You’ll love how simple it is to whip up. Plus, you can customize it to suit your taste buds. Dive into this delicious recipe and learn how to make a satisfying meal that everyone will enjoy!
Why I Love This Recipe
- Easy to Prepare: This sheet pan recipe requires minimal prep time, making it perfect for busy weeknights.
- Healthy and Nutritious: Featuring a variety of colorful vegetables and protein-rich tofu, this dish is packed with nutrients.
- Flavorful and Satisfying: The teriyaki sauce adds a deliciously sweet and savory flavor that complements the veggies beautifully.
- Versatile: This recipe can be easily customized with your favorite veggies or served over different grains like quinoa or rice.
Ingredients
Main Ingredients for Teriyaki Tofu & Veggies
For this dish, you will need the following main ingredients:
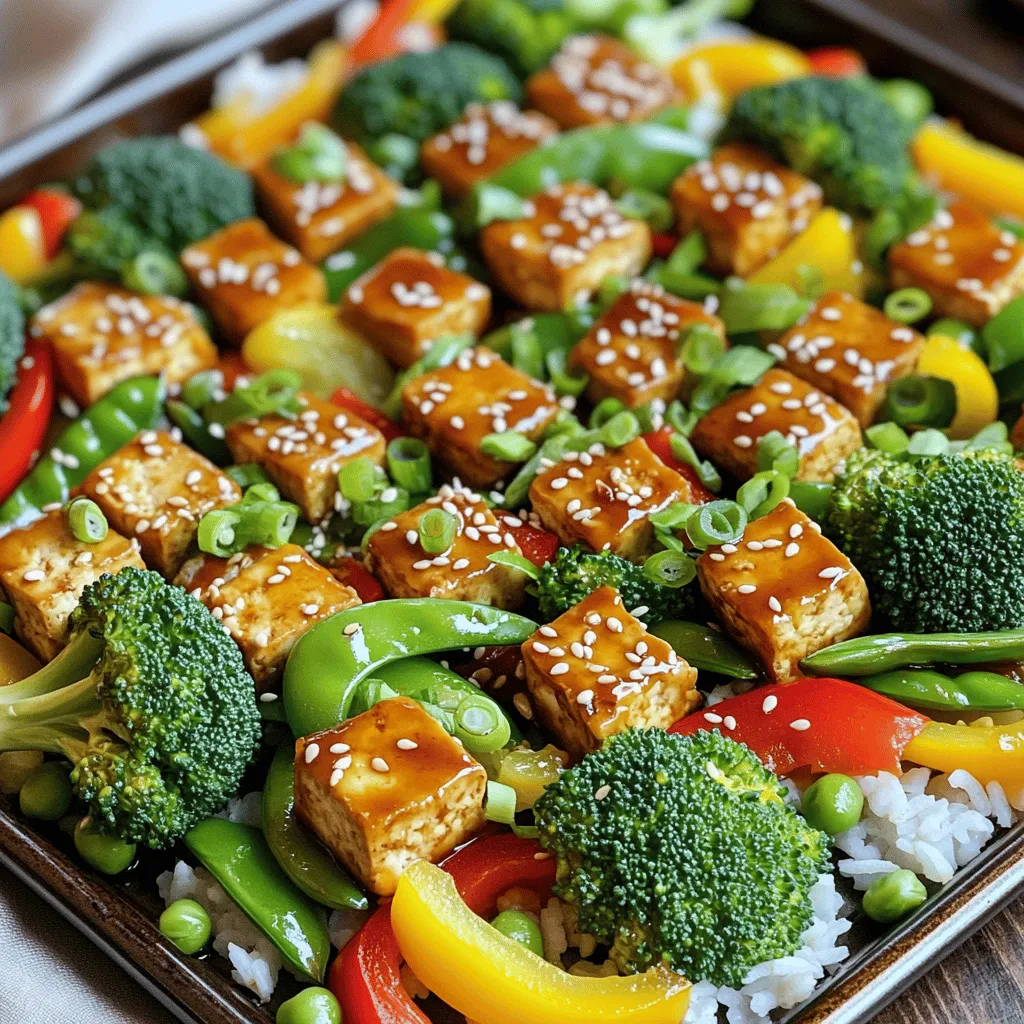
- 1 block (14 oz) firm tofu, pressed and cubed
- 2 cups broccoli florets
- 1 red bell pepper, sliced
- 1 yellow bell pepper, sliced
- 1 cup snap peas
- 2 tablespoons olive oil
- 1/4 cup teriyaki sauce (store-bought or homemade)
- Salt and pepper to taste
These ingredients come together to create a colorful and tasty meal. The firm tofu gives a hearty feel, while the veggies add crunch and flavor.
Optional Toppings and Serving Suggestions
You can enhance your Teriyaki Tofu & Veggies with these optional toppings:
- 1 tablespoon sesame seeds
- 2 green onions, chopped
- Cooked rice or quinoa for serving
Using rice or quinoa as a base makes this dish filling. The sesame seeds and green onions add a nice touch on top.
Recommended Tools and Equipment
To make this dish, gather these tools:
- A large mixing bowl
- A large baking sheet
- Parchment paper
- A spatula for tossing
Having these tools ready streamlines the cooking process. The parchment paper makes cleanup easy and prevents sticking.

Step-by-Step Instructions
Preparing the Tofu
Start by pressing the tofu. This step removes excess water. Wrap the tofu block in a clean towel. Place a heavy object on top. Let it sit for about 15 minutes. This helps the tofu absorb flavors better. After pressing, cut the tofu into cubes. In a bowl, mix the cubed tofu with olive oil, half of the teriyaki sauce, salt, and pepper. Toss until each piece is coated well. This adds taste and helps it brown nicely during roasting.
Roasting the Vegetables
Next, prepare your vegetables. Grab a large mixing bowl and add broccoli florets, sliced red and yellow bell peppers, and snap peas. Drizzle the remaining teriyaki sauce over the veggies. Toss them gently to ensure they are well coated. This step gives the vegetables a sweet and savory flavor.
Assembling and Baking the Sheet Pan
Now, it’s time to assemble everything on the baking sheet. Line a large baking sheet with parchment paper. Spread the marinated tofu evenly on one side. Then, pour the vegetable mixture around the tofu. Make sure to leave space so they roast evenly. Preheat your oven to 425°F (220°C). Bake the sheet pan for 20 to 25 minutes. You want the tofu to be golden brown and the veggies tender-crisp. When done, remove from the oven. Sprinkle sesame seeds and chopped green onions on top for added flavor and crunch. Serve over rice or quinoa with a drizzle of extra teriyaki sauce if you like.
Pro Tips
- Press Tofu Properly: Make sure to press the tofu for at least 30 minutes to remove excess moisture. This helps the tofu absorb the teriyaki sauce better, enhancing its flavor.
- Uniform Vegetable Sizes: Cut the vegetables into similar sizes to ensure they cook evenly. This way, you’ll have perfectly tender-crisp veggies every time.
- Add More Flavor: For an extra flavor boost, marinate the tofu in teriyaki sauce for at least 30 minutes before baking. This will deepen the taste.
- Customize Your Veggies: Feel free to substitute or add other vegetables based on what you have on hand. Carrots, zucchini, or asparagus work wonderfully in this dish.
Tips & Tricks
How to Press Tofu Effectively
To press tofu, start by wrapping it in clean towels. Place a heavy object on top. A cast-iron skillet works well. Let it sit for at least 15 minutes. This step removes excess water and helps the tofu absorb flavors. A well-pressed tofu gives better texture when cooked.
Achieving Perfectly Cooked Vegetables
For tender-crisp veggies, cut them into similar sizes. This way, they cook evenly. Broccoli and bell peppers should be bright and vibrant. Snap peas should have a slight crunch. Bake them at 425°F for 20-25 minutes. This high heat caramelizes the veggies, enhancing their natural sweetness.
Customizing Flavor Profiles
Add your twist to the teriyaki sauce. You can mix in ginger or garlic for depth. A splash of lime juice adds brightness. If you like heat, toss in some red pepper flakes. Feel free to swap vegetables. Carrots or zucchini work great too. This dish is all about your taste!

Variations
Different Vegetable Combinations
You can change up the veggies in this dish. Try adding carrots, zucchini, or mushrooms. Each veggie brings its own taste and texture. For a colorful mix, use bright vegetables like red cabbage or yellow squash. You can even throw in some baby corn or bok choy for a fun twist. Just remember to keep the cooking time in mind. Harder veggies may need a bit more time to cook.
Alternative Sauces and Seasonings
While teriyaki sauce is great, you can mix it up. Try soy sauce with honey for a sweet touch. You can also use hoisin sauce for a rich flavor. If you want some heat, add sriracha or chili paste. Experiment with garlic or ginger for extra depth. These flavors can change your dish and keep it interesting.
Protein Substitutes
If tofu isn’t your thing, you have options. Chickpeas or lentils are great plant-based swaps. They add protein and fiber to your meal. You can also use tempeh for a firmer bite. If you eat meat, try chicken or shrimp. Just make sure to adjust the cooking time based on what you choose. Each protein will give a unique taste to your sheet pan meal.
Storage Info
Proper Storage Techniques
To store your teriyaki tofu and veggies, let them cool first. Place the leftovers in an airtight container. This keeps the tofu and veggies fresh. Store the container in the fridge. Use them within three to four days for the best taste. If you packed them well, they should stay great.
Reheating Instructions
To reheat, you can use the oven or the microwave. If using the oven, preheat it to 350°F (175°C). Spread the tofu and veggies on a baking sheet. Heat for about 10 minutes, or until warm. If you prefer the microwave, place the food in a bowl. Heat it for one to two minutes. Check to see if it’s hot enough. Stir and heat more if needed.
Freezing Guidelines
You can freeze this dish, but it’s best to do so before reheating. Place the cooled tofu and veggies in a freezer-safe bag. Squeeze out as much air as you can before sealing. This helps prevent freezer burn. You can freeze them for up to three months. When ready to eat, thaw it in the fridge overnight before reheating.
FAQs
How long does it take to make Teriyaki Tofu & Veggies Sheet Pan?
Making Teriyaki Tofu & Veggies Sheet Pan takes about 40 minutes. You will spend 15 minutes prepping. The cooking time is around 20 to 25 minutes in the oven. This dish is quick and fits into a busy schedule.
Can I use frozen vegetables?
Yes, you can use frozen vegetables. They will save you prep time. However, they may release more water while cooking. This can make your dish a bit soggy. If you use frozen veggies, bake them a little longer to help reduce moisture.
Is this recipe suitable for meal prep?
Absolutely! This dish is great for meal prep. It stores well in the fridge for up to four days. You can easily reheat it for lunch or dinner. Just keep the rice or quinoa separate until serving. This way, everything stays fresh and tasty!
This article walked you through making Teriyaki Tofu & Veggies. We explored the main ingredients, tips, and variations to suit your taste. You learned how to prepare and cook the tofu and veggies, plus proper storage options.
In closing, cooking this dish is fun and flexible. Try new flavors and veggies to make it your own. I hope you enjoy this tasty, easy meal just as much as I do!

Teriyaki Tofu & Veggies Sheet Pan
Ingredients
1 block (14 oz) firm tofu, pressed and cubed
2 cups broccoli florets
1 red bell pepper, sliced
1 yellow bell pepper, sliced
1 cup snap peas
2 tablespoons olive oil
1/4 cup teriyaki sauce (store-bought or homemade)
1 tablespoon sesame seeds
2 green onions, chopped
Salt and pepper to taste
Cooked rice or quinoa for serving
Instructions
Preheat the oven to 425°F (220°C) and line a large baking sheet with parchment paper.
In a large mixing bowl, toss the cubed tofu with olive oil, half of the teriyaki sauce, salt, and pepper until well-coated.
Spread the tofu evenly onto one side of the prepared baking sheet.
In the same mixing bowl, add the broccoli, bell peppers, and snap peas. Drizzle with the remaining teriyaki sauce, and toss to coat.
Pour the vegetable mixture onto the baking sheet, arranging it around the tofu.
Bake in the preheated oven for 20-25 minutes, or until the tofu is golden brown and the veggies are tender-crisp.
Remove from the oven and sprinkle with sesame seeds and chopped green onions.
Serve over cooked rice or quinoa, drizzling any remaining teriyaki sauce on top as desired.
Prep Time: 15 minutes | Total Time: 40 minutes | Servings: 4

Teriyaki Tofu & Veggies Sheet Pan
Ingredients
- 14 oz firm tofu, pressed and cubed
- 2 cups broccoli florets
- 1 whole red bell pepper, sliced
- 1 whole yellow bell pepper, sliced
- 1 cup snap peas
- 2 tablespoons olive oil
- 0.25 cup teriyaki sauce
- 1 tablespoon sesame seeds
- 2 whole green onions, chopped
- to taste salt and pepper
- for serving cooked rice or quinoa
Instructions
- Preheat the oven to 425°F (220°C) and line a large baking sheet with parchment paper.
- In a large mixing bowl, toss the cubed tofu with olive oil, half of the teriyaki sauce, salt, and pepper until well-coated.
- Spread the tofu evenly onto one side of the prepared baking sheet.
- In the same mixing bowl, add the broccoli, bell peppers, and snap peas. Drizzle with the remaining teriyaki sauce, and toss to coat.
- Pour the vegetable mixture onto the baking sheet, arranging it around the tofu.
- Bake in the preheated oven for 20-25 minutes, or until the tofu is golden brown and the veggies are tender-crisp.
- Remove from the oven and sprinkle with sesame seeds and chopped green onions.
- Serve over cooked rice or quinoa, drizzling any remaining teriyaki sauce on top as desired.


. To start, you need to preheat your oven. Set it to 400°F (200°C). This step is key for even cooking. Let the oven warm up while you prepare the glaze. Next, you’ll make the honey lemon garlic mixture. Take a small bowl and add: - 1/4 cup honey - 2 tablespoons fresh lemon juice - 3 cloves garlic, minced - 2 tablespoons olive oil - Salt and pepper to taste - 1 teaspoon paprika Whisk these ingredients together until they blend well. This glaze gives the salmon its sweet and tangy flavor. Now, grab your salmon fillets. Place them skin-side down on a parchment-lined baking sheet. This helps with easy cleanup and prevents sticking. Then, brush that tasty honey lemon garlic mixture generously over each fillet. Make sure to coat them well. This step adds flavor and keeps the salmon moist. Bake your salmon in the preheated oven for about 12 to 15 minutes. The ideal temperature is 400°F. To check for doneness, look for the salmon to flake easily with a fork. If it does, it’s ready! If not, give it a few more minutes. To get the perfect texture for salmon, follow these steps: - Choose the right salmon: Fresh, wild-caught salmon has better flavor and texture. - Avoid overcooking: Bake the salmon for 12-15 minutes. It should flake easily. - Rest the salmon: Let it sit for a few minutes after baking. This keeps it juicy. For the best honey and garlic combination, try these tips: - Use fresh garlic: Freshly minced garlic gives the best flavor. Avoid powdered garlic. - Balance sweetness and acidity: Adjust the honey and lemon juice to your taste. This balance makes the dish shine. Creative plating ideas can enhance your meal: - Use a decorative platter: Place the salmon fillets on a colorful plate. Drizzle extra glaze over the top. - Garnish thoughtfully: Add lemon slices and fresh parsley around the salmon. This adds color and freshness. Pairing suggestions can make your meal even better: - Choose sides wisely: Serve with steamed veggies or rice. These sides complement the salmon well. - Wine pairing: Light white wine, like Sauvignon Blanc, works great. It enhances the flavors of the dish. For the full recipe, including steps and tips, check out the Honey Lemon Garlic Salmon section. {{image_2}} You can change how you cook honey lemon garlic salmon to suit your taste. Here are two methods: - Grilling honey lemon garlic salmon: Grilling gives the salmon a nice smoky flavor. Preheat your grill to medium-high. Place the salmon on the grill and cook for about 6-8 minutes per side. Brush it with the honey lemon garlic mix while it cooks. This method adds a crispy char and enhances the dish's flavor. - Pan-searing for a crispy finish: This method can create a great crust. Heat a skillet over medium heat with olive oil. Place the salmon skin-side down. Cook for 4-5 minutes, then flip and cook for another 3-4 minutes. Use the honey lemon garlic mix to glaze the salmon during the last minute of cooking. This method gives a beautiful golden-brown color. You can swap out ingredients to fit your needs: - Replacing salmon with other fish: If you can’t find salmon, try trout or tilapia. Both fish work well with the honey lemon garlic mix. They cook in similar times and will soak up the flavors nicely. - Vegan alternatives for a similar recipe: For a plant-based option, use tofu or tempeh. Marinate them in the same honey lemon garlic mix. Bake or grill them just like you would the salmon. This will give you a similar sweet and tangy taste while keeping it vegan. For the full recipe, check out the guidelines I provided earlier. Enjoy experimenting with these variations! To keep your honey lemon garlic salmon fresh, store it in the fridge. Place leftovers in an airtight container. This helps keep the salmon moist and flavorful. Ideally, eat it within three days for the best taste. If you want to save it for longer, consider freezing it. For freezing salmon, make sure it's completely cool. Wrap each piece in plastic wrap, then place it in a freezer bag. Remove as much air as possible to prevent freezer burn. You can freeze it for up to two months. When you’re ready to eat, thaw it in the fridge overnight. Reheating salmon can be tricky. You don't want to dry it out. The best method is to use the oven. Preheat it to 300°F (150°C). Place the salmon on a baking sheet and cover it with foil. Heat for about 10-15 minutes. This keeps it moist and tasty. You can also use the microwave, but be careful. Set it at a low power level. Heat in short bursts, checking often. Serve it right after reheating for the best taste. Enjoy your meal! What is the best type of salmon to use? I recommend using wild-caught salmon. It has richer flavor and better texture. Sockeye and king salmon are both great choices. They are firm and hold up well during cooking. Farmed salmon is also fine but may be fattier. Can I prepare the glaze in advance? Yes, you can make the glaze ahead of time. Just mix honey, lemon juice, and garlic. Store it in the fridge for up to two days. When you're ready to cook, simply take it out and use it. How do I know when the salmon is fully cooked? Look for a few signs. The salmon should be opaque and flake easily with a fork. An internal temperature of 145°F (63°C) means it's done. If you’re unsure, use a food thermometer for accuracy. Can I use bottled lemon juice instead of fresh? You can use bottled lemon juice, but fresh is best. Fresh lemon juice has a brighter taste. Bottled juice can be more tart or less flavorful. If you must use bottled, choose a high-quality brand for the best effect. Nutritional benefits of salmon and the ingredients used Salmon is packed with omega-3 fatty acids, which are good for your heart. It also has high protein and vitamins like B12. Honey adds natural sweetness and antioxidants. Garlic offers health benefits like boosting the immune system. Is honey lemon garlic salmon suitable for special diets? Yes, this dish fits many diets. It is gluten-free and low-carb. If you are vegan, you can substitute salmon with tofu or chickpeas. Just adjust the cooking time to fit the new ingredients. For those watching sugar, you can reduce the honey amount. For the full recipe, check out the Honey Lemon Garlic Salmon section! This blog post explored how to make a delicious honey lemon garlic salmon. We covered required ingredients, preparation, and cooking steps to get it just right. I shared some tips for perfect texture and presentation. You also learned variations and storage methods for leftovers. Enjoy trying this recipe in your kitchen! With practice, you'll impress your family with a tasty, healthy meal.](https://dailydishlab.com/wp-content/uploads/2025/07/2945a810-a7cd-4e48-9023-917694da23c6-768x768.webp)
![- 1 pound gnocchi (store-bought or homemade) - 1 cup cherry tomatoes, halved - 1 zucchini, sliced into half-moons - 1 bell pepper (red or yellow), chopped - 1 cup broccoli florets - 2 tablespoons olive oil - 2 cloves garlic, minced - 1 teaspoon Italian seasoning - Salt and pepper to taste - 1/4 cup grated Parmesan cheese (optional) - Fresh basil leaves for garnish To make Easy Sheet Pan Gnocchi Primavera, gather these simple ingredients. Start with gnocchi, which you can find at any store. The cherry tomatoes add sweetness. Zucchini and bell pepper give texture and color. Broccoli adds a crunch, balancing the dish. For seasoning, olive oil helps cook the veggies and gnocchi. Garlic brings a bold flavor. Italian seasoning adds a classic taste. Salt and pepper enhance all the flavors. Don’t forget the Parmesan cheese for creaminess! Fresh basil leaves make a lovely garnish. Once you have all your ingredients, you’re ready to create a delicious meal! For the complete recipe, check out the [Full Recipe]. - Step 1: Preheat your oven to 425°F (220°C). This helps cook the gnocchi right. - Step 2: Combine gnocchi, cherry tomatoes, zucchini, bell pepper, and broccoli on a baking sheet. Make sure they mix well for even cooking. - Step 3: Drizzle olive oil and add minced garlic, Italian seasoning, salt, and pepper. This adds great flavor to the dish. - Step 4: Toss and spread everything evenly on the baking sheet. This helps all the ingredients cook at the same time. - Step 5: Roast for 20-25 minutes, stirring halfway through. This step ensures a nice golden color. - Step 6: Sprinkle with Parmesan cheese and garnish with basil before serving. This makes your dish look and taste amazing. Follow these steps closely for a delicious Easy Sheet Pan Gnocchi Primavera. For the full recipe, check out the section above. - Cook gnocchi until golden brown and vegetables are tender. This adds great flavor. - Use parchment paper for easier cleanup. It saves time and keeps your pan clean. - Add red pepper flakes for heat. It gives a nice kick to the dish. - Try different herbs like thyme or rosemary for varied flavor. Fresh herbs can brighten your meal. - Serve directly from the sheet pan for a casual meal. This makes for easy serving and a fun vibe. - Pair with a side salad for a balanced dinner. A light salad complements the warm gnocchi well. For the complete details, check out the Full Recipe. {{image_2}} You can change up the veggies based on your taste. Try replacing the broccoli with asparagus or green beans. These veggies add crunch and flavor. For more greens, toss in baby spinach or kale. They cook down nicely and boost nutrition. Want more protein? You can add cooked chicken, shrimp, or tofu. These ingredients make the dish heartier. If you prefer a vegetarian option, mix in cannellini beans. They are creamy and fill you up. If you want a healthier twist, consider using cauliflower gnocchi. Whole wheat gnocchi is another great option. If gnocchi is not available, try other types of dumplings. They can add a fun new taste to your meal. For the full recipe, check out the Easy Sheet Pan Gnocchi Primavera. To store leftovers, place them in an airtight container. This keeps them fresh. You can keep them in the fridge for up to three days. If you want to save them longer, freeze portions. Use freezer-safe bags or containers. Label them with the date. They can last up to three months in the freezer. To reheat gnocchi, use the oven for best texture. Preheat the oven to 350°F (175°C). Place the gnocchi on a baking sheet. Heat for about 10-15 minutes. Stir halfway through to warm evenly. If you use a microwave, put the gnocchi in a bowl. Heat for 1-2 minutes, stirring once. Be careful not to overheat, as it can change the texture. For easy weeknight meals, prepare ingredients in advance. Chop vegetables and store them in the fridge. You can also cook the gnocchi ahead of time. Keep sauces and garnishes separate to keep them fresh. This way, you can mix and match ingredients as needed. Use these tips to enjoy quick meals all week. If you want to see the full recipe, check the link. Can I use frozen gnocchi for this recipe? Yes, you can use frozen gnocchi. Just toss them straight on the sheet pan. They will cook well and taste great. No need to thaw them first. How can I make this vegan-friendly? To make this dish vegan, skip the Parmesan cheese. You can use nutritional yeast for a cheesy flavor. Also, check that your gnocchi is egg-free. What’s the best way to tell when the vegetables are done? The best way is to check their color and texture. They should be bright and tender, but not mushy. You can poke them with a fork to test. Can I add more vegetables or change the quantities? Absolutely! Feel free to add more veggies like carrots or mushrooms. Just remember to keep the total amount similar so everything cooks evenly. What can I serve with Easy Sheet Pan Gnocchi Primavera? This dish goes well with a fresh salad. You can also serve garlic bread or a light soup. They add flavors and make the meal more filling. How do I store leftovers for the next day? To store leftovers, place them in an airtight container. Keep them in the fridge for up to three days. Reheat in the oven or microwave before serving. This recipe shows how to make a simple sheet pan gnocchi dish. We covered all the main ingredients, seasonings, and step-by-step cooking directions to ensure success. Remember to customize your meal with different veggies, proteins, or gnocchi types. After a quick roast, you can have a delicious dinner ready. Keep it fresh with storage tips for leftovers. Enjoy your cooking and make this dish your own. Each bite is packed with flavor and fun. Happy cooking!](https://dailydishlab.com/wp-content/uploads/2025/07/51139aef-520e-4271-91ea-5c6754dfc759-768x768.webp)

![For these tasty bowls, you need: - 2 boneless, skinless chicken breasts - 1 cup jasmine rice - 1 cucumber, thinly sliced - 1 carrot, julienned - Fresh cilantro leaves for garnishing - Lime wedges for serving - Sliced red chili (optional, for heat) These ingredients create a base full of flavor and texture. The chicken offers protein, while the jasmine rice adds a nice touch of sweetness. The veggies give crunch and freshness. The marinade brings all the flavors together. Here’s what you need: - 3 tablespoons fish sauce - 2 tablespoons honey - 1 tablespoon soy sauce (low-sodium is fine) - 2 cloves garlic, minced - 1 tablespoon fresh ginger, grated - 1/2 teaspoon black pepper This mix makes the chicken tender and packed with taste. Fish sauce adds a salty depth, while honey balances it with sweetness. Garlic and ginger provide warmth and depth. Feel free to add more veggies to your bowls. Some great options include: - Bell peppers, sliced - Snap peas, trimmed - Radishes, thinly sliced You can also switch up the garnishes. Consider adding: - Chopped green onions - Sesame seeds - Fresh mint leaves These additions enhance the meal's look and flavor. They also add extra nutrients, making your meal even better. For the full recipe, check out the Vietnamese Chicken Meal Prep Bowls section. To start, you need to make the marinade. In a mixing bowl, whisk together: - 3 tablespoons fish sauce - 2 tablespoons honey - 1 tablespoon soy sauce - 2 cloves garlic, minced - 1 tablespoon fresh ginger, grated - 1/2 teaspoon black pepper Mix well until everything blends together. This marinade gives the chicken a great flavor. Next, add the chicken breasts to the bowl. Make sure each breast is coated with the marinade. Cover the bowl and let it sit in the fridge for at least 30 minutes. If you have time, let it marinate for up to 2 hours for more flavor. While the chicken marinates, it’s time to cook the jasmine rice. In a medium pot, combine: - 1 cup jasmine rice - 1 3/4 cups water or low-sodium chicken broth - A pinch of salt Bring the mixture to a boil over medium-high heat. Once it boils, lower the heat and cover with a lid. Let it simmer for about 15 minutes until the rice is fluffy. After cooking, keep it covered for an extra 5 minutes. This helps the rice steam and become perfect. Now, heat a non-stick skillet on medium-high heat. Add a little cooking oil once it’s hot. Carefully place the marinated chicken in the skillet. Cook each side for 6-7 minutes. You want the chicken to be golden-brown and fully cooked. Use a meat thermometer to ensure it reaches 165°F (75°C). Once cooked, take the chicken out of the skillet. Let it rest for a few minutes on a cutting board. After it rests, slice the chicken into thin strips. This makes it tender and easy to eat. Now for the fun part: assembling the bowls! Start by dividing the cooked jasmine rice into 4 airtight containers. Top each serving of rice with sliced chicken. Then, add: - Thinly sliced cucumber - Julienned carrots Garnish each bowl with fresh cilantro leaves. Place lime wedges on the side for a burst of flavor when you eat. If you like some heat, add sliced red chili on top. Allow the bowls to cool before sealing them with lids. You can store them in the fridge for up to 4 days. These meal prep bowls are perfect for quick lunches or dinners. For the complete recipe, check out the [Full Recipe]. To make meal prep easy, I like to set up a workspace. First, gather all your tools. This includes cutting boards, knives, and bowls. Having everything close by cuts down on time. I also recommend cooking in batches. Make extra rice or chicken. This way, you can use them in other meals too. To ensure juicy chicken, marinate it well. A good marinade adds flavor and moisture. I suggest marinating for at least 30 minutes. For best results, go for 2 hours. When cooking, use medium-high heat. This helps create a nice golden color. Always check the chicken's temperature. It should reach 165°F (75°C). Letting it rest after cooking is key. This keeps the juices in the meat. There are many ways to boost flavor in your meal prep bowls. Try adding fresh herbs like mint or basil. You can also squeeze lime juice over each bowl. For extra crunch, add chopped peanuts or cashews. If you like spice, toss in some sliced chili. These small touches make a big difference. For the full recipe, check out the complete guide on Vietnamese Chicken Meal Prep Bowls. {{image_4}} You can easily swap chicken for other proteins. Shrimp is a great choice. Cook the shrimp for just 2-3 minutes until they turn pink. Tofu works well too. Use firm tofu and press it first to remove extra moisture. This helps it absorb flavors. Another option is beef. Use thinly sliced flank steak instead of chicken. Cook it quickly over high heat for a tender bite. If you want a vegetarian or vegan meal prep bowl, try using tempeh or seitan. Both have a great texture and soak up flavors well. Marinate them just like the chicken. Cook tempeh for about 5-7 minutes in a skillet. For a vegan option, skip the fish sauce and use soy sauce instead. You can also add more veggies like bell peppers or mushrooms for added taste and nutrition. Make your bowls unique with different toppings. Try adding sliced radishes for crunch. You can also add avocado for creaminess. Fresh herbs like mint or basil work wonders too. For extra flavor, drizzle some sriracha or hoisin sauce on top. You can even add nuts for a tasty crunch. These simple tweaks let you enjoy a new meal every time. To see the full recipe, check out the [Full Recipe]. To keep your Vietnamese Chicken Meal Prep Bowls fresh, use airtight containers. Divide the bowls into four portions. Store rice, chicken, and veggies separately if you can. This will help maintain texture and flavor. Let the meal prep bowls cool before sealing them. This step helps prevent steam from making everything soggy. When you're ready to enjoy your meal prep bowls, use the microwave. Place a bowl in the microwave for 1-2 minutes. Stir halfway through to heat evenly. Check that the chicken reaches 165°F (75°C) before eating. If you prefer, you can reheat on the stove. Just add a splash of water to prevent sticking. These bowls last for up to four days in the fridge. After that, the flavors may fade. Always check for any off smells or changes in color before eating. If you want to store them longer, consider freezing. Just make sure to label them, so you know what's inside. Enjoy your delicious meal prep with confidence! To make Vietnamese Chicken Meal Prep Bowls, start with chicken breasts. First, mix fish sauce, honey, soy sauce, garlic, ginger, and black pepper in a bowl. This creates a tasty marinade. Coat the chicken in this marinade and let it sit for 30 minutes in the fridge. While it marinates, cook jasmine rice in water or broth for about 15 minutes. Heat a skillet, add oil, and cook the chicken for 6-7 minutes on each side until it’s golden and reaches 165°F. Slice the chicken and assemble the bowls with rice, chicken, cucumber, and carrots. Don’t forget the cilantro and lime! For more details, check the Full Recipe. Vietnamese Chicken Meal Prep Bowls pair well with light sides. Here are some great choices: - Steamed broccoli - Pickled vegetables - Fresh spring rolls - Asian-style slaw - Edamame These sides add color and different textures to your meal. They also keep the meal fresh and exciting. Yes, you can freeze Vietnamese Chicken Meal Prep Bowls. Just make sure to cool them completely before sealing them in airtight containers. They can last in the freezer for up to three months. When you want to eat them, thaw them in the fridge overnight and reheat in the microwave. This keeps your meal fresh and tasty. Vietnamese Chicken Meal Prep Bowls are healthy and balanced. Here is a rough idea of the nutrition per serving: - Calories: 400 - Protein: 30g - Carbohydrates: 45g - Fat: 10g - Fiber: 3g - Sugar: 6g This dish provides protein, carbs, and healthy fats. You can adjust ingredients for your dietary needs. In this blog post, we covered the key ingredients and step-by-step instructions for making Vietnamese Chicken Meal Prep Bowls. We discussed marinades and cooking tips to ensure great flavor. You can also explore various protein options and learn how to store and reheat these bowls effectively. These meal prep bowls are easy to customize and perfect for busy days. With simple steps and tasty ingredients, you can enjoy delicious, healthy meals throughout the week. Happy cooking!](https://dailydishlab.com/wp-content/uploads/2025/06/450469d4-7878-479c-828a-ae6f4f51905d-768x768.webp)