TikTok Salmon Rice Bowls Flavorful and Simple Recipe

Looking to impress at dinner or spice up your meal prep? TikTok Salmon Rice Bowls are both flavorful and super simple to make! This dish combines fresh salmon, sushi rice, and vibrant veggies, all beautifully arranged. Follow my easy step-by-step guide, and you’ll whip up this trendy favorite in no time. Let’s dive into the delightful world of salmon rice bowls that everyone is raving about!
Why I Love This Recipe
- Quick and Easy: This recipe comes together in just 45 minutes, making it perfect for a weeknight dinner or a quick lunch.
- Fresh Ingredients: Utilizing fresh salmon and vibrant veggies ensures a nutritious meal packed with flavor and health benefits.
- Customizable: The bowl can be easily adapted to include your favorite toppings or ingredients, allowing for endless variations.
- Deliciously Inspiring: With its beautiful presentation and delicious taste, this recipe is sure to impress family and friends alike!
Ingredients
List of Main Ingredients
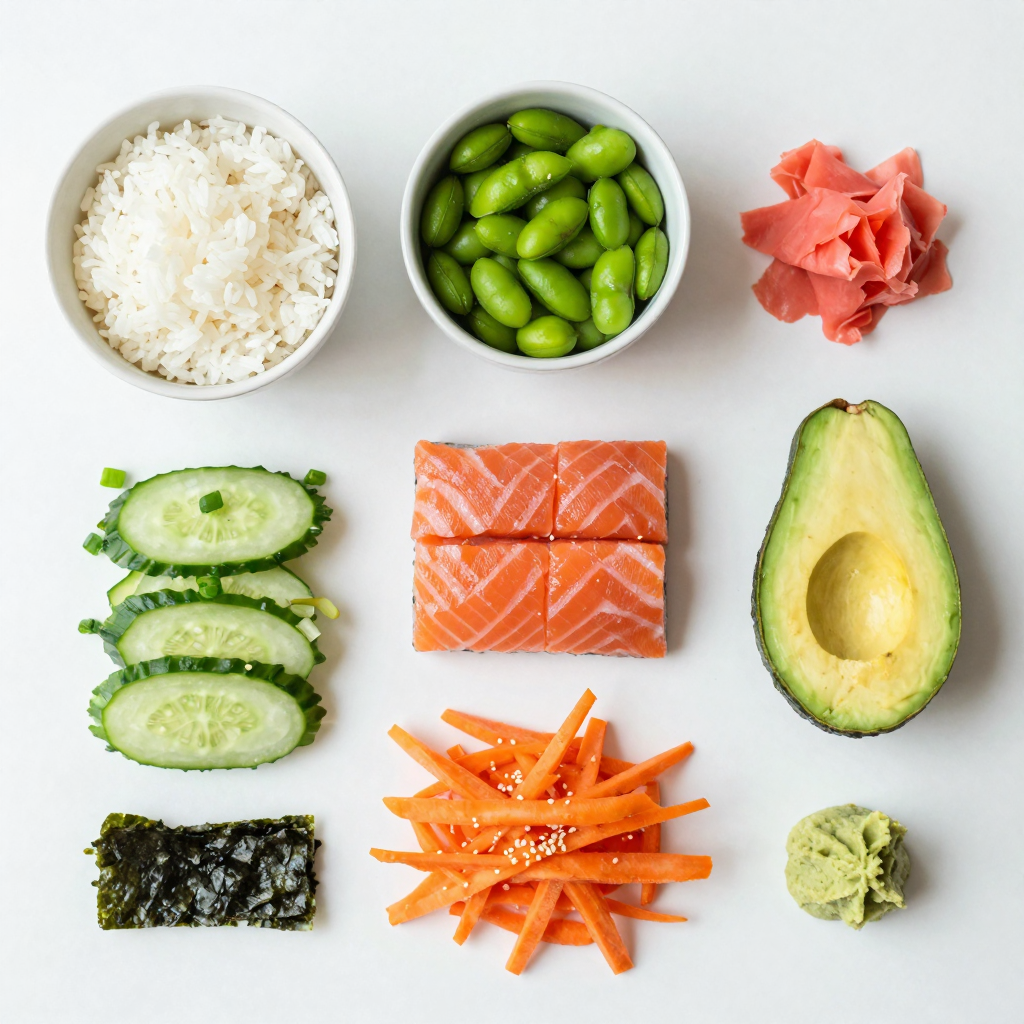
- 1 cup sushi rice
- 1 ¼ cups water
- 8 ounces fresh salmon fillet, skin removed
- 1 tablespoon soy sauce
- 1 teaspoon sesame oil
- 1 avocado, sliced
- 1 small cucumber, julienned
- 1 cup edamame (shelled)
- 1 carrot, grated
- 2 green onions, chopped
- 1 tablespoon sesame seeds
Optional Ingredients
- Pickled ginger
- Seaweed sheets, cut into strips
- Wasabi

Step-by-Step Instructions
Cooking the Sushi Rice
To cook the sushi rice, rinse it under cold water. Keep rinsing until the water runs clear. This step removes excess starch. In a medium saucepan, combine the rinsed rice and water. Bring this mixture to a boil over medium-high heat.
Once boiling, reduce the heat to low and cover with a lid. Cook for 15-18 minutes or until all the water is absorbed. After cooking, remove it from the heat and let it sit, still covered, for 10 minutes. This resting time makes the rice fluffy.
Marinating the Salmon
While the rice cooks, cut the salmon fillet into bite-sized cubes. In a small bowl, mix the soy sauce and sesame oil. Pour this marinade over the salmon cubes. Let it marinate for about 10-15 minutes. This step adds a deep flavor to the salmon.
Preparing the Vegetables
For the vegetables, slice the avocado thinly. Julienne the cucumber into thin strips. Grate the carrot finely. If your edamame is not shelled, do that now. These fresh veggies add crunch and color to the bowl.
Assembling the Bowls
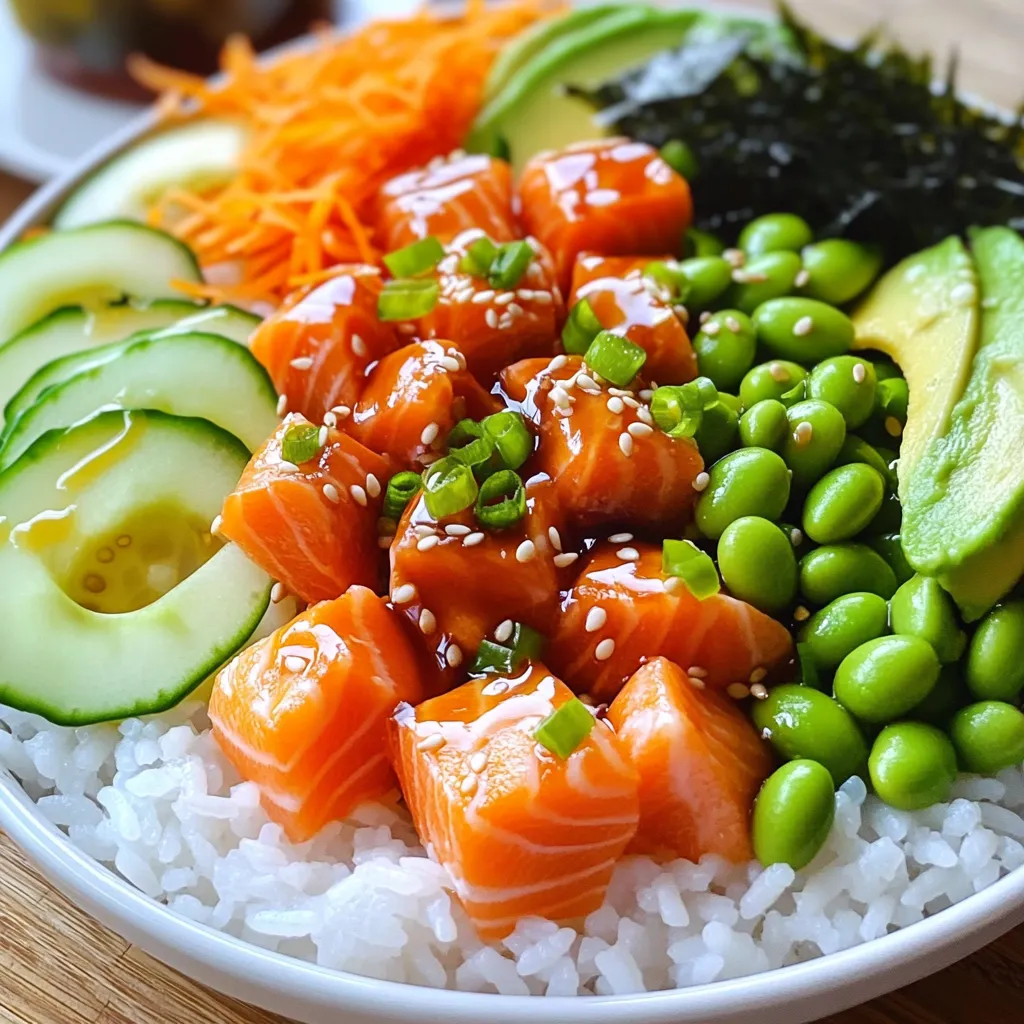
Once the rice is cooked, fluff it with a fork. Divide the rice evenly among your serving bowls. Next, arrange the marinated salmon, avocado slices, cucumber, edamame, and grated carrot on top of the rice. Make it look colorful and inviting.
Garnishing and Serving
To finish, sprinkle chopped green onions and sesame seeds over the bowls. Add pickled ginger and strips of seaweed on the side for extra flavor. If you like spice, offer a small dollop of wasabi with each bowl.
Your TikTok salmon rice bowl is now ready to enjoy! Each bite brings a burst of flavor and freshness.
Pro Tips
- Choosing the Right Rice: Use short-grain sushi rice for the best texture. It becomes sticky when cooked, which is essential for forming a good rice base for your bowl.
- Salmon Freshness: Always select the freshest salmon you can find, preferably sashimi-grade, for the best flavor and safety since it will be served raw.
- Marinating Time: Don’t marinate the salmon for too long; 10-15 minutes is sufficient to enhance the flavor without compromising its texture.
- Garnishing Ideas: Feel free to customize your toppings! Try adding radish slices, pickled vegetables, or even a drizzle of spicy mayo for extra flavor.
Tips & Tricks
Perfecting the Sushi Rice
To make perfect sushi rice, rinse it well. Start by washing it in cold water. Swirl the rice in a bowl until the water is cloudy. Drain the water and repeat this until it runs clear. This step is key to removing excess starch. After rinsing, combine the rice with water in a saucepan. Use a 1:1.25 rice-to-water ratio for the best results. Bring it to a boil, then reduce the heat. Cover and let it cook for 15-18 minutes. After cooking, let it sit covered for 10 more minutes. This resting time helps the rice finish cooking.
Salmon Options
If you can’t find fresh salmon, don’t worry! You can use frozen salmon. Just ensure it is fully thawed before cooking. Alternatively, canned salmon works well too. It adds a different texture but still tastes great. If you’re looking for a plant-based option, try marinating tofu instead. It absorbs flavors well and gives a nice texture.
Enhancing Flavor Combinations
To elevate your TikTok Salmon Rice Bowls, think about adding extra flavors. Soy sauce and sesame oil are essentials, but you can add more. Try mixing in some sriracha for a spicy kick. A sprinkle of furikake can also add a tasty crunch. For a fresh twist, include lime juice or a bit of rice vinegar. These simple additions can really enhance your dish. Don’t forget to add pickled ginger and wasabi for a burst of flavor!
Variations
Vegan Option
You can make this dish vegan by swapping out the salmon for marinated tofu. Cut firm tofu into cubes and press it to remove extra water. Marinate it in soy sauce and sesame oil for the same flavor. You can also add extra toppings, like roasted chickpeas or grilled mushrooms. These will give great texture and taste.
Additional Protein Choices
If you prefer meat, chicken works well in this bowl. Use grilled or pan-seared chicken breast, cut into strips. Shrimp is another great option. Just sauté it until pink and opaque. Tofu is a fantastic choice, too. It absorbs flavors well and adds protein without meat.
Flavor Tweaks
Want to change up the flavor? Try a different marinade. A mix of teriyaki sauce and lime juice adds a sweet kick. You can also use a spicy mayo made from mayo and sriracha for a creamy heat. A splash of lemon juice brightens the dish, too. Experiment and find what you love!

Storage Info
Refrigeration Guidelines
You can store the assembled bowls in the fridge for up to two days. Keep them in an airtight container. If you want the best taste, eat them fresh.
Reheating Instructions
When reheating, use the microwave. Heat the rice for 30 seconds to 1 minute. For the salmon, heat in short bursts of 15 seconds. Check to avoid overcooking.
Freezing Tips
You can freeze the salmon and rice separately. Wrap them tightly in plastic wrap. Use freezer bags for easy storage. Thaw in the fridge overnight before use. Vegetables do not freeze well, so add them fresh when serving.
FAQs
How long does it take to make TikTok Salmon Rice Bowls?
It takes about 45 minutes to make these bowls. You need about 20 minutes to prep. Cooking the rice takes 15-18 minutes. Marinating the salmon takes about 10-15 minutes.
Can I use frozen salmon for this recipe?
Yes, you can use frozen salmon. Just make sure to thaw it first. Thaw the salmon in the fridge overnight for best results. If you hurry, you can place it in cold water for about an hour.
What can I substitute for sushi rice?
If you can’t find sushi rice, you can use jasmine rice or short-grain rice. These types will stick together better than long-grain rice. This helps when you eat the bowl with chopsticks.
Is it necessary to use fresh ingredients?
Fresh ingredients enhance the taste. Fresh salmon will give a better flavor than frozen. However, frozen veggies can work well. They are often frozen at peak freshness, so they still taste good.
Can I make this dish ahead of time?
You can prepare many parts ahead. Cook the rice a day before and store it in the fridge. Marinate the salmon a few hours before serving. Slice the veggies just before serving for the best crunch.
In this post, we explored how to make tasty TikTok Salmon Rice Bowls. We covered the main ingredients like sushi rice, fresh salmon, and veggies. I shared step-by-step instructions from cooking rice to garnishing the bowls. You can also explore variations, tips for best flavors, and storage info.
Enjoy making this dish with fresh ingredients and your choice of protein. It’s simple, fun, and delicious!

TikTok Salmon Rice Bowls
Ingredients
1 cup sushi rice
1 ¼ cups water
8 ounces fresh salmon fillet, skin removed
1 tablespoon soy sauce
1 teaspoon sesame oil
1 avocado, sliced
1 small cucumber, julienned
1 cup edamame (shelled)
1 carrot, grated
2 green onions, chopped
1 tablespoon sesame seeds
Pickled ginger, for garnish
Seaweed sheets, cut into strips (optional)
Wasabi, for serving (optional)
Instructions
Cook the Sushi Rice: Rinse the sushi rice under cold water until the water runs clear. In a medium saucepan, combine the rinsed rice and water, bringing it to a boil over medium-high heat. Once boiling, reduce the heat to low and cover with a lid. Cook for 15-18 minutes or until the water is absorbed. Remove from heat and let it sit covered for 10 minutes.
Marinate the Salmon: While the rice is cooking, cut the salmon fillet into bite-sized cubes. In a small bowl, mix the soy sauce and sesame oil, then pour over the salmon. Let it marinate for about 10-15 minutes.
Prep the Vegetables: While the salmon marinates, slice your avocado and julienne the cucumber. Prepare the grated carrot and shell the edamame if not already done.
Assemble the Bowls: Fluff the cooked sushi rice with a fork and evenly distribute it among serving bowls. Arrange the marinated salmon cubes, avocado slices, cucumber, edamame, and grated carrot on top of the rice.
Garnish and Serve: Sprinkle the bowls with chopped green onions and sesame seeds. Add pickled ginger and strips of seaweed on the side. For those who enjoy a kick, serve with a small dollop of wasabi.
Enjoy Your Creation: Mix everything together or enjoy each component separately for a delightful flavor explosion!
Prep Time: 20 min | Total Time: 45 min | Servings: 2

TikTok Salmon Rice Bowls
Ingredients
- 1 cup sushi rice
- 1.25 cups water
- 8 ounces fresh salmon fillet, skin removed
- 1 tablespoon soy sauce
- 1 teaspoon sesame oil
- 1 whole avocado, sliced
- 1 small cucumber, julienned
- 1 cup edamame (shelled)
- 1 whole carrot, grated
- 2 whole green onions, chopped
- 1 tablespoon sesame seeds
- to taste pickled ginger, for garnish
- to taste seaweed sheets, cut into strips (optional)
- to taste wasabi, for serving (optional)
Instructions
- Rinse the sushi rice under cold water until the water runs clear. In a medium saucepan, combine the rinsed rice and water, bringing it to a boil over medium-high heat. Once boiling, reduce the heat to low and cover with a lid. Cook for 15-18 minutes or until the water is absorbed. Remove from heat and let it sit covered for 10 minutes.
- While the rice is cooking, cut the salmon fillet into bite-sized cubes. In a small bowl, mix the soy sauce and sesame oil, then pour over the salmon. Let it marinate for about 10-15 minutes.
- While the salmon marinates, slice your avocado and julienne the cucumber. Prepare the grated carrot and shell the edamame if not already done.
- Fluff the cooked sushi rice with a fork and evenly distribute it among serving bowls. Arrange the marinated salmon cubes, avocado slices, cucumber, edamame, and grated carrot on top of the rice.
- Sprinkle the bowls with chopped green onions and sesame seeds. Add pickled ginger and strips of seaweed on the side. For those who enjoy a kick, serve with a small dollop of wasabi.
- Mix everything together or enjoy each component separately for a delightful flavor explosion!


![To make this creamy spinach stuffed salmon, you need simple and fresh ingredients. Here’s what you will use: - 4 salmon fillets, skinless - 2 cups fresh spinach, chopped - 1 cup cream cheese, softened - 1/2 cup feta cheese, crumbled - 1/4 cup grated Parmesan cheese - 2 cloves garlic, minced - 1 tablespoon olive oil - 1 teaspoon lemon juice - Salt and pepper to taste These ingredients create a rich, flavorful filling that pairs perfectly with salmon. The cream cheese adds creaminess, while feta offers tang. Spinach gives a fresh taste. Adding garnishes makes the dish look great and taste even better. Here are some options: - Fresh dill or parsley - Lemon wedges These garnishes add color and freshness. They also enhance the flavor of your dish. Having the right tools helps make cooking easier. You will need: - A skillet - A mixing bowl - A baking dish - Toothpicks (if needed) - A knife These tools help you prepare and cook the salmon. They ensure everything goes smoothly. If you want to see the full recipe, check it out here: [Full Recipe]. To start, gather your ingredients. You need: - 4 salmon fillets, skinless - 2 cups fresh spinach, chopped - 1 cup cream cheese, softened - 1/2 cup feta cheese, crumbled - 1/4 cup grated Parmesan cheese - 2 cloves garlic, minced - 1 tablespoon olive oil - 1 teaspoon lemon juice - Salt and pepper to taste - Fresh dill or parsley, for garnish First, preheat your oven to 375°F (190°C). This step helps cook the salmon evenly. Next, heat a skillet over medium heat. Add the olive oil and sauté minced garlic for about 1 minute. You want it fragrant but not burnt. Then, add the chopped spinach to the skillet. Cook until it wilts, which takes about 2-3 minutes. Remove the skillet from heat and let the spinach cool a bit. In a bowl, mix the softened cream cheese, feta cheese, grated Parmesan, sautéed spinach, lemon juice, salt, and pepper. Stir until combined, creating a creamy filling. Now, take your salmon fillets and place them on a cutting board. Make a slit in the side of each fillet. This creates a pocket for your filling. Next, generously fill each pocket with the creamy mixture. If needed, use toothpicks to secure the openings. Place the stuffed salmon fillets in a lightly greased baking dish. Bake in the preheated oven for 20-25 minutes. The salmon should cook through and flake easily with a fork. This timing ensures a moist and flavorful dish. To ensure you cook the salmon just right, use a meat thermometer. The internal temperature should reach 145°F (63°C). This helps you avoid overcooking, which can make the fish dry. Let the salmon rest for a few minutes after baking. This allows the juices to redistribute. For a beautiful finish, garnish with fresh dill or parsley. Serve it on a bed of sautéed asparagus or a light salad for a colorful plate. Enjoy your creamy spinach stuffed salmon! If you want the full recipe, check out the [Full Recipe]. When picking salmon, freshness is key. Look for bright, shiny skin without any brown spots. The flesh should be firm and spring back when you press it. Wild-caught salmon often has a richer taste than farmed salmon. If you can, ask your fishmonger for the best catch of the day. You can prepare this dish ahead for a busy weeknight. Make the creamy spinach filling and stuff the salmon up to one day before cooking. Wrap the salmon tightly in plastic wrap and store it in the fridge. This way, the flavors meld nicely. Just bake it when you’re ready to eat! Avoid these pitfalls for the best results. First, do not overstuff the salmon. Too much filling can make it hard to cook evenly. Second, don’t skip the resting time after baking. Letting it rest helps the juices settle. Lastly, be careful not to overcook the salmon. It should flake easily but still be moist. Enjoy your delicious meal! {{image_2}} You can switch up the cheeses in this recipe. Cream cheese gives a rich taste. Feta adds a nice tang. You can try goat cheese for a creamy twist. Mozzarella works well for a mild flavor. Each cheese brings a unique taste to the dish. Want to make this dish lighter? Use low-fat cream cheese. You can also swap out feta for a lower-fat cheese. Instead of olive oil, try using a cooking spray. This will cut down on extra calories while keeping the flavors intact. Adding fresh herbs can boost the dish's taste. Try basil or thyme for a fresh kick. A sprinkle of red pepper flakes adds heat if you want spice. For a zesty touch, squeeze more lemon juice before serving. These simple changes bring new life to the salmon. For the full recipe, check the details above. To store leftovers of creamy spinach stuffed salmon, let it cool first. Place the salmon in an airtight container. Keep it in the fridge for up to three days. This helps maintain its flavor and texture. If you have extra stuffing, store it in a separate container. Reheat the salmon gently to avoid drying it out. Preheat your oven to 350°F (175°C). Place the salmon on a baking sheet. Cover it with foil to keep moisture in. Heat for about 10-15 minutes. You can also use a microwave. Heat it on low power in short intervals. Check to ensure it warms evenly. You can freeze creamy spinach stuffed salmon for longer storage. Wrap each piece tightly in plastic wrap. Then, place it in a freezer-safe bag. It can last for up to three months in the freezer. To thaw, move it to the fridge overnight before reheating. This keeps the salmon moist and tasty. For the best results, avoid refreezing after thawing. Yes, you can use frozen salmon. Just make sure to thaw it first. Place it in the fridge overnight or submerge it in cold water for faster thawing. Frozen salmon works well, but fresh salmon gives the best flavor and texture. You can pair this dish with many sides. Here are a few ideas: - Sautéed asparagus - Lemon rice - Garlic mashed potatoes - A light salad with vinaigrette - Steamed broccoli These sides will balance the rich flavors of the salmon. To check if salmon is cooked, look for a few signs: - The flesh should be opaque and flake easily with a fork. - The internal temperature should reach 145°F (63°C). - The color should change from bright pink to pale pink. These tips will help ensure your salmon is safe and tasty. For the full recipe, check the details above. In this article, we covered how to make creamy spinach stuffed salmon. We looked at key ingredients, preparation, and baking steps. I shared tips for choosing the best salmon, making ahead, and avoiding common mistakes. You also learned about tasty cheese swaps and ways to enhance flavor. Lastly, I explained how to store, reheat, and freeze leftovers. Enjoy this dish that combines ease and flavor. With practice, you’ll master it!](https://dailydishlab.com/wp-content/uploads/2025/07/597501d1-48c7-4a9b-bedb-1c262109b33c-768x768.webp)


![- 4 large russet potatoes - 2 cups broccoli florets, chopped - 1 cup sharp cheddar cheese, grated - 1/2 cup cream cheese, softened - 1/4 cup sour cream - 2 tablespoons butter - 1 garlic clove, minced - Salt and pepper to taste - 1/4 teaspoon paprika (optional) - Green onions, chopped (for garnish) The main ingredients for broccoli cheddar stuffed potatoes are simple and fresh. Russet potatoes are perfect because they are fluffy and hold up well. Broccoli adds a nice crunch and color. Sharp cheddar cheese gives a bold flavor, while cream cheese and sour cream add creaminess. Butter and garlic bring richness and aroma. - Additional toppings (bacon bits, chives) - Alternative cheese options You can play with the toppings. Bacon bits add a savory touch. Chives lend a fresh, onion-like flavor. You may also swap cheese types if you prefer. Try mozzarella or pepper jack for a twist. This recipe is flexible, so feel free to make it your own! 1. Preheat your oven to 425°F (220°C). This helps the potatoes cook evenly. 2. Scrub the russet potatoes under running water. This removes dirt and makes them clean. 3. Pierce each potato several times with a fork. This lets steam escape as they bake. 4. Place the potatoes on a baking sheet. Bake them for 45-60 minutes. They are done when tender. 1. While the potatoes bake, steam the broccoli florets for 3-4 minutes. They should look bright green and tender. 2. Drain the broccoli and set it aside. This keeps it from getting too soggy. 3. In a mixing bowl, combine the steamed broccoli, sharp cheddar cheese, cream cheese, sour cream, butter, and minced garlic. 4. Stir everything together until it’s well mixed and coated. Add salt and pepper to taste. This mixture is the heart of the dish. 1. When the potatoes are cooked, take them out of the oven. Let them cool for a few minutes. 2. Cut each potato in half lengthwise. Be careful; they will be hot! 3. Scoop out some of the potato flesh with a spoon. Place this in a separate bowl. Don’t scoop out too much; leave some for structure. 4. Mash the scooped-out potato flesh with a fork until it’s smooth. 5. Add this mashed potato back to the broccoli and cheese mixture. Stir until everything is combined. 6. Spoon the broccoli-cheese filling back into the potato skins. Heap it on top for a nice look. 7. Return the filled potatoes to the oven. Bake for an additional 15 minutes. The tops should be golden and the cheese melted. 8. Take them out of the oven and let them cool slightly. Garnish with chopped green onions before serving. For the complete details, check the Full Recipe. Enjoy your delicious Broccoli Cheddar Stuffed Potatoes! To know when your potatoes are done, pierce them with a fork. If it slides in easily, they’re ready. For best results, bake large russet potatoes for 45-60 minutes at 425°F (220°C). When you scoop out the flesh, leave some inside the skins. This helps the potato hold its shape. It also keeps the skins from getting too crispy. A little potato left adds flavor and texture to your filling. To boost flavor, consider adding spices like garlic powder or onion powder. A sprinkle of paprika gives a nice touch. You can also mix in some herbs, like thyme or chives, for a fresh taste. For a creamy filling, use both cream cheese and sour cream. This combo creates a rich texture. Mixing in some melted butter also adds a lovely smoothness to the filling. Serve your stuffed potatoes on a colorful plate. This makes the dish look inviting. You can drizzle a bit of sour cream on the side. It adds extra creaminess and looks nice too. Garnish with chopped green onions for a pop of color. They add a fresh crunch that pairs well with the soft filling. For an extra touch, you can even sprinkle some cheese on top before serving. Enjoy these tips to make your broccoli cheddar stuffed potatoes not just tasty, but a feast for the eyes! Don't forget to check out the Full Recipe for complete instructions. {{image_2}} If you want a vegan version, swap dairy ingredients for plant-based options. Use vegan cheese instead of cheddar. Replace cream cheese and sour cream with cashew cream or tofu. These changes keep the flavor while making it dairy-free. For gluten-free needs, ensure you pick gluten-free cheese. Most cheeses are safe, but always check labels. You can also serve the filling in a bowl without the potato skin. This way, you enjoy all the flavors without gluten. Adding protein can make this dish heartier. Try cooked chicken or crispy bacon for extra flavor. Chop them up and mix them into the filling. This will add a tasty twist and make it more filling. You can also change up the veggies! Spinach and bell peppers work well. Chop them finely and add them to the broccoli mix. This adds color and nutrition to the dish, making it even better. Want to save time? You can use an air fryer. Just set it to 375°F (190°C) and cook the potatoes for about 30 minutes. This method gives you a crispy skin and soft inside. For a hands-off approach, try a slow cooker. Place the potatoes in the cooker, add a bit of water, and cook on low for 6-8 hours. This way, they cook while you do other things. Just be sure to check for doneness before serving. For the full recipe, check out the details above. To store your leftover broccoli cheddar stuffed potatoes, place them in an airtight container. This keeps them fresh and tasty in the fridge. Make sure to cool them down before sealing the container. They can stay in the fridge for about 3 to 5 days. If you want to save some for later, freezing is a great option. Wrap each stuffed potato tightly in plastic wrap, then place them in a freezer bag. This method helps prevent freezer burn. You can freeze them for up to 3 months. When it's time to heat up your stuffed potatoes, the best method is to use the oven. Preheat your oven to 350°F (175°C). Place the potatoes on a baking sheet and cover them with foil. This keeps moisture in and prevents drying out. Heat for about 20-25 minutes or until they are hot all the way through. You can also use a microwave if you're in a hurry. Simply place a potato on a microwave-safe plate and cover it with a damp paper towel. Heat for 2-3 minutes, checking often to avoid overcooking. These stuffed potatoes can last in the fridge for about 3 to 5 days. If you freeze them, they can last for 3 months. Look for signs of spoilage, like a sour smell or mold, before eating. If they don't smell right, it's best to toss them. Enjoying your delicious broccoli cheddar stuffed potatoes fresh is always the best way! For the complete recipe, see the [Full Recipe]. Baking the potatoes takes about 45 to 60 minutes. Start by preheating your oven to 425°F (220°C). Scrub the potatoes well and pierce them several times with a fork. This step helps steam escape while they bake. Place the potatoes on a baking sheet and let them bake until they feel soft when you poke them with a fork. The exact time can depend on the size of your potatoes. Larger ones might take a bit longer. Yes, you can prepare these stuffed potatoes ahead of time. Bake the potatoes and prepare the filling. Store the potato skins and filling separately in the fridge. When you are ready to eat, simply fill the skins and bake them. This method saves you time on busy days. You can even prepare everything a day before. Just reheat the filling if it has cooled down too much. Stuffed potatoes pair well with many side dishes. A simple green salad adds freshness and crunch. You can also serve them with roasted vegetables for extra flavor. If you want protein, grilled chicken or a side of beans works well too. For a heartier meal, consider adding a warm soup. Tomato soup or a creamy broccoli soup complements the stuffed potatoes nicely. Absolutely, you can make these potatoes vegetarian. Use plant-based cream cheese and sour cream for the filling. You can also swap the cheddar cheese for a dairy-free alternative. This way, you keep the creamy texture and rich flavor. Ensure all your ingredients are labeled vegetarian. This dish remains delicious and satisfying without meat. This blog post detailed how to make tasty stuffed potatoes. We covered the key ingredients, preparation steps, and helpful tips. You learned ways to enhance flavor and explore easy variations. Stuffed potatoes are versatile, healthy, and fun to make. You can enjoy them as a side dish or a main meal. With these ideas, you can create your own unique version. Enjoy cooking and sharing this delicious dish!](https://dailydishlab.com/wp-content/uploads/2025/06/cd67da25-e7a2-45e2-aa83-3a832e7f2c3d-768x768.webp)