Triple Chocolate Brownie Bites Rich and Decadent Treat

If you love rich desserts, you must try these Triple Chocolate Brownie Bites. They are packed with semi-sweet, milk, and white chocolate, creating a treat you can’t resist. I’ll guide you through simple steps to make these bites at home. You’ll impress your friends and family with this easy dessert. Get ready to indulge in chocolate bliss! Let’s dive into the deliciousness!
Why I Love This Recipe
- Decadent Flavor: These brownie bites are rich and chocolatey, combining three types of chocolate for an indulgent treat.
- Perfectly Chewy: The baking time ensures that these brownie bites remain chewy on the inside, making each bite satisfying.
- Easy to Make: With simple ingredients and quick preparation, these brownie bites can be whipped up in no time.
- Impressive Presentation: Serving them on a tiered cake stand with garnishes elevates their appeal for any occasion.
Ingredients
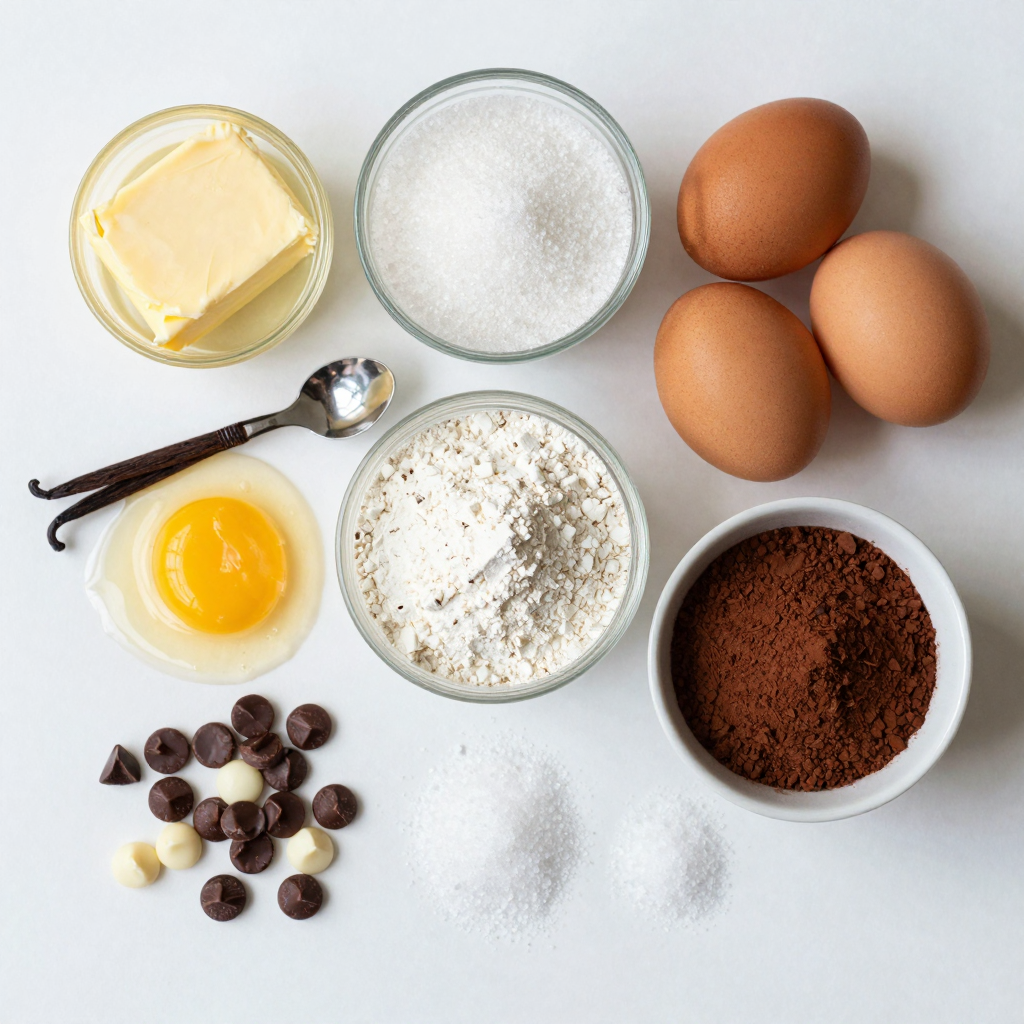
To make the best Triple Chocolate Brownie Bites, you need simple, quality ingredients. Here’s what you’ll need:
- 1/2 cup unsalted butter
- 1 cup granulated sugar
- 2 large eggs
- 1 teaspoon vanilla extract
- 1/3 cup all-purpose flour
- 1/2 cup cocoa powder
- 1/4 teaspoon salt
- 1/4 teaspoon baking powder
- 1/2 cup semi-sweet chocolate chips
- 1/2 cup white chocolate chips
- 1/2 cup milk chocolate chips
These ingredients create a rich, fudgy treat that melts in your mouth. Using unsalted butter gives you control over the saltiness. Granulated sugar adds sweetness and helps with the texture.
Large eggs bind the mix together, while vanilla extract enhances the flavor. All-purpose flour and cocoa powder provide the base, giving the bites a lovely chocolate taste.
Salt balances the sweetness, and baking powder adds a little lift. The semi-sweet, white, and milk chocolate chips mix in for extra flavor and texture. This blend creates a delightful contrast.Enjoy creating these amazing brownie bites!

Step-by-Step Instructions
Preparing the Oven and Pan
First, preheat your oven to 350°F (175°C). This helps the brownie bites cook evenly. While the oven heats up, grab a mini muffin pan. You can line it with mini muffin liners or grease it with cooking spray. Greasing helps the brownie bites come out easily.
Mixing Wet Ingredients
Next, let’s melt the butter. Put it in a medium saucepan over low heat. Stir it as it melts. Once it’s all liquid, take it off the heat. Now, add the granulated sugar. Mix until it looks smooth. After that, let it cool a little. Then, add the eggs and vanilla extract. Stir until everything is well combined.
Combining Dry Ingredients
In a separate bowl, sift together the all-purpose flour and cocoa powder. This step makes sure there are no lumps. Add the salt and baking powder too. Now, slowly mix this dry mixture with the wet ingredients. Stir gently until just combined. You don’t want to overmix here.
Baking the Brownie Bites
Now it’s time to fill the muffin pan. Spoon the brownie batter into each cup. Fill them about 3/4 full for the best rise. Place the pan in the preheated oven. Bake for 10-12 minutes. To check if they are done, insert a toothpick into the center. If it comes out with a few moist crumbs, they are ready. Be careful not to overbake; you want them chewy. After baking, let them cool in the pan for about 5 minutes. Then, transfer them to a wire rack to cool completely.
Pro Tips
- Butter Temperature: Make sure the butter is just melted and not hot when mixing with sugar. This helps achieve a smooth batter without cooking the eggs.
- Mixing Technique: Avoid overmixing the batter once you add the dry ingredients. This keeps the brownie bites chewy and avoids a cakey texture.
- Cooling Time: Allow the brownie bites to cool in the pan for a few minutes before transferring to a wire rack. This helps them set and prevents breaking apart.
- Chocolate Chip Varieties: Feel free to mix different types of chocolate chips or even add nuts for extra texture and flavor!
Tips & Tricks
Achieving the Perfect Texture
To get that chewy texture, avoid overbaking. Check your brownie bites a bit early. A toothpick should come out with a few moist crumbs. This shows they are done but not too dry.
Using room temperature ingredients is key. It helps the butter and sugar blend well. This makes a smoother batter that bakes evenly.
Enhancing Flavor
You can always add extra chocolate chips to boost flavor. Mixing in a bit of dark chocolate or even flavored chips can add depth.
Consider incorporating nuts or spices. Chopped walnuts or pecans add a nice crunch. A pinch of cinnamon or espresso powder can elevate the taste too.
Presentation Ideas
Serve these brownie bites on a tiered cake stand. Dust them with powdered sugar for a lovely look.
Garnish each bite with a dollop of whipped cream. A sprinkle of chocolate shavings makes them even more inviting. You can also place them in cute cupcake liners for a fun touch.

Variations
Different Chocolate Combinations
You can swap chocolate chips to change the taste of your brownie bites. Try dark chocolate chips for a richer flavor. You can also use peanut butter chips for a fun twist. For a fruity touch, consider adding raspberry-flavored chocolate. This lets you explore new flavors while keeping your base recipe intact.
Gluten-Free Alternatives
If you want gluten-free brownie bites, use gluten-free flour. Almond flour or oat flour works well. These flours provide a nice texture and taste. You can also find gluten-free chocolate chips. Just check the label to ensure they meet your needs. This way, everyone can enjoy these bites.
Dietary Considerations
To make vegan brownie bites, replace eggs with flax eggs. Mix one tablespoon of flaxseed meal with two tablespoons of water. Let it sit for a few minutes to thicken. Use plant-based butter instead of regular butter. For a low-sugar version, use a sugar substitute like stevia. This keeps the sweetness without the extra calories.
Storage Info
Proper Cooling Techniques
Before you store your brownie bites, let them cool completely. This step helps keep them moist. I recommend cooling them on a wire rack. This allows air to circulate all around the bites. Avoid stacking them while they’re warm, as this can cause them to stick together.
When handling the brownie bites, be gentle. Use a spatula to lift them from the pan. If you try to remove them too soon, they might break apart. Wait at least five minutes after baking before removing them from the pan.
Storage Methods
You can store brownie bites at room temperature for a few days. Place them in an airtight container. If you want them to last longer, refrigerate or freeze them. For refrigeration, keep them in an airtight container for up to one week. For freezing, wrap them tightly in plastic wrap and place them in a freezer bag. They can last up to three months in the freezer.
To thaw frozen brownie bites, remove them from the freezer and let them sit at room temperature. This keeps them soft and tasty.
Shelf Life
If stored properly, brownie bites can last several days. At room temperature, they last about three days. In the fridge, you can enjoy them for a week. If frozen, they are great for about three months.
Watch for signs of spoilage. If they smell off or feel dry, it’s best to toss them. Keeping an eye on freshness ensures you enjoy the rich, decadent flavors of your triple chocolate brownie bites.
FAQs
How do I make the brownie bites chewier?
To make your brownie bites chewier, adjust your baking time. Bake them for less time. Start checking at the 10-minute mark. Remove them when a toothpick comes out with a few moist crumbs. You can also add an extra egg yolk. This adds moisture and richness.
Can I use dark chocolate instead of semi-sweet?
Yes, you can use dark chocolate instead of semi-sweet. Dark chocolate gives a richer flavor. Just make sure to adjust the sugar in the recipe. Dark chocolate is less sweet than semi-sweet. This may make your bites less sweet overall.
What should I do if my brownie bites are too dry?
If your brownie bites are dry, first check your baking time. Overbaking causes dryness. You can also add a bit more butter next time. This will add moisture. Another tip is to add an extra egg. This helps keep them soft and chewy.
Where can I buy pre-made triple chocolate brownie bites?
You can find pre-made brownie bites at many grocery stores. Look in the bakery section. Some stores may have them in the freezer aisle. You can also check online. Sites like Amazon or specialty dessert shops offer them too.
How do I reheat leftover brownie bites?
To reheat brownie bites, use your oven or microwave. For the oven, set it to 350°F (175°C). Place the bites on a baking sheet for about 5 minutes. For the microwave, heat them for 10-15 seconds. This keeps them soft and gooey. Enjoy them warm!
You now know how to make delicious triple chocolate brownie bites. We covered the key ingredients, step-by-step instructions, and helpful tips. You can personalize your brownies with different chocolate types or dietary options. Store them properly to keep them fresh. Remember, brownies should be fudgy, not dry. With these tricks, your treats will impress everyone. Enjoy baking these bites and sharing them with friends!

Triple Chocolate Brownie Bites
Ingredients
1/2 cup unsalted butter
1 cup granulated sugar
2 large eggs
1 teaspoon vanilla extract
1/3 cup all-purpose flour
1/2 cup cocoa powder
1/4 teaspoon salt
1/4 teaspoon baking powder
1/2 cup semi-sweet chocolate chips
1/2 cup white chocolate chips
1/2 cup milk chocolate chips
Instructions
Preheat your oven to 350°F (175°C). Line a mini muffin pan with mini muffin liners or grease the pan with cooking spray.
In a medium saucepan, melt the butter over low heat. Once melted, remove from heat and stir in the granulated sugar until smooth.
Allow the mixture to cool slightly, then add in the eggs and vanilla extract, mixing until well combined.
In a separate bowl, sift together the all-purpose flour, cocoa powder, salt, and baking powder. Slowly add this dry mixture to the wet ingredients, stirring until just combined.
Fold in the semi-sweet, white, and milk chocolate chips until evenly distributed throughout the batter.
Spoon the brownie batter into the prepared mini muffin pan, filling each cup about 3/4 full.
Bake in the preheated oven for 10-12 minutes, or until a toothpick inserted into the center comes out with a few moist crumbs. Be careful not to overbake as you want them chewy.
Remove from the oven and allow the brownie bites to cool in the pan for about 5 minutes, then transfer to a wire rack to cool completely.
Prep Time: 15 minutes | Total Time: 30 minutes | Servings: 24 brownie bites
– Presentation Tips: Serve these decadent brownie bites on a tiered cake stand dusted with powdered sugar. For an extra touch, garnish each brownie bite with a small dollop of whipped cream and a sprinkle of chocolate shavings. Enjoy!

Triple Chocolate Brownie Bites
Ingredients
- 0.5 cup unsalted butter
- 1 cup granulated sugar
- 2 large eggs
- 1 teaspoon vanilla extract
- 0.33 cup all-purpose flour
- 0.5 cup cocoa powder
- 0.25 teaspoon salt
- 0.25 teaspoon baking powder
- 0.5 cup semi-sweet chocolate chips
- 0.5 cup white chocolate chips
- 0.5 cup milk chocolate chips
Instructions
- Preheat your oven to 350°F (175°C). Line a mini muffin pan with mini muffin liners or grease the pan with cooking spray.
- In a medium saucepan, melt the butter over low heat. Once melted, remove from heat and stir in the granulated sugar until smooth.
- Allow the mixture to cool slightly, then add in the eggs and vanilla extract, mixing until well combined.
- In a separate bowl, sift together the all-purpose flour, cocoa powder, salt, and baking powder. Slowly add this dry mixture to the wet ingredients, stirring until just combined.
- Fold in the semi-sweet, white, and milk chocolate chips until evenly distributed throughout the batter.
- Spoon the brownie batter into the prepared mini muffin pan, filling each cup about 3/4 full.
- Bake in the preheated oven for 10-12 minutes, or until a toothpick inserted into the center comes out with a few moist crumbs. Be careful not to overbake as you want them chewy.
- Remove from the oven and allow the brownie bites to cool in the pan for about 5 minutes, then transfer to a wire rack to cool completely.

![To make no-bake chocolate oat bars, you need simple and wholesome ingredients. Here’s what you will need: - 2 cups rolled oats - 1 cup natural peanut butter (or almond butter) - 1/2 cup honey or maple syrup - 1/2 cup unsweetened cocoa powder - 1/4 teaspoon salt - 1 teaspoon vanilla extract - 1/2 cup mini chocolate chips (plus more for topping) - Optional: 1/4 cup chopped nuts (e.g., walnuts or almonds) These ingredients create a rich and tasty treat. The oats provide fiber and good nutrients. Peanut butter adds protein and healthy fats. Honey or maple syrup gives sweetness, while cocoa powder delivers that chocolate flavor we all love. Salt enhances the taste, making it all balanced. I love how easy it is to mix these ingredients together. You can customize it, too! Add nuts for crunch or swap the nut butter based on your taste. This recipe is perfect for snacks or dessert. You can find the full recipe with instructions to create these bars. Making no-bake chocolate oat bars is simple and fun. You only need a few basic steps. First, gather your ingredients. This recipe makes 16 bars, perfect for snacks or dessert. Start with a large bowl. Add 2 cups of rolled oats, 1/2 cup of cocoa powder, and 1/4 teaspoon of salt. Mix these dry ingredients well. This mixture gives the bars structure and rich flavor. In a small saucepan, add 1 cup of peanut butter and 1/2 cup of honey. Heat over low heat. Stir until smooth. This step helps the two ingredients blend nicely. Once mixed, take the pan off the heat and add 1 teaspoon of vanilla extract. Stir well to combine. Pour the warm peanut butter mix over your oat mixture. Stir until all the oats get coated. Fold in 1/2 cup of mini chocolate chips and optional chopped nuts if you like. Next, line an 8-inch square baking dish with parchment paper. Leave some paper hanging over the edges. This makes it easy to lift out the bars later. Transfer the oat mixture into the dish. Press it down firmly with a spatula or your hands. Sprinkle more mini chocolate chips on top and press them lightly into the mixture. Now, place the dish in the fridge for at least 2 hours. This will help the bars set. When ready, lift them out using the parchment paper. Cut into squares or rectangles. Enjoy your no-bake chocolate oat bars! For the full recipe, check out the complete list of steps above. To get the right texture for your no-bake chocolate oat bars, focus on the oats. Use rolled oats, not instant oats. Rolled oats give you that chewy bite. Make sure to mix the wet ingredients well. A smooth peanut butter blend helps to bind everything. Press the mixture firmly into your dish. This will help the bars set better. You can make these bars your own with toppings. Add different nuts for crunch, like walnuts or almonds. You can also sprinkle coconut flakes for a tropical twist. If you love chocolate, add more mini chocolate chips on top. Feel free to get creative! Use dried fruit or seeds for added flavor and nutrients. Avoid using too much liquid. This can make your bars too soft. If they don't hold together, they won't slice well. Also, don't skip chilling them long enough. They need at least two hours in the fridge. This helps them set properly. Lastly, always line your baking dish with parchment paper. This makes removing the bars easy and mess-free. For the full recipe, check out the [Full Recipe]. {{image_2}} You can make this treat even healthier. Try using whole grain oats instead of rolled oats. They add more fiber and nutrients. You can swap honey for agave syrup or use mashed bananas for sweetness. Both options lower the glycemic index. If you want a lower-fat option, use a nut butter with less oil. This keeps the flavor while cutting some calories. Let your taste buds explore! You can add spices like cinnamon or nutmeg to the oat mixture. This gives the bars a warm, cozy flavor. Try mixing in dried fruits like raisins or cranberries for a chewy texture. You can also switch up the chocolate chips. Use white chocolate or butterscotch chips for a fun twist. Each change makes the bars unique! Making these bars vegan or nut-free is easy. To go vegan, use maple syrup instead of honey. Replace peanut butter with sunflower seed butter. This keeps the bars nut-free and still delicious. You can also use pumpkin seed butter for a different flavor. Both options are rich in protein and healthy fats. Enjoy your tasty treat without worry! Check out the Full Recipe to see how easy these variations are to make. To keep your no-bake chocolate oat bars fresh, store them in an airtight container. Use parchment paper between layers to prevent sticking. This way, they stay nice and tasty for longer. If you have a big batch, you can also wrap them individually in plastic wrap. This makes it easy to grab one on the go. When stored properly, these bars last about one week at room temperature. You can keep them in the fridge for up to two weeks. The cool air helps keep them firm and tasty. Just make sure they stay in a sealed container to avoid moisture. You can freeze these bars for even longer storage. They freeze well for up to three months. To do this, wrap each bar in plastic wrap. Then, place them in a freezer-safe bag. When you want one, take it out and let it thaw in the fridge. This way, you’ll always have a treat ready to enjoy! For the full recipe, check out the detailed steps above. Yes, you can use other nut butters. Almond butter works well and has a nice flavor. Cashew butter is another tasty choice. Just make sure it is natural and creamy. Each nut butter may change the taste a little. Feel free to experiment with your favorite! To make this recipe gluten-free, choose certified gluten-free oats. Most rolled oats contain gluten. So, look for oats labeled as gluten-free. This small step ensures your tasty bars are safe for gluten-free diets. You can enjoy these bars without worry! If you want to substitute honey or maple syrup, try agave syrup or brown rice syrup. Both options add sweetness and keep the bars moist. You can also use date syrup for a fruity flavor. Just remember, these swaps may slightly change the taste. In this blog post, we covered a delicious recipe for oat bars. You learned about key ingredients like oats, nut butter, and cocoa powder. I shared step-by-step instructions to guide your cooking process. Tips for perfect texture and common mistakes were also discussed. Variations let you customize flavors and ensure everyone can enjoy these bars. Remember to follow storage tips for freshness. Baking these oat bars is fun and rewarding. They make a great snack for everyone. Enjoy your tasty creation!](https://dailydishlab.com/wp-content/uploads/2025/07/967f7db3-ab0b-4ab4-b9dd-ccfa3a2c04e2-768x768.webp)

![To make these classic blueberry muffins, you need a few key ingredients: - 2 cups all-purpose flour - 1 cup granulated sugar - 1 tablespoon baking powder - 1/2 teaspoon salt - 1/2 cup unsalted butter, melted and cooled - 1 cup milk (whole or almond) - 2 large eggs - 1 teaspoon vanilla extract - 1 1/2 cups fresh blueberries These ingredients work together to create a soft, fluffy, and delicious muffin. The flour gives structure, while the sugar adds sweetness. Baking powder helps them rise, leading to a light texture. Butter adds richness, and milk keeps them moist. Blueberries are the star of this dish, bursting with flavor. You can also enhance your muffins with these optional ingredients: - Zest of 1 lemon (for added flavor) - 1 tablespoon coarse sugar (for topping, optional) - Variations for milk substitutes (whole or almond) Adding lemon zest brings a bright, fresh taste. Coarse sugar on top gives a nice crunch. If you're avoiding dairy, almond milk works well. These extras can elevate your muffins, making them even more special. For the complete recipe, check out the [Full Recipe]. 1. Preheat your oven to 375°F (190°C). This step makes sure your muffins bake evenly. Line a 12-cup muffin pan with paper liners or grease it with non-stick spray. 2. In a large mixing bowl, combine the dry ingredients. Add 2 cups of all-purpose flour, 1 cup of granulated sugar, 1 tablespoon of baking powder, and 1/2 teaspoon of salt. Whisk them together until they are well mixed. 3. In another bowl, combine the wet ingredients. Whisk together 1/2 cup of melted butter, 1 cup of milk, 2 large eggs, and 1 teaspoon of vanilla extract. Make sure everything is smooth and fully mixed. 1. Now, it's time to mix the wet and dry ingredients. Pour the wet mixture into the dry mixture. Use a spatula to gently mix them together. Do not overmix; a few lumps are okay. 2. Carefully fold in the blueberries and lemon zest. Add 1 1/2 cups of fresh blueberries. If you use frozen blueberries, keep them frozen to avoid color bleeding. 3. Next, fill the muffin cups. Scoop the batter into each cup, filling them about 3/4 full. If you like a crunchy top, sprinkle 1 tablespoon of coarse sugar on top. 4. Bake your muffins for 18-22 minutes. They are ready when the tops turn golden and a toothpick comes out clean from the center. For the complete recipe, check out the Full Recipe section. To make perfect blueberry muffins, the texture matters a lot. First, avoid overmixing the batter. When you mix the wet and dry ingredients, stop as soon as you see no dry flour. Lumps are okay. Overmixing makes the muffins tough, which we don’t want! Next, cooling the muffins properly is key. After baking, let them sit in the pan for just five minutes. This keeps them moist. Then, transfer them to a wire rack. Cooling them fully helps maintain a soft texture and stops sogginess. You can make your muffins even better with a few simple additions. Consider adding chopped nuts, like walnuts or pecans, for a crunchy bite. A pinch of cinnamon or nutmeg can add warmth and depth to the flavor. You can also play with the sweetness. If you prefer a less sweet muffin, reduce the sugar by a quarter cup. For a sweeter treat, add a bit more sugar or top the muffins with a sprinkle of coarse sugar before baking. This gives a nice, sweet crunch on top. For the complete recipe, check out the [Full Recipe]. {{image_2}} You can easily switch up your classic blueberry muffins with new flavors. One fun option is lemon-blueberry muffins. Just add the zest of one lemon to your batter. This brings a bright and fresh taste to each bite. The lemon pairs well with the sweet blueberries, creating a lovely balance. Another delightful option is almond-flavored muffins with blueberries. You can achieve this by adding almond extract instead of vanilla. This gives a nutty twist that makes your muffins stand out. You can also sprinkle sliced almonds on top before baking for extra crunch. If you follow a gluten-free diet, you can still enjoy these muffins. Just replace the all-purpose flour with a gluten-free blend. Many blends work well and keep the muffins soft. You can use the same amount, making it easy to convert the recipe. For those who want vegan muffins, I have good news! You can swap the eggs for flax eggs. To make a flax egg, mix one tablespoon of ground flaxseed with three tablespoons of water. Let it sit for a few minutes to thicken. Also, use almond or soy milk instead of regular milk. This keeps your muffins moist and delicious. Try these variations to create your perfect blueberry muffin. New flavors and dietary choices make baking fun! For the full recipe, check out the Berrylicious Blueberry Muffins 🫐🧁 section above. To keep your muffins fresh, store them in an airtight container. This helps prevent them from drying out. You can keep the muffins at room temperature for up to three days. If your kitchen is warm and humid, it’s best to keep them in the fridge. However, this can change the texture. Muffins may become dense and less fluffy when chilled. To freeze muffins, first, let them cool completely. Wrap each muffin tightly in plastic wrap. Then place the wrapped muffins in a freezer-safe bag or container. This helps keep out air and prevents freezer burn. You can freeze muffins for up to three months. When you want to enjoy a muffin, take it out of the freezer. Unwrap it and reheat it in a microwave for 20 to 30 seconds. For a crisp top, you can warm it in the oven at 350°F (175°C) for about 10 minutes. This method keeps your muffins tasting fresh and delicious. Can I use frozen blueberries instead of fresh? Yes, you can use frozen blueberries! They work well in muffins. Just add them straight from the freezer. This helps keep your muffins from turning blue. How do I know when my muffins are done baking? Check your muffins at 18 minutes. Insert a toothpick into the center. If it comes out clean, your muffins are done. The tops should look golden brown too. What can I do if my muffins are too dry? If your muffins are dry, try adding more milk next time. You can also reduce baking time slightly. This keeps them moist and fluffy. How to make blueberry muffins in a mini version? To make mini muffins, use a mini muffin pan. Fill each cup about halfway. Bake at the same temperature for 10-12 minutes. Keep an eye on them as they bake. Can I substitute any ingredients for a healthier muffin? Yes, you can! Try using whole wheat flour instead of all-purpose flour. You can also use less sugar or substitute it with honey. These changes can make a healthier muffin. In this post, we covered everything about making classic blueberry muffins. You learned the key ingredients, step-by-step instructions, baking tips, and cool variations. Baking perfect muffins means mixing well but not too much. Fresh blueberries make a big difference. You can try new flavors and adaptations, like gluten-free options. Remember to store muffins properly and enjoy them warm. With these tips, you can bake tasty muffins that everyone loves. Now get in the kitchen and start baking!](https://dailydishlab.com/wp-content/uploads/2025/07/a334ec52-bf2f-4d59-8425-d9a15cac52c1-768x768.webp)


. To get that perfect soft and chewy texture, use room temperature butter. This helps create a great blend with the sugars. Cream the butter and sugars until they feel light and fluffy. Mix only until combined when adding flour. Over-mixing can lead to tough cookies. Baking time is key too. Take them out when the edges turn golden but the centers still look soft. One common mistake is using cold butter. This won’t mix well and will affect the texture. Another issue is not measuring flour correctly. Too much flour makes cookies dry. Don’t skip the sea salt on top. It enhances the flavors and balances the sweetness. Lastly, don’t overcrowd the baking sheet. Cookies need space to spread. To keep cookies fresh, store them in an airtight container. They stay soft for days that way. For longer storage, freeze them. Just make sure to wrap them well. When you want them warm, pop them in the oven at 350°F for a few minutes. This brings back their soft, chewy goodness. You can also microwave them for about 10 seconds, but be careful not to overheat. Enjoy your cookies as they were meant to be! For more on making these cookies, check out the Full Recipe. {{image_2}} You can choose between classic milk chocolate and rich dark chocolate. The classic version is sweet and creamy. It brings back childhood memories. Dark chocolate has a bold taste, with a hint of bitterness. I love using dark chocolate chips, especially those with 70% cocoa or more. They add depth and contrast to the sweet cookie dough. For a fun twist, mix both types of chocolate. This combo makes for a delightful surprise in every bite. Want to switch things up? Add nuts or spices to your cookies. Chopped walnuts or pecans give the cookies a nice crunch. They also add a warm, nutty flavor. You can also try adding a pinch of cinnamon or a dash of sea salt. These additions elevate the taste. If you want a fruity twist, fold in some dried cherries or cranberries. This adds a chewy texture and a burst of flavor. Each option brings a new life to the classic recipe. You can easily modify this recipe for special diets. For a vegan option, replace the butter with coconut oil. Use flax eggs instead of chicken eggs. To make gluten-free cookies, swap all-purpose flour with almond or oat flour. These swaps work well and still taste great. You can experiment and find the best fit for your needs. Just remember, the texture might change slightly. For more ideas, check the Full Recipe related to adaptations. To keep your cookies soft and chewy, store them in an airtight container. Place a slice of bread in the container. The bread adds moisture and helps the cookies stay fresh. You can also use parchment paper between layers of cookies. This keeps them from sticking together. Freezing cookie dough is easy. First, scoop the dough into balls. Place the balls on a baking sheet. Freeze until firm, about 1-2 hours. Then transfer the dough balls to a freezer bag. Label the bag with the date and type of cookie. This way, you can enjoy fresh cookies later. To thaw frozen cookie dough, move it from the freezer to the fridge overnight. If you need cookies fast, you can bake them straight from the freezer. Just add a minute or two to the baking time. For reheating baked cookies, pop them in the microwave for about 10-15 seconds. This brings back the soft, warm texture. Enjoy your homemade treats with every bite! Chocolate chip cookies stay fresh for about one week at room temperature. Place them in an airtight container to keep them soft. You can also store them in the fridge for longer life. Just remember, cold cookies might lose their soft feel. Yes, you can use oil instead of butter. The cookies may spread a bit more, but they will still taste great. Use a little less oil than the butter amount. For example, if the recipe calls for one cup of butter, use about three-quarters cup of oil. If your dough feels sticky, add a bit more flour. Start with one tablespoon and mix it in. Keep adding until the dough holds together but is still soft. You want it to be easy to scoop but not too wet. To get chewy cookies, use more brown sugar than white sugar. Brown sugar adds moisture. Also, try chilling the dough for at least an hour before baking. This helps the cookies stay thicker and chewier. You can find the full recipe for my decadent dark chocolate chip cookies to see all the tips in action! Now you know how to make the best chocolate chip cookies. We covered key ingredients, step-by-step baking, and tips for the perfect cookie. You can customize your cookies to fit any diet. Remember to store them properly to keep them fresh. With these tips, you can enjoy delicious cookies anytime. Happy baking!](https://dailydishlab.com/wp-content/uploads/2025/06/fa49041d-95ac-4bc8-8fd4-5b20d3bd1dd4-768x768.webp)