

Are you ready to master the art of crème brûlée? This simple baking guide takes you through each step of creating the perfect vanilla bean delight. With just a few key ingredients like heavy cream, vanilla beans, and egg yolks, you’ll impress everyone with your culinary skills. Whether you’re a beginner or an experienced baker, this guide will make sure your crème brûlée turns out creamy, delicious, and topped with that perfectly caramelized sugar crust!
Why I Love This Recipe
- Elegant Dessert: This crème brûlée is the epitome of sophistication, making it perfect for special occasions or dinner parties.
- Rich Flavor: The combination of heavy cream and real vanilla bean creates a luxurious and creamy texture that simply melts in your mouth.
- Customizable Topping: The caramelized sugar crust is not only a delightful contrast to the creamy custard but can also be infused with flavors like citrus or spices.
- Impressive Presentation: Serving individual ramekins with a perfectly caramelized top adds a touch of flair to your dessert spread.
Ingredients
Main Ingredients
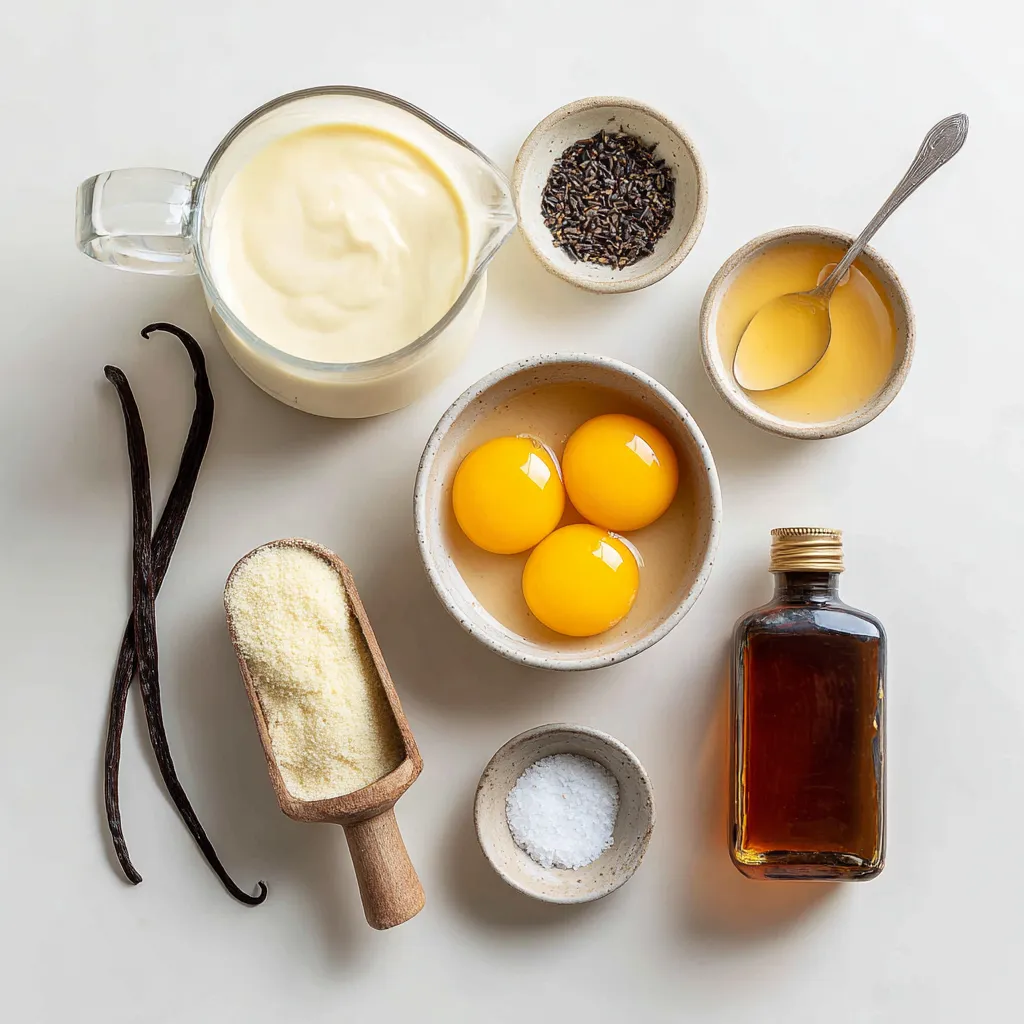
– 2 cups heavy cream
– 1 vanilla bean, split and seeds scraped
– 4 large egg yolks
– 1/2 cup granulated sugar (plus extra for topping)
– 1 teaspoon vanilla extract
– A pinch of salt
The main ingredients for vanilla bean crème brûlée are simple. First, heavy cream gives that rich, smooth texture. The vanilla bean adds a burst of flavor. Egg yolks help create the custard base. Granulated sugar sweetens the mix and forms that crunchy top. Vanilla extract enhances the overall taste. A pinch of salt balances the sweetness.
Tools Needed
– Ramekins
– Mixing bowls
– Fine-mesh sieve
– Kitchen torch or broiler
To make this dessert, you need a few tools. Ramekins hold the custard as it bakes. Mixing bowls help combine all the ingredients. A fine-mesh sieve ensures a smooth custard by removing lumps. A kitchen torch or broiler will caramelize the sugar top. Each tool plays an important role in making your crème brûlée a success.
Step-by-Step Instructions
Preparation Steps
– Preheat your oven to 325°F (160°C).
– In a medium saucepan, combine 2 cups of heavy cream with the seeds from 1 split vanilla bean and the pod. Heat this mix over medium heat until it starts to simmer. Remove it from heat and let it sit for about 15 minutes. This allows the vanilla flavor to seep in.
Custard Preparation
– Take 4 large egg yolks and 1/2 cup of granulated sugar. Whisk them together in a bowl until the mix turns pale and thick.
– Slowly pour the warm cream into the egg yolk mix while whisking. This helps avoid scrambling the eggs.
– Strain the mixture through a fine-mesh sieve into a clean bowl. Straining gets rid of any bits of cooked egg.
Baking Process
– Place four ramekins in a baking dish. Pour the custard mix evenly into each ramekin.
– Add hot water to the baking dish, filling it halfway up the sides of the ramekins. This water bath helps cook the custard evenly.
– Bake in the oven for about 30 to 35 minutes. The custard should be set but still a bit wobbly in the center.
– Once done, remove the ramekins from the water bath and let them cool to room temperature. Then, refrigerate for at least 2 hours or overnight.
Tips & Tricks
Achieving Perfect Texture
To get the best texture, bake low and slow. A low oven temperature helps the custard set gently. This makes it smooth and creamy. Check it around 30 minutes. The center should jiggle a bit. If it jiggles too much, it needs more time.
Cooling is key! Let the ramekins cool at room temp first. Then, cover and chill them in the fridge for at least two hours. This helps the flavors blend and the texture firm up. For best results, chill overnight.
Caramelizing Sugar
Caramelizing the sugar is the fun part! If you have a kitchen torch, hold it a few inches above the sugar. Move it in small circles until the sugar melts and turns golden brown. This creates a nice crunch on top.
If you don’t have a torch, use your oven’s broiler. Place the ramekins on a baking sheet. Sprinkle sugar on top, then broil them for 2-3 minutes. Watch closely to avoid burning. The sugar should melt and turn golden.
Enhancing Flavor
Using high-quality vanilla makes a big difference. Look for real vanilla beans or pure vanilla extract. They add rich flavor that will shine through.
You can also play with flavors! Add a bit of orange zest for a citrus twist. Or, try a hint of coffee for a deeper taste. Just mix these in when you whisk the egg yolks and sugar. It’s all about finding what you love!
Pro Tips
- Use Fresh Vanilla Beans: Fresh vanilla beans provide a more intense and aromatic flavor than vanilla extract, elevating the overall taste of your crème brûlée.
- Temperature is Key: Ensure your cream mixture is warm but not boiling when combining with the egg yolks to avoid curdling. This gentle process creates a smooth custard.
- Strain for Smoothness: Straining the custard mixture through a fine-mesh sieve eliminates any curdled egg bits, ensuring a silky texture in your final dessert.
- Perfect Sugar Caramelization: When caramelizing the sugar, move the torch in a circular motion to achieve even melting and prevent burning, resulting in a perfect golden crust.
Variations
Flavor Variations
You can change the flavor of your crème brûlée easily. Here are some fun ideas:
– Chocolate crème brûlée: Add melted dark chocolate to the cream before mixing it with the egg yolks. This gives a rich taste that chocolate lovers will adore.
– Coffee or espresso-infused crème brûlée: Mix in brewed coffee or espresso with the cream. This adds a lovely coffee kick to your dessert.
– Seasonal fruit additions: You can also fold in pureed fruits like strawberries or mangoes into the custard. This adds a fresh twist and a pop of color.
Dietary Adaptations
Want to make your dessert fit your diet? Here are some great swaps:
– Dairy-free alternatives: Use coconut cream instead of heavy cream. It gives a nice flavor and keeps it creamy. You can also try almond or soy milk for a lighter version.
– Sugar substitutes for lower-calorie options: Swap granulated sugar with stevia or monk fruit sweetener. These choices reduce calories without losing sweetness. Just remember to check the conversion rate on the package for best results.
Storage Info
Refrigerator Storage
To keep your crème brûlée fresh, cover it tightly with plastic wrap. This stops any odors from the fridge from changing its flavor. You can also place the ramekins in an airtight container. Crème brûlée can last for up to 3 days in the fridge. Just remember to add the sugar topping right before serving to keep that crunchy layer.
Reheating Tips
If you need to reheat your crème brûlée, do it gently. Place the ramekin in a warm water bath for about 10 minutes. This method warms it without making it runny. Avoid using a microwave, as it can ruin the texture. After reheating, you can add fresh sugar and caramelize it for that perfect crisp top.
FAQs
Common Questions
What can I use instead of a kitchen torch?
You can use your oven’s broiler. Just place the ramekins under the broiler for 2-3 minutes. Keep a close eye to avoid burning. The broiler will caramelize the sugar just like a kitchen torch would.
Can I make crème brûlée a day in advance?
Yes, you can! Prepare the custard and chill it in the fridge. Just add the sugar and caramelize right before serving. This makes it easy to impress your guests.
How do I know when the custard is done baking?
The custard should be set around the edges but still slightly jiggly in the center. If it looks too wobbly, it needs more time. Watch closely during the last few minutes to avoid overbaking.
Troubleshooting
Why did my crème brûlée curdle?
Curdling happens when the eggs cook too fast. Always whisk the egg mixture while adding the warm cream slowly. This helps keep the eggs from cooking too quickly and getting lumpy.
How to fix a too-sweet dessert?
If your crème brûlée is too sweet, serve it with fresh fruit. Berries or citrus can balance the sweetness. You can also reduce the sugar in your next batch for a better taste.
To make crème brûlée, you need a few key ingredients and tools. Focus on heavy cream, egg yolks, and good vanilla. Follow the steps carefully, from heating the cream to straining the custard. Remember tips for baking and cooling to get the right texture. You can also try fun variations like chocolate or coffee flavors. Store your creations properly and enjoy them later. With practice, you’ll make great crème brûlée that impresses everyone. Keep experimenting and have fun in the kitche


