Vegan Snickers Energy Bites Tasty and Nutritious Snack

If you crave a tasty snack that fuels your energy without animal products, I’ve got the perfect recipe for you: Vegan Snickers Energy Bites! These little treats pack the flavor of your favorite candy bar while being nutritious and easy to make. With simple ingredients and straightforward steps, you’ll satisfy your sweet tooth and feel good about it. Let’s dive into this fun and delicious recipe that’s sure to be a hit!
Why I Love This Recipe
- Healthy Energy Boost: These Vegan Snickers Energy Bites are packed with natural ingredients that provide a quick and nutritious energy boost, perfect for your busy day.
- Easy to Make: With just a few simple steps and no baking required, these bites can be whipped up in under 15 minutes!
- Customizable: Feel free to swap in your favorite nuts, nut butters, or add-ins like dried fruit or seeds to make them your own.
- Decadent Flavor: With rich cocoa and creamy peanut butter, these bites satisfy your sweet tooth while still being healthy.
Ingredients
Complete list of ingredients
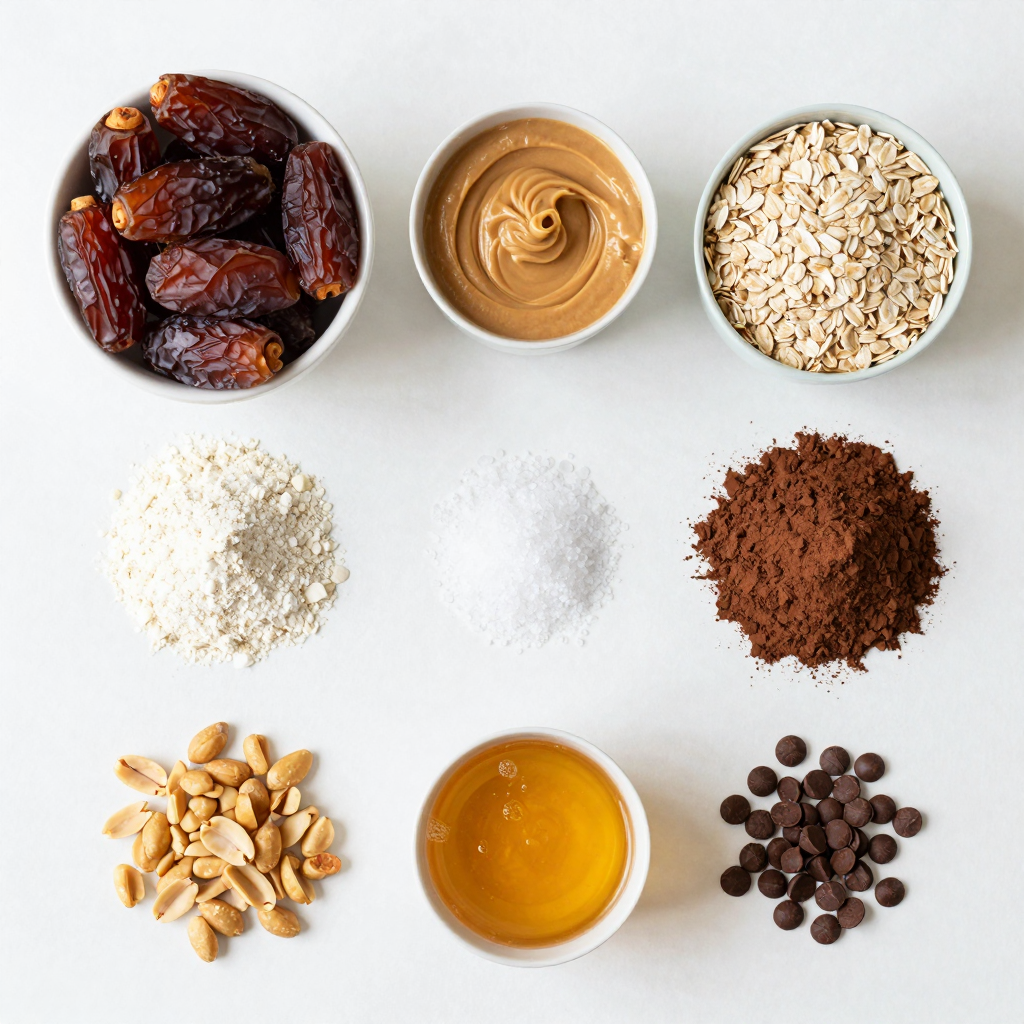
To make Vegan Snickers Energy Bites, gather these simple ingredients:
- 1 cup pitted dates
- 1/2 cup natural peanut butter
- 1/2 cup rolled oats
- 1/4 cup almond flour
- 1/4 cup unsweetened cocoa powder
- 1/4 teaspoon sea salt
- 1/2 cup chopped unsalted peanuts
- 1/4 cup maple syrup
- 1/2 teaspoon vanilla extract
- Dark chocolate chips (vegan) for drizzling
These ingredients blend together to create a rich and nutty flavor. Each bite feels like a treat, but it is healthy too.
Nutritional information per serving
Each serving, which is about one energy bite, offers a great balance of nutrients. Here’s what you can expect:
- Calories: 120
- Protein: 3g
- Carbohydrates: 15g
- Fiber: 2g
- Sugar: 8g
- Fat: 6g
These bites provide a good mix of energy and nutrients. They are perfect for a quick snack or boost before a workout.
Optional substitutions for allergens
If you have allergies or dietary needs, you can easily swap some ingredients. Here are a few ideas:
- Nut-Free: Use sunflower seed butter instead of peanut butter.
- Gluten-Free: Make sure to use certified gluten-free oats.
- Low-Sugar: Replace maple syrup with a low-calorie sweetener like stevia.
These substitutions keep the taste while catering to your needs. Enjoy making these bites your own with your favorite flavors!

Step-by-Step Instructions
Preparation of the base mixture
To start, gather your ingredients. You’ll need dates, peanut butter, oats, and more. In a food processor, add the pitted dates, peanut butter, rolled oats, almond flour, cocoa powder, and sea salt. Blend this mix until it looks like sticky dough. This step is key; it gives the bites their chewy base. Next, pour in the maple syrup and vanilla extract. Pulse until everything combines well.
Forming the energy bites
Now it’s time to shape your mixture. Grab some of the sticky dough with your hands. Roll it into small balls, about one inch wide. This size makes them perfect for snacking. Place each ball on a parchment-lined baking sheet. Once you finish, you’ll have a tray full of energy bites ready for the next step.
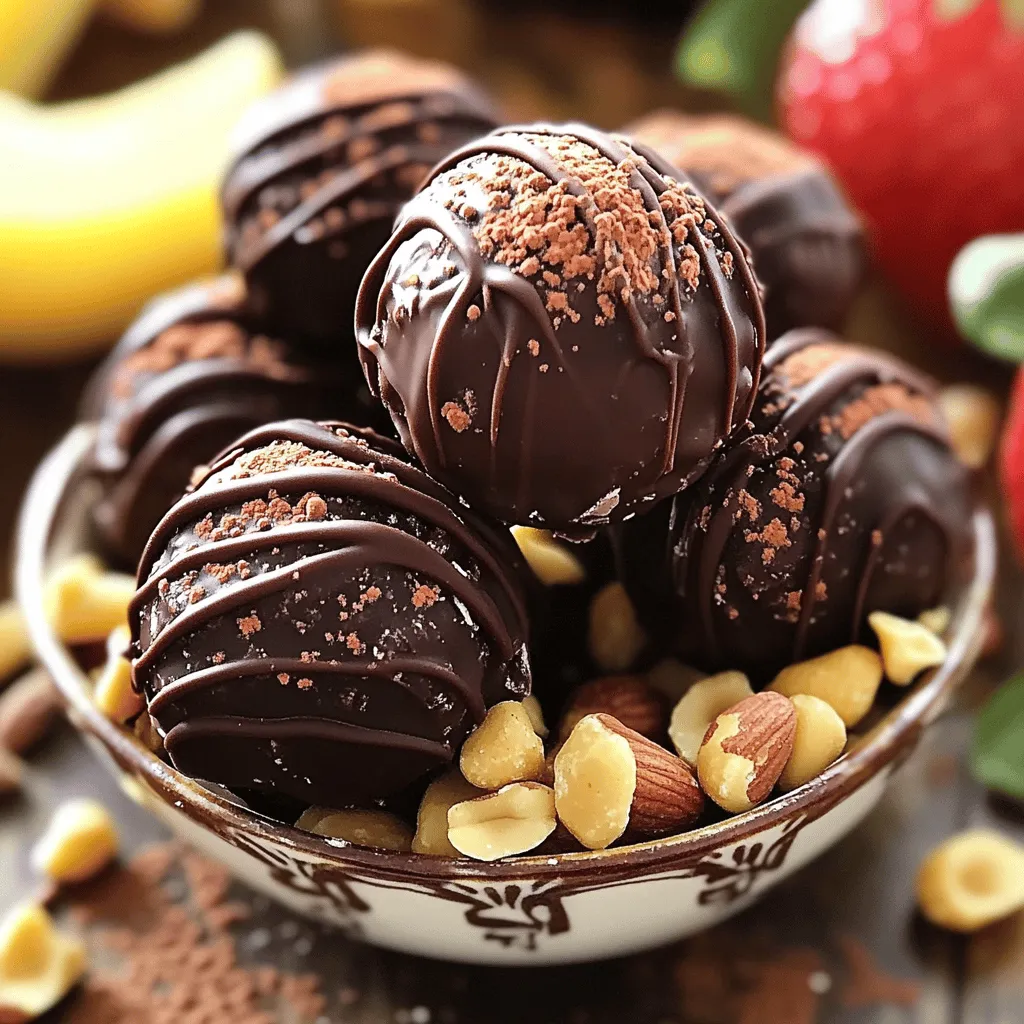
Drizzling with chocolate
For the final touch, melt some dark chocolate chips. You can do this in a microwave or over a double boiler. Stir until the chocolate is smooth and shiny. Use a fork or a piping bag to drizzle the melted chocolate over each energy bite. This adds a sweet finish and makes them look great. When done, chill the bites in the fridge for about 30 minutes. They need to set before you enjoy them.
Pro Tips
- Use Fresh Dates: Make sure your dates are soft and fresh for the best texture and sweetness in your energy bites.
- Chill for Better Shape: If the mixture feels too sticky to handle, refrigerate it for 10-15 minutes before rolling into balls.
- Experiment with Nuts: Feel free to substitute chopped peanuts with other nuts like almonds or cashews for a different flavor profile.
- Drizzle Technique: For a neater chocolate drizzle, use a piping bag instead of a fork to control the flow of the melted chocolate.
Tips & Tricks
Common mistakes to avoid
When making Vegan Snickers Energy Bites, avoid using dry dates. They need to be soft and sticky. If they’re too dry, your bites won’t hold together. Also, don’t skip the sea salt. It enhances the flavor. Another mistake is over-processing the mixture. You want a sticky dough, not a puree.
Best practices for storing energy bites
Store your energy bites in an airtight container. Keep them in the fridge for the best taste. They can last up to a week this way. If you want to save them longer, freeze them! Just layer them with parchment paper so they don’t stick together.
Enhancing flavor profiles with spices or extracts
To amp up the flavor, add spices like cinnamon or nutmeg. A pinch of cayenne can give it a kick! You can also try other extracts like almond or coconut. Just a few drops can change the whole taste. Play around with these to find your favorite flavor!

Variations
Alternative nut butters and their impact on flavor
Switching nut butters can change the taste of your Vegan Snickers Energy Bites. For example, cashew butter offers a creamy, mild flavor. Almond butter adds a nutty twist that pairs well with cocoa. Sunflower seed butter is a great option for nut-free diets. Each nut butter brings its own unique profile. Experimenting with these can lead to tasty surprises!
Adding dried fruits or seeds for extra texture
You can boost the texture and flavor by adding dried fruits or seeds. Chopped dried apricots or cranberries add sweetness and chewiness. Flaxseeds or chia seeds add crunch and healthy fats. Just mix them in after you combine the main ingredients. This way, you create a bite that surprises with each munch!
Making it gluten-free: ingredient swaps
To keep these energy bites gluten-free, swap rolled oats for certified gluten-free oats. You can also use coconut flour instead of almond flour. This keeps the texture light while adding a hint of sweetness. Ensure your other ingredients are gluten-free too, like your chocolate chips. These simple swaps make it easy to enjoy without worry!
Storage Info
How to store Vegan Snickers Energy Bites
To keep your Vegan Snickers Energy Bites fresh, store them in an airtight container. You can keep them in the fridge for easy snacking. The cool temperature helps maintain their texture and flavor. Make sure to separate layers with parchment paper to prevent sticking.
Freezing for long-term storage
If you want to store them for longer, freezing is a great option. Place the energy bites in a single layer on a baking sheet and freeze until firm. Once frozen, transfer them to a freezer-safe bag or container. They can last up to three months in the freezer. When you’re ready to enjoy, let them thaw in the fridge for a few hours.
Shelf life and best consumption practices
When stored properly, these energy bites last about one week in the fridge. They taste best when fresh, but they still make a great snack even after a few days. For the best flavor, enjoy them within the first couple of days. These bites are perfect for a quick pick-me-up or a post-workout treat.
FAQs
Can I make these energy bites nut-free?
Yes, you can make these energy bites nut-free. Instead of peanut butter, try using sunflower seed butter. This option keeps the taste rich while avoiding nuts. Just make sure your other ingredients, like chocolate chips, are also nut-free. You still get that great taste without the nuts.
How long do these energy bites last?
These energy bites last about one week in the fridge. Store them in an airtight container to keep them fresh. If you want to enjoy them longer, you can freeze them. They last up to three months in the freezer. Just thaw them in the fridge before snacking.
Can I use different sweeteners instead of maple syrup?
Yes! You can use other sweeteners like agave syrup or honey if you’re not strict vegan. Each sweetener may change the flavor a little, but they all work well. Be mindful of the amount; some sweeteners are sweeter than others. Adjust to taste when mixing.
These energy bites are easy to make and fun to eat. We covered the key ingredients and listed options for allergies. I walked you through every step—preparing the mixture, shaping bites, and adding chocolate.
I shared tips to avoid mistakes and ways to store them well. You learned about fun variations to try. Remember to experiment with flavors and storage methods.
Enjoy making these snacks and find what suits your taste best!

Vegan Snickers Energy Bites
Ingredients
1 cup pitted dates
1/2 cup natural peanut butter
1/2 cup rolled oats
1/4 cup almond flour
1/4 cup unsweetened cocoa powder
1/4 teaspoon sea salt
1/2 cup chopped unsalted peanuts
1/4 cup maple syrup
1/2 teaspoon vanilla extract
Dark chocolate chips (vegan) for drizzling
Instructions
In a food processor, combine the pitted dates, peanut butter, rolled oats, almond flour, cocoa powder, and sea salt. Process until the mixture resembles a sticky dough.
Add the maple syrup and vanilla extract to the mixture, then pulse until everything is well-combined and sticky.
Fold in the chopped unsalted peanuts until evenly distributed.
Using your hands, scoop out small portions of the mixture and roll them into bite-sized balls, about 1 inch in diameter. Place them on a parchment-lined baking sheet.
Once all the energy bites are formed, melt the dark chocolate chips in a microwave-safe bowl or using a double boiler, stirring until smooth.
Drizzle the melted chocolate over the energy bites using a fork or a piping bag for a cleaner look.
Place the bites in the refrigerator for at least 30 minutes to set.
Prep Time: 15 minutes | Total Time: 45 minutes | Servings: Approximately 12 bites
– Presentation Tips: Arrange the energy bites in a small decorative bowl and sprinkle some chopped peanuts or cocoa powder on top for an appealing finish. Serve with a side of fresh fruit for a balanced snack!

Vegan Snickers Energy Bites
Ingredients
- 1 cup pitted dates
- 0.5 cup natural peanut butter
- 0.5 cup rolled oats
- 0.25 cup almond flour
- 0.25 cup unsweetened cocoa powder
- 0.25 teaspoon sea salt
- 0.5 cup chopped unsalted peanuts
- 0.25 cup maple syrup
- 0.5 teaspoon vanilla extract
- to taste dark chocolate chips (vegan) for drizzling
Instructions
- In a food processor, combine the pitted dates, peanut butter, rolled oats, almond flour, cocoa powder, and sea salt. Process until the mixture resembles a sticky dough.
- Add the maple syrup and vanilla extract to the mixture, then pulse until everything is well-combined and sticky.
- Fold in the chopped unsalted peanuts until evenly distributed.
- Using your hands, scoop out small portions of the mixture and roll them into bite-sized balls, about 1 inch in diameter. Place them on a parchment-lined baking sheet.
- Once all the energy bites are formed, melt the dark chocolate chips in a microwave-safe bowl or using a double boiler, stirring until smooth.
- Drizzle the melted chocolate over the energy bites using a fork or a piping bag for a cleaner look.
- Place the bites in the refrigerator for at least 30 minutes to set.


![- 1 cup rolled oats - 1 cup almond milk (or your preferred milk) - 1/2 cup plain Greek yogurt - 1/4 cup cream cheese, softened - 2 tablespoons maple syrup (or honey) - 1 teaspoon vanilla extract - 1/2 cup fresh blueberries - 1 tablespoon chia seeds (optional) - 1/4 teaspoon ground cinnamon - Fresh blueberries and graham cracker crumbs for topping - If you want dairy-free options, swap cream cheese and Greek yogurt for coconut yogurt. Almond milk works well, but you can also use oat or soy milk. - For gluten-free oats, use certified gluten-free rolled oats. They are easy to find in most stores. - If you prefer a different sweetener, try agave syrup or coconut sugar instead of maple syrup or honey. When I create this dish, I aim for the best taste and texture. These ingredients blend well, giving you that cheesecake flavor you crave. The oats soak up the almond milk and yogurt, creating a creamy base. The blueberries add a burst of natural sweetness and freshness. Plus, the graham cracker crumbs on top provide a nice crunch. You can find the full recipe here, which shows you how to mix everything perfectly. 1. In a medium bowl, combine the rolled oats, almond milk, Greek yogurt, and cream cheese. 2. Whisk these ingredients together until they form a creamy mixture. 3. Next, stir in the maple syrup, vanilla extract, chia seeds, and ground cinnamon. 4. Mix until all the flavors blend smoothly. 5. Now, gently fold in the fresh blueberries. 6. Be careful not to crush the blueberries while mixing. 1. Divide the mixture evenly into two mason jars or airtight containers. 2. Close the jars with their lids tightly. 3. Place the jars in the fridge overnight. 4. This helps the oats soak up the flavors and get soft. 1. When it's time to serve, remove the jars from the fridge. 2. Give each jar a good stir to mix everything up again. 3. For a cheesecake effect, top your oats with more fresh blueberries. 4. Sprinkle graham cracker crumbs on top to finish it off. For the full recipe, you can refer to the recipe section above. To get the best texture, use rolled oats. They soak up the liquid without getting mushy. You want your oats creamy but still holding their shape. Avoid quick oats; they can turn your dish into a mushy mess. For a thicker texture, add a bit more oats or reduce the milk slightly. Spices can take your oats to the next level. A pinch of nutmeg or a dash of vanilla can make a big difference. You can also add fresh lemon zest for a bright flavor. Don't forget about crunch! Toss in some chopped nuts or seeds. They add a nice texture and extra nutrition. Making a larger batch saves time. Double or triple the recipe and store in jars. This way, you can grab a jar for breakfast all week. These oats keep well in the fridge for up to five days. Use airtight containers to keep them fresh. Enjoy a quick and easy meal every morning! For the full recipe, check the earlier section. {{image_2}} You can swap blueberries for other fruits. Strawberries, raspberries, or blackberries work great, too. Each fruit brings its own sweet flavor. You can also use seasonal fruits. In summer, try peaches or cherries. In fall, apple slices or pumpkin puree can add a fun twist. Want to make your oats even better? You can add protein powders or nut butters. These add a great taste and extra protein. Almond butter or peanut butter mix well. Seeds like chia or flax can add crunch and fiber. They also help keep you full longer. Feeling fancy? You can create fun dessert flavors. Try adding cocoa powder for chocolate oats. You can also use caramel syrup for a sweet treat. Using flavored yogurt can make it even tastier. Vanilla or strawberry yogurt adds a nice twist. You can explore so many flavors with just a few tweaks! Check the [Full Recipe] for all the details you need. To keep your blueberry cheesecake overnight oats fresh, use glass jars or airtight containers. These options seal well and prevent odors from mixing in the fridge. Make sure to store them in the refrigerator. This keeps the oats cool and safe to eat. For the best taste and texture, eat your oats within three days. After this, the oats may lose their creamy texture. Signs of spoilage include a sour smell, watery separation, or mold. If you see any of these, throw them away. Yes, you can freeze overnight oats! This is great for meal prep. Just make sure to use freezer-safe containers. When you’re ready to eat, transfer the oats to the fridge to thaw overnight. Avoid heating them directly from the freezer. This can change the texture and flavor. Blueberry Cheesecake Overnight Oats stay fresh for about 3 to 5 days in the fridge. Store them in airtight containers. This keeps them moist and tasty. If you notice any strange smell or mold, it's best to toss them out. Yes, you can use frozen blueberries. However, they may change the texture a bit. Frozen berries can make the oats a little mushy. If you want to keep the fresh taste, add frozen blueberries just before serving. Almond milk is my go-to for these oats. It adds a nice flavor without extra calories. You can also use oat milk, soy milk, or regular cow's milk. Choose what you like best. Each type gives a different taste and creaminess. To make this recipe vegan, swap Greek yogurt for coconut yogurt. Use vegan cream cheese instead of regular cream cheese. For sweeteners, choose maple syrup or agave nectar. These simple swaps keep it dairy-free and delicious. Yes, you can meal prep these oats for the week. Just make sure to portion them in jars. They keep well in the fridge. This is a great way to have a quick and healthy breakfast ready. Just grab a jar each morning! For the full recipe, check out the provided link. This article covered how to make Blueberry Cheesecake Overnight Oats. We went over key ingredients, easy steps, and various storage tips. You learned how to customize your oats and enjoy delicious flavors. Whether you need a quick breakfast or snack, these oats fit the bill. Enjoy the creamy texture and fresh taste. Give this recipe a try and discover your favorite mix!](https://dailydishlab.com/wp-content/uploads/2025/07/6a6a2d5b-d90b-4d1a-93b4-34eef24f4ecd-768x768.webp)

